A failed generator blocks the operation of the entire scooter as a whole, since the entire scooter system is somehow connected to it. If there is a breakdown in the electrical system, a weak spark, or a poor battery charge, in addition to other equipment, a breakdown of the generator cannot be ruled out.
There are not many breakdowns in this case, these are:
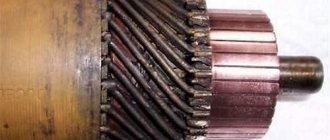
Let's consider each of the points in more detail. For example, let’s take one of the Chinese scooters, since it is these devices that are most often subject to such breakdowns. What causes the rotor magnetization to decrease? This phenomenon can be observed due to an impact (for example, during a fall) or being near elements of a high magnetic field. As a result, the output current of the generator drops significantly during operation, and normal operation of the scooter is impossible.
Checking the generator output voltage is quite simple. First, you need to disconnect the generator connectors and connect the control device. After this, we start the engine and check the output voltage of the generator. The minimum voltage should be within 5V at minimum engine speed.
Now we check the output voltage of the switch. To do this, you need a multimeter (tester) with a voltage amplitude reading. We connect all the switch wires to the generator stator wires. Next, disconnect the wire of the switch unit from the terminal of the primary winding of the ignition coil. It remains to connect one terminal to the engine ground, and connect the second terminal to the main wire of the ignition coil, which comes from the switch.
Now we install the will and crank the engine, checking the output voltage of the commutator wire to the ignition coil. We reconnect the switch wire to the coil and determine the average output voltage. It should be about 200V, this is the average value with and without the use of a voltage amplitude meter.
Next, check the condition of the battery. To do this, you need to warm up the engine, then turn off the ignition and connect the tester to the battery terminals. Now we start the engine and check the voltage change depending on the speed of rotation of the engine shaft. You need to carry out the experiment first with the headlights on, then with them off. It should be taken into account that at low engine speeds, the battery voltage readings should be at the level of idle battery without load and recharging. As the speed increases, even at maximum values, the multimeter readings should be within 14-15 volts DC. If the indicators indicated earlier are significantly overestimated, we can talk about a faulty voltage regulator. You can also think about its breakdown if, with an increase in engine speed, the multimeter values remain unchanged.
Important to know:
The normal charging current voltage at the battery terminals with the engine running should be between 13 and 16 volts.
Now let's check the operation of the generator without load. To do this, you need to disconnect the magdino wire connector and, starting the engine, spin it to 5000 rpm. Then use a multimeter in AC mode to measure the voltage between the white-red wire and ground. Typically, voltage readings should fluctuate between 65 V at 5000 rpm. This indicates that the scooter's generator is working properly.
And finally, let's check the stator winding. To do this, first measure the resistance between the white-red wire and ground. The nominal resistance value in this case should be 0.6 - 1.1 Ohm. Now, in the same way, let’s measure the resistance between the white-red wire and ground. Here the average resistance values should be 0.5 - 0.8 Ohms. Deviations of the above indicators in one direction or another may indicate the need to replace the generator winding.
Checking a scooter's generator is a fairly important and sometimes necessary procedure for every owner of this two-wheeled vehicle. Unfortunately, it can be difficult to establish its functionality, especially if you do not have deep knowledge in the field of electrical engineering, as well as the necessary tool - a multimeter tester . If you have such a tool, then before checking the generator you will need to familiarize yourself with the concepts of alternating and direct current, voltage, electrical impulse and tester indicators.
Let's move from words to action
To check the generator on a scooter, you need to remove the plastic around the engine, and then measure the indicators - first of all, the voltage . You need to remove the casing as carefully as possible, otherwise you will damage the fastening system.
Find the place where the bundle of wires comes out of the engine and move along it to the connector - the place where the generator is connected to the scooter’s on-board network. Then you will need to measure the resistance of the circuit that powers the generator coil. Disconnect the wiring from the generator and measure the resistance of the connector wires. In theory, the resistance in the coil should be from 80 to 150 Ohms. If during measurement deviations from these values are found, you should not immediately think about a malfunction.
Try removing the generator from the scooter and measuring the resistance of the coil itself by connecting the tester directly to it. When taking readings from the coil, carefully inspect the condition of its terminals - damage that leads to a decrease in resistance may be the cause.
If during diagnostics you find out that the coil resistance readings are within the normal range, then the cause of the malfunction most likely lies in the wires themselves, coming from the coil or at the output points. Check the wiring and make sure there are no shorts in the wires.
If, as a result of this, no malfunctions were identified, you should also measure the variable resistance at the terminals from the ignition unit. If, after checking the generator on the scooter, you do not find any problems, the reason for the poor operation of the generator lies in the ignition unit.
How to check the scooter generator for serviceability
A failed generator blocks the operation of the entire scooter as a whole, since the entire scooter system is somehow connected to it. If there is a breakdown in the electrical system, a weak spark, or a poor battery charge, in addition to other equipment, a breakdown of the generator cannot be ruled out.
There are not many breakdowns in this case, these are:
- wire break (for example, due to wire damage or fumes);
- short circuit;
- significant reduction in the magnetization of the generator rotor.
Let's consider each of the points in more detail. For example, let’s take one of the Chinese scooters, since it is these devices that are most often subject to such breakdowns. What causes the rotor magnetization to decrease? This phenomenon can be observed due to an impact (for example, during a fall) or being near elements of a high magnetic field. As a result, the output current of the generator drops significantly during operation, and normal operation of the scooter is impossible.
Checking the generator output voltage is quite simple. First, you need to disconnect the generator connectors and connect the control device. After this, we start the engine and check the output voltage of the generator. The minimum voltage should be within 5V at minimum engine speed.
Now we check the output voltage of the switch. To do this, you need a multimeter (tester) with a voltage amplitude reading. We connect all the switch wires to the generator stator wires. Next, disconnect the wire of the switch unit from the terminal of the primary winding of the ignition coil. It remains to connect one terminal to the engine ground, and connect the second terminal to the main wire of the ignition coil, which comes from the switch.
Now we install the will and crank the engine, checking the output voltage of the commutator wire to the ignition coil. We reconnect the switch wire to the coil and determine the average output voltage. It should be about 200V, this is the average value with and without the use of a voltage amplitude meter.
Next, check the condition of the battery. To do this, you need to warm up the engine, then turn off the ignition and connect the tester to the battery terminals. Now we start the engine and check the voltage change depending on the speed of rotation of the engine shaft. You need to carry out the experiment first with the headlights on, then with them off. It should be taken into account that at low engine speeds, the battery voltage readings should be at the level of idle battery without load and recharging. As the speed increases, even at maximum values, the multimeter readings should be within 14-15 volts DC. If the indicators indicated earlier are significantly overestimated, we can talk about a faulty voltage regulator. You can also think about its breakdown if, with an increase in engine speed, the multimeter values remain unchanged.
Important to know:
The normal charging current voltage at the battery terminals with the engine running should be between 13 and 16 volts.
Now let's check the operation of the generator without load. To do this, you need to disconnect the magdino wire connector and, starting the engine, spin it to 5000 rpm. Then use a multimeter in AC mode to measure the voltage between the white-red wire and ground. Typically, voltage readings should fluctuate between 65 V at 5000 rpm. This indicates that the scooter's generator is working properly.
And finally, let's check the stator winding. To do this, first measure the resistance between the white-red wire and ground. The nominal resistance value in this case should be 0.6 - 1.1 Ohm. Now, in the same way, let’s measure the resistance between the white-red wire and ground. Here the average resistance values should be 0.5 - 0.8 Ohms. Deviations of the above indicators in one direction or another may indicate the need to replace the generator winding.
Source
Common causes of problems with scooter generators
In conclusion, it is worth noting that the failure of a scooter generator is one of the most common problems faced by owners of two-wheeled vehicles. If a malfunction occurs, you may encounter external signs such as a poor battery charge, a weak spark, or some problems with the electrical system. Typically, the reason for the incorrect operation of the generator is:
- Short circuit;
- Wire wear;
- A sharp decrease in the magnetization of the generator rotor, etc.
Before repairing the generator, you must carry out diagnostics and find out the cause of the malfunction, and only then begin repairs or take the device to a workshop.
Homemade voltage regulator.
Greetings to all! Somehow my voltage regulator (not a relay-regulator, don’t confuse it) on a Chinese 4-stroke “fly”; I wasn’t planning on buying a new one, since the standard LV on all 4Ts is crap, so I went online to look for a diagram. I didn’t have to search for long; I found a very simple and cheap option: a shunt RN. But for proper operation, it was necessary to disassemble the generator and disconnect the wire from ground, and lead it out with a separate wire.. Well, okay, I won’t explain further, because not everyone knows about electrics. In Chinese 4t, as a rule, these are the LVs: The circuit is crap, the efficiency is crap, the resource is crap. Let’s assemble this one (For a single-phase generator, in our case): For a three-phase one: We have two options for connecting a homemade LV, I won’t drag it out and tell you what and how: The first option (with alteration of the generator): 1) We disassemble the generator, remove the stator from engine and this is what we see: Important: Where it says “The mass needs to be soldered off” we solder a separate wire onto the winding and bring it out, this will be one end of the winding. The other end will be the white wire. That's it, we're done, putting the generator back together. It should turn out like this: That is, we have two wires coming from the generator (Actually, there will be three of them, but we will need two). I won’t describe the connection of the LV further, I’ll show you a better picture: Done, all that remains is to connect the yellow wire from the old LV to the “+” of the battery. With this, the first version of the alteration is completed. Now our board. the network has a constant voltage.
Preparatory procedures
Where should you start first? Check all electrical connections on your scooter. Most of them can be found in the battery compartment. Make sure they are all tightly connected to each other. At this time, your scooter's battery pack will automatically check the main and individual battery connections. Bundles of wires should not hang freely.
Usually the battery compartment on a scooter is located at the bottom of the floor
Scooter engine initial test
Test the generator by making a direct connection to the battery. You will need to find an insulated wire to perform this procedure and cut 2 pieces approximately 20cm long.
- Raise the scooter so that the rear wheel does not touch the ground.
- Remove the battery cover and locate the 2 wires that come from the engine. Disconnect the motor wires from the controller - this is easy to do by unfastening the clamps.
- Using 2 wires, attach the first jumper wire to the red positive wire inside the motor wire clamp. Do the same with the black negative wire coming from the engine. Then take the red wire and make contact with the positive terminal of the battery and do the same with the black wire at the negative terminal.
Connected battery on a scooter
Signs that a check is needed
If the battery on your scooter often runs out, and it is still quite new, this means that there is a problem with the operation of the relay regulator. As practice shows, it burns out quite often. If the device is faulty, the battery stops charging completely and loses its capacity. This means you won’t be able to start the scooter with a button; you’ll have to start it with a kickstarter.
Another characteristic sign of incorrect operation of the device may be the frequent burnout of incandescent light bulbs. They themselves are durable and have a good durability, but are quite sensitive to voltage changes. This happens because the optimal voltage in the scooter network is considered to be 12-13 V. Increasing this value even by 2 V reduces the service life of electronics and components by 2 times.
The greater the deviation from the norm, the greater the likelihood that something will burn out in the scooter. Therefore, when starting the scooter from the starter due to a power surge and a faulty relay, the bulbs usually burn out.
Signs of a malfunctioning regulator are identical for all models of Chinese scooters. They are especially typical for charging relays for scooters of Chinese models with an engine capacity of 50 cc. Therefore, before making a decision to replace something in electronics, testing systems and devices should begin with the relay regulator.
Read more: Replacing spark plugs for Nissan Maxima
Scheme and principle of operation
The operation of the stabilizer for all models is almost the same and consists in distributing the current supplied from the generator to stabilize it and further distribute it to consumers.
The operation of the stabilizer is almost the same for all models
The main peripheral consumers of the scooter include:
- battery;
- indicators;
- light bulbs;
- sensors;
- enrichment agent;
- other nodes;
- starting enrichment.
How does the stabilizer work? The main principle of its operation is to act as a transformer, which lowers the voltage to an optimal level acceptable for the operation of electrical appliances, and also stabilizes the network and prevents unexpected power surges.
If the relay malfunctions, the scooter’s devices fail, quickly wear out or burn out.
To avoid these problems and their undesirable consequences, you should know the basics of the correct operation of the electrical circuit and voltage components of the scooter (Figure 1).
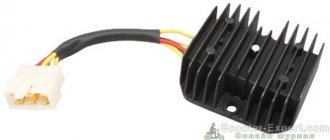
Voltage relay pinout diagram and wiring for main scooter models
The pinout of the relay regulator is standard for all models of Chinese-made scooters.
Scooter relay-regulator pinout
The stabilizer has an aluminum body and plastic contacts, each of which has its own wire. Each contact has its own wire color. This makes it convenient to connect the device to the wires if the plastic connector is worn out. The wires must be connected to the contacts according to the electrical diagram (Figure 3).
Electrical diagram for connecting the relay regulator
Alfa moped wiring diagram: features of domestic operation
With the development of trade relations between Russia and China, in addition to traditional knitted goods and consumer electronics, various auto and motorcycle equipment began to be imported en masse to our country.
And since the domestic motorcycle industry was experiencing a decline, the new items were to the taste of motorcyclists and began to be purchased en masse for their own needs. Of particular interest is the ALPHA moped with an air-cooled engine, which is sold in the Russian Federation as “Alpha 110cc” or “Alpha 49”. The numbers in the name indicate the engine displacement:
- 49 cc four-stroke air-cooled engine. cm, power 4.5 hp;
- 110 cc four-stroke air-cooled engine. cm, power 7 hp.
Mopeds, due to their external resemblance to motorcycles, differ from scooters, although they represent a separate class. However, the combination of technical parameters, ease of do-it-yourself maintenance and low operating cost have made this moped a sales leader on the Russian motorcycle market.
Fuse box in the trunk of a car
Description of the scheme
| A | Rear window defroster relay |
| B | Trunk lid release relay |
| C | Fuel filler lock actuator relay |
| D | Seat heater relay |
| E | Trunk Lamp Timer Relay |
| 1 | (40A) Rear window defroster |
| 2 | (10A) Heated door mirrors |
| 3 | (20A) Trunk lid opening drive |
| 4 | (25A) Fuel tank filler flap opening drive |
| 5 | (20A) Seat heater |
| 6 | (15A) Trailer electrical connector |
| 7 | (30A) Power seat right |
| 8 | (25A) Electric rear windows |
| 9 | (30A) Left seat electric drive |
Moped maintenance
Like any vehicle, Alpha mopeds require routine maintenance, the essence of which boils down to:
- Replacement of parts and assemblies whose service life has expired;
- Setting up and restoring the factory parameters of the main components and assemblies;
- Visual inspection of the moped to identify damage.
Chinese engines quite confidently “maintain” 20,000 km on our domestic fuels and lubricants without breakdowns or overhaul of the piston group. The main thing is to change the oil in a timely manner, especially during the break-in period.
If you do not operate the moped in harsh conditions (winter, cross-country racing, etc.), then all oil seals and rubber seals will also last a long time.
Travel rules
The moped is popular not only because of its budget. Another advantage is that you can ride a moped without having a license and without undergoing a technical inspection. At the same time, no one exempts the moped driver from knowing the rules of the road. A moped is considered more like a bicycle than a motorcycle. Therefore, the moped should not move in the general flow of cars, but as close as possible to the right edge of the road or along a bicycle path.
With a scooter things are a little different. A scooter is a type of motorcycle. Today, a law is being developed to revise the age limits for driving a scooter, as well as compulsory acquisition of a license.
Air conditioning compressor from Chrysler
Around this time, I came across a refrigeration compressor and it turned out to be ideal as the basis for the engine I had planned. It was a Chrysler RV-2 automatic air conditioning compressor. The crank moved the pistons 90 degrees (V-twin design), with a 58.7mm bore and 33.4mm stroke.
In both cylinders, combined with the correct gas path, the displacement was 127.8 cc, which is more than double the volume compared to the Philips MP1002C engine. Being a refrigeration compressor, the design was made thoroughly and with sufficient margin of safety for such strong compression. In addition, this compressor contained a gerotor oil pump, which under pressure lubricated the edges of the large connecting rod bearings. Each aluminum piston had one compression ring and was connected through Alcoa aluminum connecting rods. This compressor turned out to be the most optimal for my idea.
Air conditioning compressor Chrysler RV-2
Years of development
Over the course of several years, I have designed and developed all the necessary components in order to adapt the compressor to work in a Stirling engine. I also designed a tubular support frame to support the engine. The frame is styled to resemble that used on a Philips generator set.
The heater head, displacer and inner cylinder are made of stainless steel 302 pipes of various sizes. I used a coil of copper wire as a regenerator. The cooler, located on the compression side of the engine, was made of aluminum tubes. Used a small 200 watt 12 volt belt driven generator that was originally purchased and intended to run on a garden tractor.
Here is this engine, called SV-2 MK I (Stirling V-2 Mark I):
Generator based on the Stirling engine SV-2 MK I (Stirling V-2 Mark 1)
Let's summarize the above
First, use a light bulb to check whether the switch generates a pulse or not:
- If the light is on, the switch and the modules that ensure its operation are 100% operational
- If the light does not light, it means that the switch or some module that ensures its operation has failed. And to understand for sure that the switch is faulty, we need to check all the modules.
- If the modules turn out to be serviceable, but the switch does not generate a pulse, then it is faulty and you can safely replace it with a new one
In conclusion, I would like to warn you against the temptation to take a known-good switch from someone and plug it in instead of your own. Yes, with this express method the faulty switch will be identified immediately. If it was really faulty, then with a known good one, a spark will immediately appear.
But how can we be 100% sure that the wiring of the scooter is in perfect order and no one has managed to put their smart personality into it before you?.. What if something shorted or some tusk messed up the wiring in his own way and then the working switch will receive a “complete butt”. And then you will buy two switches - one for the person you asked for, the second for yourself. Do you need it?
Supercharging (pressure injection in Stirling)
To obtain significant output power, it is necessary to increase the pressure in the working area of the engine. Knowing that the Philips engine operated at 12 bar (175 psi), I would like to have an engine that was structurally strong and compact to operate at these levels of internal working gas pressure. The working fluid was air, and it was chosen on the basis of practicality. I wanted my generator to be oil-lubricated, just like the Philips Stirling - this feature greatly contributes to the quiet operation and long service life that you really want in a Stirling engine.
Starting current coefficient
There is another important nuance that must be taken into account - the inrush current coefficient. When most electrical appliances start up, their power consumption increases for the first few milliseconds. For example, a standard 800 W microwave oven has a starting current coefficient of 2, so in the first second its energy consumption will be 1600 W. In most cases, these coefficients are distributed as follows:
- All heating electrical appliances that no longer perform any functions (electric kettles, boilers, incandescent lamps, irons, heaters, etc.) have a coefficient of 1, that is, they do not consume more energy at the time of startup;
- TVs, computers, laptops and similar equipment have a minimum inrush current coefficient of 1.1.
- Most power tools (jigsaws, drills, screwdrivers, grinders, industrial hair dryers and similar devices) operate with a coefficient of 1.3-1.4.
- The highest coefficient (3-4) is for refrigerators, concrete mixers, vacuum cleaners, water pumps and air conditioners.
Thus, you can calculate that if, during a power outage, 3 incandescent lamps of 100 W each are on in your home, a computer is running at 400 W, a refrigerator at 600 W, and you decide to clean with a vacuum cleaner at 1800 W (starting current coefficient 2.5) then you need a diesel - a 5.8 kW generator or gas generator, while it is advisable to leave some reserve and install a 7 kW power plant. If you try to perform these operations with an electric generator whose power is 4 kW, unwanted overloads will occur and the protection system will work. Therefore, calculating the optimal performance of a home station is of great importance.
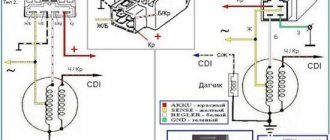
We adjust the contactless ignition system
The contactless system operates through a sensor, switch, primary and secondary ignition windings. When the rotor with magnet closes the sensor, it sends a signal to the commutator, which, in turn, begins to accumulate current from the generator and transmit it to the primary winding. At this moment, high voltage appears in the secondary ignition winding. Its purpose is to ignite the spark. If there are any malfunctions listed above, adjustment is carried out by simply aligning the crankcase and ignition marks; to do this, remove the valve cover. The next steps are:
- We disassemble the crankcase in accordance with the technical description for your car.
- A mark is made on the rotor and crankcase at the dead center position of the engine in a place convenient for viewing.
- By rotating the crankshaft, we achieve a spark, make a mark on the crankcase relative to the mark made on it in the MTD. The difference between these marks on the crankcase is the ignition timing.
- Unclench the stator mounting bolts and set the advance angle corresponding to the technical documentation.
It is important to ensure that two of the three holes in the gear for the chain are at the level of the cylinder, and the remaining one is above the plane in which the cylinder and the mentioned holes are located. The Alpha moped has a reliable ignition system, but it can also break; you should not put off this breakdown and ride on a faulty moped. You just need to try setting the ignition
You can set the ignition yourself if you have special tools and minimal skills. If this is not the case, then it is best to contact a specialist.
You just need to try setting the ignition. You can set the ignition yourself if you have special tools and minimal skills. If this is not the case, then it is best to contact a specialist.
The Alpha moped has a reliable ignition system, but it can also break; you should not put off this breakdown and ride on a faulty moped. You just need to try setting the ignition. You can set the ignition yourself if you have special tools and minimal skills. If this is not the case, then it is best to contact specialists.