As you know, Chinese electronics are known for their simplicity and cheapness with all the ensuing consequences, namely durability and not always efficient operation. I decided to make an electronic switch for the Delta moped with adjustment. It is based on the classic CDI capacitor ignition circuit, which is used in this type of motorcycle.
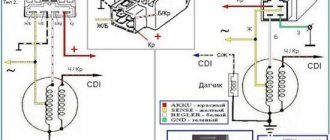
I will not go into details of the operation of the circuit, I will just note that the trimming resistor R4′ adjusts the optimal operating mode of the engine under load and at idle. In general, they need to adjust the operation of the engine so that it runs stably at idle and at maximum speed. The connection diagram in the ignition connector is shown below
The circuit is assembled on a textolite board, which is wrapped in heat shrink and sealed with cellophane on top.
What kind of spark plug is needed for an Alpha moped and other parts involved in igniting the fuel? Few owners of such vehicles know the answer to this question. But a problem can happen at any time and it’s better to be able to fix it yourself.
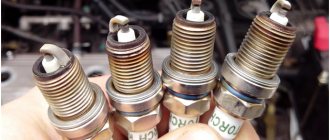
The first reason for the lack of a spark is a faulty spark plug.
To do this, you must have a spare candle in stock. We put the high-voltage cap on the spare spark plug and repeat the procedure again. If there is no spark, then we look for the reason further.
If the spark on the spark plug electrode jumps in different directions, then it is better to replace it.
You should know that three things are responsible for a spark on a moped:
- Ignition coil (Bobbin);
- Switch;
- Generator.
We will now examine these three reasons.
Malfunctions
Malfunctions as such in the coil of CDI ignition systems are very, very rare, contrary to popular belief. And all of them are mainly associated with damage to the housing, combustion of the windings, or an internal break or short circuit of the wires.
In all my difficult practice, I only once came across a truly faulty coil. And this despite the fact that the owner of the scooter himself ruined it: he forgot to connect the ground to the engine and turned on the starter button... A very high starting current went straight through the coil to the starter... And where should it go. There was no mass on the engine. Naturally, the coil couldn’t withstand such abuse: it got hot and burst.
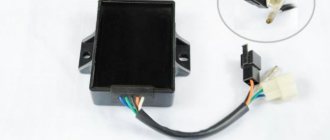
The second reason if there is no spark on the Alpha moped is the ignition coil, or switch
The switch is in an accessible location. You just need to remove the right side decorative cover on the moped. Disconnect the switch from the wires and check with a multimeter. If such a device is not available, then we go to the store and buy a new switch. Fortunately, it costs a couple of hundred rubles.
Similar actions with the ignition coil.
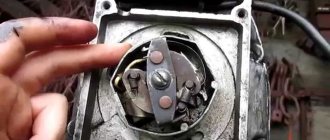
Ignition coil (Bobbin)
AC switch
This type of moped switch works great without 12V DC. Despite its simpler design, it has a slightly more complicated connection to the moped's electrical circuit. This type of switch, due to its small size, exists without a max. limiter. rpm, and can also work in conditions under which the DC switch is inoperable. That is, by removing the battery, the ignition switch, and the relay-regulator, the moped with the AC switch will start and drive.
The third reason is the generator
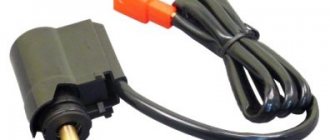
If after replacing the ignition coil and switch the spark does not appear, then we check the generator. Here we need a multimeter. We set the device to the diode position, remove the generator chip and begin the test. Two wires are responsible for the spark:
- blue with a white stripe is a hall sensor;
- black with a red stripe is the coil on the generator.
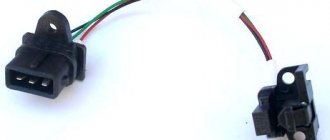
Generator chip
Check the hall sensor. We connect the probe from the device to the blue wire with a white stripe. And we connect the other probe to engine ground. Numbers should appear on the device, indicating that the hall sensor is working.
We do the same work with the coil on the generator. If the numbers are displayed on the device, then the coil on the generator is working. If nothing happens on the device, then you will have to change the generator or hall sensor.
Service Features
Unfortunately, motorcycle suppliers do not always take into account the specific features of a particular type of vehicle.
, suggesting that low price is king. In particular, the majority of mopeds supplied to Russia under the ALPHA brand are not designed for our climatic and road conditions.
Original wiring diagram for an Alpha moped with 49 and 110 cc engines. cm
This manifests itself in the following:
- Most mopeds are used off-road (in rural areas, for trips to nature, fishing, etc.). And factory tires, alloy rims, springs and shock absorbers are not designed for such loads;
- The quality of gasoline and oil is also far from ideal, which affects the performance parameters of the moped;
- The moped is not intended for operation at sub-zero temperatures.
the Alfa moped especially suffers from harsh climates , since its insulation is made of cheap plastic. At sub-zero temperatures it becomes brittle and breaks down. Experienced owners, after purchase, replace it with rubber-insulated wiring.
The fifth reason is alarm
If all the work done does not produce results, then the reason may be the alarm installed on the moped. It can block the spark. Checked by turning off the alarm. We pull out the alarm chip and check for the presence of a spark. If a spark appears, then we remove the alarm unit or check it.
If all of the above reasons do not produce results and a spark does not appear, then we check the wiring on the moped, the high-voltage cap and connecting points that could oxidize and lose contact.
If after the above reasons you do not have a spark, then the spark has gone to the wheel. Joke.
Source
Moped maintenance
Like any vehicle, Alpha require routine maintenance, the essence of which boils down to:
- Replacement of parts and assemblies whose service life has expired;
- Setting up and restoring the factory parameters of the main components and assemblies;
- Visual inspection of the moped to identify damage.
Chinese engines quite confidently “maintain” 20,000 km on our domestic fuels and lubricants without breakdowns or overhaul of the piston group. The main thing is to change the oil in a timely manner, especially during the break-in period.
If you do not operate the moped in harsh conditions (winter, cross-country racing, etc.), then all oil seals and rubber seals will also last a long time.
Tip: Change your air filter often. This will save the carburetor and make it easier to start the engine in all operating modes.
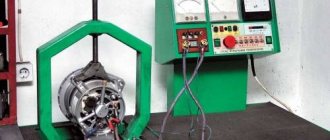
Photo report: How to check a scooter's generator?
Just like that, without minimal knowledge of electronics, at least at the school curriculum level (like mine) and a simple multimeter tester, you won’t be able to test the generator, don’t even dream about it. Before taking on such work, you should at least be able to use a tester and understand that current can be alternating or constant, know what an electrical impulse is and what resistance is. Do you know all this? Have you held a tester in your hands? If yes, then let's not hesitate.
Checking the functionality of the generator should begin with measuring the voltage that the generator itself must generate and transmit through wires to consumers. We look at where the wiring harness from the generator comes out of the engine - we move along it until we reach the connector with which the generator is connected to the on-board network of the scooter.
On the vast majority of scooters, the alternator connector looks something like the picture. In the common connector, there is one plug and two wires that are connected to the scooter’s on-board network through round terminals.
The plug combines the connectors of the two main windings of the generator: The working winding (yellow wire), which ensures the operation of the headlights, turn signals, lights and other consumers. And the control winding (white wire), the control winding provides voltage control in the main winding of the generator. That is, when the voltage in the operating winding of the generator increases above the specified limits, the relay-voltage regulator supplies current to the control winding of the generator, due to which the voltage in the operating winding of the generator drops to the specified limit. When the voltage drops, the reverse process occurs.
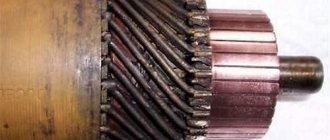
In this generator, the main windings are wound with thick copper wire on six coils.
The third winding of the generator, which is usually called high-voltage or inductive, and the magnetic induction sensor of the generator are connected to the scooter’s on-board network through round terminals.
High-voltage winding of the generator - ensures the generation of high alternating voltage (the voltage in this winding can reach 160 V or more), which directly enters the switch where it is rectified, then accumulated in the capacitor and at a certain moment in the form of a pulse is supplied to the ignition coil.
In this generator, the high-voltage winding is wound with a thin copper wire on two coils. The high-voltage winding coils are carefully insulated on the outside.
There are generators in which the high-voltage winding is wound on only one coil.
A small clarification: ignition systems in which a DC CDI type switch is installed, the high-voltage winding does not participate in the formation of a spark charge on the spark plug, so there is no point in checking it. Scooter manufacturers install a generator with a high-voltage winding, but do not use it (meaning ignition systems with a DC CDI switch). It's just wound on the generator and that's it. I will say more: due to the fact that the winding is not loaded with anything during operation of the generator, over time it simply burns out.
An example of a generator, on two coils of which a high-voltage winding that is not involved in operation is wound. I checked this winding - the tester showed an open circuit, which confirms the above.
The resistance of the generator's inducing winding is always greater than that of the other windings. The wire coming from the inducing winding of the generator is almost always red and black.
The magnetic induction sensor, when a special ledge on the generator rotor passes past it, generates an alternating pulse that opens a theristor through which the switch capacitor is discharged to the ignition coil.
Types of coils
The inductor can be found in many devices. For example, without it it is impossible to operate the ignition system of a grass trimmer, metal detector, or chainsaw. Manufacturers now offer three types of starter coil:
- A classic scheme with a spark distributor or, as it is also called, a distributor. This option is considered insufficiently effective, but is common on older models.
- Dual Ignition System (DIS). Here one coil serves two spark plugs. A working spark occurs during the compression stroke, another is idle during the exhaust period.
- The name of the COP design literally translates as “a coil located on each spark plug.” Such engines have a coil for individual use - IKZ. This option is the most common in modern car models.
In all of these types, a prerequisite is the conversion of low voltage to high voltage through the use of inductance.
Checking the high voltage circuit
Malfunctions of the high-voltage circuit, often leading to complete or partial (interruption) failure of the ignition system, are mainly associated with damage, contamination or breakdown of the spark plug cap housing or breakdown of the insulation of the high-voltage wire.
As I already said: the current generated by the secondary winding of the ignition coil is very high and there are frequent cases when the current supplied to the spark plug makes its way around through cracks in the cap body or a layer of dirt, dust, or cracks in the insulation of a high-voltage wire. Which leads to complete failure of the ignition system. These malfunctions occur very, very often and in most cases lead to complete or partial (interruption) failure of the ignition system.
In order to check the high-voltage circuit, do the following: Unscrew the cap from the high-voltage wire; insert a thin nail or piece of wire into it; We bring the nail to the metal motor housing at a distance of 2-3mm ( This is important! The distance between the end of the wire and the motor housing must be 2-3mm, otherwise you will screw the switch ) and turn the motor.
- If a spark appears, it means the cap is broken - replace it with a new one.
- If there is still no spark, the high-voltage wire may be broken or damaged.
Examination
The test itself is not particularly difficult even for beginners. And it will be associated with measuring the supply voltage supplied to the coil, checking the mass, which must necessarily be suitable for the engine, switch and coil, and checking the integrity of the wires supplying current to consumers of the ignition system.
Another point: the technique that will be described here can be safely applied not only to a scooter, but also to any other type of vehicle equipped with a CDI ignition system, be it a motorcycle, an ATV, a scooter, or even a walk-behind tractor - it doesn’t matter.
Whether the coil produces a spark to the spark plug or not depends directly on whether power (pulse) is supplied to the coil from the switch or not. Power is power, without it not a single electrical consumer can work. Therefore, any check should begin with checking the power supply - is it there or not? And only then, depending on the result, finish the check or move on.
Power check
We free access to the coil and, without removing the terminals from it, connect a control light to the power wires: green and black-yellow and turn the engine with the starter. In the mode of cranking the engine with the starter, the control light should be lit at the incandescent level.
- If the light does not light, you need to check whether the switch generates a supply voltage (pulse) at its terminal and whether it reaches the ignition coil?
- If the light is on, but there is no spark on the spark plug, it means that the coil itself is faulty or there is no ground on it, or the high-voltage circuit supplying voltage to the spark plug is faulty.
The light on the coil is on - the switch is 100% working.
If your light bulb does not light, check the switch and if it is working, but there is no voltage at the coil terminals, look for the reason in the wires supplying power to the coil.
The voltage on the switch is checked in the same way as on the coil: we touch the green and black-yellow wires, turn the engine with the starter and look at the light bulb.
The light on the switch is on, which means it is 100% working.
Another common cause of coil failure, provided there is power at its terminals, is poor grounding or its complete absence. The ground on the coil is checked simply: we switch the tester to the audio “continuity” mode, touch any metal part of the engine with one probe, and the green ground terminal with the second.
- If there is ground on the coil, the tester will beep
- If many numbers appear on the tester display, the ground is bad.
- If the tester is silent and the display shows solid zeros, there is no mass
- If there is power and ground on the coil, but there is no spark, we check the high-voltage circuit and, depending on the result, draw conclusions about the operability of the coil
This reel has good mass.