- Why do you need to adjust the ignition on a Ural motorcycle?
- The sequence of actions when setting up the ignition on a Ural motorcycle
Today, Ural motorcycles are found among many experienced motorcyclists. This type of motorcycle is reliable and can last for many years. Ural motorcycles have a whole set of recommendations for use. The main one is monitoring the operation of all systems. In order for them to work properly, it is necessary to carry out preventive adjustments of some parts. In particular, the ignition system undergoes regular adjustments.
Peculiarities
Before setting up the ignition, you should understand what elements it consists of in the Urals. This will allow you to avoid some mistakes and also configure it more accurately. If you bought the motorcycle secondhand, then the ignition may be homemade, in which case it will have to be redone.
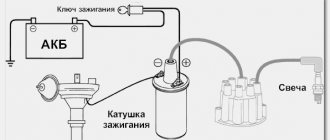
The main source of the high-voltage pulse is the ignition coil, often called the bobbin. Can be used from Oka. It is installed separately from the main body. A chopper (cams), which is equipped with a device for advancing the ignition angle. A couple of candles. There is a set of wires for low and high voltage. This also includes power supplies, as well as their switch.
It is worth noting that, depending on the assembly, it may require 6 or 12 volts. The difference between these systems is in the coils. On twelve volt coils a B-204 coil is used, on six volt coils B-201. The connection diagram here is standard.
The breaker has a rather complex design, which consists of several elements. The housing contains a movable and fixed cam with a regulator, which operates from centrifugal force. There is also a capacitor that directly controls spark formation.
There is a piece of felt in the design; it lubricates the mechanism. Separately, it is worth mentioning the screw that secures the cam assembly; with its help, additional adjustment of the Ural ignition is made.
First signs of trouble
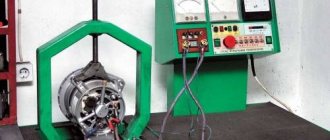
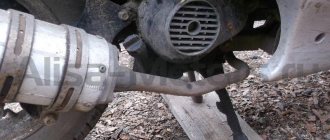
Before checking, the coil must be removed from the motorcycle using the available tools. Before removal, the part must be carefully disconnected from the connectors, and when removing it, you should be careful not to break its fragile fastening. Having taken out the coil, look carefully at its surface.
The main sign of a coil malfunction will be dark spots on the surface of the winding, as well as traces of melting, which indicate that excessive voltage is applied to the part. In addition, spots of oil or other foreign substances, which theoretically should not be in the ignition system, will be a reason to be wary. When the ignition operates without the motor running, clearly noticeable damage may appear on the surface of the winding, including breaks visible to the naked eye. However, you should not rely only on visual inspection - after inspection, the part is subjected to a thorough examination.
Examination
If there is any suspicion of problems with the ignition, you should check that it is working correctly. Diagnosis is carried out in the following order;
- We check the mechanical component of the unit. We look to see if the cam mechanism is stuck; if there are problems with mobility, then it is worth checking its performance. Be sure to measure the gap between the cams; most often it turns out to be too small, which prevents sparks from forming;
- The next step is to check for the presence of a spark. To do this, turn on the ignition and force the cams to move using a screwdriver, creating a gap. The spark should be blue and white. If it is red or orange, then you need to look for a malfunction.
- We take a multimeter and measure the resistance at the bobbin terminals. Attention! The ignition must be turned off. On the primary winding the resistance should be 6 Ohms, on the secondary winding 10 Ohms;
- The resistance between ground and terminals is checked, in optimal condition it should be 6-15 Ohms, if more, then the problem is in the wire;
- The tester is also used to ring high-voltage wires. If the resistance tends to infinity, then it is worth replacing the wire; it is better to do it as a set;
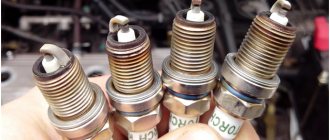
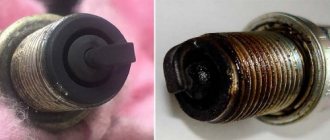
- The last step is to check the condition of the candles. Electrodes should have a sand color. It is recommended to maintain a distance of 0.6 mm between them.
Actually, this is all that should be checked. Microprocessor varieties are also checked in approximately the same way. SoveK ignition is of this type.
Leave it to mechanics or install electronics
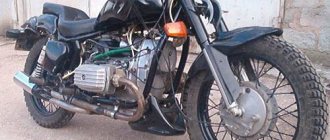
Perhaps not all older motorcycle models are running. The Ural motorcycle sits and rusts in my grandfather’s barn because it won’t start.
The wheels are spinning, the engine is not jammed. Maybe the spark goes into the ground, as they say. In short, you need to look at the spark generation system. But even a working motorcycle, with a contact ignition system, causes unexpected and unpleasant problems for its owner:
- won't start when you really need it;
- with new oil rings in the engine, the spark plugs become covered with soot;
- there is no required engine power when driving with maximum load;
- the maximum speed is not reached;
- The battery is slightly discharged and the engine does not start.
Tuning a Ural motorcycle with your own hands - this article will help you decide in which direction to modernize your Ural.
The contact ignition system creates a lot of problems, especially when the moving parts in it have already worn out, backlash has appeared, and the geometry of the elements has changed.
The solution is simple - all cam ignition is thrown out, a modern electronic non-contact type spark generation system is installed. You will no longer have to deal with the thankless task of cleaning contacts and endlessly adjusting the gaps in the breaker. All this is possible thanks to the simple, but quite reliable design of the motorcycle. For example, it is quite easy to set the thermal gap and adjust the valves in the Urals with your own hands, using only your own tools from the garage. This way you will gain valuable experience and save money on visiting the workshop.
Adjustment
If you have identified a problem with out-of-phase phases, then you just need to find out how to set the ignition on a Ural motorcycle. This will make your life much easier in the future. Please note that the electronic ignition on the Ural motorcycle is regulated completely differently.
So, you need to adjust the ignition of the Ural motorcycle. To work, you will need wrenches, a screwdriver, and it is advisable to take a test light. Adjustments are made in the following order:
- First, set the engine to the top dead center position of the first cylinder, and this should be the compression stroke. You can check this as follows: unscrew the spark plug, plug the hole with paper and crank the engine. When the resulting plug is knocked out, you can stop, this is the desired position.
- Loosen the fastening of the breaker body, after which it is turned all the way clockwise, and a 12-volt test light is connected to the contacts;
- Turn on the ignition and turn the breaker housing until the light turns on. As soon as it lights up, you should stop and secure the lid. This completes the setting of the advance angle.
Izh Jupiter 5 ignition adjustment is done in approximately the same way. Now you know how to configure this system on your motorcycle.
Previous entry Installing electronic ignition on a Ural motorcycle
Next entry Restoring a Ural tuning motorcycle
Express diagnostics
If the motorcycle begins to act up “in the field,” then removing and installing the ignition coil will become an almost impossible task. And even if you have a multimeter at hand, it will be incredibly difficult to perform the test. Therefore, it is worth using an alternative method for diagnosing the ignition system, which is often used in practice by experienced motorcyclists.
If the battery is more than half charged, you will be able to check the functionality of the ignition coil in a couple of minutes. To do this, you need to remove the contact cap of the spark plug and turn on the ignition, holding it by the insulated part. The distance between the cap and the candle should be 5–7 millimeters.
Hit the kickstarter hard and pay attention to the spark plug. If a spark forms between it and the cap, the ignition coil is in working order, and you should look for the cause of the failure in other parts of the motorcycle. In some cases, a spark is formed, but it appears rather weak and dull. This is usually due to the battery being low. However, if you are sure that the battery is charged, then most likely the problem is a breakdown of the ignition coil windings.
Contactless ignition systems
Not so long ago you could only find a homemade device. The reason is the lack of proper supply in stores. Craftsmen in garages remade the contactless unit from other motorcycle models and assembled it from individual parts. This is a rather complex activity that requires skills. Now you can purchase a ready-made kit without any problems.
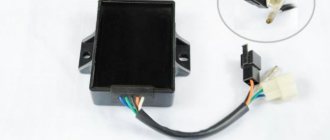
There are many advantages to using ready-made products. At a minimum, they have been tested in the Urals, which guarantees reliable operation. It is also much easier to install a ready-made unit than to make it yourself. The following sets can be found on the market:
- "SoveK". Under this brand you can find regular contactless ignition, as well as a more advanced microprocessor ignition. The assembly can be supplied with or without a bobbin. Easy to install and practically does not respond to voltage changes;
- "Saruman." Quite an interesting and reliable assembly. There are two sensor options available here; there can be a conventional Hall sensor, or a modern optical one. There is protection against voltage surges, especially high current. To simplify setting the ignition, there is a light indication.
Using ready-made kits is currently the best option.
Settings
Now we adjust the ignition timing. We install the motor in accordance with the marks, connect all the wires. Next you need to adjust the position of the sensors. Next, we attach all the elements and check for sparking. If everything is fine, then you should drive 10-20 kilometers and check the set angle again.
The rotor lights up green when receiving an engine impulse, red during scheduled ignition. The tests revealed that some things still need to be improved. In the meantime, the processor was upgraded to a newer version and new programs were added to the program. The rotation, forward and other parameters are sent via serial communication to the computer for further analysis. It has, among other things, an ignition premise.
A fan motor is a good approximation of a pulse generator, but has its limits, mainly in terms of acceleration. My child was taken from the hands of a criminal, that is, the previous owner, brought and buried in a garage.
If necessary, adjustments are made, but if everything is done correctly, this will not be necessary. Knowing how to do contactless ignition on your motorcycle, you will not wonder how much this work costs in a workshop.
One of the main pain points of heavy Ural motorcycles is the ignition system. Although currently motorcycles produced by IMZ are equipped with Italian-made Ducati Energia electronic ignition, only about three percent of the bikes produced today are sold in the Russian Federation. Most of the owners travel across the country using outdated mechanical ignition in the Ural. Electronic one has a number of advantages.
Eventually it was redesigned. The reason for the failure was the poor aluminum five-wheel driver. The other not-so-great part was the rubber O-ring, which used to wear out and caused problems during assembly, but the main problem was the driver's fingers that screwed in the screws that secure the pressure plate springs. As a result of intensive work, the aluminum driver's struts could move in the longitudinal direction, which led to the screws securing the springs being pulled out or falling off.
Loose screws or broken driver parts can become trapped between the rotating elements of the prismatic drive and cause chucks to crack and even lock up the gearbox. There were also problems replacing friction discs. When assembling the clamping disc, the screws must be screwed to the driver's seat using regular screws. Worn screws often had threaded threads, causing the screws to break on the driver's aluminum pins.
Selection of candles
The contactless system has certain requirements for candles. If they are faulty or do not fit a specific motor, then you will not get any positive effect from using this system.
Be sure to check the condition of the spark plugs. They should not have soot. It is optimal if the electrode has a sand color. If necessary, replace the spark plugs; when selecting, pay attention to the heat rating. When the spark plugs are in order, the electronic ignition can be installed.
MY MOTORCYCLE
A correctly adjusted Ural or Dnepr should start with half a turn. If, despite the carburetor float chambers being filled with gasoline, you have to hit the kickstarter for a long time before the engine reluctantly starts to spark, then it’s time to adjust the ignition. This must also be done if the engine backfires when starting, and knocks during operation, overheats, or runs poorly, let’s turn our attention to the classic system with a PM 302A breaker, which is equipped with a suppressor.
the majority of heavy motorcycles. Let's look at the whole process from the very beginning.
On a new motorcycle (if you were lucky enough to buy one), the contacts, as a rule, are skewed and touch at one point. Using small pliers, you need to slightly bend the contact fastenings so that the area of their contact is maximized. It is more convenient to bend the movable contact hammer; it is more pliable.
After this, the contacts should be cleaned with sandpaper, folding it in half and placing it between the contacts. You don't need to remove a lot of metal. Then the sandpaper should be replaced with a soft cloth soaked in clean gasoline, and the remaining abrasive should be thoroughly removed. After completing this operation, it will not be superfluous to lubricate the axis of the moving contact by dropping 1-2 drops of spindle or motor oil onto it. Apply a few drops of the same oil to the felt felt.
Let's install the breaker with the ignition timing machine in place (don't forget about the mark on the machine's leash!). Now let's adjust the gap between the contacts. Let's set the cam to the position where they are maximally open. Having loosened the screw securing the fixed contact, we will rotate the eccentric with a screwdriver, while simultaneously measuring the gap size with a 0.5 mm thick feeler gauge. When the probe begins to enter the gap with slight friction, carefully close the screw.
Turning the crankshaft using the kickstarter, we will find an arrow on the flywheel (for “Urals”) or a “TDC” mark (for “Dneprs”) and set it opposite the mark in the viewing window.
Now you need to turn on the ignition. Let's take an 8x10 wrench and apply it to the steel core of the coil. We will turn the breaker body in the direction of the arrow stamped on its cover until the key touches the core. In this position, lightly tighten the breaker mounting screws so that it can rotate, but with some effort.
Let's take a long thin rod, for example, an old knitting needle, rest one end of it against the breaker flange, and apply light blows to the second with a small hammer or a 19x22 wrench, thereby slowly turning the breaker in the opposite direction. At the moment the contacts open, the key, attracted to the ignition coil, will fall with a melodious ringing. In this position, the breaker mounting screws must be tightened.
It remains to check that the initial ignition timing we have set is correct. To do this, turn the crankshaft until the contacts close, hang the key on the reel again and, turning the crankshaft with light blows of your fist on the kickstarter, slowly bring the arrow on the flywheel closer to the mark on the crankcase. If the key falls when they match, everything was done correctly. If the arrow does not reach the mark, the ignition is early, and the breaker body needs to be turned slightly in the direction of the arrow on its cover. If the key falls after the marks coincide, turn the breaker in the opposite direction.
At first glance, the amount of work seems quite large. But in everyday use, all operations are not required, and besides, by adjusting the ignition once or twice, you will learn to do this in a matter of minutes, and this system will no longer cause you trouble.
source