The scooter's ignition system is needed to ignite the gasoline entering the cylinders. It is very important that the moment of fire is chosen accurately, otherwise the scooter will not move. Ignition is provided by a powerful electrical discharge issued by the spark plug. This requires a voltage of at least 15,000 volts, which can only be obtained thanks to the ignition coil, which converts the voltage supplied by the battery. Older models were equipped with contact cam ignition; modern ones are equipped with contactless ignition, which proves to be better and more practical.
Ignition switch and its features
The operating principle of supplying a spark to fuel in a moped is approximately the same as in a car. The task of this system is to ignite the mixture, which is supplied by the carburetor to the engine. The candle itself produces the ignition itself, but before that, other parts also participate in the process.
It is very important that the spark is supplied at exactly the right moment, when the piston has not yet reached top dead center.
To activate the system, a so-called lock is used, from which a signal is sent to other parts. A key is required to use it on most vehicles. In the off position, the switch is shorted to ground using a special “leg”. In general, the design of the system on Alpha and other scooters and mopeds is not too different from that on cars. As mentioned above, in addition to the lock, the main role is played by the ignition coil and switch.
Ignition settings
When setting up the ignition, you will need to do the most important thing - install the shafts according to the marks so that the gas distribution functions synchronously with the operation of the piston group. This is the first thing you should do before you start adjusting the ignition. It is worth noting that there should not be any particular difficulties during setup, especially on VAZ 2108-21099 cars. The thing is that the ignition distributor on the engines of these machines can only be installed in one position. Moreover, the ignition switch does not undergo any settings during this procedure, since it does not have any.
The distributor body rotates around its axis to make more precise adjustments. And this turns out to be enough. To accurately set the torque, you can use a simple circuit that uses a simple LED as an indicator. The Hall sensor is disconnected from the system, and positive power is supplied to its negative terminal. An LED is switched on between “+” and the signal LED, and a 2 kOhm resistance is connected in series with it to reduce the voltage. But the plus of the Hall sensor is connected to ground. Now all that remains is to slowly rotate the distributor housing. The moment when the diode lights up will be the desired one.
Design and principle of operation of the ignition coil
The ignition coil has a simple operating principle based on electromagnetic induction. The part has a primary and secondary winding, as well as a metal core on which they are wound. The primary consists of several hundred turns, and the secondary consists of thousands.
Passing through the primary winding, the current forms a magnetic field. The current does not flow continuously and the field disappears, but voltage condenses in the secondary winding. It is this that will be supplied to the spark plug at the moment specified by the switch to ignite the fuel.
The ignition coil has a wire of a high enough cross-section so that it can withstand the voltage applied to the spark plugs. Its installation and replacement, if necessary, is quite simple, but first you need to check the functionality of the part.
Photo gallery “Main parts of the system and the timing process”
Checking the high voltage circuit
Malfunctions of the high-voltage circuit, often leading to complete or partial (interruption) failure of the ignition system, are mainly associated with damage, contamination or breakdown of the spark plug cap housing or breakdown of the insulation of the high-voltage wire.
As I already said: the current generated by the secondary winding of the ignition coil is very high and there are frequent cases when the current supplied to the spark plug makes its way around through cracks in the cap body or a layer of dirt, dust, or cracks in the insulation of a high-voltage wire. Which leads to complete failure of the ignition system. These malfunctions occur very, very often and in most cases lead to complete or partial (interruption) failure of the ignition system.
In order to check the high-voltage circuit, do the following: Unscrew the cap from the high-voltage wire; insert a thin nail or piece of wire into it; bring the nail to the metal motor housing at a distance of 2-3mm (This is important! The distance between the end of the wire and the motor housing should be 2-3mm, otherwise you will screw the switch) and turn the motor
- If a spark appears, it means the cap is broken - replace it with a new one.
- If there is still no spark, the high-voltage wire may be broken or damaged.
We check the high-voltage wire using a similar principle: Unscrew it from the coil and screw in any other piece of insulated wire instead (the wire must be insulated! Otherwise it will screw you up so hard it won’t seem like much!) wire, bring it to the engine housing at a distance of 2-3mm and turn the engine .
- If a spark appears, it means the insulation is broken or the central core of the high-voltage wire is broken - replace it with a new one
- If there is no spark, then by the elimination method the ignition coil is faulty - replace it with a new one
- If power (pulse) is supplied to the coil, but there is no spark, we check the ground and the high-voltage circuit.
- If everything is in order with the ground and the high-voltage circuit, then the coil is faulty.
- If there is no voltage (pulse) at the coil terminals, measure the voltage at the switch.
- If there is voltage at the switch terminal, but there is no voltage at the coil terminal, it means there is no ground on the coil or the wire connecting the coil to the switch is broken - we look for ground or break and fix it.
- If there is no voltage on the switch, then the switch itself or the generator, the induction sensor of the generator or something else is faulty.
That's actually the whole technique. I've been testing coils using this principle for several years now. And it only takes me a few minutes to complete a complete check with almost one hundred percent accuracy. Of course, this technique may seem complicated to many of you, but in fact it is not entirely true. The main thing is to understand the principle, the rest will follow.
How to check the ignition coil yourself?
You can check how the ignition coil works quite simply:
- First, you need to get to it by dismantling the body of the vehicle.
- There are two contacts suitable for the part; you need to disconnect them.
- First, the resistance of the primary winding is measured. Measure it with a multimeter on the two terminals of the wires that you disconnected. Different models should have different levels of resistance; check the normal level for your ignition coil in the technical documentation.
- Now check the secondary. For it, the resistance values should be higher (and an order of magnitude greater if measurements are taken together with the core).
Ignition installation instructions
It is very important to correctly set the spark moment to ignite the fuel in a vehicle - the operation of the engine depends on it.
The instructions are as follows:
- disassemble the crankcase and make notes of the lower and upper positions of the piston;
- unscrew the spark plug and then turn the shaft until a spark appears, make a mark on the crankcase;
- you need to set the torque so that ignition occurs 2-3 mm below the top point of the piston;
- Loosen the alternator bolts and follow your moped's instructions to adjust the commutator.
Video “Scooter 4T installation of ignition”
This video talks about setting the ignition moment of the fuel mixture on a four-stroke engine (the author of the video is Andrey Shevelev).
Just like that, without minimal knowledge of electronics, at least at the school curriculum level (like mine) and a simple multimeter tester, you won’t be able to test the generator, don’t even dream about it. Before taking on such work, you should at least be able to use a tester and understand that current can be alternating or constant, know what an electrical impulse is and what resistance is. Do you know all this? Have you held a tester in your hands? If yes, then let's not hesitate.
Checking the functionality of the generator should begin with measuring the voltage that the generator itself must generate and transmit through wires to consumers. We look at where the wiring harness from the generator comes out of the engine - we move along it until we reach the connector with which the generator is connected to the on-board network of the scooter.
On the vast majority of scooters, the alternator connector looks something like the picture. In the common connector, there is one plug and two wires that are connected to the scooter’s on-board network through round terminals.
The plug combines the connectors of the two main windings of the generator: The working winding (yellow wire), which ensures the operation of the headlights, turn signals, lights and other consumers. And the control winding (white wire), the control winding provides voltage control in the main winding of the generator. That is, when the voltage in the operating winding of the generator increases above the specified limits, the relay-voltage regulator supplies current to the control winding of the generator, due to which the voltage in the operating winding of the generator drops to the specified limit. When the voltage drops, the reverse process occurs.
In this generator, the main windings are wound with thick copper wire on six coils.
The third winding of the generator, which is usually called high-voltage or inductive, and the magnetic induction sensor of the generator are connected to the scooter’s on-board network through round terminals.
High-voltage winding of the generator - ensures the generation of high alternating voltage (the voltage in this winding can reach 160 V or more), which directly enters the switch where it is rectified, then accumulated in the capacitor and at a certain moment in the form of a pulse is supplied to the ignition coil.
In this generator, the high-voltage winding is wound with a thin copper wire on two coils. The high-voltage winding coils are carefully insulated on the outside.
There are generators in which the high-voltage winding is wound on only one coil.
A small clarification: ignition systems in which a DC CDI type switch is installed, the high-voltage winding does not participate in the formation of a spark charge on the spark plug, so there is no point in checking it. Scooter manufacturers install a generator with a high-voltage winding, but do not use it (meaning ignition systems with a DC CDI switch). It's just wound on the generator and that's it. I will say more: due to the fact that the winding is not loaded with anything during operation of the generator, over time it simply burns out.
An example of a generator, on two coils of which a high-voltage winding that is not involved in operation is wound. I checked this winding - the tester showed an open circuit, which confirms the above.
The resistance of the generator's inducing winding is always greater than that of the other windings. The wire coming from the inducing winding of the generator is almost always red and black.
The magnetic induction sensor, when a special ledge on the generator rotor passes past it, generates an alternating pulse that opens a theristor through which the switch capacitor is discharged to the ignition coil.
Sensor in person
Ledge on the generator rotor
The wire coming from the magnetic induction sensor is almost always blue-white.
A small educational program: Traders and collective farm tusks, magnetic induction sensor of the generator, CDI ignition systems - called the Hall sensor. My dears... Maybe that's enough already?.. Where does this illiteracy come from?.. The magnetic induction sensor of the generator, the CDI ignition system, and it is this system that is discussed in this article - it has nothing to do with the hall sensor! And don’t listen to these hucksters and “gurus” who say the opposite...
The actual check itself
We switch the tester to the alternating current (ACV) measurement mode to a range of 200 V and no less. We remember that the voltage of the inducing winding can reach 160 V or more, so the measurement range of the voltage of the inducing winding must be at least 200 V.
We disconnect the plug and round terminals of the main harness - connect one probe of the tester to ground, connect the other to the terminal (black-red wire) of the inducing winding of the generator. Turn on the ignition and turn the engine with the starter. A fully operational pickup winding should produce approximately the following values.
The pulse generated by the sensor is very weak, therefore, we switch the tester to the alternating voltage (ACV) measurement mode in the 2 V range. Measuring the pulse from the sensor in a higher range may not give a result, since the tester may simply not catch it. For this purpose, use only a tester with a range in AC voltage measurement mode of no more than 2 V.
We do everything exactly the same as in the first example. The pulse from the sensor should produce approximately the following values.
By analogy with the first two examples, we measure the voltage in the working and control windings. We put the tester in the alternating voltage (ACV) measurement mode in the 200 V range and take measurements.
Well, what did you measure?.. Do all windings generate current? Or not all?.. If any winding does not produce current, then whether you like it or not, you will have to check it in more detail. But if the windings generate a current of approximately the same magnitude as in the pictures, then this means that your generator is in perfect order. Something like this…
In-Depth Check
We lay the generator so that the terminals of the generator windings are accessible to you. We determine the ends of the terminals of all generator windings. Finding the ends of the windings is very simple: look at the color of the wire that is soldered to the terminal block and determine what kind of winding it is.
I have marked the ends of the windings here with arrows. I selected the arrows in color in accordance with the color of the wires soldered to the terminal block. The green arrow marks the terminal block on which the ends of all windings are soldered - this is the ground terminal block.
We switch the tester to the dialing mode, take any wire from the common harness, connect any tester probe to this wire, and with the second probe touch the terminal block to which this wire is soldered. The tester should beep and show zero resistance.
If the tester is “silent” and shows numbers instead of zeros, then this means that there is a wire break somewhere or poor contact between the end terminal and the wire. Inspect the wire carefully for a break and, if necessary, replace it with a new one. We check the remaining wires, including the sensor wire, using exactly the same principle.
After checking the wires, we proceed to checking the generator windings for open circuits and interturn short circuits. We switch the tester to the continuity mode, touch any tester probe to the generator housing, and touch the end of the wire of any winding or terminal block with the second probe.
The high-voltage winding in the continuity mode should show approximately this resistance value. If the high-voltage winding does not show resistance or shows little resistance, then this means that somewhere there is an internal break or an interturn short circuit. You understand that such a malfunction cannot be “treated.”
When checking the remaining windings, the tester should emit a sound signal; the resistance of the working windings is very small, so most likely you will only see zeros on the tester display. If the tester does not emit a signal, it means there is an internal break somewhere. Such a malfunction cannot be “treated.”
We put the tester in dialing mode, touch the sensor body with any probe, touch the sensor wire or the terminal on the body to which the wire is soldered with the second probe. The resistance of the sensor winding should be approximately within these limits. If there is little or no resistance, replace the sensor with a new one.
Scooters today are relevant, popular and practical vehicles. People of various age categories can successfully move on them. For most owners, a scooter is their only means of transportation. Other owners use this technique as entertainment. During the operation of Chinese and Japanese mopeds, various malfunctions may occur. One of the common problems faced by many is the loss of spark on the scooter. Let's consider possible causes and ways to eliminate this problem. Often the spark disappears at the most inopportune moment, and the driver is saddened by the stalled engine. Owners of Chinese equipment especially often face this problem.
Electrics and electrical equipment of a scooter
Dedicated to all owners of Chinese scooters...
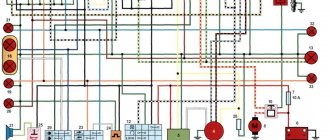
To begin with, I would like to present a wiring diagram for a Chinese scooter.
Since all Chinese scooters are very similar, like Siamese twins, their electrical circuits are practically no different.
The diagram was found on the Internet and is, in my opinion, one of the most successful, since it shows the color of the connecting conductors. This greatly simplifies the diagram and makes it more comfortable to read.
(Click on the image to enlarge. The image will open in a new window).
It is worth noting that in the electrical circuit of a scooter, just like in any electronic circuit, there is a common wire. On a scooter, the common wire is the minus (—). In the diagram, the common wire is shown in green. If you look more closely, you will notice that it is connected to all the electrical equipment of the scooter: headlight (16), turn relay (24), instrument panel backlight lamp (15), indicator lamps (20, 36, 22, 17), tachometer (18 ), fuel level sensor (14), horn (31), tail light/brake light (13), start relay (10) and other devices.
First, let's go over the main elements of the Chinese scooter circuit.
Egnition lock.
Ignition switch (12) or “Main switch”. The ignition switch is nothing more than a regular multi-position switch. Even though the ignition switch has 3 positions, the electrical circuit uses only 2.
When the key is in the first position, the red and black wires are connected. In this case, the voltage from the battery enters the electric circuit of the scooter, the scooter is ready to start. The fuel level indicator, tachometer, sound signal, turn relay, and ignition circuit are also ready for operation. They are supplied with power from the battery.
If the ignition switch malfunctions, it can be safely replaced with some kind of switch like a toggle switch. The toggle switch must be powerful enough, because the entire electrical circuit of the scooter is, in fact, switched through the ignition switch. Of course, you can do without a toggle switch if you limit yourself to short-circuiting the red and black wires, as the heroes of Hollywood action films once did
In the other two positions, the black and white wire from the CDI ignition module (1) is shorted to the housing (common wire). In this case, engine operation is blocked. In some scooter models, to block the engine, there is an engine stop button (27), which, like the ignition switch, connects the white-black and green (common, body) wire.
Generator.
The generator (4) produces alternating electric current to power all current consumers and charge the battery (6).
There are 5 wires coming from the generator. One of them is connected to a common wire (frame). The alternating voltage is removed from the white wire and supplied to the relay regulator for subsequent straightening and stabilization. The yellow wire removes voltage, which is used to power the low/high beam lamp, which is installed in the front fairing of the scooter.
Also in the design of the generator there is a so-called hall sensor. It is not electrically connected to the generator and there are 2 wires coming from it: white-green and red-black. The hall sensor is connected to the CDI ignition module (1).
Relay regulator.
Regulator relay (5). People may call it a “stabilizer”, “transistor”, “regulator”, “voltage regulator” or simply “relay”. All these definitions refer to one piece of hardware. This is what the relay regulator looks like.
The relay regulator on Chinese scooters is installed in the front part under a plastic fairing. The relay-regulator itself is attached to the metal base of the scooter in order to reduce the heating of the relay radiator during operation. This is what the relay regulator looks like on a scooter.
In the operation of a scooter, the relay regulator plays a very important role. The task of the relay regulator is to convert the alternating voltage from the generator into direct voltage and limit it to 13.5 - 14.8 volts. This is the voltage required to charge the battery.
The diagram and photo show that there are 4 wires coming from the relay-regulator. Green is the common wire. We have already talked about it. Red is the output of positive DC voltage 13.5 -14.8 volts.
The regulator receives alternating voltage from the generator through the white wire to the relay. Also connected to the regulator is a yellow wire coming from the generator. It supplies the regulator with alternating voltage from the generator. Due to the electronic circuit of the regulator, the voltage on this wire is converted into a pulsating one, and is supplied to powerful current consumers - the low and high beam lamps, as well as the dashboard backlight lamps (there may be several of them).
General diagnostics
If the moped engine stalls, you should first find out why this happened. Indeed, among the main reasons why an engine stalls on the road or refuses to start, only two are the lack of fuel or the inability to ignite the mixture. Often, during the first diagnosis, it turns out that there is gasoline in the tank, and the fuel mixture is supplied to the cylinders due to vacuum. And therefore, the reason for everything is that the spark on the scooter disappeared. To verify this, you simply need to unscrew the spark plug from its standard hole in the cylinder head. Then it is inserted into the cap, its end is applied to the motor body.
Next, start the engine and look at the electrodes. You should also check the element not only for the presence of a spark, but also for the condition of the electrodes. The candle can be dry or wet. If the electrode is wet, then the fault is not the power system and carburetor, but the lack of a spark. If there is no spark on a 4T scooter, the reasons may be different. We will look at the most likely ones below.
The principle of operation of ignition in a 4-stroke scooter engine
Modern scooters are equipped with contactless systems.
They are considered the most reliable and easy to use, do not require complex connections, and provide a constant good spark on time. However, the setting is still important; even the presence of a spark does not always allow the fuel mixture to ignite, since its power also plays a role. The main reasons for the operation of the ignition system are quite simple: its task is to create a spark to detonate the fuel mixture. If this does not happen, you need to carefully examine each node and find out why the spark disappeared.
- In order to check whether there is a spark at all, you need to unscrew the spark plug and apply it to the engine ground; this can be done using metal objects that are not covered with paint.
You cannot hold it with your hand: if there is a spark, it can give you an electric shock, and the discharge reaches 40,000 volts, which the coil creates. The functionality of the spark plug is checked in this simple way: you need to attach the spark plug to the metal body of the engine and turn the starter - If the spark plug does not produce a spark, it must be replaced with a new one; You can also check it using a special device that can be bought at a car store. It is inexpensive, it is a faster and safer way.
- If the spark plug is working, but there is still no spark, you will have to use a multimeter, with which you can check the wiring of the scooter, find a break or a faulty element.
- You also need to check the generator. It is an important element without which the scooter will not work. You will need to measure the resistance: to do this, you need to disconnect the ignition coil from the wiring, then measure the resistance between ground and the generator. This is usually a black wire with a red stripe. If the resistance is normal, it will be about 80-150 Ohms. If the device malfunctions, the resistance will be significantly less or absent altogether.
- After this, you need to measure the resistance that the coil produces. To do this, a multimeter is connected to its terminals. One of the terminals is connected to the magnetic circuit. If there is no resistance, a coil malfunction is diagnosed. If it is there, but weak, it is worth checking the wiring or the place where the coil connects to it.
- If everything is in order, but there is still no spark, you will need to check the wiring: to do this, you need to select two points to which the multimeter will be connected. One of the points should be the switch or ignition coil, the second should be the generator block. The wires may either be broken or there may be a short circuit between them. If the circuit is fully operational, check the ignition unit. It rarely fails, so it is dealt with last, when more likely causes of failure have been excluded.
Broken ignition is the cause of engine failure
An incorrectly configured or faulty ignition often causes engine failure. It would be wrong to immediately climb into the cylinder and examine the insides of the scooter, especially since this will not solve the problem. Before touching the ignition system, you need to check for other reasons why the scooter may not work.
- The simplest thing is the lack of gasoline in the tank. Quite often, owners forget to refuel their vehicle, and such a trivial reason can be overlooked.
- The carburetor may be clogged, which prevents the formation of a mixture suitable for driving.
- The carburetor needs to be cleaned regularly, so it doesn't hurt to check whether fuel is flowing from it into the cylinder. It is possible that the fuel pipe is clogged. The jets and other parts of the device may become clogged with debris, which causes little fuel to flow or, conversely, the engine does not have enough air, and therefore it does not start.
- The scooter may also refuse to start if the fault is caused by spark plugs.
They may be wet or not produce a normal spark. It is advisable to have a spare set and check with it. In any case, the spark plug needs to be unscrewed and inspected. This way you can visually determine the condition of the spark plug on the scooter. - If, after checking all the components, you are convinced that they are in order, you can check the ignition system in the manner indicated above and proceed to setting it up if everything is in order with the technical part.
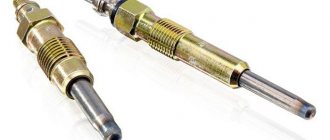
Faulty spark plug
This is the simplest reason why there is no spark at the electrodes. Such a nuisance often happens due to the quality of the fuel, as well as due to the presence of various harmful impurities in domestic gasoline. Because of this, many owners of Chinese equipment lost spark on their 4T (4 stroke) scooters. How to check its availability?
To make sure that the spark plug has failed, you need to install a new or exactly serviceable part in its place. But there are times when a new one is not available and there is nowhere to purchase it. Then a nail or a piece of wire will help. It is necessary to select devices whose diameter will be sufficient so that the wire or nail does not fall out of the cap. The element must be inserted into the spark plug cap, and then it is brought to the engine housing. The approximate distance from the nail to the crankcase should be 7 millimeters.
Next, the starter turns the crankshaft. If the scooter's electrical wiring is completely intact, a white spark will appear between the nail and the metal body of the motor. This means that the ignition system is operating normally, and it is worth replacing the spark plug. You can try to clean it of carbon deposits. This way it will work again. But most beginners do it wrong. After such cleanings, if the spark returns, it is for a very short period of time.
Hall sensor on a scooter
The Hall sensor is widely used in the automotive industry to measure the angle of the camshaft and crankshaft.
It notifies the driver about the moment of spark formation. This sensor is based on the Hall effect or Hall voltage, which consists in the fact that when a conductor with direct current moves into a magnetic field, it generates a transverse potential difference.
This electromagnetic phenomenon is named after the Baltimore scientist Edwin Hall who discovered it in 1879. Hall discovered the emergence of a transverse potential difference on thin gold plates, but the application of his discovery in practice became possible only 75 years later, during the era of active development of the production of semiconductor films. The Hall effect found its application in the sensor of the same name, used in cars and scooters to capture the potential difference on the sides of the plate, that is, as a magnetic field meter.
Nowadays, there are two main types of Hall sensors:
- Digital, detecting the presence of an electromagnetic field.
- Analogue, converting field induction into voltage.
Pros and cons of the Hall sensor
Advantages:
- Miniature;
- Does not cause a shift in the measurement torque when measuring engine speed;
- It has a constant value.
Along with advantages, there are also objective disadvantages. The Hall sensor contains a microcircuit and therefore can be sensitive to electromagnetic field interference.
Additionally, if you purchase a sensor hand-held or online, there is a high chance that the device will be inaccurate.
What does a Hall sensor do in a scooter?
Measuring the magnetic field strength is necessary in various motors. Typically, a Hall sensor is used when working with the ignition system in a car or scooter. The advantage of using this particular device is its non-contact effect. It can be applied to liquid level meters, current measurement, motor control, and magnetic code reading. The Hall sensor has completely replaced reed switches, which mechanically close and open the electrical circuit when the magnetic field strength changes properly;
In a scooter, the Hall sensor may be an element of the engine ignition sensor. Sometimes it serves to monitor the load current and shut down in case of excessive current supply, since the device can break down if it experiences sudden voltage surges. Due to the absence of contacts and the possibility of contamination, the Hall sensor is ideal for scooters.
How to replace the sensor?
A malfunction of the Hall sensor in a scooter is diagnosed using a tester. During normal operation of the sensor, the indicator should be above about.4 V.
If your meter is faulty, it must be replaced. This is done as follows:
Remove the distributor by freeing it from the cover. Note the position of the slider before replacing. There is a pin inside that needs to be removed. Also remove coupling 22 (oil deflector) and washer. Remove the screws of the Hall sensor and its mounting
Carefully remove the device. Make the necessary repairs or install a new sensor by performing all the steps in reverse order.
motoaria.ru
Cleaning the elements correctly
Every owner of motorcycle and automobile equipment should know how to properly clean spark plugs from carbon deposits. Most beginners try to restore parts themselves and then wonder why they don't work.
The main mistake is that the spark escapes to the spark plug body along the soot - it is not a conductor of electricity. The engine cannot be started. Plaque forms not only on the electrodes, but also on the ceramic insulator. Therefore, it is necessary to clean not only the side and central electrodes, but also the insulator.
A better effect can be achieved if you use it. If this is not available, you can try cleaning simply with sand. To do this, you should purchase an electric drill and sand in a bucket. Next, take the candle and clamp it in the drill chuck by the thread on the top. Large threads are wrapped with tape. The part is then lowered into the bucket and the tool is started. After some time, the electrodes and insulator will be cleaned. If the spark is lost due to this reason, the scooter will work properly again.
Check by appearance
A serviceable part must be clean. Only slight soot on it is allowed. However, if the electrodes are melted or black, then the spark will not occur. Spark plugs deteriorate if the fuel mixture is too rich. If the insulator is white, but there are small black spots on it and signs of erosion on the electrode, this indicates overheating. This is also evidenced by melted electrodes and insulator in bubbles. If there are oil deposits on the part, it can be considered faulty and it is better to replace it with a new one. This simple DIY scooter repair will help you use this vehicle again.
Breaks in the spark plug cap
This reason can also be considered simple. If there is no spark on the scooter, you should remove the cap and then check its resistance level. After disconnecting the cap from the wire, take measurements. The multimeter probe is inserted into the spark plug hole. The other is attached to the pin that the wires go to. If the cap is working properly, the multimeter will show about 5 kOhm. On most modern scooters, the spark plug cap is made one-piece.
All these parts are filled with rubber or compound. Therefore, you can test the cap, wire and ignition coil as a whole. One of the probes of the device is inserted into the spark plug hole on the cap. The second is connected to the ignition coil. This is how the resistance on the primary and secondary windings and the high-voltage wire itself are revealed. The reading on the primary winding should be between 0.1 ohm and 0.4 ohm.
Secondary resistance ranges from 6.35 ohms to 9.7 ohms on most scooters. Sometimes a high-voltage wire becomes unusable. To replace it, you need a cable with a metal core. A car part with carbon filler is not suitable for this procedure.
Checking the high voltage circuit
Malfunctions of the high-voltage circuit, often leading to complete or partial (interruption) failure of the ignition system, are mainly associated with damage, contamination or breakdown of the spark plug cap housing or breakdown of the insulation of the high-voltage wire.
As I already said: the current generated by the secondary winding of the ignition coil is very high and there are frequent cases when the current supplied to the spark plug makes its way around through cracks in the cap body or a layer of dirt, dust, or cracks in the insulation of a high-voltage wire. Which leads to complete failure of the ignition system. These malfunctions occur very, very often and in most cases lead to complete or partial (interruption) failure of the ignition system.
In order to check the high-voltage circuit, do the following: Unscrew the cap from the high-voltage wire; insert a thin nail or piece of wire into it; bring the nail to the metal motor housing at a distance of 2-3mm (This is important! The distance between the end of the wire and the motor housing must be 2-3mm, otherwise you will screw the switch) and turn the motor
- If a spark appears, it means the cap is broken - replace it with a new one.
- If there is still no spark, the high-voltage wire may be broken or damaged.
We check the high-voltage wire using a similar principle: Unscrew it from the coil and screw in any other piece of insulated wire instead (the wire must be insulated! Otherwise it will screw you up so hard it won’t seem like much!) wire, bring it to the engine housing at a distance of 2-3mm and turn the engine .
- If a spark appears, it means the insulation is broken or the central core of the high-voltage wire is broken - replace it with a new one
- If there is no spark, then by the elimination method the ignition coil is faulty - replace it with a new one
Breaks in electrical wiring
This happens very often, especially on Chinese-made scooters. Here, wire breaks in the ignition system are possible.
The reason may also be oxidized contacts and terminals. Do-it-yourself scooter repair, in this case, consists of checking the integrity of all wires in the ignition system. Also pay attention to the terminals. If the contacts are oxidized or do not hold tightly, then they should be cleaned and tightened. It would be a good idea to check the wire that comes from the switch. You need to make sure the connection is secure and the terminal is clean.
Failure of ignition system components
This is not a common reason. But if the spark on the scooter disappears and there are no visible reasons, then it is necessary to test the switch, coil, and generator winding. You can check all these devices with the same multimeter. To make sure that the winding and pulse sensor are working properly, you need to connect one tester probe to the wire from the sensor, and the second to the engine crankcase.
A normally operating pulse sensor has a resistance of about 500 ohms. The generator winding resistance is two to three times less. If the multimeter shows infinity, then one of the components has failed. It should be replaced with a new one. If the value is less than 150-200 ohms, then the problem is in the supply coil, and therefore the spark is lost on the scooter. What to do in this situation? Buy a new generator. Such a device can be repaired, but if there is no time, it is better to simply replace it. Fortunately, the cost of the generator is low.
Pinout
If you have a 4T motor installed on your scooter, the pinout of the switch will depend on what type the scooter requires. For DC it will be as follows:
The leftmost terminal on top should connect to the generator sensor. Ground is connected to the terminal located under it.
You can tie the negative wire, for example, to the body of a moped; it is important that the part is metal. The upper terminal, located in the center, is connected to the wire leading to the ignition coil drive. The one located under it is also connected to the negative wire (ground). The wire from the ignition switch is connected to the upper rightmost terminal, which is needed to turn off the engine. The power wire is connected to the terminal located under it; it also comes from the ignition switch. If you have an AC type, the location of the terminals is the same, but they are connected differently:
If you have an AC type, the location of the terminals is the same, but they are connected differently:
- We move from left to right, first the top row, then the bottom.
- Here the wire from the generator sensor goes, as in the previous version.
- Next comes the ignition coil wire.
- And at the end there is a “silencer” for the ignition switch.
Bottom row:
- The first two terminals are the negative wire, “ground”.
- To the last remaining terminal we connect the power wire from the high-voltage winding of the generator. This point is the main difference when connecting an AC switch from a DC one.
Scooter Honda Dio AF 18 27
The Honda Dio AF 18 has a slightly different switch, made in Japan, which is why the pinout of the scooter is a little unique, and the mounts on the switch are different. It is connected as follows: from left to right, first the upper, then the lower terminals. Location:
- Hall Sensor.
- Ignition coil.
- Weight.
- Ignition lock.
- Power wire from a high voltage coil.
Yamaha Jog Scooter
Several types of generator can be installed on this type of motor vehicle. The most common option has 5 contacts, with wires already coming out of it. Therefore, if you have original wiring, you need to connect as follows:
- Orange should lead to the ignition coil and alternator.
- Black - to the ignition switch.
- Purple – Hall sensor.
- The remaining two wires are connected to the ignition coil.
Chinese scooters
Typically, such vehicles have standard switches, which were described above. The connection diagram depends on whether the AC or DC device is installed on your vehicle. It is worth remembering that different types of switches are not interchangeable.
Switch
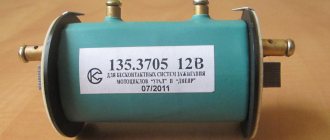
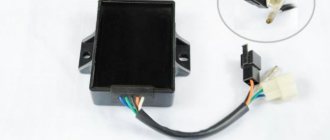
Even a beginner will find its location. This is a plastic box with different colored wires attached to it. The switch is necessary to control the operation of the ignition system. Both the switch and the ignition coil are made non-separable. If the element fails, then the problems can only be solved by replacement. The price of these parts is low - up to 500 rubles. Some service stations have special instruments that allow you to test the switch. However, in order to avoid searching for the appropriate services for a long time, the easiest way is to purchase a new switch. In the process of searching for the reason for the failure of the switch, you do not need to listen to “experts” who claim that the failure occurred due to driving without a battery. This is an unreliable opinion. The fact is that in modern scooters the power supply system and the ignition system do not depend on each other in any way.
Difference between stand and second scooter
Let's say you wondered how to check the switch on a 2T scooter. You have read this article and realized that simply using a tester will not give you the results you need. Therefore, you are faced with the question of whether to get a stand, or try to find another scooter to check. Many people are inclined to the second option, as it looks much simpler and more convenient. However, you should still consider the former, as it has several significant advantages. One of the biggest is the depth of testing: if with a second scooter you can simply test the functionality of the switch and some details of its operation, then on the bench you will have the full range of possibilities. Everything will be before your eyes, you will be able to use the tester on any element, set the number of revolutions you need in order to test at various load levels, and so on. You can even check the compatibility of switches with ignition coils, as well as come up with any checks and tests that your imagination allows you to do.
In general, you will have a complete flight of fancy. You will get the answer to not only how to check if the switch is working on a scooter. You will be able to get an answer to any question that concerns your vehicle. However, it’s worth saying right away that if you just decide to buy a scooter for a couple of years and then switch to a motorcycle or car, then you shouldn’t waste time and money. The stand is more suitable for those people who are confident that they will ride a scooter for many years.
Spark plug gap
Spark plug gap is an important factor for proper engine operation. This parameter plays an important role in the process of spark formation, ignition of the fuel mixture, and efficient operation of the scooter throughout the entire speed range. The gap should be specified in the documentation for the specific scooter - this parameter may vary among manufacturers. Generally speaking, for most modern four-stroke Chinese and Japanese mopeds, the gap on the spark plugs is from 0.5 to 0.8 millimeters. It is necessary to monitor this parameter. For this reason, the spark may disappear. She leaves because the gap is too big.
How not to break the ignition
Someday you will have to cook something on a scooter.
But before using welding, you need to disconnect the switch and voltage stabilizer. Otherwise, these elements will simply burn out.
Scooter ignition system
It works on the principle of igniting the fuel-air mixture, which is supplied to the cylinder by a carburetor. The mixture is ignited by a spark plug, which is supplied with the necessary voltage, but up to this point the current goes through several stages of transformation, from the moment it occurs until the spark on the spark plug, which is equal to a power of several thousand volts.
The mixture should be ignited only at the right moment, until the period when the piston is at top dead center. It is in this position that the maximum pressure of the burning mixture on the piston will occur at that very moment of the power stroke. This allows the engine to operate as efficiently as possible. The efficiency of a scooter greatly depends on this factor.
The current set by the switch with several thousand volts at the right moment tends from the ignition coil to the spark plug along a high-voltage wire. The spark plug produces a spark through an insulated center electrode to a grounded side electrode. The spark must be strong enough to ignite the mixture with maximum effect. It is for this purpose that spark plugs are divided into varieties based on engine type. All scooter manufacturers must indicate in the instructions exactly the brand of spark plug that will best suit the operation of a particular scooter model.
Candles are divided into hot and cold. Taking into account the temperature conditions of the engine, the manufacturer recommends a certain marking of spark plugs. A plug that is too cold tends to become covered in carbon deposits too quickly, which affects the normal operation of the engine and makes it difficult to start. A plug that is too hot can cause the air/fuel mixture to ignite prematurely. In this regard, the power of the scooter’s engine may drop, and sometimes this even threatens to cause the motor to fail, for example when a piston burns out.
How is BSZ better than contact?
Having carefully read the previous section, you can see that the system uses an inductive non-contact Hall sensor. The advantage is obvious - there is no friction and commutation
For comparison, look at the contact system. In it, the breaker switches the voltage, the value of which is 12 Volts
Whatever one may say, the metal contacts are constantly in contact with each other, gradually wear out, and become covered with soot.
For these reasons, it is necessary to constantly monitor the breaker, adjust the gap, and carry out timely replacement. BSZ is devoid of these shortcomings, therefore, without third-party intervention, the system operates much longer. The Hall sensor fails very rarely, just like the switch
This increases the reliability of the system, but precautions must also be taken, in particular, the connection of the switch to the body must be as tight as possible to ensure effective heat exchange. In addition, BSZ allows you to improve engine performance, increase, albeit slightly, its power, along with increasing reliability