Switch for moped
Moped owners will be very interested in learning how to properly install the switch on your moped.
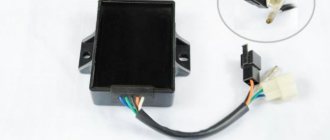
Switch
- this is a device that is responsible for supplying high voltage pulses to the spark plug. This device works in tandem with an ignition coil.
First, let's look at what types of moped switches there are. There are not many of them, only three:
- Switch with built-in high voltage generator (DC CDI)
- A switch that needs a high voltage source (AC CDI)
- Coil-commutator
Let's look at each briefly.
Checking the presence of a spark and the condition of the spark plug.
This is the simplest check that every moped owner can carry out, having only a spark plug wrench or a spare spark plug on hand. Moreover, if you unscrew the spark plug from the engine, you can at the same time assess its condition and understand by the color of the carbon deposits how correct the working mixture is being prepared by the carburetor.
So, if you unscrew the spark plug from the engine, pay attention to the carbon deposits that cover the central electrode. Soot should be brown or light brown in color
If the carbon deposits are black, this indicates that the mixture is too rich, or the spark plug is faulty, or the engine is “eating” oil. Perhaps this is the reason for poor engine performance.
Also pay attention to the presence of liquid on the candle. If the spark plug is “wet”, that is, there is gasoline on the spark plug, it means that gasoline still enters the combustion chamber, but does not ignite
There are at least three reasons why a spark plug may be wet:
- trying to start the engine with the ignition turned off - if you turn the engine with the kick starter for a long time, the spark plug will simply flood with fuel and it will not be able to work normally. To solve the problem, the candle needs to be dried, for example, heated with a lighter.
- The spark plug is faulty - if the spark plug insulation is broken or the gap is broken, the spark plug will not work normally. Only replacing the spark plug with a known good one will help here.
- ignition system faulty
Now we put the tip on the spark plug and press it to a metal surface, for example, to the engine head, turn on the ignition and turn the engine with the kickstarter. It is more convenient to check the spark together, so that one person holds the spark plug and the other turns the engine. But in principle, one person can handle it. Be careful - there is high voltage at the center electrode of the spark plug.
This is interesting: Solid oil will help prevent the rapid burnout of a light bulb in a headlight
If there is no spark, then the ignition system is at fault. Check all wires for breaks or shorts to ground. All electrical wiring connectors must be connected. If possible, replace the ignition coil with a known good one. Check if the generator coils are damaged. If you can’t figure out the wiring, contact someone who knows how to do it.
If there is a spark, then most likely the problem is in the power system. Screw the candle into place and continue.
DC switch
Due to its ease of connection, this is one of the most common moped switches. The most basic model has only 4 contacts:
- Ignition coil
- Hall Sensor
- Plus(12V);
- Minus
Switches of this type exist in various modifications:
- with max. limiter rpm
- without limiter
- with additional contacts
- with changing ignition timing
AC switch
This type of moped switch works great without 12V DC. Despite its simpler design, it has a slightly more complicated connection to the moped's electrical circuit. This type of switch, due to its small size, exists without a max. limiter. rpm, and can also work in conditions under which the DC switch is inoperable. That is, by removing the battery, the ignition switch, and the relay-regulator, the moped with the AC switch will start and drive.
Alfa moped switch
In this part of the article, we will look at the pinout feature of the switch for the Alpha moped (and, to boot, the Delta), and also find out the purpose of each wire. All information is presented in the diagram below.
It is noteworthy that the same switches can be installed on mopeds of various brands of Chinese production, since there are a lot of Alpha clones.
As we can see, the pinout of this switch is very simple.
Pinout
- Black and yellow wire 1
goes to the ignition coil. - Black-red wire 2
is responsible for power. - Contact 3
is missing in principle. - Black and white wire 4
is responsible for turning off the engine and goes to the ignition switch. - Blue-white pin 5
goes to the Hall sensor. - The last, green pin 6
is ground.
Scooter switch pinout
The scooter switch pinout is a diagram of its connection to the scooter's electrical circuit. There are several types of devices: for example, in Chinese models a DC or AC type switch can be used. They differ from each other not only visually, but also in the principle of energy accumulation for further creation of a spark. DC takes energy directly from the battery, while AC is tied to the generator coil.
Weight check
If there is any suspicion of a malfunction of any scooter ignition module, the ground is first checked. Although, mass in two-wire wiring is a relative concept, but for now let’s call it that.
We take the tester, switch it to the “continuity” mode (diode icon or sound signal icon), look for green wires on the switch - this is something other than ground (in Feng Shui - negative wire), touch the metal part of the engine with any probe of the tester, with another poke the probe into the green wires:
- If there is mass, the tester will beep
- If the mass is bad, numbers will appear on the tester display
- If there is no mass, the tester will be silent, and the screen will show only zeros
Depending on what the tester shows you, fix the problem or continue testing:
- If the ground is bad, look for a break or oxidation in the wiring
- If there is no ground, look for an open circuit or connect it directly from the engine
- If there is mass, but there is no spark, we continue checking
An example of a good mass: the tester beeps in the “dialing” mode, the display shows solid zeros
Pinout
If you have a 4T motor installed on your scooter, the pinout of the switch will depend on what type the scooter requires. For DC it will be as follows:
- The leftmost terminal on top should connect to the generator sensor.
- Ground is connected to the terminal located under it. You can tie the negative wire, for example, to the body of a moped; it is important that the part is metal.
- The upper terminal, located in the center, is connected to the wire leading to the ignition coil drive.
- The one located under it is also connected to the negative wire (ground).
- The wire from the ignition switch is connected to the upper rightmost terminal, which is needed to turn off the engine.
- The power wire is connected to the terminal located under it; it also comes from the ignition switch.
If you have an AC type, the location of the terminals is the same, but they are connected differently:
- We move from left to right, first the top row, then the bottom.
- Here the wire from the generator sensor goes, as in the previous version.
- Next comes the ignition coil wire.
- And at the end there is a “silencer” for the ignition switch.
- The first two terminals are the negative wire, “ground”.
- To the last remaining terminal we connect the power wire from the high-voltage winding of the generator. This point is the main difference when connecting an AC switch from a DC one.
Scooter Honda Dio AF 18 27
The Honda Dio AF 18 has a slightly different switch, made in Japan, which is why the pinout of the scooter is a little unique, and the mounts on the switch are different. It is connected as follows: from left to right, first the upper, then the lower terminals. Location:
- Hall Sensor.
- Ignition coil.
- Weight.
- Ignition lock.
- Power wire from a high voltage coil.
Yamaha Jog Scooter
Several types of generator can be installed on this type of motor vehicle. The most common option has 5 contacts, with wires already coming out of it. Therefore, if you have original wiring, you need to connect as follows:
- Orange should lead to the ignition coil and alternator.
- Black - to the ignition switch.
- Purple – Hall sensor.
- The remaining two wires are connected to the ignition coil.
Features of the work
Before starting assembly, it would be a good idea to take a smartphone or digital camera with you to familiarize yourself with the correct pinout diagram. You can also go to specialized Internet resources and find official images showing the connection diagram of the electronic filling. Don't forget to take a full set of electrical tools that may be needed to complete the replacement.
Having found the switch, you need to clarify its type. To do this, just connect the multimeter to the power cable, turn on the ignition and look at the display readings. We will have a DC type only if power appears.
It also happens that food does not appear. In this case, you need to select the AC test mode, selecting a range of 200 volts. Crank the power unit using the starter. In the case of AC type switches, power will appear immediately.
Why is it important to determine the switch type?
Some owners of scooters (in particular, those from Yamaha) often face the problem of correct identification. There are practically no official manuals, so owners have to work blindly and trust in luck. Buying a switch that is not designed to be used on a scooter can have serious consequences. The first of these is the immediate failure of the part being replaced. There is no difference in what kind of switches are installed - DC on a scooter that only supports AC, and vice versa. The electronic filling will burn out instantly. In some cases, there was a failure of a number of other related electronic elements - light bulbs, mini-radio tape recorders, alarms, and so on. Without knowing which switch is installed on the scooter, owners are guaranteed to lose good money.
Before connecting a new switch to a scooter, it would be a good idea to first read the official manuals. In some cases, manufacturers provide information about installed switches on four-stroke scooters.
You can make the connection according to a special scheme, or you can do the work yourself, having previously photographed all the connector connection points. Attentiveness and slowness are the main factors determining the success of the work performed.
DC CDI switch
One of the most famous switches due to the ease of connection. The most common one has only 4 contacts for the following wires:
Despite its simplicity, there are many switches of this type. It is available with and without a maximum speed limiter, with variable ignition timing, and with additional contacts for a wide variety of needs. In particular, you can “hook” a side stand to some switches, so that when opened, the engine will not spin up to the speed at which the clutch engages. This is done in order to insure the driver against dangerous rash actions.
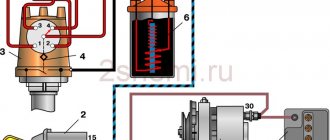
Ignition circuit elements.
One of the most important electrical circuits in a scooter is the ignition circuit. It includes a CDI ignition module (1), an ignition coil (2), a spark plug (3).
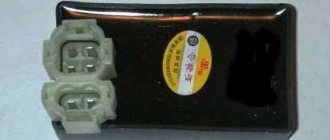
CDI ignition module.
The CDI ignition module (1) is made in the form of a small box filled with compound. This makes it difficult to disassemble the CDI unit if it malfunctions. Although the modular design of this unit simplifies the process of replacing it.
There are 5 wires connected to the CDI module. The CDI module itself is located in the bottom of the scooter body near the battery compartment and is secured to the frame with a rubber clamp. Access to the CDI block is made difficult by the fact that it is located in the bottom part and is covered with decorative plastic, which has to be completely removed.
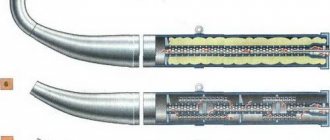
Ignition coil.
Ignition coil (2). The ignition coil itself is located on the right side of the scooter and is mounted on the frame. It is a kind of plastic barrel with two connectors for connection and a high-voltage wire output that goes to the spark plug.
Structurally, the ignition coil is located next to the start relay. To protect against dust, dirt and accidental short circuits, the coil is covered with a rubber cover.
Spark plug.
The ignition coil is connected to the A7TC spark plug (3) using a high-voltage wire.
The spark plug turned out to be cleverly hidden on the scooter, and it can take quite a long time to find it the first time. But if we “walk” along the high-voltage wire from the ignition coil, the wire will lead us straight to the spark plug cap.
The cap is removed from the candle with a little effort. It is fixed to the spark plug contact with an elastic metal latch.
It is worth noting that the high-voltage wire is connected to the cap without soldering. The insulated stranded wire is simply screwed onto the screw contact built into the cap. Therefore, you should not pull the wire too hard, otherwise you can pull the wire out of the cap. This can be easily fixed, but the wire will have to be shortened by 0.5 - 1 cm.
It's not so easy to get to the spark plug itself. To dismantle it, a socket wrench is required. With its help, the candle is simply unscrewed from its seat.
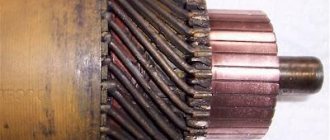
Starter (8). The starter is used to start the engine. It is located in the middle part of the scooter next to the engine. It's not easy to get to.
Stock switch for scooter
A stock or original switch is the one that is installed on the vehicle from the factory. Its main advantage over others is that it is already designed for the equipment with which it operates; it is often equipped with a limiter so that the engine does not develop speeds that are dangerous to the life and life of the main bearings, the entire crank mechanism, cylinder-piston groups and other structures and assemblies. The stock commutator is the main source of a well thought out engine's longevity, efficiency and durability. Those who take the risk of replacing a factory switch with a sports (tuning) one are risking a lot. Those who do not fully understand what they intend to do risk even more. Inept installation of such parts and their subsequent use with a conventional engine often lead to a decrease in service life and the death of the engine, sometimes on the same day.