The scooter is a fairly common vehicle today; it does not require a lot of fuel, but at the same time it does not provide the incredible speeds that its two-wheeled motorcycle brothers can boast. This is a rather specific type of transport that not everyone will choose for themselves. But all the people who like scooters are always excited about riding them, they have a lot of fun and also find them extremely practical. But at the same time, not a single vehicle is insured against breakdowns, including a scooter.
Malfunctions can be very diverse, but in this article we will talk about electronics, and more precisely, about how to check the switch on a scooter. Naturally, if you have no idea what we are talking about, then you should not immediately take up the tools. It is better for you to calmly and carefully study exactly how the electronics in a scooter work, how checking the switch on a car and on a moped differs, and also what exactly you can do to check the electronics for damage and repair your vehicle. In general, before considering the question of how to check the switch on a scooter, you should understand what it actually is.
Two stroke and four stroke scooter
A scooter, as you know, can be with a two-stroke or a four-stroke engine. The operating principle of the entire exhaust system differs radically among analogues.
The muffler on a four-stroke scooter removes gases in a relatively shorter time, doing this with minimal noise. In addition, tuning the muffler in this case will be quite simple. On the other hand, in both cases, when carrying out tuning, it will be necessary to change the pipes.
Types of mufflers for scooters
For the muffler of a two-stroke scooter, selecting components that make it possible to carry out tuning will be much more difficult. The standard muffler itself for such scooters is more difficult to manufacture and configure.
The exhaust system of a two-stroke scooter works as follows. During the process of cleaning exhaust gases, part of the power is returned to the engine. This happens at certain speeds and if you manage to implement this whole process by tuning, the scooter will be unrecognizable.
You can install a high-quality and correctly tuned resonator on a two-stroke scooter. This will give a noticeable increase in dynamics up to a quarter. But in this case, it will be important to carry out professional settings of the entire power system.
Malfunction
What prompted you to study the article on how to test the switch on a 4T scooter or any other common model? Most likely, your vehicle has stopped starting, but you don't know what exactly the problem might be. Perhaps the ignition is acting up, perhaps the engine is stalling. All this may or may not have a cause in the switch - this is the main problem of repair. You need to determine where exactly the problem is in order to fix it.
If your switch does not work or does not function well, then the low voltage pulse will not be transmitted to the ignition coil - accordingly, ignition will not occur. But the problem could be in the generator, the coil, or even the spark plug, so you need to know exactly how to check these elements. This material focuses specifically on the switch, so attention will be paid mainly to how to check the switch on a 4T scooter and other popular models.
Why do you need quality mufflers?
As you know, a certain amount of fuel combustion products accumulates in the cylinders of a moped engine. They must be thrown out and in this case it is the muffler that is responsible for this. In other words, this unit seems to smooth out the pulsations that are inevitable when combustion products are released at high speed.
The very design of the muffler, used not only on scooters and mopeds, but also on motorcycles and cars, implies a special exhaust system, which can be different, depending on what result the vehicle owner wants to achieve. For example, if the desire to improve the gas exhaust system is related to increasing the power of the scooter, a special type of muffler is required - a direct-flow muffler.
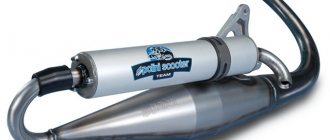
Direct flow type muffler
Direct-flow muffler device for moped
Installing this type of muffler will not only increase dynamic power, but will also significantly increase the noise emitted when gases escape. On the one hand, this is good, because this way you can attract the attention of other drivers, thereby increasing passive safety. As you know, drivers of large cars often complain that they do not notice motorcyclists, and mopeds and scooters even more so.
Making such a muffler from scratch or using a method that involves tuning is not difficult, but many technical aspects need to be studied.
Features of a direct-flow muffler
The features of direct flow are as follows: exhaust gases are ejected outside the engine immediately, the cylinders of the power unit have time to fill with the fuel mixture in the optimal amount.
I would like to remind all readers that at the moments of intake and exhaust, engine valves tend to open and close. Between these stages, a vacuum occurs, which allows the cylinders to be cleared of exhaust gases. As a result, free space is freed up, where the fuel mixture is supplied. It is easy to guess that the faster the cylinders are released from exhaustion, the faster they will be filled.
Thus, if you can ensure a faster exit of gases from the system, the performance and, as a result, the power of the scooter or moped will increase.
Switch and circuit device
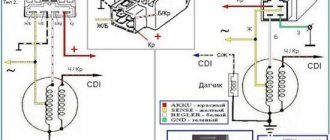
How to check the switch on a scooter if you don’t even know what it is and where to look for it? This is why you need to start small. The first thing you need to do is find out what a switch is. In fact, everything is quite simple, since a commutator is an element of the electrical ignition circuit in a vehicle that produces a low voltage pulse that is transmitted to the ignition coil. In isolation from the overall picture, the definition does not look very clear, so it is worth considering the structure of the entire circuit.
So, the main element here is the generator, which generates the operating voltage in order for the switch discussed in this article to work. As mentioned above, using the energy of the generator, the switch generates a pulse for the ignition coil, but not just a pulse - namely a low voltage one. The ignition coil, in turn, generates a high voltage pulse at a specific moment in time, which is transmitted to the spark plug. The spark plug is screwed into the cylinder head and, upon receiving a high-voltage pulse, ignites the combustible mixture, which powers the engine. Well, now you know how the electrical circuit works in a vehicle, which will allow you to better understand how to test the switch on a scooter.
Cleaning the muffler
The cleanliness of the muffler affects the power of the moped
Before you start changing anything in the exhaust system, I would like to give one piece of advice. The power of the scooter is directly affected by the cleanliness of the muffler. If it were possible to see the exhaust in a cross-section of the muffler, the owner of the scooter would be very surprised. After a certain mileage, the scooter's dynamics decrease, and owners begin to look for the reasons for this, finding them in a complete rework of the standard muffler or its replacement.
The reason for the loss of power, meanwhile, may be hidden in the condition of the engine itself. This will help determine the specialist you should contact before tuning. But the most common cause of loss of dynamics is soot that clogs the muffler. In this case, it is recommended to carry out cleaning in three ways.
First method: mechanical
It involves cleaning the muffler section (it is done with a grinder). The inside of the muffler is cleaned of soot using a wire or cable. The section in the section is closed by welding.
Second method: chemical
It involves pouring water with some kind of cleaner into the muffler. For example, caustic soda is suitable for this purpose. This cleaning has the advantage that the appearance of the muffler will not be affected in any way.
Third method: heat treatment
The muffler is heated either on the scooter with a blowtorch, or dismantled in an oven or on a grill. It will be necessary to repaint the muffler only after it has cooled.
Testing the switch with a tester
If you have a special testing device, that is, a tester, then you can use it on the switch, since in any case it can give certain results. You can use a simple voltmeter, or you can use a more universal multimeter, but in any case you need to remember that this part of the scooter has five terminals - to ground, to the sensor, to power, to the ignition coil and to shutdown. If you only have one switch and tester, then you can only check for zero voltage. When the tester needle does not move at one of the outputs, this means that there is no voltage in it.
However, the result of damage is not always a complete loss of voltage - sometimes it may happen that at one of the outputs it will be unstable, low, and so on. And you won’t be able to find out about this unless you have the same switch that has already been measured for comparison. As you understand, this is only a partial test, that is, you can use this method to figure out how to check the switch on a Yamaha scooter or on any other specific model. But if you want to conduct a full check, you will have to use more effective methods. How to check the faulty switch on a scooter with maximum accuracy? For this you will need another work scooter.
Muffler conversion
As a rule, many craftsmen not only assemble a muffler, but remake a standard one. This makes it possible to spend less time and get a more acceptable option.
Tools and materials
Before you start tuning, you need to prepare the necessary tools. In this case, the following components will be needed:
- Welding machine, preferably with different operating modes;
- Pipe of appropriate size and diameter;
- Bulgarian;
- Several metal brushes for washing dishes.
Let's start tuning
First we dismantle the muffler. Then we take a grinder and cut out a piece of metal on top of the muffler. With this cut it will be much easier to work with the muffler. You should almost completely cut out the top part. After this, it is necessary to clean the entire internal space of the muffler, dismantling the cut-away elements.
It's time to work with the piece of pipe that we have prepared. Using a powerful drill or welding, we make many holes in the pipe. We place the pipe in the section of the standard muffler. We select in advance a pipe of such a diameter that it fits inside the standard one. It is desirable that the pipe be without any obvious flaws and perfectly straight.
Straight-through muffler in the process of assembly
The space in the cut that remains between the two pipes must be filled with metal pipe cleaners or similar materials. We weld the top of the pipe as it was. We reinstall all structural elements that were dismantled during the process.
As a result of the tuning, we will get a forward flow muffler that provides the desired result. The massive and rich roar of the engine, as well as the increase in power of the moped, will be evidence that everything was successful.
Testing on another scooter
If you are wondering how to check the switch on a Honda-Dio scooter, then in this case you do not need another Honda-Dio to complete the procedure. We will talk about the interchangeability of switches on scooters a little later, but now you need to understand that you can get accurate readings if you have another scooter nearby. This method is the simplest and most common.
You need to disconnect the switches on both scooters, and then connect the element under test to the other scooter. If everything works perfectly, this will mean that there is nothing wrong with the switch, meaning the problem should be looked for in some other area. Naturally, this is additional work, but the fact remains that you learned how to check the serviceability of the switch on a scooter, you performed the test and got the result. If the problems remain, then you have found it - you will need to repair or replace the switch, but this will also be written about later.
At this point, it's time to move on to another very interesting method - imitation.
Making a direct-flow muffler from scratch
You can make such a muffler from scratch. This will be a completely new version made from several components. The difficulty of this operation, called tuning from scratch, lies in finding the diagram of the exhaust system of a particular moped.
Tools and materials
In this case, again, you need to prepare the necessary tools and materials.
- Purchase in a store or find two pipes with a diameter of 33 mm;
- Buy plexiglass;
- Bolts M8 and M3;
- Prepare glue and nails;
- Welding machine;
- Needles;
- Hacksaw for metal.
Let's start assembling
First of all, you need to cut 18 cm from one of the pipes. It is recommended to carefully process the place in the cut with a needle file. From the second pipe we cut a circle with a diameter of 1.5 cm. We process it using the method described above. Glue the cut out circle in the section of the first pipe. We cut off another piece of pipe, 18 cm long. We make many holes in it. This can also be done with a sharp nail.
We connect all the parts using a welding machine. We fill the cavity formed at the junction of two pieces of pipe with mineral wool. We wrap the finished product with a special fire-resistant material. The homemade muffler is ready. To install it, you will need to attach the element to the scooter body mount.
Making a muffler mounting element
From plexiglass, which is indispensable in this matter due to its strength and easy paintability, we cut out a special type of ring, the edges of which can be bent outward by 180 degrees. We attach the resulting circles with serifs to the moped using the required bolts. We polish the muffler using sandpaper. To be sure, the joints between the homemade product and the moped body will need to be lubricated.
Homemade muffler for moped disassembled
If homemade production causes certain difficulties, you can find a lot of models of mufflers already in finished form. They are usually inexpensive. On the other hand, only a homemade version can provide the ideally expected option.
Ignition circuit components
The ignition system is an important element in the operation of the entire scooter. The formation of a spark and a precisely calculated impulse that ignites the fuel depend on it.
The scooter ignition circuit includes many components that are responsible for a specific job.
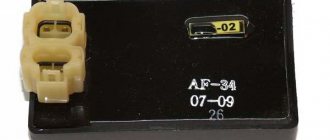
CDI ignition module
The first item in the list is the CDI module. This abbreviation stands for Capacitor Discharge Ignition - ignition from a capacitor discharge.
The switch module is made in a non-separable box, so if it fails, it is replaced with a new one. 5 wires are connected to it, distributed throughout the entire ignition circuit of the scooter.
The block is hidden inside the scooter, so getting to it is not easy. The plastic covers will have to be completely dismantled.
Ignition coil
The purpose of this component is a fast pulse of high voltage voltage based on a signal from the switch. It goes directly to the spark plug, where it is converted into a spark.
The coil is located on the right side of the Chinese scooter and is attached to its supporting structure. It is easy to recognize - it is made in the form of a plastic barrel. On the reverse side there is a thick wire connected. It is he who transfers the discharge according to the circuit from the transformer to the spark plug.
To protect against dirt and dust, the coil is placed in a rubber cover.
Spark plug
Its function is simple - to form a spark and ignite the mixture inside the cylinder. The scooter uses an A7TC spark plug.
Its position is hidden from view, but experienced owners know where to look for it. Having passed along the high-voltage wire, we reach the engine block and the spark plug cap.
The rubber seal protects the contact from accidental electrical breakdown. Remove with a little effort towards you. Do not pull the wire too hard - the cap may come off.
The spark plug is unscrewed with a socket wrench. After removal, you need to inspect the color of the contacts and their condition. An indicator of good engine performance is a brown tint without traces of soot. Deviation from the norm indicates a malfunction of the carburetor.
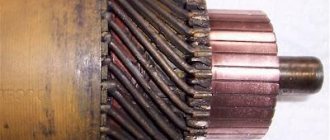
Starter
The device is used to make it easier to start a scooter engine, without using a kick pedal. The starter is located in the middle part of the moped, near the engine. To open it, you need to remove the decorative plastic.
The starter is connected through the starting relay, which is located on the scooter frame.
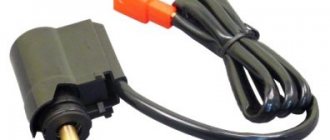
Fuel gauge and indicator
The sensor measures the amount of gasoline in the tank and signals the need to refuel. It is located in the tank itself and is connected by three wires.
The indicator is directly connected to the sensor. Both are powered by stabilized current from the rectifier. If problems are observed in the operation of the indicator, you should check the connection to the circuit.
Voltage is supplied only when the ignition switch is turned on.
Turns relay
The breaker is used to control the turn lights. When the button is closed, the relay produces current pulses with a frequency of 1 Hz.
The block is located under the instrument panel. To change the relay you need to remove the plastic protection.
Switching the circuit is not difficult. When turning right, voltage flows through the blue wire, which is responsible for the corresponding lamps. The left position of the switch shorts the gray bus to the orange one.
Duplicate lamps on the instrument panel are connected in parallel to the turns circuit lines. They signal that the lamps are on on a specific side of the scooter.
Resonant muffler: improving the efficiency of a two-stroke engine
A motorcycle muffler is a device that weakens the sound of the engine. Mufflers are needed not so much to reduce noise as to change the timbre. And high-frequency sounds have a more unpleasant effect on the human psyche and ear than low tones.
Many people associate the roar of sports motorcycles with a muffler. And they believe that filling the muffler can reduce the power of the car. But that's not true. When replacing or modifying a muffler, only a small amount of horsepower is lost.
There is an intake and exhaust silencer. And scientific research has proven that if you choose the right basic elements, you can improve the filling of the cylinder. Such mufflers are called resonant mufflers.
Noise suppression is carried out by the part of the muffler located behind the first partition, and it consists of an acoustic filter. These filters on sports motorcycles are made simpler, since a higher noise level is allowed in sports motorcycles.
When deciding to remake a muffler, you need to remember the following. Sometimes, when improving one part, you have to sacrifice the quality of another. No one has yet succeeded in creating a universal motorcycle.
Manufacturers recommend using factory mufflers for your motorcycle. The muffler cavity becomes covered with carbon deposits, which can close the acoustic filter channels. Therefore, the cavity of the device must be cleaned regularly. The resulting carbon deposits prevent the exhaust gases from escaping, and engine power is reduced. After every five to ten thousand kilometers, mufflers need to be cleaned.
The original mufflers are quite quiet and good. Their disadvantage can be considered their heavy weight and size. Many consider their high price to be a disadvantage. Silencers are produced by many companies, and you can use a non-original muffler if you wish. Most often these are open mufflers. In them, exhaust gases exit the engine without any obstacles. But they make a lot of noise.
Those who love the loud roar of motorcycles can buy the cheapest muffler, which does not muffle anything. But if the roar of the motorcycle does not suit you, then you will have to buy an expensive option.
These mufflers differ in design and material of manufacture. There are four types:
- Titanium. He is considered the best. It's light, looks nice, and doesn't get too hot.
- Aluminum. Light enough. It looks worse than titanium, but there is a drawback. You can get seriously burned.
- Carbon. Looks nice, light and cool. But its significant drawback is that even with vibrations it can crumble.
- Stainless steel. Strong and heavy, but very hot.
Each type of muffler has its own advantages and disadvantages. Therefore, you need to choose for yourself.
You can buy a direct-flow muffler in any specialized stores. They are usually of interest to young motorcyclists who dream of high speeds. But real bikers are not sold on stickers from famous brands. They do everything they need with their own hands.
If you want to enter the world for real men, you need to make a direct-flow muffler with your own hands. When riding at normal speed, its noise will not be different from other motorcycles. But as the speed increases, the characteristic rumble of the engine appears. What do I need to do?
- Take a piece of pipe that has a diameter of 60 mm and cut it in half. First, one part is processed and a flange is welded in the middle. The outer part does not change. This is the inlet pipe. In half of the pipe, which is located in the muffler, you need to drill a large number of holes using an electric drill. You need to use a 5-6 mm drill. Recess the flange with a ten-millimeter tip into a pipe with a diameter of 100 mm and weld it.
- We are preparing the second pipe. Weld a flange to the second section of pipe. It should be 80 mm from the edge. This part of the pipe will be inserted into the muffler.
- Carefully lay mineral wool insulation into a pipe with a diameter of 100 mm. This is to combat noise reduction. To do this, roll the cotton wool along the diameter of the pipe and push it to the opposite side.
- Roll up the mesh and lower it inside the insulation that was inserted into the pipe. The mesh should fit onto the pipe with holes.
- Now you need to insert the flange with the pipe, which you prepared in advance, into the pipe with the short end. It needs to be recessed to a depth of 10 mm and welded.
- You can cut off the fastening elements from the old muffler and transfer them to the direct-flow muffler by welding them.
Checking the ignition coil
Disconnect the battery and remove the beak on the scooter. We disconnect the connector on the switch and measure the resistance on the coil with a meter. We put one probe in the connector on the black wire, and the second on the negative (green wire). There should be 4 ohms - this means that the wiring and the primary winding of the coil are working properly.
We check the second winding of the coil. We take out the probe from the contact of the green wire and insert it into the candlestick instead of the candle. And we leave the other probe on the contact of the h/w wire. The resistance should be about 7.85 kOhm. This indicates that the second winding, the armored wire and the candlestick itself are in good working order.
Let me remind you that the armor wire and the candlestick separately from the coil have a resistance of 5 - 8 kOhm. Such resistance is needed to suppress radio interference from the spark discharge, so as not to interfere with others listening to the radio in the car or at home. If you make an armored wire and a candlestick without resistance and drive next to someone who is listening to the radio. Then the radio stops working normally and begins to crackle in time with the spark discharge on the scooter (moped).
And if the device shows a break (i.e. does not react at all), then remove and check the candlestick and armored wire separately. If they ring, it means a break has occurred in the ignition coil. It cannot be repaired, it is solid, you will have to replace it with a new one. It's inexpensive and you can always buy it without any problems.
Stage 2.
The most labor-intensive and dirty process is disassembling the muffler.
My scooter has a stamped, non-separable muffler, probably everyone has one. All the seams were welded, and I had a vague idea of what was inside. I knew that there were several partitions and tubes.
I decided that I would take it apart from the end. To cut the muffler, you can use a grinder. But I thought that the mark from the disk would be too wide, and it wouldn’t be possible to “cut” evenly anyway. Therefore, I took up the old-fashioned method - a hacksaw for metal.
To prevent the canvas from overheating too much, I lubricated it with machine oil - I always do this, although I don’t know if it’s right? I sawed the jar in a circle so as not to touch the central tube - 5 minutes and done!
I sawed it off, and what I see is a partition and tubes.
After poking around a little, I realized: nope, he won’t figure it out that easily.
Maybe try to disassemble from the other end? But there are ears for fastening. No problem, the grinder will help. By the way, don’t forget about glasses - they will protect your eyes from debris and flying sparks. I cut it down. Now I use a hacksaw again to cut the can in a circle. I sawed it, but something is still holding it - I need to saw off the central tube. The can is open on both sides, but it doesn’t want to open it.
After cleaning the muffler from dirt on the body, I notice three welding points - the fastening of the central partition. You'll have to drill it out.
First we drill with a thin drill with a diameter of 2-3mm, and then with a larger one. I needed 8 mm.
For further disassembly, you cannot do without a large hammer. I picked out and knocked out the back wall, then the middle partition, and took out the perforated mesh and fiberglass from the front. Well, there was dust there. I didn’t know, so I came home with a black face. My advice to you is to disassemble the muffler on the street, or even better, in a gauze bandage.
It took me about 2 hours to remove the insides, and with all the words I could remember the developer of this muffler. The worst part is over.
Buying a switch
Purchasing a switch is the easiest and fastest way out, since you do not waste time, effort, and the cost of this mechanism is not so high as to save much on it. This is really the most reasonable solution that you can come up with in a situation where your switch has burned out. However, again, it is very important that you check everything correctly, do not use only a tester, but carry out a full procedure for checking the switch so that you can say with certainty that this is the reason. Otherwise, you will just spend money on a new part, but your scooter will still not function.
Work process
Let's figure out how to make a forward flow on a motorcycle with your own hands? The workflow takes a little time. The main problem may arise if you use silencers from other companies. Their direct flows may not fit the fastenings, which is why you will have to tinker with the installation.
If you want to modify the system a little, you can throw away all the standard internals. Then you need to make or buy a pipe with thin walls. An excellent option would be a millimeter tube made of aluminum or steel. It must not contain defects. If there are dents, cracks, chips, then during the trip excess metallic noise will be created. The dimensions should not exceed standard ones, otherwise the exhaust of gases will be difficult. A homemade direct flow to a motorcycle should not violate the requirements for maintaining the bike.
There is a significant gap between the outer “can” and the new installed pipe. It must be filled to reduce noise. Materials like glass wool will work. During operation, it is important that the clogged material does not catch fire. To do this, the pipe is wrapped with asbestos. Its fire resistance will minimize the risk of fire. After filling with filler, the direct flow is installed on the motorcycle. After you finish the installation, start the motorcycle and listen to the new sound. It should have a slight bass response when working. However, even if you make a slight modification to your forward flow, few will be able to distinguish it. If you want to stand out, then there is another way to create a new exhaust pipe.
When creating a sonorous forward flow, it is necessary to understand the meaning of its work. In general terms, we can say that it is a system for controlling gases and liquids in a heat exchanger, in which the substances separated by the wall move in one direction. Thus, there are many different types of forward flow, aimed at both increasing power and changing the sound.
When creating a high-quality exhaust pipe, it is worth looking at several types of professional work and, based on them, creating your own idea. Having such working equipment as a welding machine and an angle grinder
Features of installing an alarm on a motto
Let's look at the process of installing an alarm system on a motto: the practical part is installing an alarm system - this is the most effective way to resist robbery.
However, if a couple of years ago, in rare cases, expensive parts were effectively sold in motorcycle parts stores, today Chinese versions of alarms have proven to be in demand. Of course, no alarm system can provide a 100% guarantee, but the chances for scooters will increase significantly. Installing an alarm system on a moto is not such a difficult process.
It is important to correctly identify the option, and it will be very easy to find the necessary model by visiting a motorcycle parts store
For a moto, you can choose an alarm system from Chinese manufacturers who are focused on the global market.
Now let’s move on to consider the process of installing an alarm on a motorcycle:
- First, we prepare the place for installation of the alarm system on the motto and provide the wiring.
For these purposes, we remove the plastic from the front, under which there are all the necessary contacts along with the connectors.
The remoteness of the battery in this option is not so important, so you don’t even need to look at it. We fasten the plastic with bolts - just unscrew them and it can be dismantled
In some cases, depending on the motorcycle model, the mount may be different. In this case, it is recommended to read the manual.
In terms of technical characteristics, the installation of an alarm system on both a Japanese-made motorcycle and a Chinese-made motorcycle is almost identical. Therefore, this article does not have any connection to specific models of motor vehicles.
Any of the alarm system kits with instructions that detail the areas in the wiring where it needs to be connected. First, we disconnect the ignition switch chip, since no one can be immune from errors, and when igniting it can ruin your life. Then you need to find the main motorcycle wiring, which is designed as a harness and is located mainly in a polyvinyl chloride pipe. In rare cases, but the main wiring is simply wrapped with insulating tape.
We get to each wiring and select blue, orange and yellow-red. Then we remove the insulation and expose the wiring. You can do it another way and, without damaging the insulating tape, connect the alarm system directly to the chip.
Now you can return to the ignition switch and you need to expose the area of the wire at a distance of approximately 5 centimeters from the chip. You can consider the preliminary work completed.
- We carry out wiring of the alarm system
First you will need to find an area where you can install the central unit. It is recommended to place it under the front plastic if you glue it to the inner area using the special tape that is included in the kit.
For a more durable fastening, we carefully wipe the plastic and then degrease it. When choosing a location, you immediately need to find out the length of the wiring, which is recommended to be cut off rather than hiding the entire mass under plastic. One tourniquet, which is recommended to be left long, is black. And for all others, after determining the length, it is recommended to cut it.
You should definitely leave a couple of centimeters for laying, and expose the ends of any wire by 2 centimeters.
- Connecting the alarm system
The red wire must be connected to the red ignition switch wire by winding one end to the other. We connect the orange wire to the black one in the same way. Then we connect back the ignition switch and alarm system.
https://youtube.com/watch?v=H7cwSYmjfmg
Alternative options
If you are interested in how to make a muffler quieter without losing precious horsepower, you can use a scheme that has been used in Chinese motorcycles for quite a long time. However, it is worth remembering that this option is only suitable for the production of mufflers for low-power motorcycles, whose performance does not exceed 40 hp. With. A pipe is inserted into the muffler body two-thirds of its length, the last 10 centimeters of which are covered with small holes according to the scheme described above. Having installed the inlet pipe, we are engaged in the outlet, which will be a pipe of a slightly larger diameter, inserted from the opposite side by two-thirds. It also remains to drill holes in 10 centimeters located closest to - such a muffler will represent a compromise between forward flow and the factory product.
If you know the structure of a motorcycle muffler, you can probably make a forward flow from an ordinary part. After opening the housing, you will see tubes that pass through special chambers, first to the end of the muffler, and then back and again to the exhaust pipe. These, as well as the motorcycle's catalytic converter, will need to be removed to achieve the desired effect. The perforated tube mentioned in the previous diagrams is inserted inside and wrapped with fiberglass. Of course, you can buy a special synthetic material used in the packing of original mufflers, but it will obviously cost more.
If you already know how to make a motorcycle muffler that fully meets your requirements, do not forget about fine-tuning the exhaust - for this you need to select the optimal diameter and position of the pipes, as well as the density of the holes. It is almost impossible to achieve an ideal result without using a special stand, so you will have to be content with approximate parameters obtained experimentally. In addition, after installing a different muffler, the motorcycle engine should be retuned. Modern injection engines will require the installation of new firmware, but carburetor motorcycles get by with a simple adjustment of the fuel system. Not everyone can do this kind of work, so it is quite possible that you will have to go to a specialized service center.
Disassembling the alpha moped engine: do-it-yourself repair
Any, even the most advanced motorcycle equipment needs careful handling and professional care. The engine is the heart of the Alfa moped. If handled incorrectly, the consequences can be unpredictable. In order to avoid the risk of irreversible damage to the moped, it is important to know how to independently disassemble and reassemble the engine of this model. Repairs are easy. This will require experience, as well as knowledge of some nuances.
Engine Features
The engine of the Chinese Alpha moped has characteristic features, thanks to which fans of motorcycle technology prefer this particular model.
Engine for Alpha moped
Engine capacity - 72 cc. With the right approach, it can be upgraded to 110 cc. Also, if desired, you can increase the speed by 10 kilometers.
The weak point of the engine is the gearbox, which requires close attention and a delicate approach. When repairing the “heart” of a moped, you need to know how to correctly disassemble and reassemble this part of the motorcycle “organism”.
Alpha is equipped with a powerful engine, the circuit of which is complex. If you can’t figure it out on your own, it is recommended to contact an experienced specialist. The price of repairs is quite affordable.
Causes of malfunction
The Chinese Alpha moped, whose price is affordable, does not cause owners many problems. Interruptions in a moped engine have several causes, and once you understand them, you can quickly fix the breakdown.
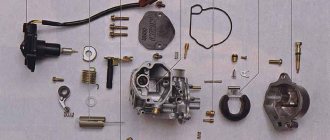
Disassembling the moped engine
So, if the engine starts with great difficulty, the muffler “shoots”, and smoke comes out of the chimney, it means that the moped is “capricious” due to problems with the carburetor. In order to solve this problem with the Alpha moped, you need to:
If the Alpha slowly picks up speed, and its engine is not able to develop the declared power, then the reason is the incorrect operation of the moped valves. It can also “get sick” due to gaps and incorrect timing. In order to make the Alpha moped function normally, it is necessary to replace the used valves with new ones.
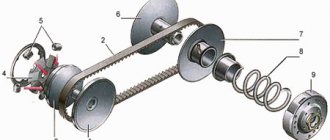
If the Alpha moped is not able to reach the required speed, despite the roar of the engine and solid revolutions, it is impossible to stop the spinning wheel, and gear shifting occurs intermittently, then the cause of the malfunction is clutch wear.
Moped clutch parts
To eliminate the breakdown, you must perform the following manipulations:
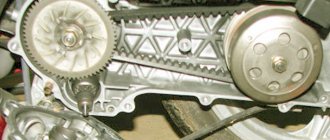
Another cause of moped engine malfunction may be wear on the drive sprockets. If they are very worn, they must be replaced with new ones.
You may encounter the problem of engine overheating. The situation can be corrected after adding oil. If oil leaks, you must immediately contact a professional service.
Alpha moped engine overheating
Engine disassembly
Disassembling the Alpha engine is quite simple. To do this you need:
After performing the necessary manipulations, you need to properly assemble the engine, installing all the parts in place.
A diagram can help you understand the nuances. Also, a lot of useful tips regarding repairing the most important “organ” of the Alpha moped are contained in the training video.
Gearbox disassembly
It is necessary to disassemble the gearbox in order to replace used parts. This is done after the following parts have been dismantled:
Gearbox disassembly
Repair of this part of the engine is carried out as follows:
Conclusion
In order to carry out independent engine repairs correctly, you need to familiarize yourself with the training videos. The engine diagram of this model will help you avoid confusing the location of the forks and gears. If there is no access to the diagram, then you need to mark them on a piece of paper.
The Alpha moped rarely needs repairs. If the owner is not confident in his abilities, then the repairs should be carried out by a professional. Otherwise, the price of the issue will be very high.
Video on the topic
Stage 4.
Search for components. The body will be from the old muffler, but the insides will be different. Center pipe: perforated mesh or pipe with a large number of holes. I settled on the mesh - the most budget-friendly and easiest option. I found a pipe of a suitable diameter, wrapped a mesh around it and weaved the wires together.
I used kaolin wool as fiberglass filling. I use it at work, and it has been verified that this cotton wool does not burn or melt at a temperature of 1300C°. In my opinion, you can use regular fiberglass insulation, but of course there are many options. The quality of the gasket will determine the sound of the exhaust. They also write that the sound depends on the length of the muffler and the diameter of the internal perforated pipe, but I have not checked this information.
Four-stroke scooter muffler device
Today we’ll talk about the design of the muffler and the necessity, as well as the possibility, of installing a “tuning” one. I will immediately disappoint you in the ability to squeeze out power by using a tuning muffler from well-known manufacturers. I'll explain why. First, a little theory. In a two-stroke engine, the muffler consists of two parts: the resonator and the muffler itself. It is the use of the “correct” resonator that gives an increase in power. Based on the design of the two-stroke engine (read the article “ Design
and the principle of operation of a four-stroke engine"), intake and exhaust in the cylinder occur almost simultaneously. This means that at a certain moment both the inlet and outlet ports of the cylinder are open. Exhaust gases exit into the exhaust pipe and then enter the resonator. Their place in the cylinder is taken by the fuel mixture. But since the cylinder exhaust ports are open, part of the fuel mixture enters the exhaust pipe. The purpose of the resonator is to reflect the exhaust gases, create a back wave from them, which will “push” the fuel mixture back into the cylinder and thereby create higher pressure in the combustion chamber. Of course, I could write in more detail, using special terms and quotes from smart books, but in the end, this site is dedicated to four-stroke scooters.
So, unlike the two-stroke, the four-stroke
An internal combustion engine has intake and exhaust valves that close the intake and exhaust ports. Thus, the need and expediency of using a resonator disappears. The same explains the impossibility of achieving significant results by installing a muffler
low resistance or straight-through muffler. Of course, this will bring some power, since the resistance provided by the muffler is reduced. Those who want to change the exhaust sound and make it “sportier” can install such a muffler. But, I repeat, one should not expect significant results.
Dismantling and assembling a moped gearbox
Disassembly and reassembly of the gearbox is carried out to replace worn parts.
Before disassembly, it is necessary to dismantle the cylinder head, generator rotor, cylinder and clutch housing. Using a screwdriver with a thin blade, remove the retaining spring ring from the secondary shaft and then the driven gear of the motor transmission. To remove the gear shift mechanism, unscrew the gear lock bolt on the right side of the engine and remove the lock together with the spring located under it.
We remove the gear shift shaft assembly with the auxiliary gear shift fork.
We separate the halves of the engine crankcase and dismantle the crankshaft, after which access to the gearbox parts opens. The gearbox shafts along with the gears remain in the left half of the crankcase.
Unscrew the screw securing the speed indicator sensor and remove the sensor. Using a hex wrench, unscrew the gear shift drum screw. Under the screw there is a contact element and a washer for the speed indicator sensor. We remove the drum along with the shift forks, shafts and gears of the gearbox. When separating gears, shafts and forks, it is important not to mix them up.
If defects are found, the parts must be replaced. Reassemble the box in reverse order.
Disassembly and assembly of a moped gearbox updated: July 31, 2017 by: admin 2017-05-29
Stage 5.
Assembly.
From the very beginning, the design of the muffler seemed dismountable to me. I thought there would be 3 parts, but settled on two. The first assembly and launch were experimental, so the fastening of all the parts was not major - it was simply secured with a couple of welding points. I made a clamp for the mesh from a pipe of a suitable diameter and welded it tightly. On the other hand, the mesh is also fixed with a pipe, which is also our outlet. We insert the mesh inside. We fill the space between it and the muffler body with fiberglass material. The packing is done quite tightly. As practice has shown, if the packing is loose, the insides of the muffler fly out very quickly. The first launch must be carried out outdoors, as many small particles of fiberglass will be released into the air, which are very harmful if inhaled. During final assembly, we completely clean the muffler body, degrease it and paint it with special heat-resistant paint.
Photo report: Assembly of the gearbox (box) of the “Ant” scooter
After completely disassembling the engine of the Ant scooter, many, especially beginners, have difficulty reassembling the gearbox, and this is not surprising. There is very little reference information, there are too many “ant” experts, the matter is further complicated by the fact that there are no marks on the gearbox parts that greatly simplify the work on the correct orientation of the gearbox parts relative to each other.
In fact, everything is not as complicated as it might seem at first glance...
The gearbox, after disassembling the engine and troubleshooting the parts, turned out to be in very good condition; only one gear of the first gear had to be replaced (extreme wear of the bushing and, as a consequence, increased backlash of the gear on the shaft) and all the bearings (due to severe wear). All other gearbox parts were checked for wear and so on without any problems. Complete disassembly of the “ant” engine is described in detail in the article: Photo report: Disassembling the engine of the “Ant” scooter
Before assembling the gearbox, we carefully wash all the parts from dirt, pay special attention to the engine crankcase and the condition of the threaded connections, buy a new set of oil seals and gaskets (preferably made of paronite). The general principles of engine crankcase repair are described in detail in the article: Photo report: Repairing a scooter engine crankcase
And so, the right half of the crankcase is completely washed, laid on wooden blocks and is completely ready for the introduction of our gearbox into it.
We insert the retaining ring into the mounting hole of the secondary shaft bearing.
Using a mandrel, install the bearings into their mounting holes. Don't forget to place a special washer under the input shaft bearing.
We check the performance of the copier, for this: we press on it with a screwdriver or a finger and release it - several times, there should be no jamming or excessive play in its operation, the working surface should be strictly in the form of a cone (not “slicked”).
We carefully inspect the teeth of the “pawl” of the gear shift mechanism; there should be no cracks, chips, or wear. The teeth should be sharp (not “slick”).
In the same way, we inspect the teeth of the crescent of the gear shift mechanism.
We assemble the gearshift shaft and install the return spring.
We install the gearshift shaft into the engine crankcase.
We install the secondary shaft in its place.
We put the fourth gear gear in its place.
Apply any grease to the thrust washer of the tracing shaft (marked with an arrow) and place it on the mounting hole of the tracing shaft.
We unfold the crescent of the gear shift mechanism so that its last tooth (marked by an arrow) engages with the gear of the copier shaft.
We take the copy shaft and carefully inspect the forks of the gear shift mechanism, they should not show signs of excessive wear and signs of overheating (blue), wear on the working surface of the forks should not be more than 0.5 mm. You should also check the ease of movement of the forks on the shaft and the play, which should not be excessive.
These small abrasions on the forks are considered quite normal for this engine.
We take the copy shaft in our hand (with the daisy pointing towards us) and turn the forks of the gear shift mechanism all the way to the right (clockwise), the forks should take the position as in the photo.
We put the gearbox gears on the forks; the first and third gear gears (large) are placed on the long fork; the second and fourth gear gears (small) are placed on the short fork.
We install the copy shaft assembly with gears in place, while carefully ensuring that it is the last tooth of the crescent of the gear shift mechanism that engages with the gear of the copy shaft (as in the photo). If the crescent meshes with the gear with another tooth, then the gearbox will not work correctly in this case.
Reinstall the input shaft.
We put the first gear gear on the secondary shaft and swing it; if large play is detected, we replace the gear with a new one.
We install the copy shaft clamp along with the spring on the gear shift mechanism shaft.
After assembling the gearbox, we must check its functionality and prepare the engine for final assembly. The final assembly of the engine is described in detail in the article: Repairing the Ant scooter engine
High-quality forward flow
Despite the apparent complexity of such an operation, you can make a direct-flow muffler for a motorcycle yourself, saving up to $1000 on the purchase of a product from a famous brand. First of all, you should decide on the type of materials you will use in your work. Experts give the following recommendations:
- The best option would be titanium, since it has very high strength with minimal weight. However, bending titanium sheet to produce a muffler will be very difficult, as will finding welding equipment. You don't even need to mention the incredibly high cost of titanium;
- Aluminum is excellent for muffler production for the reasons described above. However, when using it, it will be problematic to connect the device to the motorcycle engine;
- Stainless steel has a large mass, but is durable and quite easy to bend. To weld a motorcycle component from this material, you will need specialized equipment;
- Ferrous metal is heavy, has low reliability and requires repeated processing. However, it is recommended for use by beginners due to the ease of bending and welding.
The thickness of the metal should be approximately 0.8-1.5 mm so that it can easily bend and weld without burning. Once you've selected the metal that best suits your muffler, spend some time researching the required equipment to cut and weld it.
Now it’s time to make muffler patterns for a motorcycle. The first thing to make is the resonator cone, which connects the device you are making to the motor of the two-wheeler. You can also make it yourself - to create the correct pattern, you need to remember that the planar projection of the cone is a sector of a circle. Next, pipes are taken that correspond to the diameter of the exhaust system - there should be three of them. Remember that it is better to take the pipes ready-made, although if desired or if there are no suitable materials, you can weld them yourself.
The first pipe will be approximately 50 mm long (more if necessary) - it will connect the engine to the new muffler. The second will serve as an outlet - it needs to be given a similar length. The third will go inside the muffler housing and will serve to reduce the intensity of sounds. To get a quiet enough muffler, you need to make the last pipe long enough. However, it is worth understanding that increasing it will lead to a lengthening of the motorcycle muffler housing.
All that remains is to cut out the body itself—whether it will be cylindrical or flattened depends only on your desire. The minimum diameter of the case is 100 mm, but if possible it should be 150-170 mm. The sides of the body are made of similar sheet metal, after which holes for pipes are made in them. The first and second pipes described above are processed, after which they should form a flange that allows them to be firmly secured inside the muffler. You need to drill a lot of holes in the third pipe - the best option would be holes with a diameter of 1 mm in increments of 10-15 mm, then insert it inside the body and securely fasten it between the first and second.
The last step in assembling a motorcycle muffler is to fill it with a non-flammable material that dissipates sound - fiberglass is suitable for this. It needs to be laid as tightly as possible in order to achieve maximum muffling of unpleasant sound. Now you can finally weld the motorcycle muffler and... If you are doing such work for the first time, it is better to first try to make all the patterns from thick cardboard and try on a similar homemade muffler for your motorcycle. If you make a mistake, you will be able to understand exactly what the mistake is and correct it without wasting expensive metal.
Let's start repairing the Chinese miracle of technology
The Alpha 72cc moped is one of the most famous representatives among Chinese motorcycles.
This moped is perfect for use both in rural areas and on city roads. A durable iron frame, complete absence of plastic parts, large diameter wheels - simply created for domestic roads, the quality of which is far from European level. If you ride often, the rather high seating position of the ALPHA moped makes it possible to overcome low obstacles. A big advantage when choosing a moped is its low price, which makes the purchase quite affordable. This would be a good choice for a beginner.
There are models with a side trailer. Practical to use in rural areas. A reliable assistant in the household.
Economical, with an engine capacity of 72 cubic meters and air cooling, the Alpha moped is unpretentious. This is an extremely simple transport and servicing it couldn’t be easier! You simply cannot find a simpler engine, and spare parts cheaper than Alfa’s can only be found in a dream.
Anyone can carry out tuning or repairs on an Alpha moped with their own hands.
Before you start disassembling the motor, you should fix it on the center stand and completely remove all the plastic. All power systems should be turned off - tank, carburetor and fuel filter; The oil should also be drained.
The engine should be removed along with the transmission, and the Alpha moped should be repaired on a flat surface.
You can remove the alpha engine according to the following diagram:
- remove the muffler and exhaust pipe;
- remove the camshaft gear cover;
- unscrew all 4 bolts from the cylinder cover;
- remove the top cover and cylinder head;
- We study the degree of wear of the valves, check how dirty the insides of the system parts are.
Is this your first time repairing an Alpha moped yourself? No problem! A moped is not a hadron collider; nothing has changed in 50 years of moped construction. For convenience, draw a diagram of the location of the parts so that later you can complete the assembly without any problems.
A smartphone can help, take photos of each step so that later you can reassemble in the reverse order without confusion.
If it is necessary to replace the valves, or if there are gaps in the fit, then they need to be removed:
- Place the head on a level place. To prevent the valve from being damaged during dismantling, it is better to place a layer of thick rubber or a rag under it;
- we select the socket head, place it on the valve plate and hit it hard with a hammer;
- release the crackers, remove the top plate and valve washer;
- remove the valve and guide bushing. To complete the repair of the Alfa moped engine, after replacing the parts, we begin assembling the engine in the reverse order, putting everything in its place, observing the marks. Don't forget to add fresh oil.
The gearbox of an Alpha moped often fails and requires constant attention. The author of this article got the sprockets stuck in the box while driving in 4th gear 10 years ago. When trying to force a gear change, for some reason the gearbox automatically selected first gear and the moped was driven at a speed of under 100 km/h. I just braked without throwing the author of this article over the steering wheel. Yes, there are difficulties with gearboxes. Repairing it at home is not particularly difficult for a beginner.
Ready!
Impressions and results. The sound is of course not for everyone, but, in my opinion, it turned out well. I found an interesting photo on the Internet. As I understand it, by reducing the diameter of the output tube you can reduce the volume. I experimented, and indeed: the volume decreases, but the bass also disappears! What's the point of direct flow then? Oh yes, I forgot! Are you probably still interested in the power increase? I didn't notice anything supernatural. A small increase appeared in the upper rev range. Also, do not forget that when installing direct flow it is necessary to enrich the fuel mixture.
And off we go, with a loud roar, which some people like, but others irritate and infuriate!
Vladimir Maruk, Minsk scooter club