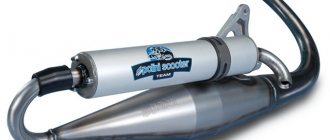
Instructions on how to independently give a new and beautiful look to an old scooter muffler, and at the same time make it quieter.
Point 1. For work we need.
Materials: A piece of thin stainless steel, 0.4-1 mm thick. A piece of fabric, rolled heat-resistant sound absorber, ~5 mm thick.
Tools: Semi-automatic welding machine. Grinder with a thin disc of 1 mm.
Point 2. Reasons.
Over time, even the most famous manufacturers of motorcycles, like Honda in this case, completely clog the muffler with exhaust deposits, after which the engine does not start and there are only two options: buy a new Chinese muffler or dismantle and clean the old one.
But since the Chinese muffler completely lacks a reverse wave resonance system, that is, it is just an empty can, and also very thin, and as a result for a two-stroke engine, this is a loss of power of up to 50% and as a result, the scooter completely stops driving!
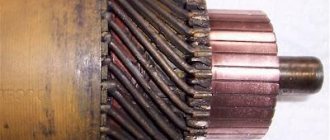
When disassembling the muffler, it is necessary to remove the internal noise absorber of the fiberglass body, after which the sound of the operating scooter becomes louder and more unpleasant (ringing), that is, the body can itself rings and resonates, and the appearance is no longer as neat as before.
Therefore, self-installation of an additional decorative housing with an additional sound absorber will be very useful.
Point 3. Manufacturing and installation.
Unscrew and remove the muffler.
We measure the circumference of the muffler can and the length between the welds. To the resulting circumference dimensions we add 2-3 cm for overlap, and to the width 2 cm for bends.
We cut out a design rectangle from thin stainless steel.
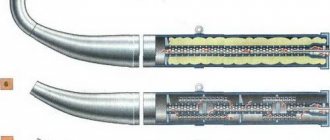
On both sides of the wide side we make bends of 5-6 mm. Polish the surface with GOE paste. Use a thin disk to make cuts in 5 mm increments. We remove sharp edges and burrs. Using the resulting dimensions, we cut out a piece of noise absorber (for example, asbestos weave, fiberglass, etc.) so that it fits tightly inside between the folds. We wrap it around the muffler can so that the joint is on the back side. For ease of welding, we secure it with clamps or other fasteners (for example, rubber rings). We do spot welding.
Even with minimal tuning of the scooter, you need to think about installing a resonant exhaust
. The operating principle and review of saxophones, as such mufflers are popularly called, will be given in another article.
Resonant muffler saxophone
- the thing is not cheap and not everyone can afford it.
Accordingly, scooterists have a desire to save money and make such an exhaust pipe on their own. In this article you will learn how to make a primitive homemade saxophone using the example of a Yamaha Jog
.
Why primitive? Because with this method we will not carry out calculations of the resonator
(this requires a special program), but will simply use a drawing of a saxophone muffler.
How to get the most out of a scooter with tuning?
Scooter tuning is a fairly extensive process, but consists mainly of styling (improving appearance), chassis tuning (modifying driving characteristics) and engine tuning.
The last point consists of many different operations that are aimed at increasing engine power, its better implementation and increasing acceleration and maximum speed. Below we will consider modifications to the engine and transmission. It’s worth noting right away that the scheme is general and suitable for Italian, Japanese and Chinese models. Those who doubt the quality of Chinese scooters should be reminded that the level of production of modern models from the Middle Kingdom has increased significantly over the past 10 years, and most of the spare parts on the market for all models are from Chinese manufacturers.
There are many ways to speed up your scooter and, first of all, they depend on the current technical condition of the unit. Let's take, for example, an old scooter with an incorrectly configured variator, a clogged air filter, a dirty carburetor and a number of other problems that arise when the equipment is not properly maintained. Such an engine has great potential, but it can only be realized after proper tuning. After thorough cleaning and adjustment of all systems, even standard engine performance will seem like a significant improvement.
It follows that any work aimed at improving driving performance must begin with a complete revision of the engine.
Removing factory limiters is a very popular type of tuning and quite simple. Most of the Japanese equipment and similar Chinese equipment comes from the factory with special limiters that do not allow the engine to operate at full power. Fortunately, you can get rid of restrictions in any garage, and any tuning of a scooter with your own hands begins with the elimination of such restrictions.
When childhood illnesses are over, it is worth paying attention to real tuning, namely, improving or modifying existing components and assemblies. We are talking, of course, about the cylinder-piston group, carburetor, muffler, variator, air filter and ignition system
At this stage, the degree of involvement in improving a particular element depends on the budget. If funds are limited, then we will make the most of the existing set by modifying the described units.
If you have a certain budget for tuning, you can go the route of replacing parts with special tuning ones. Special parts designed for such modifications automatically improve the basic characteristics of the engine, plus they are designed for higher loads. We have figured out the general scheme of improvements, and below we will look at how tuning occurs, using examples of specific components.
Preparing for cleaning
If the piston group of the scooter is not worn out and the spark plug is working properly, but the vehicle is poor and picks up speed jerkily, then in 80% of cases the cause of the problem is dirt in the carburetor. To prepare it for external cleaning, the carburetor must be removed from the scooter - to do this, you must carefully disconnect the oil and fuel supply hoses, contacts of the starting enrichment, as well as mounting bolts from it.
When performing the above manipulations, you need to carefully ensure that not a single detail is lost.
After disconnecting the carburetor from the main structure, you need to thoroughly clean its outer side of dirt by rinsing the unit in gasoline and then wiping it with a dry cloth. Then the carburetor must be prepared for internal cleaning - to do this, you need to unscrew the two bolts that secure the float chamber cover and thoroughly rinse it from the inside with gasoline and a rag. After this, you need to carefully remove the float, making sure that its delicate plate does not bend when removed. The carburetor is now ready for internal cleaning.
Cleaning the cylinder, boring windows.
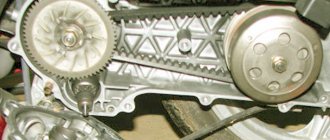
Improvement suitable for scooters with two-stroke engines. Their peculiarity is that very often the casting inside the drain and exhaust channels is defective, that is, it has roughness. These shortcomings lead to the fact that the piston is not blown through properly and, accordingly, loses power. Having removed the cylinder and armed with a rolling cutter, you can polish the channels, and then round off the sharp edges on the inside. When tuning scooters, in the photo you can see the differences between the motor before and after polishing. This action will help make the engine work easier at high speeds and potentially add a couple of kilometers to the top speed.
You can go further and increase the diameter of the inlet/outlet windows. For each 2T engine, this parameter is calculated individually. For example, it is enough to bore some 50 cc engines by 1 mm to obtain optimal intake/exhaust parameters. Do-it-yourself tuning of a 150cc scooter and other engine sizes is done in the same way.
Making a direct-flow muffler from scratch
You can make such a muffler from scratch. This will be a completely new version made from several components. The difficulty of this operation, called tuning from scratch, lies in finding the diagram of the exhaust system of a particular moped.
Tools and materials
In this case, again, you need to prepare the necessary tools and materials.
- Purchase in a store or find two pipes with a diameter of 33 mm;
- Buy plexiglass;
- Bolts M8 and M3;
- Prepare glue and nails;
- Welding machine;
- Needles;
- Hacksaw for metal.
Let's start assembling
First of all, you need to cut 18 cm from one of the pipes. It is recommended to carefully process the place in the cut with a needle file. From the second pipe we cut a circle with a diameter of 1.5 cm. We process it using the method described above. Glue the cut out circle in the section of the first pipe. We cut off another piece of pipe, 18 cm long. We make many holes in it. This can also be done with a sharp nail.
We connect all the parts using a welding machine. We fill the cavity formed at the junction of two pieces of pipe with mineral wool. We wrap the finished product with a special fire-resistant material. The homemade muffler is ready. To install it, you will need to attach the element to the scooter body mount.
Making a muffler mounting element
From plexiglass, which is indispensable in this matter due to its strength and easy paintability, we cut out a special type of ring, the edges of which can be bent outward by 180 degrees. We attach the resulting circles with serifs to the moped using the required bolts. We polish the muffler using sandpaper. To be sure, the joints between the homemade product and the moped body will need to be lubricated.
Homemade muffler for moped disassembled
If homemade production causes certain difficulties, you can find a lot of models of mufflers already in finished form. They are usually inexpensive. On the other hand, only a homemade version can provide the ideally expected option.
Homemade muffler with a pleasant sound
I don’t know how it is now, but many people used to know that an old car fire extinguisher is an excellent preparation for direct flow.
The story is simple: what I didn’t do with the original muffler can on the pita was of little use. I changed the muffler stuffing, made a flute like a Yamaha one, but still the sound was disgusting, rattling and loud, in general - a barrel organ.
It is possible to install a full-fledged direct flow from the pit, but you need to shorten it, digest the fasteners, but you understand: there was no particular desire to buy a barrel for 5 rubles and still digest it all, but the desire to get rid of the original muffler still did not leave.
And so back to the fire extinguisher. One was lying gathering dust in the garage a long time ago, but to make a direct flow you need two... And so, one fine May morning, on a small river, among the snags on the surface, the desired second fire extinguisher was spotted. Exactly the same as the first one, and now there were two of them. Well, you yourself understand what this led to.
In general, let's go)))
We take the most attractive tool in the garage, affectionately called “Binder,” and saw the bottoms of the fire extinguishers evenly.
Next, take a forty pipe, cut the gas distribution slots with a grinder, or, if you’re not too lazy, drill a billion holes. Then we weld one end of the pipe to the part of the muffler where the outlet will be.
You don’t even need to do anything with the outlet hole: the mounting location for the fire extinguisher spray is just perfect and the diameter is just right.
Now we stomp into the kitchen and tear open the casing of the ZIL refrigerator, tearing out the glass wool from there. Just wear thick clothing and gloves when working with glass wool, otherwise you will itch for two days, and if during these two days you want to relieve yourself, then... yes, it will itch there too... In general, we take glass wool and stuff the outlet part of the jar as tightly as possible.
Then we proceed to the entrance part. The thread in it needs to be cut so that the magpie pipe passes through, and, of course, we also fill it with glass wool, the denser the better.
Well, well, the only thing left to do is weld both parts together and weld the pipe to fit it with the standard muffler.
I didn’t bother with the fastenings to the frame, and why should I? I made two points of attachment to the luggage frames (it couldn’t be stronger): this fastening withstood a revolution on the asphalt and the can became a junk)))
The end of the jar is at your own discretion. I made pipes of a smaller diameter, and it looks quite good)
The sound, let me tell you, turned out surprisingly great! Even though it’s forward flow! At idle you can’t hear it at all, even the electronics are louder, but when driving it’s just the most beautiful sound - a soft growl without a dull metallic rumble and yelling.
Well, here’s the final look) The plastic doesn’t burn, the sound is pleasant, nothing was done to the original pipe. What else does?)))
Element Benefits
What is forward flow? This element is a device that is an excellent alternative to a standard muffler.
It is often installed on motorcycles and scooters, but in some cases, passenger cars are also equipped with this part.
Essentially, a tuning direct-flow muffler changes the exhaust system, thereby significantly increasing engine power. Such devices cost quite a lot, so among motorcyclists the question of how to make a direct-flow muffler with your own hands arises very often. Below we will tell you how to make this element of the exhaust gas system yourself.
DIY saxophone muffler for scooter
Even with minimal tuning of the scooter, you need to think about installing a resonant exhaust . The operating principle and review of saxophones, as such mufflers are popularly called, will be given in another article.
A resonant saxophone muffler is not a cheap thing and not everyone can afford it. Accordingly, scooterists have a desire to save money and make such an exhaust pipe on their own. In this article you will learn how to make a primitive homemade saxophone using the example of a Yamaha Jog scooter. Why primitive? Because with this method we will not carry out calculations of the resonator (this requires a special program), but will simply use a drawing of a saxophone muffler.
Muffler conversion
As a rule, many craftsmen not only assemble a muffler, but remake a standard one. This makes it possible to spend less time and get a more acceptable option.
Tools and materials
Before you start tuning, you need to prepare the necessary tools. In this case, the following components will be needed:
- Welding machine, preferably with different operating modes;
- Pipe of appropriate size and diameter;
- Bulgarian;
- Several metal brushes for washing dishes.
Let's start tuning
First we dismantle the muffler. Then we take a grinder and cut out a piece of metal on top of the muffler. With this cut it will be much easier to work with the muffler. You should almost completely cut out the top part. After this, it is necessary to clean the entire internal space of the muffler, dismantling the cut-away elements.
It's time to work with the piece of pipe that we have prepared. Using a powerful drill or welding, we make many holes in the pipe. We place the pipe in the section of the standard muffler. We select in advance a pipe of such a diameter that it fits inside the standard one. It is desirable that the pipe be without any obvious flaws and perfectly straight.
Straight-through muffler in the process of assembly
The space in the cut that remains between the two pipes must be filled with metal pipe cleaners or similar materials. We weld the top of the pipe as it was. We reinstall all structural elements that were dismantled during the process.
As a result of the tuning, we will get a forward flow muffler that provides the desired result. The massive and rich roar of the engine, as well as the increase in power of the moped, will be evidence that everything was successful.
Tuning a muffler on a scooter - what will a saxophone give us?
The operating principle of the exhaust system on two-stroke and four-stroke scooters is radically different. Their task is the same, but otherwise they work differently.
The purpose of a muffler on a four-stroke scooter is to remove exhaust gases as quickly as possible with minimal noise. Therefore, tuning a muffler on a four-stroke bike is not at all a difficult task. Although, in both cases, it is necessary to change the pipes. In the case of a four-stroke engine, this is not so important in terms of which one to buy and whether anything needs to be configured. Everything is simple there.
But muffler for two-stroke engines are much more complex in production, settings and selection for each specific model for specific tasks.
The principle of operation of the exhaust system for two-stroke bikes is known and was discussed in the section “Scooter design”. It is known that part of the power is returned to the engine from the exhaust system during operation at certain speeds. If this whole process is implemented ideally, after tuning the muffler the scooter will be unrecognizable. Naturally, if other components were tuned before. After a general boost of the scooter, the stock muffler is not enough for adequate engine operation throughout the entire speed range and replacing the muffler with a tuning one is perhaps the only way to make your scooter run faster and more dynamically.
Tuning companies produce a huge number of wonderful mufflers for the most popular European, Japanese, Taiwanese and Korean scooters. You can always choose a specific model for any budget. The price in this case depends on the complexity of the design, quality, and popularity of the scooter model for which it is designed. However, it's worth it.
After installing a high-quality and correctly configured resonator on a two-stroke scooter, you can expect an increase in power of up to 25% only after professional adjustments to the power system. This is a considerable figure, considering that in tuning, for example, for racing, the struggle is for every millisecond during the competition
For everyday life this is not so important, and the difference in power increase between 20 and 25% is difficult to notice, but experienced scooter riders will not remain indifferent after installing a branded saxophone
All mufflers are divided into several classes and, depending on the class, its final cost is determined.
If you are not going to race and fine tuning is not your thing, you can look at cheaper pipes. Every self-respecting tuning company produces both budget pipes and premium exhaust systems
Don't pay attention to cheap saxophones made in China. The filling in these exhaust pipes does not meet the requirements of physics during engine operation, as a result of which, after replacing the stock pipe, you will not only throw away money, but also lose some power
What can we say if even on four-stroke scooters with a 139QMB engine, the Chinese manage to add a saxophone, which in this case is absolutely useless. Naturally, it is empty inside and there can be no talk of resonators, but there is no point in such a fashionable feature, and such a toy will only make professionals smile.
Source
Resonant exhaust and its types
What is a resonator, a half-wave trumpet, a saxophone for a scooter, how it works and why it only works on a 2T motor, see this video.
Zhen give me some advice, Scooter Suzuki Address v100 CE13A engine with a catalyst, I drove more than 20 thousand, I started catching sticks at a speed of 75 when driving together, even at an outside air temperature of less than 20 degrees, they said the oil pump drive needs to be checked while adding oil to the gasoline, I calculated that at 600 km the oil tank leaves 350 ml... I add another 50 ml to 5 liters and still gets stuck... Where to look? Can a muffler cause problems? There is compression, it drives as before, the maximum speed is 90 - 95 km (as usual, nothing has changed (belt, variable speed gear are ok)
where can I get a normal muffler for a yamaha jog? and how much does it cost?
in short, I realized that it makes sense to install resonators for road motorcycles that ride at a certain engine speed
what if you put it in the first place? how will it work?
Basically, all lectures about resonators create the impression that a person has heard something about resonance, repeats ready-made terms as a fact, with a confident look, but still does not fully understand the physics of the process. After all, simple questions, but, I assume, lecturers answer them will not be able to answer: “The sound wave that is visible during an explosion,” which the lecturer talks about, is, firstly, not a sound wave, but a supersonic wave. Only such a wave is visible. Does a supersonic wave have a frequency (like a sound wave), and what is that frequency? What frequency should the resonator be tuned to? Is this the frequency of the sound wave that occurs when the working mixture explodes? Or is it the crankshaft speed? Or even some frequency or length of a supersonic wave? Does the waveform matter (U-shaped, sawtooth, sine)? Are the formulas for calculating acoustic systems and bass reflexes applicable to calculating the resonator of an internal combustion engine? After all, sound waves appear there, and supersonic ones here? And if you bring your hand to the exhaust pipe, then there is no sound wave at all, but there are some infrasonic vibrations of the air. Maybe they are talking about them, creating pressure and vacuum at the right moments? Thus, we have at least 3 types of waves in the exhaust system: supersonic, sonic and infrasonic, and modulation, the superposition of one on top of the other. Which of them do we design the system for? And there are also standing waves, such a thing as a waveguide pipe and many other things. None of this is covered here. Once you dig deeper, an understandable, coherent lecture turns into “nothing is clear.”
Do these principles apply to cars? Why do they usually say that the resonator makes the exhaust quieter, but here, on the contrary, it turns out to be louder? Conflicting information. They call it a “pre-muffler” there, but here they call it a saxophone (sound enhancer)? Glass wool is shoved into a car resonator, but here it is contraindicated; on the contrary, the fewer unnecessary impurities and the purer the metal, the better.
What is the difference between saxophones that give a boost at low revs and those with high revs? and how do they differ externally in terms of cones or maybe some nuances? I need it to start working at 5000 rpm because the engine from the Grand is low-speed
Cleaning the muffler
The cleanliness of the muffler affects the power of the moped
Before you start changing anything in the exhaust system, I would like to give one piece of advice. The power of the scooter is directly affected by the cleanliness of the muffler. If it were possible to see the exhaust in a cross-section of the muffler, the owner of the scooter would be very surprised. After a certain mileage, the scooter's dynamics decrease, and owners begin to look for the reasons for this, finding them in a complete rework of the standard muffler or its replacement.
The reason for the loss of power, meanwhile, may be hidden in the condition of the engine itself. This will help determine the specialist you should contact before tuning. But the most common cause of loss of dynamics is soot that clogs the muffler. In this case, it is recommended to carry out cleaning in three ways.
First method: mechanical
It involves cleaning the muffler section (it is done with a grinder). The inside of the muffler is cleaned of soot using a wire or cable. The section in the section is closed by welding.
Second method: chemical
It involves pouring water with some kind of cleaner into the muffler. For example, caustic soda is suitable for this purpose. This cleaning has the advantage that the appearance of the muffler will not be affected in any way.
Third method: heat treatment
The muffler is heated either on the scooter with a blowtorch, or dismantled in an oven or on a grill. It will be necessary to repaint the muffler only after it has cooled.
Why do you need quality mufflers?
As you know, a certain amount of fuel combustion products accumulates in the cylinders of a moped engine. They must be thrown out and in this case it is the muffler that is responsible for this. In other words, this unit seems to smooth out the pulsations that are inevitable when combustion products are released at high speed.
The very design of the muffler, used not only on scooters and mopeds, but also on motorcycles and cars, implies a special exhaust system, which can be different, depending on what result the vehicle owner wants to achieve. For example, if the desire to improve the gas exhaust system is related to increasing the power of the scooter, a special type of muffler is required - a direct-flow muffler.
Direct flow type muffler
Direct-flow muffler device for moped
Installing this type of muffler will not only increase dynamic power, but will also significantly increase the noise emitted when gases escape
On the one hand, this is good, because this way you can attract the attention of other drivers, thereby increasing passive safety. As you know, drivers of large cars often complain that they do not notice motorcyclists, and mopeds and scooters even more so
Making such a muffler from scratch or using a method that involves tuning is not difficult, but many technical aspects need to be studied.
Features of a direct-flow muffler
The features of direct flow are as follows: exhaust gases are ejected outside the engine immediately, the cylinders of the power unit have time to fill with the fuel mixture in the optimal amount.
I would like to remind all readers that at the moments of intake and exhaust, engine valves tend to open and close. Between these stages, a vacuum occurs, which allows the cylinders to be cleared of exhaust gases. As a result, free space is freed up, where the fuel mixture is supplied. It is easy to guess that the faster the cylinders are released from exhaustion, the faster they will be filled.
Thus, if you can ensure a faster exit of gases from the system, the performance and, as a result, the power of the scooter or moped will increase.
Why do motorcyclists need forward flow on a motorcycle?
The exhaust system is designed to perform several tasks. Exhaust gases are removed. The exhaust gases better fill the engine cylinders. And dampens the noise. The spent mixture leaves the cylinders at a very high speed and therefore creates a loud noise. It is the muffler that reduces the noise of exhaust gases due to the obstacles installed in it.
A straight-through muffler simply does not have baffles that reduce noise. In this case, exhaust gases exit without obstruction, and engine power increases. Therefore, the noise on such motorcycles is like a roar.
A direct-flow muffler or direct-flow muffler on a motorcycle produces a peculiar engine roar and is not accepted by many people. It is believed that motorcycles with such a muffler disturb people and pollute the atmosphere.
Motorcyclists who promote quiet riding in the city do not accept straight-through mufflers. But experienced bikers are sure that forward flow is not only passive safety, but even active safety on the roads. How? The fact that you can indicate your location in the traffic.
Sometimes it is difficult to show some drivers even with a signal or headlights that you are nearby. And only the roar of the muffler helps to do this. And it happens that the sound of the muffler stops the driver from a careless maneuver that could lead to an accident.
How to Make a Yamaha Jog Saxophone Silencer
So let's get started. To make a saxophone, we need metal approximately 1.2 mm thick. It must be cut according to the dimensions indicated on the drawing (You can adjust these dimensions closer to your parameters). In order to accurately bend the metal, we grind a wooden blank to size (we get a kind of wooden muffler) and then bend the steel according to this shape. After carefully adjusting the workpiece, we weld the joints using semi-automatic welding. We clean the part using any available means.
We also bend the muffler and muffler pipe. On one side we weld it completely, and on the other side with rivets (to replace the filler, here it is glass wool). After welding, we check all elements for leaks - there should be no gaps, of course.
We sand all the parts and paint. In this case, the muffler is painted with powder paint, and everything else is painted with simple acrylic paint.
The fastenings on the muffler are made of stainless steel.
And here is the result of our painstaking work - a copy of the Tecnigas saxophone. Not bad, right?
A saxophone on a scooter looks even better.
After installing such a muffler, you may need to adjust the scooter's carburetor, adjust the transmission as a whole, and the engine in general.
Good evening everyone, blog readers... Today there will be an interesting entry, but first of all it will be of interest to those who have mopeds and light motorcycles... Now I will tell you how, without any collective farm work and sawing the muffler and similar things, you can make a pleasant exhaust and a sound that you will like even with Every turn of the throttle, the sound will amaze you more and more... I read a bunch of articles and everything about this, I also watched a bunch of videos of how they cut off the original muffler, drill holes in it, and so on... In short, I am an opponent of such tuning, it’s just stupid... By Therefore, we decided to come up with and create a structure ourselves that will not only be installed, but can be removed... And so, if you are ready, let's begin...
One day I turned to my friend Zelencoff to come up with something to change the exhaust sound to a more pleasant one... I’m just the kind of person who loves a pleasant exhaust sound, I can listen to it for hours. For example, on my car I have a home-made muffler from a GAZelle, completely overcooked and redone as it should, and stuffed with cotton wool that doesn’t burn too tightly... And the result is a pleasant sound, like it’s not a direct flow and there’s not a lot of bass, but it’s pleasant to listen to and doesn’t put pressure on the ears. By the way, it’s also like Ruslan’s idea. So... I got distracted, let's return to our sheep... Phew. to motorcycles. In general, they tried on a bunch of all sorts of pipes, all sorts of cans and bottles and came up with who knows what. then we look at an empty paint can lying around, we sawed off the neck and bottom and just brought it to the muffler and this is what happened...
After that, we began to think about how to create this entire structure, secure it and make it completely removable... At this point my head turned on, I thought about how this could be done and explained to Ruslan how we would do it. And off we go... now everything will be described in detail.
What is a muffler and what is it used for? The goal is to acquaint you not only with how to construct a homemade muffler for a scooter with your own hands, but also with the purpose of this important unit
Making a muffler can for a motorcycle.
After several loud cries of “curvaaa. "With the motorcycle being thrown into the branches of trees, the muffler on the poor TM EN 300... was dented. I had to make a new one.
I could never do this kind of work. With the exception of minor manipulations, such as burning the flute and trips for materials, the new muffler bank was completely made by Oleg, for which another huge thank you to him!
A muffler is one of the most common motorcycle tuning options. A logical question: why, in addition to simply saving money, bother making a copy of a stock silencer when you can order a tuned one, at the same time slightly dampening the exhaust. The fact is that tuning the exhaust on two-stroke motorcycles must begin, first of all, with the resonator. And then, to the resonator, which are selected for the desired operating speed range, select a muffler can. Or not to select it, since on two-stroke engines it does not have the same effect as on 4t. Therefore, ordering a tuned muffler can without tuning the resonator makes no sense, and ordering a stock one is doubly pointless. There is one more factor in order not to order FMF, Yoshka and similar products: there is already so much dope in a two-stroke three hundred that I, for example, will not need to increase it further for many more years
The original muffler on the TM EN 300 is made of foil, it wrinkles well, bends after another fall, and begins to catch the wheel when landing from jumps, when the suspension compresses - and wears through to holes!
Therefore, having sacrificed a little to save weight, we had to make a new muffler from an aluminum pipe 3 mm thick.
The pipe, however, was found with a diameter of only 100 mm, while in order to maintain the original proportions, the diameter of the pipe should have been 90 mm.
At the same time, I burned the flute. As it turned out, you don’t even need a burner for this; a hair dryer at 400 degrees will do just fine.
In addition to saving the weight of the motorcycle, not a single manufacturer will install mufflers with a 3 mm wall on their motorcycles, or at least with 3 mm mounting brackets to the subframe, because then this can will never break in life, and the costs of materials will increase .
The neat flake weld will face down towards the ground and will not be noticeable. It's time to make a plug from a 3 mm aluminum sheet. Then a tube will be welded into it, which will center and secure the flute from the inside.
A dozen fittings, a little more argon - and the new plug gets fastened. You can collect: steel rivets, a piece of new packing to replace the old one that burned out in the center, a flute from an old muffler.
In general, for off-the-beaten paths, come here if necessary. And I'm happy!
Share “Making a muffler can for a motorcycle.”
We remove the engine.
Specialists, experts or garage technicians begin tuning a scooter with their own hands by dismantling the factory limiters. They are necessary to, firstly, keep the equipment within the established speed limits (Japanese models), and also to increase the service life of the motor. The problem is that you can find this element only after studying your engine model on various forums. The reason for this is the different locations of these same limiters, it could be a blind fork in the exhaust, an electronic limiter installed on the variator or even in the carburetor.
- Plug in the variator. In this case, the part is a special plate mounted on the side of the weights. It prevents the belt from reaching its maximum radius, which means it is impossible to achieve the maximum possible speed. If you have such a part, then by removing it you can significantly increase the maximum speed.
- Limiter in the variator. Sometimes the limiter is the lip on the bushing itself; here you cannot do without the work of a turner. By loosening the limiting edge of the variator, you can increase the speed. Also for many models a ready-made, bored part is sold.
- Carburetor. In this assembly, the plug looks like a valve. With a significant increase in pressure, it opens, thereby preventing the full entry of the air-fuel mixture into the combustion chamber. This can all be treated as in previous options - by dismantling the element or replacing the entire part.
- Exhaust. An interesting restriction system is located in the exhaust. It represents a branch where one of the channels is a dead end. Thus, turbulence and internal pressure in the exhaust increase, which prevents high-quality purging of the combustion chamber. The problem can be solved by brewing dead-end branches.
- Electronic system. Finally, the switch limiter can be considered the most advanced by modern standards. Some Chinese and Italian models can be deceived by cutting the limiter wire, for this you will have to study a lot of literature on electrical engineering. Other models get rid of the problem by simply replacing the unit.
Carburetor internal cleaning
There are two ways to clean the inside of a scooter carburetor. The first involves washing the unit in gasoline and blowing it with a pump or compressor, onto which a special nozzle with a pointed tip is attached. To perform the second method, you will need to purchase a special can for cleaning the carburetor containing a special flushing liquid. Using this method eliminates cleaning with gasoline, since the can is a kind of compressor and itself blows through the carburetor using its high pressure.
This is interesting: Selection of Kayaba shock absorbers by car brand
Both of the above methods are equally effective; just choose the one that is most convenient for you.
When cleaning the carburetor, all channels must be washed and blown
Particular attention must be paid to the jets, which always unscrew when cleaning. You also need to remove the starting enricher and wash its channel so that the carburetor, upon completion of cleaning, is absolutely clean both inside and out. The float returns to its place, the unit is assembled in the reverse order, and the oil and fuel hoses are reconnected
In order for the scooter to start, gasoline must be pumped into the float chamber, as well as the idle speed and mixture quality must be adjusted (only in case of deviations in operation)
The float returns to its place, the unit is assembled in the reverse order, and the oil and fuel hoses are reconnected. In order for the scooter to start, gasoline must be pumped into the float chamber, as well as the idle speed and mixture quality must be adjusted (only in case of deviations in operation).
Source of the article: https://excellent-moto.ru/zabityj-glusitel-na-skutere/
Posts 1 page 30 of 67
Share22012-02-10 16:14:17
So much I want to say and so little time! It all started, as you already understood, with the modification of the manifold to an increased diameter of the pipe for better exhaust gases and reduced flow resistance. It was logical to continue the refinement and make a direct-flow muffler. Which is actually what I did the other day! Something like inspiration came to me. At first I began to develop the future concept in my head, but how often does it change during the work process! I wanted to find a seamless pipe without seams (this was the first snag). There weren’t many options until I saw an ordinary fire extinguisher at work. And then an idea appeared and began to develop rapidly in my head! Since the total length of the muffler, according to my calculations, should be at least 400 mm, and fire extinguishers with such a length are too thick, it was decided to take two small ones and make a completely assembled (dismountable) muffler. As I already said, two old unnecessary fire extinguishers were taken, the powder was released and the valves were unscrewed. Then they cut off the back parts. It looks like this:
What’s most interesting is that the muffler ITSELF will look like this:
Then you need to somehow make the ends on the muffler; for this, 6mm thick sheet metal was taken and two pancakes were cut out, which were then turned into flanges! Why such large holes, you ask? So that later you can safely insert tubes of DIFFERENT DIAMETERS. on both sides and fill with refractory material. The flanges will be tightly welded.
Pipes of different diameters will be inserted into these two jars! Why is this done, you ask? I want to achieve only low frequencies and get rid of high frequencies. A pipe with a diameter of 70mm will be installed at the outlet, and a pipe with a diameter of 40mm will be installed at the inlet to the muffler. The joint in the form of a narrow transition in the middle will cause a curvature of the flow of passing gases! The holes in the tubes will also be of different diameters. That's all for today.
We adjust valves (4t engines).
As mentioned earlier, the engine must be serviced before boosting. Work that will help improve dynamics includes adjusting the valves. The procedure is suitable for tuning Chinese 4t scooters and other 4-stroke engines. For small-capacity equipment, it is recommended to carry out such adjustments at least once every 3, and preferably once every 2 thousand km. It is also necessary to carry out adjustments after manipulations with the CPG.
Before you begin, you need to make sure that the engine has completely cooled down and that you have a set of keys (8,9) and feelers of 0.05 for the intake valve and 0.07 mm for the exhaust valve at hand. You can get to the adjusting nuts by first removing the valve cover. When access to the valves opens, the piston is installed at top dead center. Next, a feeler gauge is installed in the intake valve gap and, depending on the current position, an adjustment is made.
To increase or decrease the clearance, you need to loosen the lock nut (while holding the adjusting bolt), turn the adjustment bolt and, while holding it, tighten the lock nut back. Thus, we achieve a gap when the probe passes into it with little effort. After adjustment, make a full revolution of the crankshaft and make sure that the adjustment is accurate.
Are there any advantages to direct flow?
Why are some motorcyclists desperate to turn up the volume on their steed? Their classic argument: “Loud exhaust saves lives.” This argument works in occasional situations that are typical on our roads, but there is no scientific evidence of the benefits of loud exhaust in avoiding accidents.
Moreover, this argument presupposes the correct behavior of road users when they hear a motorcycle roar. But this is an extremely risky assumption: the driver may be frightened by a loud roar next to him and behave completely differently from what is expected of him, which can be dangerous for the motorcyclist. A loud exhaust may be noticeable, but it is unlikely to be a more effective means of preventing accidents than safe driving skills coupled with reflective elements on equipment and a mandatory helmet on the head.
Even if the "loud exhaust saves lives" argument works in some situations, it doesn't do enough to compensate for the unpleasantness of it. To be honest, many motorcyclists use forward flow to attract attention and show off their own “coolness”, without caring about their safety or those around them.
This justification for using direct flow is too selfish, don’t you think? On one side of the scale is the joy of motorcyclists, on the other is the peace of those around
Which of these is most important?
All homemade products
If you have an old but indestructible Japanese scooter, which, unlike the rotten Chinese, does not shine with chrome, but no one deserves to look beautiful and dignified. Therefore, let's give the muffler a new look.
We really need simple materials:
- A small sheet of thin stainless steel, 0.4-1 mm thick.
- A piece of roll of heat-resistant thickness, sound insulation ~5 mm (asbestos or other)
Tools:
- Welding grinder.
- semi-automatic with a thin disk of 1 mm.
Lyrical digression.
Over time, even with the most famous manufacturers of motorcycles, in my case it is Honda, the muffler becomes completely clogged with exhaust carbon, after which the engine completely stops starting and we are left with only two options, buy a new Chinese one or disassemble the muffler and clean the old one.
But Chinese mufflers in most cases are just a thin and empty can, in which there is absolutely no reverse wave resonance system, and for a two-stroke engine this is a sentence for a loss of power of up to 50% and, like a scooter, the result completely stops driving!
Therefore, a recommendation to everyone is to choose the second option - cleaning, and not if, well, replace it with the Original!
When sawing the muffler can for cleaning, out of hopelessness, it is necessary to remove the internal fiberglass noise insulator of the body, after which the sound of this working scooter becomes more disgusting and loud (ringing), the can of the body resonates, and the appearance of the muffler also suffers and is no longer as neat as before.
Therefore, this tuning kills two birds with one stone, a decorative muffler decoration and additional noise insulation, which completely returns the noise level to the new norm.
Manufacturing and Unscrewing.
assembly four nuts and remove the muffler.
length We measure the circumference of the muffler and its length by welding between the seams.
To the resulting dimensions of the circle for 2-3 cm we add the joint, and to the width we add 2 cm for the bends. We cut out a calculated rectangle from thin stainless steel.
On the wide sides we make bends of 5 - 6 mm. It is enough to place it on the corner, fix it with two clamps and tap it with a hammer.
Polish the surface immediately, for example with GOE paste.
1mm Thin. Using a disk, we make cuts along the entire height of the bend, in increments of 5 mm.
We remove the sharp edges and get the result.
According to the dimensions of the hangnail, we cut out a piece of noise insulator (eg asbestos, weave, fiberglass, etc.) so that it fits tightly inside between the bends and is equal in length to the circumference of the muffler can.
We wrap the “This” sandwich around the muffler can so that the joint is inward towards the wheel.
convenience For convenience, we compress and secure other clamps or fasteners (for example, rubber rings, belts).
spot We perform welding.
We remove the fasteners and install the muffler back on the scooter.
Let's start it!, enjoy how it runs quietly and admire the shine of the new silencer!
High-quality forward flow
Despite the apparent complexity of such an operation, you can make a direct-flow muffler for a motorcycle yourself, saving up to $1000 on the purchase of a product from a famous brand. First of all, you should decide on the type of materials you will use in your work. Experts give the following recommendations:
- The best option would be titanium, since it has very high strength with minimal weight. However, bending titanium sheet to produce a muffler will be very difficult, as will finding welding equipment. You don't even need to mention the incredibly high cost of titanium;
- Aluminum is excellent for muffler production for the reasons described above. However, when using it, it will be problematic to connect the device to the motorcycle engine;
- Stainless steel has a large mass, but is durable and quite easy to bend. To weld a motorcycle component from this material, you will need specialized equipment;
- Ferrous metal is heavy, has low reliability and requires repeated processing. However, it is recommended for use by beginners due to the ease of bending and welding.
The thickness of the metal should be approximately 0.8–1.5 mm so that it can easily bend and weld without burning. Once you've selected the metal that best suits your muffler, spend some time researching the required equipment to cut and weld it.
Now it’s time to make muffler patterns for a motorcycle. The first thing to make is the resonator cone, which connects the device you are making to the motor of the two-wheeler. You can also make it yourself - to create the correct pattern, you need to remember that the planar projection of the cone is a sector of a circle. Next, pipes are taken that correspond to the diameter of the exhaust system - there should be three of them. Remember that it is better to take pipes for a motorcycle muffler ready-made, although if desired or if there are no suitable materials, you can weld them yourself.
The first pipe will be approximately 50 mm long (more if necessary) - it will connect the engine to the new muffler. The second will serve as an outlet - it needs to be given a similar length. The third will go inside the muffler housing and will serve to reduce the intensity of sounds. To get a quiet enough muffler, you need to make the last pipe long enough. However, it is worth understanding that increasing it will lead to a lengthening of the motorcycle muffler housing.
All that remains is to cut out the body itself—whether it will be cylindrical or flattened depends only on your desire. The minimum case diameter is 100 mm, but if possible it should be 150–170 mm. The sides of the body are made of similar sheet metal, after which holes for pipes are made in them. The first and second pipes described above are processed, after which they should form a flange that allows them to be firmly secured inside the muffler. You need to drill a lot of holes in the third pipe - the best option would be holes with a diameter of 1 mm in increments of 10-15 mm, then insert it inside the body and securely fasten it between the first and second.
The last step in assembling a motorcycle muffler is to fill it with a non-flammable material that dissipates sound - fiberglass is suitable for this. It needs to be laid as tightly as possible in order to achieve maximum muffling of unpleasant sound. Now you can finally weld the motorcycle muffler and install it on the vehicle. If you are doing such work for the first time, it is better to first try to make all the patterns from thick cardboard and try on a similar homemade muffler for your motorcycle. If you make a mistake, you will be able to understand exactly what the mistake is and correct it without wasting expensive metal.
Scooter exhaust system - design features and operating principle
Often owners of scooters, especially two-stroke scooters, underestimate the impact of a properly functioning and properly tuned exhaust system on the performance of the scooter, from idle to maximum power and torque, maximum speed and dynamics.
An exhaust system refers to a systematic approach to removing exhaust gases from a scooter engine to the outside. The exhaust system also serves as a muffler for the noise generated during each combustion cycle, and the noise must be absorbed to specified levels so as not to disturb other drivers and passers-by.
During the operation of a scooter engine, the exhaust gases that exit the cylinder are under fairly high pressure and are released at enormous speed. The loud noise of an engine without a muffler is characterized by the fact that it is the effects of pressure and velocity of exhaust gases that create the conditions for their expansion in the air. Therefore, mufflers for scooters, as well as for other equipment, are created in such a way that gases enter the atmosphere after the most effective cooling and pressure reduction. However, this is only a small part of the design features of the exhaust system.
Exhaust system and muffler of a four-stroke scooter.
A properly configured scooter exhaust system is the key to stable engine operation with maximum efficiency. This also applies to four-stroke engines. The four-stroke design provides for controlling the flow of the fuel-air mixture and exhaust gases using valves. A properly designed exhaust system for a four-stroke scooter should provide pressure in the muffler in such a way that at the moment of the exhaust stroke it creates a small vacuum in the exhaust valve area, which, without adjustment, will, one way or another, arise in another area. The engineers' task is to shift this vacuum zone precisely to the exhaust valve.
Source
Is it possible to apply punishment under 2 articles simultaneously for “direct flow”?
There is also Article 4.4 of the Code of Administrative Offenses, the second part of which states that if a person commits an event for which punishment can be established under two or three articles at once and the case is being considered by the same body, by the same judge, then a more stringent type of liability may be applied.
In our case, this article does not apply, because these two violations are the consequences of different events:
- 23 – a motorist is punished for driving through a populated area in a vehicle that produces noise in decibels above the norm.
- 5.1 - the owner of the vehicle or the person driving it is punished for transforming the design of the car without obtaining the approval of the supervisory authority of the State Traffic Safety Inspectorate.
Therefore, for a “direct flow” muffler you can get off with just a warning, a fine of 500 rubles, or two fines of 500 rubles each. (in real life, traffic police inspectors never issue warnings twice). And in recent months, in some localities of the Russian Federation, traffic police officers have been issuing orders and requirements to neutralize violations.
How to make forward flow on a scooter
You will need
- – Bulgarian;
- – drill;
- - hammer;
- – mesh or tube with holes;
- - fiberglass;
- – heat-resistant paint.
Instructions
First, remove the decorative protective plates and muffler by unscrewing the four bolts. Cut it from the end in a circle using a grinder or a hacksaw. Now you need to find and drill out the welding points with a drill, using first a thin and then a larger diameter drill. Knock out the back wall with a hammer and remove the perforated mesh that is located in the front.
Leave the housing from the old muffler. Make a central tube from a tube or mesh with a large number of holes. Holes in the pipe can be made using a drilling machine. Use fiberglass as padding. First you need to fasten all parts of the muffler with several welding points. If everything works fine when you start it, do a major repair.
Make a mesh clamp using the appropriate size pipe. Weld the clamp and insert the mesh inside. On the other hand, the mesh is fixed by a tube, which is also the outlet. Pack the fiberglass very tightly between the body and the mesh to prevent the insides of the muffler from flying out over time. Wrap the tube itself with asbestos or any other fire-resistant material.
Having finally assembled the muffler, clean it, degrease it and paint it with special paint. It is advisable to seal the muffler connection points with sealant.
Video on the topic
https://youtube.com/watch?v=ob5fOdCc3Dk
note
You need to cut the muffler very carefully so as not to damage the partition and the tubes that are inside. When sawing, be sure to use special glasses to avoid damaging your eyes.
Helpful advice
Instead of fiberglass, the padding can be made from kaolin wool. It does not burn or melt even at a temperature of 1300 degrees. The exhaust sound depends on the packing material, the diameter of the perforated tube, and the length of the muffler.
- Do-it-yourself forward flow on a scooter in 2018
- how to make forward flow on a moped in 2018
Alternative options
If you are interested in how to make a muffler quieter without losing precious horsepower, you can use a scheme that has been used in Chinese motorcycles for quite a long time. However, it is worth remembering that this option is only suitable for the production of mufflers for low-power motorcycles, whose performance does not exceed 40 hp. With. A pipe is inserted into the muffler body two-thirds of its length, the last 10 centimeters of which are covered with small holes according to the scheme described above. Having installed the inlet pipe, we are engaged in the outlet, which will be a pipe of a slightly larger diameter, inserted from the opposite side by two-thirds. It also remains to drill holes in 10 centimeters located closest to the motorcycle engine - such a muffler will represent a compromise between forward flow and the factory product.
If you know the structure of a motorcycle muffler, you can probably make a forward flow from an ordinary part. After opening the housing, you will see tubes that pass through special chambers, first to the end of the muffler, and then back and again to the exhaust pipe. These, as well as the motorcycle's catalytic converter, will need to be removed to achieve the desired effect. The perforated tube mentioned in the previous diagrams is inserted inside and wrapped with fiberglass. Of course, you can buy a special synthetic material used in the packing of original mufflers, but it will obviously cost more.
If you already know how to make a motorcycle muffler that fully meets your requirements, do not forget about fine-tuning the exhaust - for this you need to select the optimal diameter and position of the pipes, as well as the density of the holes. It is almost impossible to achieve an ideal result without using a special stand, so you will have to be content with approximate parameters obtained experimentally. In addition, after installing a different muffler, the motorcycle engine should be retuned. Modern injection engines will require the installation of new firmware, but carburetor motorcycles get by with a simple adjustment of the fuel system. Not every motorcyclist can do this kind of work, so it is quite possible that you will have to go to a specialized service center.
Cylinder-piston group.
Finally, the most effective improvement for any engine is replacing the CPG. But not just a replacement, but the installation of a new, larger piston. Fortunately, there are now many ready-made kits on the market; you don’t have to sharpen or adjust anything, as with Soviet equipment. Moreover, there is even a lot to choose from. For example, for various models with a volume of 50 cubic meters, they offer kits to increase to 63, 72, 82 and even 90+ cubic cm. In some cases, this is an almost double increase in power.
The situation is similar with larger engines, for example, for 125 cubic meters, sets of 150 or 170 cubic meters are sold. Some, in the process of tuning a scooter, manage to increase 150 cubic meters with their own hands to 225 cubic meters. Choosing the right part is not the most difficult thing, the most difficult thing is installing it. After all, this process involves almost complete disassembly of the engine. You will be faced with the need to have several special removable keys in your arsenal; you can ask them from friends or borrow them for the evening at auto repair shops. We strongly recommend studying the technical component in order to properly disassemble, replace the necessary elements and assemble the motor.
Alas, for some, increased power does not promise anything other than breakdowns or inadequate performance. This is because by significantly increasing power, you inevitably entail work on all other nodes. Let's imagine that we installed a new 92 cc CPG on an old 50 cc engine. The first thing to check is the condition of the connecting rod, crankshaft and bearings. Otherwise, they will fly first, followed by our new system of both cylinder and piston.
Great, we added new bearings to the CPG, an elbow with a connecting rod, now we can be sure of reliability. But the engine does not go faster, and we decide to purchase a new carburetor. Now the mixture is too rich, and we understand that the exhaust needs to be changed. After such modifications, the engine sounds loud, accelerates perfectly, but the maximum speed is slightly higher than before and the variator sounds strange. After installing a high-speed CVT, for example from the Italian manufacturer Polini, the engine will be able to fully realize its new power. The last stage is an inspection of the brake system; you don’t want to find out at a speed of 60 km/h that the brakes are now comparable to bicycle ones.
As a result, after replacing almost all the components, we got a very fast “flea” that can surprise your friends and experts in this technology. Over time, you can make changes to the chassis system, replace shock absorbers, and install more attractive wheels. Often, the modernization process does not stop there, and after tuning a scooter 50, 150 with your own hands, impressive improvements in appearance are made. The moped is repainted, panels are changed, new devices, lighting, and so on appear.