The ignition system plays an important role: without it, not a single vehicle with a gasoline or diesel engine will move. The quality of engine operation, whether it will start in cold weather, and whether it will work correctly depends on how it is configured. Depending on how the ignition is set and what spark plugs are selected on the scooter, it depends on whether it will go or not. From this material you will learn how to set the ignition on a scooter yourself, what you will need for this, and how to set up a contactless system.
The principle of operation of ignition in a 4-stroke scooter engine
Modern scooters are equipped with contactless systems. They are considered the most reliable and easy to use, do not require complex connections, and provide a constant good spark on time. However, the setting is still important; even the presence of a spark does not always allow the fuel mixture to ignite, since its power also plays a role.
The main reasons for the operation of the ignition system are quite simple: its task is to create a spark to detonate the fuel mixture. If this does not happen, you need to carefully examine each node and find out why the spark disappeared.
- In order to check whether there is a spark at all, you need to unscrew the spark plug and apply it to the engine ground; this can be done using metal objects that are not covered with paint. You cannot hold it with your hand: if there is a spark, it can give you an electric shock, and the discharge reaches 40,000 volts, which the coil creates.
Broken ignition is the cause of engine failure
An incorrectly configured or faulty ignition often causes engine failure. It would be wrong to immediately climb into the cylinder and examine the insides of the scooter, especially since this will not solve the problem. Before touching the ignition system, you need to check for other reasons why the scooter may not work.
- The simplest thing is the lack of gasoline in the tank. Quite often, owners forget to refuel their vehicle, and such a trivial reason can be overlooked.
- The carburetor may be clogged, which prevents the formation of a mixture suitable for driving.
- The carburetor needs to be cleaned regularly, so it doesn't hurt to check whether fuel is flowing from it into the cylinder. It is possible that the fuel pipe is clogged. The jets and other parts of the device may become clogged with debris, which causes little fuel to flow or, conversely, the engine does not have enough air, and therefore it does not start.
- The scooter may also refuse to start if the fault is caused by spark plugs. They may be wet or not produce a normal spark. It is advisable to have a spare set and check with it. In any case, the spark plug needs to be unscrewed and inspected.
Replacing scooter generator brushes
If the scooter has problems with a poor battery charge, a weak spark, or there is a breakdown in the electrical system, then it is highly likely that the vehicle's generator will have to be repaired.
There may be several reasons for the failure:
1. Short circuit;
2. Violation of the integrity of the wire;
3. A sharp drop in the magnetization of the generator rotor.
The decrease in rotor magnetization is due to objective factors, typical of which are:
* The scooter enters a high magnetic field area.
Under these impacts, a significant drop in the output current of the generator often occurs, which leads to the impossibility of further operation of the scooter. But a more objective picture emerges only when a competent diagnosis is carried out.
How to set the ignition on a scooter
With minimal experience, but good theoretical knowledge, you can set the ignition yourself. To do this, you just need to strictly follow the instructions below.
The most important part of tuning is to find the correct position for the timing sprocket to sit. In order to find it, they use special marks that are applied at the factory during engine assembly. The desired mark looks like the letter "T". In this position, the piston is at dead center. This is the extreme position after which the piston will return back. You need to rotate the rotor until the protrusion on the crankcase and the letter “T” coincide. This can be done using your hands or a kick starter. An electric starter does not need to be used.
If the piston has only moved down minimally, turn it further until the marks line up. It's not always possible to get the right position the first time. After they match, you need to study the other marks: they are located on the timing star. Usually these are three points or holes that are located on the outside of the star. They form a triangular shape if you connect them visually. Notice that one point is larger than the others. After adjusting the ignition, it should be on top, and the other two marks should remain opposite each other. They must stand horizontally.
If the ignition is contactless, it is adjusted as follows. In order for the engine to run smoothly and correctly, you need to adjust the ignition of the mixture at the right moment. To do this, after all the tags are installed in the right places, you need to understand how the contactless principle works in general.
A special feature of the BZS is the presence of special sensors, a switch, and two types of ignition coil winding. When the sensor is closed using a rotor equipped with a magnet, a pulse is generated that enters the commutator, it pumps up the current coming from the generator and directs it to the primary winding of the coil. After this, the charge enters the secondary winding, where a high voltage is generated, with the help of which a spark appears, used to detonate the gasoline mixture. Adjusting the ignition is the alignment of the marks on the crankcase and the star. Usually you have to remove the valve cover.
After this you need to do the following:
- Labels are set in the manner described above.
- In order to set the ignition angle, you can release the stator mount and adjust it in accordance with the technical requirements of your vehicle.
- Make sure that the marks or holes are in the correct position.
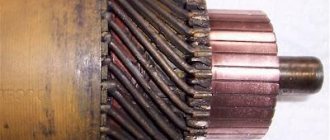
Removing the rotor
Insert the bolts into the required holes. We take the bolts from the cooling impeller - they fit there perfectly. In order not to touch the windings, we screw restrictive nuts onto the bolts - they will not allow the bolts to go deep inside the generator.
We apply the puller to the rotor and screw the bolts into the holes. In order not to break the thread, slightly tighten the central bolt and see if all the bolts are tight. If any bolt is loose, tighten it.
This way we will evenly distribute the load between the bolts. If you neglect this moment, the entire load, unnoticed by you, can rest on only one bolt or two, and then they will break out of the rotor along with the thread. We don't need this, of course.
Now the main thing: what is there, you cannot tighten the central bolt by force. In this case, excessive force will not achieve anything. Everything must be done slowly and competently. Otherwise, you will tear the puller out of the rotor along with the roots, and then your budget will become completely financially insolvent.
You only need to remove the rotor this way: Lightly tighten the central bolt of the puller with a wrench, lightly hit the end of the central bolt with a small hammer - the rotor, usually, after the first blow, flies off the cone without talking, if it doesn’t fly off, pull the bolt again and hit again.
I learned this technique back in 1996, when I had the opportunity to remove the reel drive pulley of the Kolos combine harvester from the shaft. If it weren’t for one smart person who promptly told me how to work with a puller correctly, then I would have smashed both the pulley and the puller and the sledgehammer along with the combine...
The rotor sits on a key. If you do not plan to further disassemble the engine, leave it as is. And if you plan, you better get it, otherwise you’ll lose it.
A broken key can be easily removed with small pliers; if the key fits very tightly, leave it, it won’t get away from you.
So that you don’t have to guess later how your stator was positioned, we put marks with a core or take a photo, remember it, or do something else. This is necessary in order to protect yourself from problems with a lost outline.
What is advance ignition
The quality of the mixture supplied to the engine cylinder determines the behavior of the scooter in cold weather, as well as how high the wear of the cylinder itself will be. For example, with a rich mixture, the engine starts better, but carbon deposits form; with a lean mixture, the cylinder quickly wears out and traction is lost.
In order to facilitate the process of starting the engine, you can set the ignition to advance, this will make it easier to start the engine regardless of the weather outside, slightly increase engine power, and significantly increase traction. The peculiarities of such settings are that a charge is formed in the spark plug before the piston reaches the dead center. This makes it easier to start the engine and increases engine power. However, it is worth remembering that cylinder wear may increase.
The procedure is carried out in approximately the same way as a regular ignition adjustment, but has its own nuances. To do this, all the same actions are carried out, only the tags are not completely connected. The discrepancy should be approximately half a centimeter. This is enough to get the desired effect.
How to set the lead angle (video)
Scooters Maintenance and repair
Ignition advance on a scooter - definition and control methods
You may have heard the term “ignition advance” at some point. Such a breakdown was very common on Soviet-made equipment and was quickly and successfully eliminated. This is a rare occurrence on modern scooters, but it does happen.
Ignition timing - what is it?
Initially, you should determine what ignition timing is? In simple words, this is a banal shift in the moment of spark formation, and even a few degrees will be enough. This displacement occurs at the moment before the piston reaches its top dead center (TDC).
The most efficient operation of a scooter engine, and therefore the maximum power indicators, are determined only when the maximum pressure in the combustion chamber occurs at the moment the piston moves down from TDC. But for this to happen, the mixture must ignite even before the piston reaches TDC, since the mixture in the combustion chamber does not explode immediately after supply, but after some time. However, many scooter riders are still confident that the mixture explodes immediately, even though this is not the case.
About adjusting the ignition of a 4t scooter
Knowing how to set up the ignition of a 4T scooter on your own, you can save time and money, since you will not need to contact a motorcycle repair shop. The procedure is simple, even if you have no experience it takes a little time, but you will need to be patient. Regardless of the type of ignition, an important role is played by how the marks are set.
Correct adjustment is a guarantee of stable and smooth engine operation even in cold weather conditions. Often, in used vehicles, the ignition is broken: this can happen for various reasons, ranging from elementary shaking when driving to improper handling of the equipment. In order for the scooter not to let you down and for you to be able to start it whenever you want, you will need to learn how to carry out this procedure yourself. To do this, you will need to have several keys that allow you to remove the valve cover if the engine is four-stroke.
Setting up the Vision scooter ignition system
If the ignition is knocked out, this may be the reason the scooter does not work. Restoring it is not difficult if you understand how it is done.
Advice: before starting work, carefully check and clean the carburetor: this may be the reason. Adjust the quality of the mixture. In addition, it doesn't hurt to check the spark plugs.
You need to start adjusting by setting the timing belt in the desired position. As a rule, there are marks on it for this purpose; they are set at the factory. The cylinder must be installed at dead center. The mark may be indicated by the letter T or another symbol. Now make sure that the mark installed on the rotor matches the mark found on the magneto. To do this, you need to gently press the kickstarter. The rotor can also be turned using your hands, but this is more difficult.
How to unscrew the nut?
To fix the rotor, I sometimes use a homemade puller similar to the factory one. I made it from old unnecessary pieces of hardware, and it works no worse than the factory one.
If you don't mind the money, you can buy yourself a factory one. It is inexpensive and easier to operate than a steamed turnip: insert the pins into special holes in the rotor, rest the lever on something and calmly unscrew the nut. By the way, such clamps are sold not only in spare parts stores, but also in power tool stores.
In power tool stores, traders position this device as a universal wrench for loosening nuts on angle grinders (angle grinders). It’s called: “universal wrench for angle grinders.” It costs only 160 rubles, and the original, supposedly “correct” one costs 350 rubles.
If you buy the same one for yourself, immediately cut its pins, otherwise they are very long in stock and can damage the generator windings during operation.
Unscrew the bolts and remove the impeller from the rotor.
Let me digress a little: do not lose the bolts that secure the impeller to the rotor, but it is best to immediately remove them. I had the opportunity to repair a scooter, the owner of which lost the original bolt and tightened another one in its place, but it turned out to be a little longer and broke the windings when starting the engine.
The bolt was only a few millimeters longer than the original one.
We fix the rotor and unscrew the nut. As I already said: in my work I sometimes use homemade tools, in this case a puller.
We unscrew the nut and remove it together with the washer from the rotor. If the puck is not there, then someone has already managed to dig around there before you...
Conclusion
Don't be afraid of the ignition system. It’s easy to set up, the main thing is to check the entire circuit; much more often the switch fails, there is no gasoline or the spark plug needs to be replaced. Only after making sure that there are no physical malfunctions should you start setting up the ignition. If it is set correctly, you will hear and notice, as the engine will start easily and run smoothly.
Operating a scooter and enjoying its ownership brings a lot of positive emotions to the owner. In general, a scooter is a truly unique motor scooter, which is an almost universal transport. The scooter is great for driving around the city and for traveling outside of it. And everything would be fine, but sooner or later the moment comes when it has to be repaired and maintained, something that motorcyclists like to do much less of. Also, you often have to adjust and set the ignition, which few people know how to do correctly. It’s exactly how to set the ignition on a scooter that will be discussed in today’s article.
Broken ignition as a cause of engine failure
First of all, I would like to talk about what can cause a four-stroke scooter engine to fail, and whether misconfigured ignition should be blamed for this. Answering this question, we can answer with one hundred percent confidence that an incorrectly configured or simply faulty ignition may well become the cause of engine failure. However, it is too early to blame everything on a faulty ignition system until you check the main parts that affect the performance of the engine. Let's talk about them in more detail.
The first and perhaps most obvious is a lack of fuel or a clogged carburetor. Before you start trying to adjust the ignition, thoroughly clean the carburetor and make sure that fuel is flowing to the engine. Also, check that the carburetor is providing sufficient air supply.
The second, most common reason why an engine refuses to start is faulty spark plugs. Make sure that the spark plugs used in the scooter are not punctured and have a good enough spark. Simply replacing the spark plugs usually helps.
If you are completely convinced that there are no more reasons for the engine not to start, then you can dig deeper and look for the problem in an incorrectly configured ignition. Let's figure out how to set the ignition on a scooter.
How to set the ignition on a scooter
Many people ask about how to set the ignition on a 4T scooter. In fact, this process is not as complicated as it seems at first glance, because all you need is a screwdriver and marks. In order to adjust the ignition on a scooter, you need to set the timing star position correctly. In our task we will be helped by special marks that have already been placed by the manufacturer at the factory.
Pay attention to the magneto housing. There should be a special mark on it in the form of the letter “T”. It is this mark that indicates the dead center of the cylinder (the extreme position of the piston in the cylinder when it reciprocates). Based on this mark, you need to align the rotor so that the mark on the rotor coincides with the “T” mark on the magneto housing. To do this, crank the kick starter with little effort or move the rotor manually.
Then, you will need one more, last mark located on the timing star. This mark consists of three holes or points that are marked on the outside of the timing sprocket. These points subsequently form a triangle, where one of the points or holes is the largest. After you adjust the ignition, the largest hole should be at the top, and the other two points should be opposite each other in a horizontal position. You can see more details on how to set a tag on a 4t scooter in the video below.
Is it possible to restore brushes?
In emergency situations, when you can’t count on help, you can use the advice of experts on emergency restoration of the brush assembly. However, reliable operation of the brush assembly can only be fully ensured by using high-quality spare parts recommended by manufacturers. Recovery is always a temporary solution; As soon as the opportunity arises, you need to go to the service center.
The procedure for replacing brushes, despite its apparent simplicity, requires certain skills and special knowledge. Therefore, it is better to go to a car service center, where diagnostics and maintenance of your car’s electrical equipment will be performed quickly and with a quality guarantee.
Source
Ignition advance
Some motorcyclists who understand proper ignition settings prefer advanced ignition settings. If we talk about this process more simply, then with this ignition, the motorcycle engine has a little more power and starts much easier. The thing is that with ignition set to advance, the spark plug produces a spark a little earlier than the piston in the cylinder reaches top dead center. Thus, we get a small increase in power and easier starting in bad weather conditions, for example, during cold weather.
Answering the question of how to advance the ignition on a 4T scooter, we can say that this is no more difficult to do than a normal setting. If you are already familiar with how to set marks on a 4t scooter and how to set up the ignition itself, then you will not have any difficulties. All you need to do is not completely connect the marks on the rotor and magneto housing. About half a centimeter is enough to get the ignition to advance.
This completes the ignition adjustment on the scooter. As you can see, there is nothing difficult here, the main thing is to connect all the marks correctly.
Ignition advance
- This is a shift of several degrees in the moment of spark formation at the spark plug before the engine piston reaches top dead center (TDC).
When ignited, a combustible mixture of fuel and air does not explode instantly, as many believe, but burns; this combustion takes some time. The engine will operate more efficiently and economically when the maximum pressure from the explosion of the burning fuel mixture occurs immediately after the piston passes TDC, i.e. when the piston begins to move downwards. To do this, you need to ignite the combustible mixture before the piston reaches top dead center. Ignition timing in electronic CDI
- switches - of modern scooters is not adjustable, but is completely controlled electronically. But to check the timing of the ignition installation, some modern scooter models have measuring marks.
To check the ignition timing of a scooter you need a special device - a strobe light. Such a device is not included in the tool kit of a regular scooter, and its purchase should not be considered absolutely necessary - the average scooter rider will rarely use it.
How does a strobe light work? A strobe is a device in which a bright light flashes at the moment a spark “shoots” in a candle. By determining the ignition moment with a strobe while the engine is running (the light flashes at the moment of ignition), you can see the dimensional marks and determine whether they are in the right places relative to each other. Such risks are located on the flywheel of the scooter generator and counter risks are on the housing next to the flywheel. But not all scooter models have these risks, and therefore in this case the strobe light will not help here.
Factory puller
The rotor can be removed using either a factory puller or a homemade one. The option with a factory and homemade puller has its pros and cons. I'll start with the disadvantages of the factory puller.
The main disadvantage of a factory puller is its price. A factory puller is very, very expensive. About 500-600 rubles. But price is essentially not a very important criterion for me. Versatility, reliability, ease of use and durability are much more important to me. Unfortunately, the factory puller does not have all these advantages, except perhaps ease of use.
The versatility of the factory puller is zero and, unfortunately, it is only suitable for a certain series of engines. And if you need to repair a scooter that is not widely used in our country, then you will also have to buy a new puller for it. And this will be very, very difficult to do, since tools for rare models of scooters are as rare on sale as spare parts.
The reliability of the factory puller is extremely low. I won’t say that the problem is in the design itself, rather the opposite: the design is more than perfect. Where else could it be more perfect?.. Nut + bolt - that’s its entire design.
But the quality... There is something to discuss here. The quality of factory pullers leaves much to be desired. They are enough for literally several times, and I’m talking about expensive pullers for 500-600 rubles.
Cheap ones at 220-250 rubles in terms of quality are completely out of the question. Not only are they made of some kind of plasticine, but even this seems not enough for the manufacturer of this shit. He still manages to make them thinner or even thicker than necessary.
This is what the cheapest puller looks like, or rather, what’s left of it: a bolt from it is lost somewhere. It was used only once - the thread was immediately torn off, both on the puller itself and on the rotor, although before using this guan it was good there.
And even if you imagine the situation. that I will be able to buy a good branded puller, even if it costs 1,500 rubles, but it costs about that much. So where do I put the tusks (or rather, where can I get away from them???), who kill the threads under the puller and then, with an innocent look, roll their garbage dumps to me for repairs?
This is what a high-quality factory puller looks like. Their prices are real - from 500 rubles and above.
Cons are minuses, but the factory puller also has its advantages. One of which is ease of use. And it is really convenient and easy to use. What's inconvenient about that?.. Screw it into the rotor, tighten the bolt and the rotor itself jumps into your hand.
What is ignition and how does it work?
So, let's start getting answers. The ignition system in a scooter is responsible for the correct operation of its engine and the appropriate moment of ignition of the mixture of fuel and air. The required proportions of these components are provided in the carburetor, and then the combustible composition enters the cylinder. At the moment of the highest degree of compression, a spark is supplied to the spark plug, which ignites the mixture. The spark voltage in some engines reaches 40 thousand volts.
The ignition system of a scooter is responsible for ensuring all this; it has a similar principle of operation in a moped, walk-behind tractor and any other mechanical vehicle with a gasoline engine. The result of its correct operation are such characteristics as a quick increase in engine speed, the usual level of exhaust gases emitted from the pipe and the absence of suspicious pops.
If suddenly, after repairs, you sit on your own “iron horse”, and for some reason it no longer gallops with the agility inherent in it, it’s worth checking the spark plugs. They must have a light brown soot. If the spark plugs have a black, tarry, thick layer, this is not a good symbol; in general, any deviation from the norm may be evidence of a malfunction of the ignition system.
Read
A sure sign of a poorly adjusted mechanism is also a slow increase in engine speed, exhaust pipe shots, and excessive smoke density.
While driving, you may experience jerking and uneven acceleration when accelerating. Any one of these signs or a composition of several is a direct indicator of a malfunction of the ignition system; in most cases, this problem is solved by adjusting it.
How to check generator brushes?
The brush assembly is usually combined with a voltage regulator. Contact with the rotor slip rings is carried out due to the force of the springs. A malfunction of the generator brushes can be easily determined by visual inspection (sign: the length of the protruding ends is less than 5 mm). You also need to check the diameter of the slip rings (the norm is 14.2-14.4 mm, the minimum is 12.8 mm). The presence of workings on contact surfaces is not allowed. Worn slip rings need to be replaced.
Problems with the generator can also arise due to increased brush resistance, which should be no more than 0.5 ohms. You will have to replace the brushes if, when checking, the multimeter shows increased resistance.
However, given that in most modern cars the brush assembly is combined with a voltage regulator, generator problems can be associated with a malfunction of the relay regulator, designed for a voltage of 15 V and a current of up to 5 A. Measurements with a multimeter are used for diagnostics. When the engine is running, the voltage at the battery terminals or at the generator outputs should be within 14–14.2 V. The voltage change is allowed by no more than 0.5 V. If the fluctuations are more significant, this is a sign that the relay regulator is faulty and must be replaced.
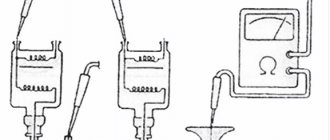
It is also useful to check the voltage regulator.
To do this, assemble a circuit that combines, using wires, an adjustable power supply, a light bulb, a voltage regulator with a brush assembly, and a multimeter (voltmeter). The power supply and multimeter are connected with correct polarity to the contacts of the voltage regulator. The light bulb wires are attached to the brushes. By turning on the power supply, voltage is applied (from 3 V), the light comes on. With a gradual increase in voltage and upon reaching 14 V, the light should go out - this indicates normal operation of the regulator.
How to set the ignition on a scooter - contact system
Now we will learn how to set the ignition
on a moped, walk-behind tractor or scooter.
The scheme of actions depends on the type of spark creation system; it is known that there are only two of them - contact and non-contact (contact-transistor). Their main difference lies in the mechanism of operation. All old models of scooters, mopeds and walk-behind tractors had contact ignition
. Currently, the second option is mostly used, since it is more advanced and tens of times more reliable.
How to set the ignition on a 4t engine
How to set the ignition
on a 4t engine,
How to adjust
valves on
a scooter
, I'M IN CONTACT -.
How to adjust valves on a scooter
For those who want to support me: 5355-5711-8360-4115 Georgievsky Stanislav.
Read
Contact ignition is based on a mechanical interruption system. In the closed state, low voltage current flows through the primary circuit. When a contact in the secondary winding system opens under the influence of electromagnetic induction, a current surge occurs with a high voltage, and then the distribution block works with it. Ignition different from the norm may be early or late. It is displayed on a distributor; this device combines a circuit breaker and a distributor. Most often, this part is installed on the crankcase, but there may be other assembly specifics; you need to look at the instructions for the design and operation of the vehicle. The adjustment procedure is as follows:
- Having previously disassembled the crankcase, on the contact group we set the maximum permissible gap for a full circle of shaft rotation.
- Next, set the piston to a position whose distance from the engine dead center corresponds to the technical documentation.
- Now we loosen the stator mount and adjust it until the contact closes.
- Now we put all the details in place and admire the result.
Checking the serviceability of the scooter generator
If a scooter generator requires repairs and its device does not allow you to assess the breakdown with the naked eye, a control device - a multimeter - can help. It is the tester that will show real surges in voltage amplitude and identify the direction for troubleshooting.
Diagnostics is carried out in several stages.
Stage 1. Checking the generator output voltage.
1. Connect the tester to the disconnected connectors;
2. With the engine turned on at minimum speed, evaluate the result. Satisfactory performance is within 5 V.
Stage 2. Checking the output voltage of the switch using a tester with a voltage amplitude reading.
1. Connect the switch wires to the generator stator wiring;
2. Disconnect the block from the terminal of the primary ignition coil;
3. We close one terminal to the main wire of the ignition coil, the second to the engine ground.
4. When starting the engine, we check the output voltage using a tester in the “constant current” mode;
5. We return the switch wire leading to the coil to its place and check the average output voltage.
6. The required indicator is about 200V.
Stage 3. Checking the battery condition.
This is the simplest operation when diagnosing and repairing a generator on a scooter :
We adjust the contactless ignition system
The contactless system operates through a sensor, switch, primary and secondary ignition windings. When the rotor with magnet closes the sensor, it sends a signal to the commutator, which, in turn, begins to accumulate current from the generator and transmit it to the primary winding. At this moment, high voltage appears in the secondary ignition winding. Its purpose is to ignite the spark. If there are any malfunctions listed above, adjustment is carried out by simply aligning the crankcase and ignition marks; to do this, remove the valve cover. The next steps are:
- We disassemble the crankcase in accordance with the technical description for your car.
- A mark is made on the rotor and crankcase at the dead center position of the engine in a place convenient for viewing.
- By rotating the crankshaft, we achieve a spark, make a mark on the crankcase relative to the mark made on it in the MTD. The difference between these marks on the crankcase is the ignition timing.
- Unclench the stator mounting bolts and set the advance angle corresponding to the technical documentation.
It is important to ensure that two of the three holes in the gear for the chain are at the level of the cylinder, and the remaining one is above the plane in which the cylinder and the mentioned holes are located.
How to set the ignition on a scooter and find out if it is functioning correctly? What to do if you decide to adjust it? The answers to these and many other questions related to the ignition of scooters, walk-behind tractors, and mopeds can be found out by reading the following article.
Replacing generator brushes
A car generator is designed to convert the mechanical energy of rotation of the engine crankshaft into electrical energy. It performs two main functions: recharging the battery and powering the vehicle's power supply systems with generated electricity. Along with the rotor and stator, the housing of the alternator also contains a brush assembly, a voltage regulator and a rectifier unit.
Brushes are the most vulnerable element of the generator. At the moment of their contact with the slip rings, the rotation speed of the generator shaft reaches 12-14 thousand rpm, which causes accelerated wear of the contacting surfaces. Timely replacement of generator brushes helps prevent damage to the brush assembly and ensure uninterrupted power supply to the vehicle while driving.
What is ignition and how does it work?
So, let's start getting answers. The ignition system in a scooter is responsible for the correct operation of its engine and the appropriate moment of ignition of the fuel-air mixture. The required proportions of these components are provided in the carburetor, and then the combustible composition enters the cylinder. At the moment of maximum compression, a spark is supplied to the spark plug, which ignites the mixture. The spark voltage in some engines reaches 40 thousand volts.
Ensuring all this is precisely what the scooter ignition system does; it has a similar operating mechanism in a moped, walk-behind tractor and any other mechanical vehicle with an internal combustion engine. The result of its correct operation are such indicators as a rapid increase in engine speed, a normal level of exhaust gases released from the pipe and the absence of suspicious pops.
If suddenly, after repairs, you sit on your “iron horse”, and for some reason it no longer gallops with the former agility inherent in it, it stands. They should have a light brown soot. If the spark plugs have a black, tarry, massive layer, this is a bad sign; in general, any deviation from the norm may be evidence of a malfunction of the ignition system.
Correct setting of the scooter carburetor
In the conditions of mass production of internal combustion engines, it is impossible to ensure perfect manufacturing accuracy; as a result, engines coming off the same assembly line may differ from each other within certain limits. The same situation occurs with the production of engine fuel system elements, in our case, carburetors.
The matter is further complicated by the fact that initially the engine manufacturer does not know in what climatic conditions a specific engine model will be operated. As you know, the same engine will operate completely differently in different climatic conditions.
Designers designing engines are well aware of these problems and therefore introduce adjusting elements into the power system (in our case, the carburetor), by influencing which you can significantly improve the efficiency, power and dynamic performance of your scooter’s engine based on specific operating conditions.
First, a little theory.
As you know, a carburetor is a device in which the working mixture (a mixture of air and gasoline) is prepared, without which the operation of the internal combustion engine is impossible. The most optimal ratio of gasoline and air in the working mixture is the value: 1/15, that is, for 15 kilograms of air there is 1 kilogram of gasoline. With such a mixture, the engine will operate without interruptions and detonation. This mixture is usually called optimal.
Unfortunately, at the optimal mixture, the scooter engine in some modes will not be able to operate stably, for example: in cold start mode, for stable operation the engine requires a mixture in which there is slightly less air than in the optimal mixture, the ratio of such a mixture is: 1/13, that is For every 13 kilograms of air there is 1 kilogram of gasoline. This mixture is usually called “rich”.
In order to enrich the mixture at the right time, additional modules (starting enrichers) are introduced into the carburetors, which are essentially mini carburetors; more details about the operation of the starting enricher are written in the article: Automatic starting enricher for a scooter
The most dangerous for engine operation is considered to be a lean mixture (a combination of gasoline and air of approximately 1/17 or lower. When the engine operates on such a mixture, detonation occurs and overall engine overheating, which ultimately leads to burnout of the piston or cylinder head gasket, melting of the internal surface of the cylinder head, such “little things” as burnout of the exhaust valve need not be mentioned at all.
We place the scooter on the central stand, provide free access to the carburetor adjustment elements, and warm up the engine (a prerequisite for high-quality carburetor adjustment).
We begin the process of setting up the carburetor by adjusting the idle speed. For this purpose, there is a special bolt on any carburetor (marked with an arrow), by rotating which you can increase or decrease the idle speed. By rotating the idle speed bolt, we achieve minimum, but at the same time stable engine speed.
How to set the ignition on a scooter - contact system
Now we will learn how to set the ignition on a moped, walk-behind tractor or scooter. The scheme of actions depends on the type of spark creation system; it is known that there are only two of them - contact and non-contact (contact-transistor). Their main difference lies in the principle of operation. All old models of scooters, mopeds and walk-behind tractors had contact ignition. Currently, the second option is mostly used, since it is more advanced and tens of times more reliable.
Contact ignition is based on a mechanical interruption system. In the closed state, low voltage current flows through the primary circuit. When a contact in the secondary winding system opens under the influence of electromagnetic induction, a current surge occurs with a high voltage, and then the distribution block works with it. Ignition different from the norm may be early or late. It is displayed on a distributor; this device combines. Most often, this part is installed on the crankcase, but there may be other assembly specifics; you need to look at the instructions for the design and operation of the vehicle. The adjustment procedure is as follows:
- Having previously disassembled the crankcase, on the contact group we set the maximum permissible gap for a full circle of shaft rotation.
- Next, set the piston to a position whose distance from the engine dead center corresponds to the technical documentation.
- Now we loosen the stator mount and adjust it until the contact closes.
- Now we put all the details in place and admire the result.
Generator brushes: what function do they perform?
When in contact with the slip rings located on the rotating rotor shaft, the generator brushes transmit current from the battery to the rotor field windings. This is how an electromagnetic field is created.
Under the influence of the alternating magnetic field of the rotating rotor, an electromotive force is induced in the coils of the stator windings and an alternating electric current is created. The current passing through the diode bridge (rectifier block of the generator) is converted into direct current. This is exactly what is needed to recharge the battery and ensure the functionality of the car’s electrical equipment.
We adjust the contactless ignition system
The contactless system operates through a sensor, switch, primary and secondary ignition windings. When the rotor with magnet closes the sensor, it sends a signal to the commutator, which, in turn, begins to accumulate current from the generator and transmit it to the primary winding. At this moment, high voltage appears in the secondary ignition winding. Its purpose is to ignite the spark. If there are any malfunctions listed above, adjustment is carried out by simply aligning the crankcase and ignition marks; to do this, remove the valve cover. The next steps are:
- We disassemble the crankcase in accordance with the technical description for your car.
- A mark is made on the rotor and crankcase at the dead center position of the engine in a place convenient for viewing.
- By rotating the crankshaft, we achieve a spark, make a mark on the crankcase relative to the mark made on it in the MTD. The difference between these marks on the crankcase is the ignition timing.
- Unclench the stator mounting bolts and set the advance angle corresponding to the technical documentation.
It is important to ensure that two of the three holes in the gear for the chain are at the level of the cylinder, and the remaining one is above the plane in which the cylinder and the mentioned holes are located.
Each type of vehicle requires you to approach and work with parts differently, so bring the service manual to the garage. If suddenly all the machinations did not help, and you are sure that the remaining units are in good working order, you should replace the switch, since it cannot be repaired and is inexpensive.
Operating a scooter and enjoying its ownership brings a lot of positive emotions to the owner. In general, a scooter is a truly unique motor scooter, which is an almost universal transport. The scooter is great for driving around the city and for traveling outside of it. And everything would be fine, but sooner or later the moment comes when it has to be repaired and maintained, something that motorcyclists like to do much less of. Also, you often have to adjust and set the ignition, which few people know how to do correctly. It’s exactly how to set the ignition on a scooter that will be discussed in today’s article.
Main elements of the system
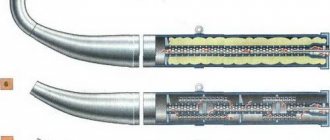
Of course, the first thing to mention is the spark plugs. They are installed in the cylinder head, the electrodes come out from the inside. These are the elements that allow the air-fuel mixture to ignite. But with the help of spark plugs alone, the engine will not be able to run. It is necessary to monitor the position of the crankshaft in order to know in what position the pistons are in the cylinders.
For this purpose, an inductive sensor operating on the Hall effect is used. It is part of the design of another element - the ignition distributor. The sensor produces a pulse that is sent to the switch. This device allows you to amplify a weak signal to a voltage of 12 volts, and then apply it to a coil. A coil is nothing more than a simple transformer (step-up). Its secondary winding has a greater number of turns than the primary. Due to this, the voltage increases and the current decreases. The voltage in the BSZ is supplied to the spark plugs at a value of 30-35 kV (depending on the car model).
Broken ignition as a cause of engine failure
First of all, I would like to talk about what can cause a four-stroke scooter engine to fail, and whether misconfigured ignition should be blamed for this. Answering this question, we can answer with one hundred percent confidence that an incorrectly configured or simply faulty ignition may well become the cause of engine failure. However, it is too early to blame everything on a faulty ignition system until you check the main parts that affect the performance of the engine. Let's talk about them in more detail.
The first and perhaps most obvious is a lack of fuel or a clogged carburetor. Before you start trying to adjust the ignition, thoroughly clean the carburetor and make sure that fuel is flowing to the engine. Also, check that the carburetor is providing sufficient air supply.
The second, most common reason why an engine refuses to start is faulty spark plugs. Make sure that the spark plugs used in the scooter are not punctured and have a good enough spark. Simply replacing the spark plugs usually helps.
If you are completely convinced that there are no more reasons for the engine not to start, then you can dig deeper and look for the problem in an incorrectly configured ignition. Let's figure out how to set the ignition on a scooter.
To watch online, click on the video ⤵
Remove the generator bell from the scooter without a puller.Read more
how to remove an alternator without a puller on a scooter (yamaha 3kj) suzuki hondaRead more
How to remove an alternator bell on a motorcycle without a special pullerRead more
How to remove a generator rotor in 2 minutesRead more
NO SPARK. Replacing an alternator on a scooter is as simple as 1 2 3. No tools and no pullerRead more
How to remove the alternator rotor (magnet) on a scooter without pullersRead more
How to remove the generator rotor from a 139qmb engineRead more
How to remove a generator on a scooter (profyscoot).wmvMore
How to remove a generator on a scooter. Read more
How to remove a mognito without a puller on a scooterRead more
how to remove the generator bell on a Suzuki Sepia scooterRead more
How to remove a magnet, alternator on a Honda dio af18Read more
how to remove a magnet (Generator Rotor) from a scooter without a puller! Read more
Removing the generator bell on a scooterRead more
There is no spark in the scooter. The high-voltage coil is broken. Removing the generatorMore details
How to remove a magnet without a puller (Dio34)Read more
how to remove the alternator bell on a Suzuki SepiaRead more
How to remove the generator coilRead more
We remove the generator rotor without a pullerRead more
Source
How to set the ignition on a scooter
Many people ask about how to set the ignition on a 4T scooter. In fact, this process is not as complicated as it seems at first glance, because all you need is a screwdriver and marks. In order to adjust the ignition on a scooter, you need to set the timing star position correctly. In our task we will be helped by special marks that have already been placed by the manufacturer at the factory.
Pay attention to the magneto housing. There should be a special mark on it in the form of the letter “T”. It is this mark that indicates the dead center of the cylinder (the extreme position of the piston in the cylinder when it reciprocates). Based on this mark, you need to align the rotor so that the mark on the rotor coincides with the “T” mark on the magneto housing. To do this, crank the kick starter with little effort or move the rotor manually.
Then, you will need one more, last mark located on the timing star. This mark consists of three holes or points that are marked on the outside of the timing sprocket. These points subsequently form a triangle, where one of the points or holes is the largest. After you adjust the ignition, the largest hole should be at the top, and the other two points should be opposite each other in a horizontal position. You can see more details on how to set a tag on a 4t scooter in the video below.
Ignition advance
Some motorcyclists who understand proper ignition settings prefer advanced ignition settings. If we talk about this process more simply, then with this ignition, the motorcycle engine has a little more power and starts much easier. The thing is that with ignition set to advance, the spark plug produces a spark a little earlier than the piston in the cylinder reaches top dead center. Thus, we get a small increase in power and easier starting in bad weather conditions, for example, during cold weather.
Answering the question of how to advance the ignition on a 4T scooter, we can say that this is no more difficult to do than a normal setting. If you are already familiar with how to set marks on a 4t scooter and how to set up the ignition itself, then you will not have any difficulties. All you need to do is not completely connect the marks on the rotor and magneto housing. About half a centimeter is enough to get the ignition to advance.
This completes the ignition adjustment on the scooter. As you can see, there is nothing difficult here, the main thing is to connect all the marks correctly.
Outline
It happens that when installing it back, the stator is installed in reverse, and then depending on your luck: everything may go without consequences, or the spark may disappear or interruptions may appear. To avoid this, any, not just CDI-type scooter generators must be installed exactly as they were originally installed. If you follow this golden rule, you will be happy.
We remove the stator. Installation of the generator is carried out in reverse order.
Source