How to adjust a scooter's carburetor
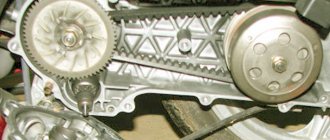
In order for a scooter engine to operate efficiently and steadily, it needs the correct fuel mixture, which is prepared in the carburetor.
Depending on the condition of the engine, cylinder volume, quality of gasoline and other factors individual for each scooter, additional carburetor adjustment may be required. Before getting down to business, it is strongly recommended to put things in order in the fuel system, namely: clean the carburetor and air filter, and also adjust the fuel level in the float chamber.
The carburetor should only be adjusted on a well-warmed engine. That is, before setting up, you need to drive the scooter for 10-15 minutes.
The carburetor usually has two adjustment screws. The smaller one is the mixture quality screw. The larger one is the idle speed screw. However, there may not be a mixture quality screw - then the quality adjustment is carried out by manipulating the throttle needle.
The factory settings are as follows: the quality screw is unscrewed by 1.5-2 turns, the idle screw is unscrewed by 2.5 turns. What does it mean? This means that the screws must first be tightened clockwise until they stop, and then unscrewed back the appropriate number of turns. It is from these initial settings that you should begin tuning. And in principle, if at the same time the engine runs stably and the scooter accelerates without failure and to maximum speed, you don’t have to adjust anything in particular. But if this is not the case, then adjustments cannot be avoided.
So, put the scooter on the stand. The motor must be running (and it must be warmed up before tuning).
Unscrew the quality screw 2 turns. Now you need to adjust the idle speed. Tighten it slowly (clockwise) - the engine speed will increase. At some point the clutch will engage and the rear wheel will begin to rotate. Then turn the screw back a quarter turn.
Now you need to test how the scooter will behave when riding. Accelerate on a flat road.
- If the scooter accelerates sluggishly, it means the mixture is not rich enough. Then tighten (clockwise) the mixture quality screw a quarter or half a turn. At the same time, the mixture will become richer (there will be less air in it, more gasoline).
- If the scooter accelerates normally, but not to the maximum, then the mixture is over-rich. In this case, you need to unscrew (counterclockwise) the mixture quality screw a quarter or half a turn to lean the mixture.
If you have turned the mixture quality screw, then you need to adjust the idle speed using the method described above.
With an ideal setting, the scooter should accelerate without dips or jerks, stably, and reach maximum speed.
Please note: This article and the images in it are subject to copyright. Partial or complete reproduction on other resources without permission is prohibited.
Lifehacks for the last time
- — Before adjusting, you need to check that the air filter is clean and soaked in engine oil. How to clean the air filter, read the article: Scooter maintenance.
- — If the rubber cuff on the quality screw is torn, then it can be replaced with a cuff from the quality screw of the classic Lada carburetor.
- — On Suzuki Sepia models, lets 2,
In the latest models of Honda Dio 34 everything is simpler. The carburetor has only one large screw, which is used to regulate the XO. The small one on dio 34 is located under the plug.
The first time the setup will take 15 - 20 minutes, and then everything will be automatic. Feel free to get down to business and share your experience in the comments.
Subscribe and see you for new articles!
How to set up and adjust the carburetor on a scooter
Having bought a motorcycle, scooter or other motorized equipment, owners have to become familiar with the operation and adjustment of their main components. One of the important elements of a two-stroke or four-stroke power unit is the carburetor, which is responsible for supplying fuel to the combustion chamber and mixing gasoline with air in the required ratio. Many people do not know how to adjust the carburetor on a scooter using the adjusting screw. This need arises if the device does not start well, shows increased appetite, or the tachometer needle indicates unstable speed.
Overheat.
Plug Type: Extremely white insulator with small black flecks and premature electrode erosion.
Consequences: loss of scooter power at high speed or under load.
Probable causes: the spark plug is not screwed in enough; The scooter's engine cooling system is not working properly; ignition of the scooter too early; The thermal range is incorrectly selected - the candle is too “hot”.
Remedy: check the torque of the scooter's spark plug; operation of the scooter engine cooling system; adjust the ignition timing; select the correct spark plug heat rating.
Type of spark plug: melted and burned central and grounding electrodes (or one of the electrodes) of the scooter spark plug; bubbling insulator with metal deposits on it.
Consequences: significant loss of scooter engine power; ignition interruptions. Continued use of such spark plugs may cause serious damage to the scooter engine.
Probable causes: thermal overload; significant overheating of spark plug parts due to glow ignition - combustion begins before a proper ignition spark appears; use of low-quality fuel; burning out of the remaining air-fuel mixture in the combustion chamber due to an incorrectly adjusted fuel system of the scooter or the ignition timing of the scooter; The thermal range is incorrectly selected - the spark plug is too “hot”.
Remedy: check the scooter engine, ignition system and fuel system, as well as the quality of the working mixture and the ignition timing of the scooter. Install new spark plugs with the correct heat rating.
Purpose and principle of operation of the carburetor
The carburetor is an important component of an internal combustion engine, responsible for preparing the air-fuel mixture and supplying it to the working cylinder in the required ratio. A scooter engine with an unadjusted carburetor cannot function properly. The stability of speed, the power developed by the engine, gasoline consumption, response to turning the throttle, as well as ease of starting in the cold season depend on the correct settings of the engine power supply.
An important component of an internal combustion engine is the carburetor.
This unit is responsible for preparing the air-gasoline mixture, the concentration of the components of which affects the nature of the operation of the power plant. The standard ratio is 1:15. Leaning the mixture to a ratio of 1:13 ensures stable engine operation at idle. Sometimes it also becomes necessary to enrich the mixture by maintaining a ratio of 1:17.
Knowing the structure of the carburetor and knowing how to adjust it, you can ensure stable operation of the engine on two-stroke and four-stroke scooters.
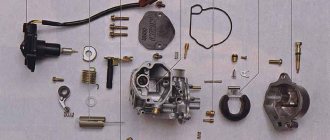
Thanks to a properly configured carburetor, easy and quick starting of the vehicle engine is ensured, as well as stable operation of the engine, regardless of the ambient temperature. Any carburetor is equipped with jets with calibrated holes, a float chamber, a needle that regulates the cross-section of the fuel channel, as well as special adjusting screws.
The adjustment process involves specially rotating the screw in a clockwise direction or in the opposite direction, which causes, respectively, the enrichment or depletion of the working mixture. Adjustment measures are carried out on a warmed-up engine. In this case, the carburetor unit must first be thoroughly washed and cleared of blockages.
Repair and maintenance of Honda, Yamaha, Vento 250 and BMW motorcycles: types of breakdowns
Engine
You can count up to 50 reasons why the internal combustion engine does not work. Most often, problems with repairing a motorcycle engine are solved by cleaning, adjusting or replacing parts, which does not take much time. If you bring your “horse” to the workshop in the morning, then it is likely that you will cover the evening journey home on your own bike.
Electronics
Clutch, brakes, front fork - all this will not function normally if there are problems with wiring and microcircuits. Inexperienced technicians suggest changing the entire system, but this is very expensive and is not required. We carry out initial diagnostics and find out the localization of the problem, only after that the client is informed of the price of the work and deadlines.
Motorcycle engine repairs should come with a warranty as it is the main part of the bike. Replacing an internal combustion engine is the most unpleasant thing that can happen. In some cases, it is indeed easier to buy a new vehicle, but if the engine has a chance of “survival,” then our auto experts will be able to save it.
Why do you need to regulate?
During the adjustment process, the scooter carburetor needle is adjusted, the position of which affects the proportions of the air-fuel mixture, as well as a number of other adjustments.
Adjusting the scooter carburetor needle is done during the adjustment process
Each tuning operation has a different effect on engine operation and fuel preparation:
- adjusting the idle speed ensures stable operation of a running engine when the transmission is turned off;
- changing the quality of the air-gasoline mixture using a special screw allows you to deplete or enrich it;
- adjusting the position of the carburetor needle affects the change in the quality of the fuel mixture;
- Ensuring a stable level of gasoline inside the float chamber avoids flooding of spark plugs.
A power unit with an adjusted carburetor operates stably in any conditions, is economical, throttle response, develops rated power and maintains speed, and does not cause problems for its owner.
Recommendations for carburetor tuning (video)
Despite all the difficulties and apparent complexity of the device, adjusting the carburetor on a scooter is possible both at home and in the field. It is recommended to carry it out at least once a season, especially during frosts - this will avoid flooding the candle. If your old engine starts to feel bad, adjusting the carburetor can extend its life. Although the moped will lose a little power. And yet, with the help of proper carburetor settings, you can make life much easier for yourself and your iron horse.
Signs that adjustment is needed
Based on certain signs that appear in abnormal engine operation, we can conclude that the carburetor needs adjustment.
The list of deviations is quite wide:
- the power plant does not develop the required power under load;
- when the scooter accelerates sharply, failures in engine operation are felt;
- a cold engine is difficult to start with the starter after a long period of parking;
- the scooter's power unit consumes fuel in increased quantities;
- there is no quick response of the engine to a sharp turn of the accelerator handle;
- The engine may suddenly stop due to insufficient fuel mixture.
The carburetor should be adjusted if there are signs of the need for adjustment.
If one or more of these signs is present, the carburetor should be adjusted, and then its condition should be diagnosed and the engine should be checked.
Signs of deviation in mixture preparation
When studying the technology of how to adjust the carburetor on a 2t, 4t scooter, the driver must know what factors indicate deviations in the process of preparing the fuel mixture. If it is lean, a popping noise will be heard from the system when the vehicle reaches high speed. In this case, the carburetor spark plug will be white. Electrodes may in some cases melt due to operating at too high temperatures. Also, the scooter will react poorly to turning the throttle when reaching the upper limit.
If the mixture is rich, a large excess of fuel will be detected. There will be black carbon deposits on the spark plugs. Black smoke and popping noises will come out of the muffler.
But if configured correctly, such phenomena will not appear. The engine will operate evenly at all speeds. There is no excessive consumption of gasoline. At any speed, the throttle will be informative, and when examining the spark plug, soot and soot will not be detected. Its color is slightly brownish (not white).
How to adjust engine idle speed
Work on setting up the power system is carried out after the engine has warmed up to operating temperature. All types of carburetors installed on scooters are equipped with a screw designed to regulate idle speed. Changing the position of the adjusting element allows you to ensure that the engine operates at stable speeds during idling.
Depending on the vehicle model, the adjusting elements are located in different places, so you need to carefully study the instructions and determine where the idle speed adjustment screw is located on the scooter.
Rotating the screw in a clockwise direction allows you to increase the crankshaft speed. Turning in the opposite direction, accordingly, ensures a decrease in speed. To perform adjustment operations, it is necessary to warm up the power unit of the scooter for a quarter of an hour.
Setting the engine idle
Then the screw is screwed in or unscrewed until a stable and precise speed of rotation of the vehicle engine is achieved. The adjustment is made in small increments by smooth rotation. After each manipulation, the engine should be run for several minutes to stabilize the speed.
Results
Despite all the difficulties and apparent complexity of the device, adjusting the carburetor on a scooter is possible both at home and in the field. It is recommended to carry it out at least once a season, especially during frosts - this will avoid flooding the candle. If your old engine starts to feel bad, adjusting the carburetor can extend its life. Although the moped will lose a little power. And yet, with the help of proper carburetor settings, you can make life much easier for yourself and your iron horse.
How to install a carburetor on a scooter: step-by-step summary
The carburetor fuel system is one of the key components of a vehicle such as a scooter. The functioning of almost all devices depends on its correct operation. Because sometimes the carburetor needs maintenance.
Every owner of the vehicles presented should be aware of the regulation function of this system. How to install a carburetor on a scooter will help you understand the advice of experienced mechanics. They will give you some tips on how to perform maintenance correctly and quickly.
Carbon meaning
Before installing a carburetor on your scooter, you need to once again study the purpose of this system. This will help you appreciate the value of doing similar work again.
The carburetor mixes the mixture of fuel (gasoline and air) before delivering it to the engine cylinder. Correct operation of this system depends on durability, engine speed and power, fuel consumption and, most importantly, driving safety.
The adjustment process must be comprehensive. Do you want to know more about adjusting the fuel level in your 2108-VAZ 21099 carburetor? Some owners of this type of car unknowingly underestimate the importance of such carburetor maintenance. At best, an inexperienced driver will only adjust the screw. This is the result, but only when the engine is running at low or idle speed.
Signs of adjustment required
There are several key features that let drivers know it's time to service their vehicle. They cannot be ignored. In other words, repairs will be much more expensive. Now I need to set up my ATV, how to tell you after Honda Scooter. In this case, find out how to properly install the carburetor on your scooter as soon as possible.
Firstly, engine power drops. This can also be observed due to wear and tear on engine systems. The piston group of cylinders may require replacement. But an incorrectly adjusted carburetor can also affect engine performance. If more air is added to the mixture than necessary, the fuel is depleted. This leads to overheating and poor performance.
If the entire engine can run, this may also indicate a carburetor problem. But to find the cause of the breakdown, you need to check several basic systems.
If the engine starts but stalls, it may be due to a blocked carburetor. In any case, the driver must carefully solve at least some problem with his vehicle.
Maintenance procedure
Carburetor damage is the most common problem in a vehicle such as a scooter. Four-stroke (4 tons) and two-stroke (2 tons) engines are available for sale. The engines produce 50 and 150 cubic meters. How to replace and adjust the clutch on a Renault Logan, how much it costs on a Renault. The differences are minor because the settings are almost the same on all systems.
It's even easier the Honda Dio carbon scooter . “That's why many automakers use this technique as an example when training inexperienced drivers. The process variant requires a number of manipulations.
Firstly, the carburetor is idle. Next, using a special screw, the ratio of air and gasoline in the fuel consistency is equalized. This operation can be performed by moving the needle. The last step is to control the fuel level in the float chamber.
Before installation, the carburetor must be removed and washed. Only then can you create settings.
Removal and cleaning
Before adjusting the carburetor On a standard Honda Dio scooter, you need to remove and clean this system. To do this, remove all plastic elements that interfere with this process (seats and plastic underneath).
If the engine is 2t, the fuel and oil hoses will be disconnected (on 4 engines there is no oil left). The enriched contacts have been removed. Then it is quite easy to unscrew the carburetor mounting bolts and remove it. Its external elements are cleaned of dirt.
Next, you need to partially disassemble the fuel system. The float chamber cover bolts are unscrewed (washed thoroughly) and the float is removed. Then the carburetor is washed. The system is reassembled in reverse order and installed in place.
Workshop Pit_Stop: Carburetor adjustment.
Blog link: Personal page in: Scooter Repair Team, Help in
Honda DIO AF 34. Part 6 Review of carburetor settings
Playlist of action camera EKEN h9r ultra hd 4k Honda DIO
A.F.
34
Cleaning the carburetor
Before adjusting the carburetor on a 2 or 4 scooter, the system mechanisms must be thoroughly cleaned. To do this, you can use one of two methods. Pit_stop Workshop: Carburetor settings. How to change a belt on a Honda Civic 4d. How to adjust the carburetor on a scooter. Initially the carburetor is shown to be very tuned. Theory (my turn 24 hours 7) carbon adjustment, how to disassemble, clean, adjust, adjust, assemble. In the first case, the carburetor is washed with gasoline and washed with a compressor. The equipment must have a tip shaped like a pointed tip.
If you don't have the proper equipment on hand, you can purchase a special carburetor flush fluid. With its help, all channels, parts and elements are simply cleaned. Liquid in a jar. Therefore it is supplied under pressure. This principle facilitates thorough purging of even narrow channels.
There is no need to dry internal systems after washing. Just assemble the system. Then you can create settings.
Idle speed adjustment
When considering how to install a carburetor on a 4 or 2 meter scooter, it should be noted that there are no fundamental differences between these types of engines. Some engine models may not have a propeller adjustment screw. This can only be corrected by adjusting the float needle.
The engine must be warmed up 10-15 minutes before starting work. One screw is installed on any scooter. To find out its location, you need to refer to the manufacturer's instructions. Use it to adjust resistance when cornering.
Turning the screw clockwise increases the speed and vice versa. How to tighten and adjust the handbrake on a VAZ-2112. The setting is created until the engine starts to run smoothly.
Mix quality
When considering how to install a carburetor on a scooter (150 cubic meters or 50 cubic meters), you should pay special attention to the quality of the flammable consistency. If the amount of air in it exceeds the permissible concentration, the engine overheats and its power decreases. Honda dio scooter, which affect the fuel consumption of scooters and mopeds, how to reduce. If, on the contrary, there is less air than specified by the equipment manufacturer, carbon black settles in the combustion chamber. Over time, this becomes a prerequisite for engine failure.
The adjustment must be made using a screw. It is best to find it using the manufacturer's abstract. So to install the carb scooter (50cc, 150cc), you need to turn the screw. Clockwise rotation will enrich the fuel, while counterclockwise rotation will deplete it.
If there is no screw, you need to use the carburetor needle adjustment feature. When grown, the mixture becomes richer, and when reduced, it becomes poor.
Mixture control scheme
When considering how to adjust the carburetor on a 4 or 2 meter scooter, you need to know the sequence of steps for such adjustment. First, the engine must warm up for 15 minutes. Then it should be disabled.
The screw is fully tightened clockwise. Then it should be released again by 1.5 turns (no more). The engine starts. At this time, the screw is pressed 1/3 of a turn. The motor runs for 2 minutes. If the rotation increases, the screw is loosened a quarter turn counterclockwise. Wait 2 minutes again. This is done until the momentum begins to fall.
When the speed is reduced for 2 minutes, the screw is tightened in the opposite direction a quarter turn.
Medium and high speed settings
If there are deviations in the production of fuel consistency at medium speed, the adjusting screw will not help eliminate the problem. Therefore, in this mode you need to resort to using the throttle needle. In most cases this can be in 5 positions.
Having learned how to adjust the carburetor on a Chinese scooter, you cannot ignore regulation at high engine speeds. This procedure occurs when the throttle valve is fully open. The quality of the consistency can only be determined by choosing the size of the main nozzle.
When the engine needs fuel enrichment, the portion presented should be larger and vice versa. The size of the jet is visible on the body of the part. How to adjust the fuel level in the carburetor on the carburetor! “How to replace it only in case of urgent need. It is quite problematic to do such work without outside help.
Signs of deviation when preparing the mixture
When studying the technology of installing a carburetor on a 2- or 4-ton scooter, the driver should know that this causes differences in the process of preparing the fuel mixture. If it becomes depleted when the car is reaching top speed, a clicking noise will be heard from the system. Hello !!! In today's post I want to tell you how to adjust the handbrake on a Renault Megane 2. In this case, the carburetor spark plug will be white. In some cases, electrodes may melt due to operation at very high temperatures. The scooter will also react poorly to the throttle when reaching the upper limit.
If the mixture is rich, high fuel consumption is detected. Dark soot will settle on the spark plugs. How to adjust the carburetor on a Honda dio, not how to adjust the needle position from the factory 1.5. Dark smoke comes out of the muffler.
But if configured correctly, such phenomena will not occur. The engine will run at moderate speeds at all speeds. There is no excessive consumption of gasoline. At all turns the throttle valve will be informative, and when inspected from the spark plug, soot and soot will not be detected. Its color is slightly brown (not white).
How to change the quality of the fuel mixture
For all scooter engines, it is important to receive fuel with an adjusted ratio of gasoline to air. A lean mixture leads to improper operation of the engine, a drop in power and overheating of the engine, while a rich mixture leads to an increase in consumption and the formation of soot.
Adjustment operations are performed by changing the position of the quality screw and moving the throttle needle.
Turning the screw to the right causes the mixture to become richer, and unscrewing in the opposite direction causes it to become leaner. The same happens with the needle: when the needle is raised, the mixture becomes richer, and when lowered, it becomes poorer. The integrated use of both methods allows you to achieve optimal results during setup. However, not all carburetors have this feature, so, as a rule, one of two options is used.
Setting the gasoline level and the correct position of the float in the chamber
A correctly adjusted fuel level in the float chamber does not allow the spark plugs to get wet and the engine to stall. In the chamber where the floats and jets are located, there is a valve that provides fuel supply. The correct position of the floats determines the closing or opening phase of the valve and prevents fuel overflow in the carburetor. The position of the floats is changed by slightly bending the fastening bar.
The closing or opening phase of the valve is determined by the correct position of the floats
Gasoline level is monitored with the engine running using a tube made of transparent material attached to the drain point and raised up. The gasoline level should be a few millimeters below the flange mounting of the cover. If the level is insufficient, remove the cover and adjust the needle firing phase by slightly bending the metal antennae.
Removal and cleaning
Before adjusting the carburetor on the Honda Dio scooter, taken as a simple example, it is necessary to remove and clean this system. To do this, all plastic elements that impede this process (the seat and the plastic underneath it) are dismantled.
If the engine is 2t, then the fuel and oil hoses will be disconnected (there are no oil outlets on 4t engines). The enrichment contacts are dismantled. Then simply unscrew the carburetor mounting bolts and pull it out. Its external elements are cleaned of dirt.
Next, you need to partially disassemble the fuel supply system. The bolts securing the float chamber cover are unscrewed (it is thoroughly washed), and the float is removed. Next, the carburetor is flushed. The system is assembled in the reverse order and installed in place.
Medium and high speed tuning
Using the quality adjustment screw, the fuel proportions at idle speed are ensured. For medium and high rotation speeds, the engine operating mode is adjusted using a different method. After turning the gas handle, the fuel nozzle starts working, supplying gasoline to the diffuser. An incorrectly selected jet cross-section causes a deviation in the fuel composition, and the engine may stall when gaining power.
To ensure uninterrupted operation of the motor at a higher frequency, it is necessary to perform a number of operations:
- remove debris from internal cavities;
- set the gasoline level in the carburetor;
- adjust the operation of the fuel valve;
- check the cross-section of the jet.
The correct operation of the engine is indicated by its quick response when turning the throttle.
A quick response when turning the throttle indicates proper engine operation.
How to set up a carburetor on a scooter - features for the 2t model
Adjusting the carburetor of a two-stroke scooter differs from adjusting the power system of four-stroke engines. Most two-stroke engines are equipped with a simple carburetor with a mechanical enricher, the trigger of which is pulled before starting the device. Scooter owners call the starting enrichment a choke; it is closed after the engine warms up. To adjust, the power system is disassembled, the needle is pulled out and mechanical intervention is carried out in the fuel chamber. Further adjustment is carried out in the same way as for four-stroke engines.
What is a starting enrichment
A starting enricher (electrovalve) is a device designed to supply an additional amount of air-fuel mixture into the combustion chamber during a cold start of the scooter engine. The fact is that when starting the scooter when cold, the engine requires an enriched mixture. The supply of such a mixture is ensured by the carburetor solenoid valve . If the starting enrichment is in good working order and there are no breakdowns in other engine elements, the scooter engine starts easily even at temperatures around zero degrees.
Setting up the carburetor on a 4t scooter - important points
Setting up the carburetor on a four-stroke scooter is easy to do on your own and is not difficult for motorcyclists. Setting up the carburetor of a 4t 50cc scooter (China) requires certain skills and patience and is performed according to the above algorithm. It is possible that the manipulations will have to be repeated many times until the desired result is achieved. If the carburetor setting on a 4t 139 qmb scooter or a similar model with a different engine is done correctly, the engine will operate stably.
It will be able to start regardless of the ambient temperature and the piston group in the engine will wear out less.
Scooter starting enrichment device
There are two types of starting concentrators - manual and automatic.
The manual (mechanical) starting enrichment requires adjustment - it must be opened at startup and closed after the engine warms up using a cable on the steering wheel. But manually opening and closing the additional channel for supplying the mixture is inconvenient. An automatic starting enricher (thermoelectric valve) is installed on most modern 2t and 4t scooters. We will learn about the device of the automatic starting enrichment further.
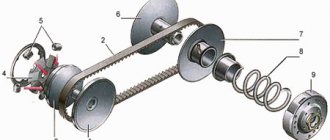
Solenoid valve body- Ceramic heater
- Drive (powder)
- Stock
- Pusher
- Damper
- Fuel chamber
- Float chamber
- Starting fuel jet
- Spring
The scooter carburetor has a small additional fuel chamber 7, which is connected to the main float chamber 8 through the start nozzle 9. The tube from chamber 7 leads to the mixing chamber into which air is supplied and from which the air-gasoline mixture goes into the engine. A valve 6 can move in the mixing chamber, similar to a carburetor throttle valve, only much smaller in size. Just like the throttle valve, the starting valve contains a spring-loaded needle that closes the fuel channel when the valve is lowered. Valve body 1 is wrapped in thermal insulation (polyethylene foam) and covered with a rubber boot. This enricher design is used on almost all modern scooters.
Older models may use a design without an electric heater, heat is transferred to the drive through a copper heat-conducting cylinder directly from the scooter's engine cylinder, and a membrane . One cavity of the flask, where it is located, is connected through a thermal valve to the intake manifold, which is mounted on the cylinder head.
Tips and tricks
Setting up the carburetor on a 4t 50cc scooter is an important and responsible procedure for servicing motorcycle equipment.
When performing adjustment operations, it is important to follow a number of rules:
- perform adjustments only after the engine reaches operating temperature;
- rotate the adjusting elements smoothly, observing the operation of the engine;
- Make sure there is no debris inside the fuel chamber and the jets are clean.
Before starting work on setting up the carburetor, you must study the operating instructions and clearly determine the location of the quality and idle screws. If you have a 150cc scooter, the carburetor adjustment is done in a similar way. After all, the process of regulating the fuel system is the same for engines of different powers.
Maintenance Procedure
Carburetor failure is the most common problem with a vehicle such as a scooter. Four-stroke (4t) and two-stroke (2t) engines are available for sale. Engines are produced in volumes of 50 and 150 cubic meters. The differences in them are insignificant, so the adjustment in all systems is almost identical.
It is much easier to adjust the carburetor of a Honda Dio scooter. Therefore, many auto mechanics use this technique as an example when training inexperienced drivers. During the setup process, you need to perform a number of manipulations.
First of all, the carburetor is adjusted at idle speed. Next, using a special screw, the ratio of air and gasoline in the fuel mixture is equalized. It is possible to perform this operation by moving the needle. The final stage is to control the fuel level in the float chamber.
Before tuning, the carburetor must be removed and washed. Only after this can the settings be made.
Methods for adjusting and tuning a scooter carburetor
The carburetor is an important part, without which the engine will not work. How to set up the carburetor on a scooter determines how smoothly and correctly the engine will run and whether it will be possible to start it in cold weather. The task of this unit is to mix gasoline with air in certain proportions, resulting in the formation of a working mixture, the composition of which determines the behavior of the power unit. The standard ratio should be 1 to 15, if you need the scooter to idle well, you can lean the mixture a little by making 1 to 13; enriched mixture - 1 to 17. For a more in-depth study of the design of a scooter carburetor, we recommend reading the article “The design of a scooter carburetor and the principle of its operation.” Well, now let's learn everything about adjusting the 2-stroke and 4-stroke carburetor of a scooter.
Intermediate setup
Adjusting the carburetor of a 2t scooter is carried out after installing the air filter in its place.
Start the engine and let it run for about 5 minutes to warm up.
Adjust the idle speed (ISR) with the quantity screw: by tightening it, the throttle rises and the idle speed increases; and when unscrewing, the throttle is lowered and the CO is reduced.
Set the speed so that the scooter operates at lower operating speeds.
How to adjust the carburetor on a scooter
Knowing how to adjust the carburetor on a scooter, you can get rid of many problems, make sure that the vehicle starts immediately, runs smoothly and does not fail in hot or cold weather. For this, the carburetor, depending on the model, has either only a needle or special adjusting screws.
Adjusting the carburetor on a scooter, if there are adjusting screws, occurs as follows: when the screw is rotated clockwise, the mixture becomes richer, and counterclockwise, accordingly, it becomes leaner.
The procedure must be carried out in the following order:
- You only need to tune it when the engine is well warmed up, so you need to let it run for 10-15 minutes, after which you can turn it off.
- Next, turn the adjusting screw all the way to the right.
- Then you can unscrew it to the left 1.5 turns. Repeat this action again.
- Carburetor adjustment does not end there. You need to turn the screw 1/3 of a turn, but before that, start the engine. Wait a few minutes and watch how the power unit works.
- If the speed increases, turn the screw ¼, this must be done counterclockwise. Wait a few more minutes and watch the engine run.
- If the speed does not drop, you need to repeat the previous step. Each time you need to let the engine run for at least two minutes, observing its behavior.
- Ideally, the motor should run smoothly after you unscrew the screw 1.5 or 2 turns. However, if the quality of the mixture is poor or the engine parts are worn out, additional adjustments are required.
- If the engine stalls when cold, then, on the contrary, you need to increase the speed, also check the quality of the mixture and change it, while it is worth noting that the carburetor adjustment occurs in principle the same way on both a Chinese and a Japanese scooter.
You also need to take into account little things that may be present on some scooter models, but not on others. For example, before adjusting the carburetor, you need to check the condition of the fuel filter. If it is very dirty, it is recommended to replace it, since even if the carburetor is new and well tuned, a clogged filter will prevent the mixture from flowing in the correct proportion.
The question of how to adjust the carburetor if you have the popular Japanese scooter Honda Dio is quite relevant. Regardless of the year of manufacture and type of carburetor, the scheme described above will suit it.
Idle speed adjustment
Idle speed adjustment plays an important role. When the engine warms up well, you can begin this procedure. To do this, you will need to rotate the adjusting screw clockwise. Its location depends on what model of scooter and carburetor you have. If you don’t know the exact location, find the description instructions for the installed model, where it will be written where which screw is located. For example, on a Honda, the original carburetor has such a screw in the center; on the left side you can find an adjustment for the quality of the mixture.
Adjustment is not difficult: you need to do it with the engine warm and running. When you tighten the screw, the speed will increase, and when you unscrew it, it will decrease. When the engine runs smoothly, you need to stop rotating the propeller. This must be done smoothly, after each change in position, let the engine run a little
Adjusting the mixture quality
Depending on the position of the needle in the carburetor, the percentage of gasoline and oxygen also changes: if there is a lot of air in the mixture, this can be seen by the spark plugs. They will turn black and a characteristic soot will appear. If, on the contrary, there is not enough air, a white coating appears on the candle, and it is clear that the electrode is melting. And this. and that’s not very good for the engine as a whole, not to mention the fact that you will have to change the spark plugs often. Before tuning, you need to unscrew the spark plug and examine its condition, from which you can already build on it, enriching or leaning the mixture.
Not only the operation of the engine, but also its condition depends on the quality of the mixture. For example, with a lean mixture, traction disappears, and with an excessively rich mixture, carbon deposits gradually form in the combustion chamber, which harms the engine. If the carburetor is modern, it has a special screw for adjusting the quality of the mixture, so there is no need to disassemble it. In order to enrich the mixture, the screw must be rotated clockwise; to lean it, rotate it counterclockwise.
The adjustment occurs as follows:
- First, the engine needs to be warmed up. This takes about 15 minutes, after which it can be turned off.
- After this, the screw is tightened clockwise until the end.
- Having done this, turn it counterclockwise 1.5 turns. We start the scooter, see how it works, you need to turn the screw 1/3 of a turn, let the motor run a little.
- When the speed increases, the screw must be unscrewed 1/4 turn.
- If this does not help, you need to turn off the engine again, turn the screw 1/4 turn, start it and let it run. Repeat the procedure until the engine runs smoothly.
If the carburetor model is old or the screw is missing, in order to debug its operation, you need to get to the needle. In this case, adjustment of the scooter carburetor occurs as follows: there is a special locking ring on the needle. When you raise it up, the mixture will become richer, and when you lower it down, it will become leaner. Typically from the factory the retaining ring is in the middle. Having pulled out the needle with your fingers or tweezers, we move the ring and reassemble the carburetor. After this, you can start the engine and see how it works. If necessary, adjust the settings to perfection using adjustment screws.
Adjusting the fuel level in the float chamber
The fuel level in the float chamber plays an important role. This part is located inside the carburetor, where the process of mixing gasoline with air takes place. In addition to the free reservoir, it contains a float, jets and a needle valve. It is the position of the float that determines when the valve is closed and, accordingly, whether the carburetor will overflow or not. If there is too much gasoline, the engine will start to stall because the spark plug will get wet and the spark will not be able to ignite the mixture.
The reasons why the carburetor on a scooter overflows are usually the following:
- Dirt has gotten into the carburetor, preventing the valve from closing.
- There is a lot of deposits in the chamber.
- The tongue that holds the float is not bent correctly, and the position of the float prevents the valve from closing in time.
The first two problems can be solved by cleaning the carburetor. You cannot use metal objects for this; You can arm yourself with a soft rag. Particular care should be taken when handling jets. The inside can be cleaned with a thin copper wire, but this should be done carefully. The second problem is solved by bending the tongue. It is quite fragile, so you can use your fingernail or tweezers, being careful not to break it. It is easy to check whether the float is positioned correctly: it should be parallel to the body, and not tilt up or down. Then, when fuel enters the chamber in the required amount, the float will rise, and the valve will block the flow of excess fuel into the chamber. Why a scooter carburetor overflows can be found in more detail here.
Carburetor structure
It is worth noting that the location of the carburetor is also different in different scooter models. Therefore, before you start adjusting it, you need to thoroughly study all the components and assemblies of your vehicle, their characteristics and location. The structure, in contrast to the location, of the carburetor is approximately the same.
The carburetor includes the following components:
- Venturi tube;
- valve with needle;
- float chamber;
- idle system;
- starting enrichment;
- spool;
- accelerator pump.
Venturi tube
So, the first element of the carburetor, called the Venturi tube, plays the most important role in its operation. This part is characterized by a diameter that varies throughout the entire length of the tube. This is due to the fact that it narrows towards the center, after which expansion follows again. It is the narrowest point of the tube that is intended for the air flow to pass through it.
The characteristic narrowing of the tube contributes to the formation of low air pressure, which is aligned to the point of expansion of the tube. If another smaller tube with gasoline is placed inside this tube, then the gasoline, on its way to the low-pressure zone, will begin to leave the small tube, spraying and evaporating, interacting with the air flow inside the large tube.
Flap with needle
The valve with the needle is installed directly in the center of the Venturi tube described above. It is necessary in order to regulate the amount of mixture that enters the combustion chamber. This adjustment is carried out by pressing the gas. However, the damper cannot operate without a needle. It is this that determines the volume of fuel entering the engine. So, when the pilot presses on the gas, the damper begins to move, thereby raising the needle, due to which the required amount of gasoline is supplied. In a word, the harder you press on the accelerator pedal, the more the damper opens, and, accordingly, the more fuel enters the combustion chamber.
Float chamber
To prevent the engine from stalling, it must be constantly supplied with fuel, a certain amount of which must be in the tube. For this purpose, a float chamber was invented, the operation of which is carried out on the principle of a toilet tank. Those. There is a float inside the chamber that moves to its lower part immediately after the gasoline level in the tube drops. Thus, the displacement of the float ensures the opening of a special valve through which fuel enters. After filling, the float rises, thereby closing the valve. This ensures a continuous and correct supply of fuel.
Idle system
The idle system in the carburetor is responsible for idling. However, its work is carried out not only at idle, but also at low speeds. In the case of idle speed, fuel is supplied through another channel of the carburetor, which is located behind the limiter. The idle system consists of:
Screw system
It is responsible for the volume of air that passes through the entire system, thereby regulating the quality of the mixture entering the combustion chamber. By tightening and unscrewing this screw, the pilot can adjust the amount of air. Accordingly, the less air volume enters the system, the tighter the screw is tightened, and vice versa. It turns out that when there is a lot of air, the fuel is leaner, when there is little, it is richer, since it contains more gasoline than air.
Special channel
The fuel mixture leaves the carburetor through it. This channel is closed by a special valve at the moment when the carburetor throttle valve opens
The valve is an important part because it prevents the system from negatively affecting the operation of the scooter's power unit at high speeds
Jet
Responsible for configuration.
It is worth noting that the carburetor idle system is its most vulnerable part. In this regard, faulty jets with a small cross-section are often the cause of carburetor malfunction. This is due to the fact that they are prone to clogging very quickly.
Thus, knowing the structure and principle of operation of the carburetor, you can begin to adjust it.
Features of setting up the carburetor of a 2-stroke scooter
The carburetor on the 2t scooter is slightly different in design and does not fit the 4t motor. The question of how to set up such a device worries all owners of two-stroke machines.
Most Chinese models have a fairly simple carburetor without unnecessary adjustments. The enrichment here is mechanical, although if you are tuning a scooter or you have a Japanese model, the enrichment can also be electric. In order to use the mechanical option, you must first pull the trigger on it, and then try to start the equipment.
Adjusting the carburetor of a 2T scooter is not difficult, but it does require some patience. In order to do this, you will need to disassemble the carburetor: first you will need to unscrew the top cover. The needle in it is fixed with a staple; it needs to be pulled out. The quality of the mixture is adjusted in the same way as described above. A feature of the push-pull system is that the needle affects the quality of the mixture only in a certain position. If the throttle valve is raised to its maximum, only the main fuel jet will be responsible for the fuel mixture. Sometimes the idle speed system interferes with it. Depending on what carburetor you have installed.
For a cold start, you need to use a starting enrichment, which must be closed after the engine warms up; Simply put, it's a suction. In such carburetors, the fuel level plays an important role. It is also regulated by mechanical intervention in the operation of the float chamber. It is configured in the same way as in the four-stroke version. In fact, the carburetor for 2t engines differs from models for engines on a 4-stroke scooter only in jets and some other parameters, but it is designed similarly, and therefore is regulated in the same way.
Tuesday, March 24, 2015
Setting up a scooter carburetor, using the example of a Honda Dio.
54 comments:
Question: Tell me what could be. Gasoline rushes from the carburetor into the air filter and flows out at the carburetor-air filter connection. This happened after cleaning and blowing the carburetor. Answer: Your scooter carburetor is overflowing. That is, the fuel level is higher than possible, obviously the needle or float is not working correctly. The carburetor may not be assembled correctly.
Thank you. I took it apart and it turned out that the float was prevented from working normally by silicone sealant, which I smeared under the gasket in the carburetor. When twisting the carburetor, it went beyond the possible limits and the float simply got stuck.
Look at the gasoline connection, you mixed up the air connection with the gasoline connection.
Tell me what size needle carburetor Honda Dio scooter 34/35.
My Honda Dio scooter won’t start and gasoline is gushing out of the orange hose when I start the scooter. Please help me.
Nikita. First, tighten the screw in front of the hose, this screw is for draining gasoline from the carburetor. And start the scooter, it will not start immediately when the carburetor chamber is filled, unless there are other reasons and breakdowns, unless of course we are talking about the hose that I thought of.
Tell me I have a Honda Tact. starts and works only when the screw is fully tightened to enrich the mixture. If you let it go, the moped stalls and the idle screw does not help. what could it be?
In short, the cause may be a clogged carburetor, poor idle speed, or a malfunctioning or incorrectly working enrichment system. Accordingly, the cause must be eliminated. I would start by cleaning the carburetor and look at the color and condition of the spark plug. Do not forget to make carburetor adjustments on a warm engine, and a temporary mixture enricher is responsible for a good start.
Features of tuning the carburetor of a 4-stroke scooter
Adjusting the carburetor of a 4t scooter is quite possible with your own hands and should not cause any difficulties, the main thing is to act according to the instructions described above. It’s not always possible to adjust; the carburetor on a 4t scooter works right away. You will have to be patient: you may have to repeat the procedure several times until you get a result that suits you. The smooth operation of the engine, the ability of the vehicle to start in cold weather, and what kind of piston wear will depend on how to correctly configure the carburetor in a 4t scooter.
4T scooters are usually equipped with similar carburetor models, so the VLC carburetor adjustment scheme described above is also applicable to other types of devices.
Scooter rider
The fuel supply system is necessary for engine operation. Even if there are craftsmen who can ride without a battery, then without a carburetor the scooter will not even start. However, a more modern analogue is becoming increasingly common - an injector. It is common in Europe and Japan, but in our country the owner of an iron horse, as a rule, has to deal with a traditional device. It is important to correctly configure the carburetor on a scooter, otherwise excessive fuel consumption and breakdowns cannot be avoided.
HOW TO ADJUST A CARBURETOR ON A SCOOTER?
Adjusting the carburetor Honda Dio 34
How to adjust the carburetor on a scooter. Theory (My Tact 24 Part 7)
If it is black, with a predominance of a large amount of soot, the mixture is rich. Carburetor adjustment must be carried out on a warm engine. You can check the fuel level in the float chamber using a transparent tube located at the very bottom of the carburetor.
Published: Apr 28 d. Interchangeability of Honda DIO carburetors. Spare parts for scooter: online store http Why...
A clean carburetor means dirty hands.
Spark plugs should be checked every thousand. We pay special attention to the fuel jet of the cold start needle. In this case, you need to unscrew the mixture quality screw counterclockwise by a quarter or half a turn to lean the mixture.
In this case, the adjusting screw will close and open the air channel.
The more you unscrew the XX screw, the more fuel-air mixture will be supplied to the combustion chambers, and the idle speed will rise. Float chamber It is important that the fuel in the float chamber is always within certain limits and does not drop below the permissible norm. It is also important that gasoline does not rise above the permissible standards - this will help to avoid overfilling.
Actually, the float, which on the opposite side has a shut-off needle at its disposal, is responsible for the optimal level of fuel in the float chamber. Gasoline filling the chamber raises the float as it enters, which is constantly afloat.
Reply Reply with a quote Quote Report to moderator 0 Informadmin You can check whether gasoline is leaving by unscrewing the drain screw. If there is no gasoline, then he has run away.
Diagnostics
Before installing the air filter, turn on the ignition and jerk the kickstarter foot several times until the engine starts.
If it does not start, then the most common reason is that the cold start system is malfunctioning.
We check this way: cover the carburetor hole with your fingers to maximally enrich the mixture with gasoline, and continue to push the kickstarter.
If the engine starts and the speed does not drop during operation, then look for the reason in the cold start system.
If the cold start system is working properly, then after starting the engine the speed will rise and gradually, within 10 minutes, begin to fall. On a warm engine, gradually unscrew the large screw (amount of mixture) until the speed drops to medium, confident idle.
At the same time, drops of gasoline should not splash or pour out of the carburetor.
If gasoline splashes out of the air supply hole, this indicates a malfunction of the reed valve in the engine. Then the valve needs to be removed and cleaned or replaced with a new one.
And if gasoline leaks out, this indicates a high level of gasoline. Adjust the float level and ensure the needle valve is sealed.
Adjusting the quality of the mixture.
You can also check the amount of gasoline in the float chamber in the morning and after starting. Reply Reply with a quote Quote Report to moderator -2 Roman The same problem with exactly the same carburetor, only our Dio 34 is generally after cap.
On more expensive Dio ZX models, these shortcomings are corrected. Scooters of the Tact family are designed for novice drivers. The advantages of Honda scooters include an engine with a vertical cylinder arrangement, which provides greater ground clearance than its analogues, and, in combination with a more durable design, allows the machine to be used not only around the city, but also in poor road conditions.
Over the years, the production of Honda scooters has been transferred to the Indian branches of the company, which has affected the quality of components and assembly of the machines.
If the mixture is too lean, the scooter will lose performance and the engine will overheat.
If you overdo it with the amount of fuel, scale will form in the combustion chamber, which will lead to breakdown in the future. You can adjust the quality of the supplied mixture using the adjusting screw.
It is considered ideal to operate the engine with the mixture quality screw in the unscrewed position by 1.5 - 2 turns. Depending on engine wear and other faults, this range may fluctuate. The scooter should accelerate smoothly, without dips, and there should be no jerking while driving.
If you are unable to achieve acceptable operation of the scooter, remove the throttle from the carburetor and raise or lower the needle. To do this, remove it from the damper and move the retaining ring along the grooves.
You can find out the quality of your mixture, and thus in which direction to adjust, by looking at the spark plug, or more precisely, by the color and deposits on its electrodes. We put the unscrewed jets into the float chamber, into which we first screw in the drain bolt and fill the float chamber with any liquid for cleaning the carburetor.
We unscrew the idle speed adjustment bolt, unscrew the mixture quality adjustment bolt, and pay attention here! Accordingly, we then assemble everything in reverse order.
Cleaning the carburetor of the Honda Dio AF18 moped
In fact, cleaning the carburetor on mopeds is not much different, so this article will apply to many models.
1. In order to get to the carburetor, you need to remove the side plastic, remove the seat with the glove compartment and remove the air vent.
2. To remove the air filter housing, you need to unscrew the 2 bolts under the housing and unscrew the clamp on the carburetor diffuser.
3. move the fuel hose clamp and the oil line clamp.
4. Unscrew the throttle valve. To do this you will need pliers.
5. Unscrew the carburetor from the inlet pipe.
6. Remove the casing from the cold start needle (unscrew 2 screws), remove the bracket and pull out the enrichment needle.
7. Using gasoline, remove dirt from the carburetor (you can use any container and a brush. A grimy carb)))
8. After we have removed all the dirt from the outside of the carburetor, unscrew the drain bolt of the float chamber and pour out all the contents. Then unscrew the float chamber.
9. Remove the float and needle valve.
10. Unscrew the idle jet and the main fuel jet with the emulsion tube. We put the unscrewed jets into the float chamber, into which we first screw in the drain bolt and fill the float chamber with any liquid for cleaning the carburetor.
11. Unscrew the idle speed adjustment bolt, unscrew the mixture quality adjustment bolt, and pay attention here! remember the order and completeness of what will be here, and the following will be here: an adjusting screw, a spring, a washer and at the end a rubber seal. Accordingly, we then assemble everything in reverse order.
12. Wash the adjusting screws with gasoline.
13. Spray all holes in the carburetor with cleaner.
16. Wash all carburetor components with an ether-based cleaner.
17. We pay special attention to the fuel jet of the cold start needle.
18. Putting everything back together)
19. After we have tightened the adjusting screws, unscrew the idle speed screw by 2.5 turns and the mixture quality screw by 1.5-2 turns.
A clean carburetor means dirty hands.
Call center 24 hours. Any questions from those. consultations to assistance with placing an order.
Warranty on all products
Warranty for goods from 6 months to 3 years. If there is a defect, we will replace the product without any questions asked.
Secure payment methods
Pay by credit card, PayPal, bank transfer or cash upon delivery.
Delivery throughout Russia
You can choose delivery by courier, Russian Post or at a pick-up point.
We will pack it well, send it for delivery and monitor the order until delivery.