Tuning the carburetor of a 4-stroke scooter is, of course, not rolling back the injector using broadband lambda
, but it also requires a competent approach and knowledge. For stable operation and efficiency, Chinese manufacturers have developed and implemented several design additions. Before you start adjusting the carburetor on a 4t scooter, it would be a good idea to become familiar with the structure of this device.
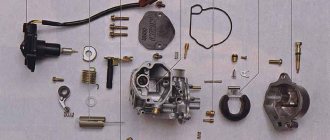
The main purpose of the main device of the power supply system is to prepare the optimal mixture entering directly into the cylinder. The carburetor consists of the following components:
- Frame.
- Throttle valve.
- Jets.
- Float system.
- Throttle valve.
- Acceleration pump.
- Start-up enrichment.
- Screws for adjustment.
- Dosing needle.
To create an enriched mixture when starting a cold engine, Chinese scooters are equipped with a starting enricher.
In the absence of voltage at its contacts, the needle completely releases the starting channel, which opens the way for an increased dose of fuel into the carburetor diffuser.
For efficiency indicators, the idle shutdown system is responsible, which disables the idle option under load.
Despite the complexity of the design, servicing the carburetor unit is quite within the capabilities of a novice mechanic. Before starting the process, it is worth installing a proven spark plug, as well as a good air filter element. Adjusting the carburetor on a 4t scooter should be done with the engine warm. The process consists of the following operations:
- idle speed adjustment;
- adjusting the quality of the mixture with a screw;
- adjusting the mixture quality with a needle;
- adjusting the fuel level in the float chamber.
The carburetor design includes a screw that controls the engine speed at idle.
When it is tightened, the air supply channel becomes smaller, as a result of which the fuel mixture is enriched and the number of revolutions increases. To reduce this indicator, accordingly, the screw must be unscrewed. The process is controlled by gradually unscrewing every quarter turn.
Compliance with the proportions of the combustible mixture is the main condition for the smooth and stable operation of the scooter.
This condition is met, depending on the model, by adjusting the throttle valve with the appropriate screw or needle. The mixture becomes richer when the screw is turned clockwise or when the needle is raised.
Exactly the opposite is the process of composition depletion. On a new product, it is considered normal for the screw to be unscrewed by 1.5-2 turns. The degree of engine wear and the presence of other breakdowns can expand this range. Experienced mechanics check the accuracy of the settings by checking the spark plug.
The amount of fuel in the float chamber is checked when the scooter engine is running by lifting the fuel supply tube up. Non-compliance of the level with technical standards is eliminated by adjusting the needle holder within small limits. Adjusting the carburetor on a 4t scooter can be considered complete if there are no unwanted dips or detonation during a test ride.
Signs that adjustment is needed
Based on certain signs that appear in abnormal engine operation, we can conclude that the carburetor needs adjustment.
The list of deviations is quite wide:
- the power plant does not develop the required power under load;
- when the scooter accelerates sharply, failures in engine operation are felt;
- a cold engine is difficult to start with the starter after a long period of parking;
- the scooter's power unit consumes fuel in increased quantities;
- there is no quick response of the engine to a sharp turn of the accelerator handle;
- The engine may suddenly stop due to insufficient fuel mixture.
Carburetor value
Today, there are several ways to supply fuel to the engine. They differ in their principle of operation, but all devices are united by a common parameter - preparing the exact amount of working mixture.
The carburetor is a simple but effective device for optimal dosing of fuel assemblies into the cylinders. The idea of its operation is simple - mix the required amount of fuel and air, and then feed the finished proportion into the engine.
The advantages of using a carburetor set it apart from other methods of preparing the mixture. The engine itself controls how much fuel it needs to receive.
Thursday, September 28, 2022
Carburetor diagram for 139qmb
Check all O-rings for damage. Replace if necessary.
When cleaning the carburetor, remove the vacuum diaphragm before using purge air or cleaning solvents. This will prevent damage to the diaphragm.
Possible malfunctions of the CVK carburetor
1.The engine is difficult to start
— No spark - Poor compression
2. There is no fuel in the carburetor
-Closed fuel line -Closed fuel filter -Blocked vacuum line -Damaged Broken vacuum line -Clogged inlet needle -Float level set too high
3. Too much fuel for the engine
-Dirty air filter -Air leak in the manifold -Faulty enrichment valve -Blocked air passage in the carburetor
4. Air/fuel mixture too rich or too pale
-Faulty enrichment valve -Tightened idle screw -Float needle stuck or dirty -Float height too high or too low -Blocked carburetor air passage -Dirty air filter -Carburetor or manifold air leak
5. Engine does not accelerate
-Bad spark -Air mixture screw too tight -Accelerator pump faulty
6. Almost does not respond to the throttle
-Weak spark/poor ignition -Blocked fuel line -Blocked fuel filter -Bad fuel -Water in fuel -Air leak in carburetor or manifold -Faulty enrichment valve -Fuel flow difficult in carburetor -Vacuum choke stuck -Damaged vacuum diaphragm -Dirt in carburetor
Removing the carburetor
1. Remove the seat and container underneath. 2. Remove the right side panel. 3. Disconnect the starter cable connector. 4. Loosen the carburetor drain screw and drain the fuel from the float chamber. 5. Loosen the clamps in the intake pipe and intake manifold. 6. Loosen the throttle cable and pull it out of the caliper and out of the throttle control sector. 7. Disconnect the fuel line from the carburetor. 8. Remove the air intake tube and pull the carburetor straight back out of the intake manifold. 9. Remove the starter enricher from the carburetor.
Checking the enrichment valve
1. Check the resistance level. 2. The standard value is below 5 if it is cold. 3. Connect the enricher to a 12 V battery. 4. The plunger should extend 3/8 inch (approximately 10 mm) after 5 minutes.
5. Check the needle and its working place in the carburetor. 6. Replace if necessary. 7. Place the enrichment valve in the installation location and press down. 8. Install the retaining ring and tighten the screws.
Air shut-off valve
1. Unscrew the two screws of the traverse, the throttle cable, and remove it. 2. Unscrew the two screws of the air shut-off valve. 3. Remove the spring and vacuum membrane. 4. Check for membrane wear, replace if necessary. 5. Clean the channels, remove dirt.
Vacuum chamber
1. Remove two screws and remove the cover. 2. Remove the spring and membrane flap. 3. Remove the fuel needle. Be especially careful not to damage the membrane. Replace if damaged.
1. Check the needle for wear and replace if necessary.
Float chamber.
1. Remove the three screws and float chamber pan. 2. Remove the pin that holds the float. 3. Remove the main fuel jet, idle speed jet and idle mixture quality adjustment screw.
Be careful not to break the fuel jets and mixture screw. Count the number of revolutions when removing the mixture quality screw. When reinstalling the jets and screw, do not tighten them.
4. Clean the jets with solvent and compressed air. 5. Clean the carburetor body and all passages with compressed air.
1. Check the float needle and its seat and blow off any dirt. 2. Install the idle jet, fuel needle nozzle, main fuel jet into the carburetor.
3. Install the float. Adjust the fuel quality screw. Standard setting is 2 turns, plus or minus 1/4 turn. 4. After installing the float chamber pan, check the fuel level using a small ruler or calibrator. The correct fuel level is 20.5 mm (0.807 in).
Maintenance Procedure
Scooter motors are manufactured in different volumes. The most common are 50 and 150 cubic meters. The gas distribution system has both 2t and 4t options. The differences between the models are minimal, so maintenance of 2 and 4 stroke 50cc mopeds is carried out according to the same principle.
The technique includes:
- Carburetor adjustment at idle speed. The scooter starts and its operation without load is analyzed. The assessment is carried out based on the evenness of the strokes and the stability of the engine speed.
- The position of the screws for the quantity and quality of the mixture is adjusted.
Due to the relative lightness of the structure, adjustment is made with two control bolts. If stable operation cannot be achieved, it is necessary to remove the unit and carry out deep cleaning and adjustment.
Important: before servicing the carburetor on a 4t and 2t scooter, you should make sure that the piston group and ignition system are in good condition. Otherwise, the adjustment will have no effect.
Removal
Because of the way it works, the carburetor is attached directly to the intake manifold. The fuel line and air duct are connected to it. All removable hoses are removed from the body and the part is exposed.
The starting enrichment is switched off. The fastening bolts are unscrewed with a spanner wrench, and the entire assembly is pulled out.
Installation is in the reverse order.
Carburetor cleaning
An excellent cleaning method is to blow out the internal channels with compressed air from a compressor. For this, a special gun with a pointed tip is used.
During operation, plaque forms on the surfaces of the carburetor. This is due to the quality of gasoline. Most of the dirt stops in the fuel filter, but some gets into the intake tract.
To remove deposits, you can use either a solvent or a special liquid for cleaning carburetors. It is also suitable for scooters. The advantage of using it is that the cleaning agent is under pressure and is able to penetrate into the most inaccessible channels.
The scooter carburetor has rubber gaskets. To avoid exposing them to cleaning mixtures, it is recommended to insulate these parts in advance.
When cleaning the intake mechanism of a scooter, it is not recommended to use fluffy rags. Their threads can get stuck in the carburetor components, which will lead to additional difficulties.
Idle speed adjustment
An indicator of proper operation of the carburetor on a scooter is a stable idle. The absence of “floating” speeds and confident operation indicate a prepared mixture inside the combustion chamber.
Regardless of 2 or 4 stroke engine options, you should start tuning by adjusting the idle speed. The number of cubes also does not matter.
For this purpose, there is a screw on the device that is responsible for dosing fuel when the scooter is operating without load.
Some carburetors do not have adjustment bolts. In this case, you need to adjust the idle mode using a needle and floats in the fuel chamber.
The scooter is started and allowed to run for a few minutes. This is necessary for better evaporation of gasoline inside the intake manifold and its mixing with air.
After warming up, turn the idle screw until the engine becomes stable. The criteria for correct adjustment are:
- the scooter maintains stable speed indicators;
- there is no engine tremors or failures in operation;
- the carburetor confidently switches to power gain mode (when over-throttled) and back.
Sometimes the scooter refuses to respond to idle adjustment. This behavior indicates additional problems in the intake system.
Mix quality
The two main components in the operation of any internal combustion engine are air and fuel. The force from their combustion pushes the pistons and forces the vehicle to move.
But simply mixing these substances is not enough. You can achieve maximum energy output only by maintaining the correct proportion of components. In a carburetor, this procedure is called adjusting the quality of the mixture and the entire operation of the 50cc scooter depends on it.
There are three types of air-fuel mass:
- poor;
- rich;
- optimal.
Maintaining the correct mixture ratio in the carburetor is vital for reliable engine operation.
Mixture control diagram
First, you need to start the scooter and warm it up. After setting the temperature, you should proceed according to the following algorithm:
- The mixture quality screw is tightened until it stops.
- Loosen the adjusting bolt one and a half turns counterclockwise.
- Start the scooter, tighten the screw a third.
- If the speed increases, turn it a quarter.
- We adjust until the speed stops falling.
This scheme allows you to configure all types of motorcycles.
Why adjust the carburetor?
Carburetor adjustment may be required in the following cases:
- The spark plugs are serviceable, but do not work very well; their color has changed to black or yellowish.
- The engine does not provide the required power
- Scooter won't start
- Fuel consumption has increased excessively.
All these problems in most cases are caused by an insufficiently enriched or, conversely, overly enriched mixture with oxygen, and they can be corrected by correctly adjusting the carburetor.
The settings, regardless of whether you have a 2t or 4t scooter, have three phases and are made as follows:
- Idle speed adjustment
- Setting the fuel level
- Adjusting the quality of the mixture.
On some carburetor models there is no screw that adjusts the fuel quality, so you have to disassemble the carburetor to change the position of the needle.
The idle speed adjustment is carried out after the engine has warmed up: this takes no more than 15 minutes. For this purpose, the design provides an idle screw. It allows you to make the engine stable by selecting the desired idle speed. When the screw is tightened, the speed will increase, and when it is rotated counterclockwise, it will decrease.
It is important to adjust the quality of the mixture. If it is too lean, the scooter will ride with difficulty, the engine will noticeably lack power
If the mixture is too rich, the spark plugs will turn black and quickly fail. Fuel quality adjustment is usually carried out using a screw located on the carburetor body. To enrich it you need to turn it clockwise, to lean it counterclockwise. If there is no screw, the carburetor is opened, the locking ring on the needle moves up for a richer mixture, down for a leaner one.
Adjustments are made as follows:
- Start the engine and warm it up for 10 minutes, after which you need to turn it off
- The screw must be tightened clockwise until it stops, but without force.
- After this, it is unscrewed counterclockwise 1.5 turns
- The engine needs to be started and the screw turned an additional 1/3 turn in the same direction. Wait 2 minutes
- As the speed increases, you need to unscrew the screw an additional ¼ turn and observe the reaction for about 2 minutes. If the speed does not drop, repeat the steps
- If the speed begins to decrease, the screw must be turned clockwise by ¼ turn.
Ideally, the engine will operate exactly at 1.5-2 propeller revolutions, but its position depends on the quality of the fuel. In the case of a needle, the quality of the mixture will vary depending on the position of the needle locking ring. The disadvantage of such a carburetor is the small number of needle positions and the need to disassemble it each time to make adjustments.
You can adjust the fuel level in the chamber as follows:
- Unscrew the drain screw
- The phone is lifted up
- You need to check the fuel level while the engine is running. The melting level is slightly below the skirt located on the float chamber cover
- Most often, the level rises above normal and the carburetor overflows, so you need to adjust the float so that it fires earlier. To do this, the needle holder is usually bent. A lot of force is not required, only a few mm are needed.
Setting the fuel level
This procedure is also carried out using a jet located at the very bottom of the float chamber. The first step is to unscrew this screw, but gasoline should not come out of the tube. The tube is located below the jet and is usually transparent. It shows the fuel level, so lift it in a vertical position. If the fuel level in the float chamber is normal, the gasoline in the tube will be slightly less than the cap curb.
Important
: You need to check this indicator only with a warm running engine.
Adjusting the fuel level in the carburetor of a 4t scooter is as follows: remove the float chamber and find the needle inside. The needle has marks and a small locking ring. You can increase the fuel level by installing the ring above this indicator, and decrease it by doing the opposite.
This is interesting: Reasons why Kalina 8KL does not start
What is the need?
In order to prevent parts from wearing out too quickly, it is important to select the correct mixture at idle, at full throttle and in modes when the throttle is not fully open. What should make the owner think about adjusting the carburetor of the Alpha moped in these modes? Violation of the ratio of air and gasoline
Ideally, it should correspond to 1:15, where there is only 1 part of gasoline. Signs of a violation may include:
- Difficulty starting the engine.
- Any instability in idle speed can be heard as irregular engine operation.
- When you turn the throttle all the way, the engine does not rev up and accelerates slowly.
- Popping sounds in the carburetor or exhaust pipe.
- Candle color is white or black.
Carburetor installation
Assembling and installing the device after washing is in the reverse order. Particular attention should be paid to the installation of the throttle. The damper must fit completely into the carburetor; to do this, turn it until it sits “head down”. Screw on the lid. If you don’t have a cleaner at hand, you can wash all the parts in gasoline and blow them out using a pump or compressor, having previously placed a special nozzle with a pointed tip on it.
You can see the cleaning process with your own hands in the video.
Purpose and principle of operation of the carburetor
The carburetor is an important component of an internal combustion engine, responsible for preparing the air-fuel mixture and supplying it to the working cylinder in the required ratio. A scooter engine with an unadjusted carburetor cannot function properly. The stability of speed, the power developed by the engine, gasoline consumption, response to turning the throttle, as well as ease of starting in the cold season depend on the correct settings of the engine power supply.
An important component of an internal combustion engine is the carburetor.
This unit is responsible for preparing the air-gasoline mixture, the concentration of the components of which affects the nature of the operation of the power plant. The standard ratio is 1:15. Leaning the mixture to a ratio of 1:13 ensures stable engine operation at idle. Sometimes it also becomes necessary to enrich the mixture by maintaining a ratio of 1:17.
Thanks to a properly configured carburetor, easy and quick starting of the vehicle engine is ensured, as well as stable operation of the engine, regardless of the ambient temperature. Any carburetor is equipped with jets with calibrated holes, a float chamber, a needle that regulates the cross-section of the fuel channel, as well as special adjusting screws.
The adjustment process involves specially rotating the screw in a clockwise direction or in the opposite direction, which causes, respectively, the enrichment or depletion of the working mixture. Adjustment measures are carried out on a warmed-up engine. In this case, the carburetor unit must first be thoroughly washed and cleared of blockages.
Adjusting the carburetor of a 4t scooter
One of the most important parts of any scooter is the carburetor; it is responsible for the correct supply of fuel, and therefore you should have a properly configured carburetor. Initially, the manufacturer makes scooters that would be suitable for a certain climatic situation, and the fuel system may not be able to cope with our weather changes, as a result of which the carburetor does not work correctly and most often does not maintain speed. That is why modern scooters are equipped with various adjusting bolts so that the vehicle owner can adjust the engine to the desired parameters, and adjusting the scooter’s carburetor does not cause difficulties.
A carburetor is a specific part of a scooter that is responsible for preparing the fuel mixture, mixing gasoline with air. The standard ratio of gasoline to air is 1 to 15, so any carburetor should produce these figures. Also, depending on this ratio, the mixture may be different; in the above parameters it will be optimal. But if you want to get a mixture that does not stall the engine at idle, use a ratio of 1 to 13.
After this, you can call the mixture “rich.” And finally, the last type is a lean mixture. This is the worst option, where the ratio of fuel to air is 1 to 17. With a lean mixture, there is a risk of carbon formation in the piston and its complete breakdown, so next we will talk about how the carburetor is adjusted on a 4t scooter.
How to set up a carburetor on an Alpha
On my moped it was possible to adjust the spark plug insulator only by checking it. Normal settings at 2.5-3 full turns of unscrewing the quality screw (2.5 turns is the minimum at which the soot stopped appearing) MY ENGINE STALLED WHEN CLOSING THE THROTTLE SHARPLY AND I NEEDED TO LEAN THE MIXTURE (AND I MIXED IT UP AND ENRICHED IT)
Next, after all that has been done, we drive the scooter for several kilometers as usual, unscrew the spark plug and visually determine by the color of the spark plug insulator what mixture the carburetor is “preparing.”
If the spark plug insulator is black and covered with a layer of soot, then the carburetor is “preparing” a “rich” mixture, in this case the situation can be corrected by UNLOCKING THE QUALITY SCREW (if this does not help, then lowering the carburetor needle to the desired division.)
It must be remembered that the reason for the enrichment of the scooter mixture can be not only incorrect carburetor settings, but also a dirty scooter air filter; and the cause of a lean mixture may be the scooter’s fuel system clogged with dirt.
Results
Despite all the difficulties and apparent complexity of the device, adjusting the carburetor on a scooter is possible both at home and in the field. It is recommended to carry it out at least once a season, especially during frosts - this will avoid flooding the candle. If your old engine starts to feel bad, adjusting the carburetor can extend its life. Although the moped will lose a little power. And yet, with the help of proper carburetor settings, you can make life much easier for yourself and your iron horse.
Carburetor adjustment (tuning)
Adjusting the carburetor on a scooter consists of several stages, which include: adjusting the idle speed, adjusting the mixture quality and adjusting the fuel level in the float chamber.
Setting up the carburetor of 2t and 4t scooters has no fundamental differences, except that on some carburetor models there may be no screw for adjusting the mixture quality and therefore the mixture quality has to be adjusted only by adjusting the needle and float in the scooter carburetor
5 - idle screw on a 4-stroke scooter
Adjusting the mixture quality
The quality of the mixture is a very important point when adjusting the carburetor, since with a lean mixture the engine can overheat and lose power, and with a rich mixture carbon deposits will form in the combustion chamber.
We adjust the quality of the mixture using the adjusting screw. The mixture becomes richer if we turn the screw clockwise and becomes leaner when we turn it counterclockwise.
The adjustment diagram looks like this:
- Warm up the scooter for 10 minutes, turn off the engine;
- Tighten the screw fully clockwise;
- Unscrew 1.5 turns back counterclockwise
- Start the engine and turn the screw back another 1/3 turn. Let the engine run for 2 minutes.
- If the speed increases, then unscrew the screw another 1/4 turn counterclockwise. We also let the engine run for 2 minutes.
- Repeat the previous step until the speed starts to drop (remember to let the engine run for 2 minutes before each change)
- If the speed begins to drop, then screw the screw clockwise 1/4 turn.
This ensures stable engine operation at any permissible speed. Ideally, the engine should work well with the mixture quality adjustment screw unscrewed by 1.5 - 2 turns. However, due to wear and tear of engine parts, this range may change.
If your scooter’s carburetor does not have a screw for adjusting the mixture quality, then the adjustment must be made only by adjusting the position of the carburetor needle. Raise the needle - the mixture becomes richer, lower the needle - the mixture becomes leaner.
You can tell by the carbon deposits on the spark plug that the quality of the mixture has been incorrectly adjusted. If the carbon deposits on the candle are black and there is a lot of it, the mixture is too rich. If the carbon deposits are almost white, the mixture is too white.
Adjusting the fuel level (in the float chamber)
The fuel level in the float chamber can be checked using a transparent tube located at the bottom of the carburetor. In order to do this, you need to unscrew the butter screw and lift the tube towards the top of the carburetor. Now we check the fuel level with the scooter engine running. It should be located just below the protruding skirt at the point where the float chamber cover is attached to the carburetor.
If the level is low or, as is more often the case, too high, then it is necessary to remove the cover and adjust the timing of the locking game by bending the needle holder (a small tendril) in a very small range.
It is worth remembering that if the carburetor malfunctions or its internal elements are dirty, adjusting the carburetor may only temporarily solve the problem.
This is the whole principle of setting up a carburetor on a Chinese and Japanese (Honda, Suzuki, Yamaha, etc.) scooter. Now you can independently repair and adjust the carburetor on 2t and 4t scooter engines with a volume of 50 and 150 cubic meters.
Design, configuration and malfunctions of a four-stroke scooter carburetor
The article describes in detail the design and principle of operation of the carburetor. Possible malfunctions and methods for eliminating them are given, as well as recommendations for setting up the carburetor.
Before writing this article, I read publications about carburetors on the RuNet. I only discovered that Moto magazine published similar information in the October 2005 issue. I never found the article itself.
The principle of operation of a carburetor. Much has been written about the principle of operation of a carburetor; in my opinion, this is described most fully and accessiblely in an article found on the Internet:
Principle of operation and adjustment of the carburetor Many sooner or later face, for some reason, the need to adjust the carburetor. But not everyone knows how to do it correctly. This article may be useful to you in such a situation... The carburetor at first glance looks like a complex device, but a little theory and it will be easier for you to cope with its settings. The first thing you need to know is at least the basics of the principle of operation of the carburetor and its main controls and adjustments. Let's start with the basics. Let's look at the principle of operation of a carburetor using the example of Figure 1:
The opening in the carburetor through which the air-fuel mixture (the mixture that ignites in the combustion chamber and causes the piston to move up and down) is supplied to the intake manifold, as shown in the figure by arrow 1 (the intake manifold is the pipe connecting the carburetor to the engine) and then enters combustion chamber. When the engine is running, the pressure in the intake manifold decreases relative to atmospheric pressure, which also leads to a decrease in pressure in the carburetor. Naturally, since the atmospheric pressure is higher, air will begin to flow into it from the side of the carburetor, shown by the blue arrow, and, accordingly, through the intake manifold and bypass channels into the combustion chamber. Air passing through the carburetor will pick up fuel from the fuel chamber and mix with it, thereby creating a combustible air-fuel mixture. Figure 1 shows that air enters the carburetor through a gradually narrowing channel. It is like a river bed. You've probably noticed that in the place where the river narrows, the current increases. The same thing happens in the carburetor: the movement of air accelerates, which leads to even greater discharge. The chamber where the fuel is located is connected to the atmosphere, so the pressure in it is higher, and the fuel rises through the tube and mixes with air. The result is a fuel-air combustible mixture. The lower the pressure in the carburetor, the more fuel enters and mixes with air. Now let's go deeper. How to regulate the supply of fuel with air? You've probably all noticed that there is a gas handle on the right side of the scooter's steering wheel? :o) So she controls the carburetor. Consider Figure 2 below:
The throttle handle on the steering wheel is directly connected to the air damper and the metering needle attached to it. When the gas is released, the needle almost completely blocks the fuel supply channel from the float chamber (why it is a float chamber, we will explain below) and the air damper blocks the air. How does the needle block the fuel channel? Yes, very simple! After looking at Figure 3, you should understand everything at once. The more gas you add, the higher the valve needle rises and the more the fuel supply channel opens. Along with the needle, the air damper also rises. The amount of combustible mixture increases proportionally and is supplied to the combustion chamber, where it is ignited by a spark from a candle.
How does idle work? Why is it needed? It is needed to stably maintain low engine speeds during times when the scooter is not moving, so that the engine does not stall, and also to save fuel. The combustible mixture in this mode is quite lean and enters through a separate channel. The principle of operation is shown in Figure 4. When the throttle is released, the spool needle closes the main fuel supply channel, only air damper 3 remains slightly open, supplying a little additional air for idle speed (hereinafter in the text we will reduce idle speed - XX). The hole through which the fuel mixture is supplied for XX is located behind the air damper and the air-fuel mixture begins to flow through it into the cylinder only when the vacuum in the carburetor increases greatly, i.e. when the air damper closes the air too much. The combustible mixture at XX is prepared in this way: fuel from the float chamber is supplied through channel 4 and mixed with incoming air through a separate air channel shown by the blue arrow. The quality of the mixture is regulated by the mixture quality screw XX 2, i.e. the more you tighten the screw, the more you block the air channel, then the mixture becomes richer (there is more fuel in it), the more you unscrew the screw, the more air comes in and the mixture becomes leaner (there is more air in it). Thus, by screwing or unscrewing the XX quality adjustment screw, you achieve the optimal proportion. Higher or lower engine speeds are achieved by slightly raising or lowering the main air damper 3. For this purpose, a special speed screw is installed on the side. By twisting it, you raise the air damper, and by unscrewing it, you lower it.
For the correct dosage of fuel and air, jets are installed in the places where they are taken. What is this, a jet? Schematically in cross-section it looks as shown in Figure 5:
Hole 1 in it is selected with a certain diameter and does not allow consuming more fuel or air than normal. The jets are installed at the entrances to the fuel supply channels for the main and idle speeds. Also, sometimes, instead of an adjusting screw for the quality of the XX air mixture, a jet is installed at the entrance to the air channel. The advantages of this design are that you do not need to adjust the quality of the mixture, the disadvantages are that if it wears out over time or due to other factors, you cannot adjust anything. What is a float chamber? This is the container in the carburetor where the fuel is located. With the help of a plastic or iron float, the level of gasoline in the chamber always remains stable. As soon as the fuel begins to decrease, the float lowers and the needle to which it is connected opens the fuel supply hole from the gas tank. Gasoline begins to flow, the float rises again and the level stabilizes.
It is worth mentioning that when the engine is cold, it does not have enough fuel to start properly and the mixture needs to be richer. Agree, turning the screws and changing jets for this is not very convenient :o) For this purpose, an additional channel for supplying the fuel mixture was created, very similar to the main one, only smaller in size. There is also an air damper and a needle, but the damper is controlled mainly in two ways: 1). Manual control. There is a lever installed on the steering wheel. When cold, you turn it, an additional channel opens and additional mixture flows in. As it warms up, turn the lever to its original position. 2). Automatic control. The needle and flap are connected to a device that is forced to heat up. Heating often occurs with a coil (similar to a boiler) connected to a generator. In this case, the material that heats the spiral expands and pushes the rod to which the air damper with a needle is attached. The warm-up time is optimally calculated, and after a certain time (approximately 3 to 7 minutes) the channel is completely closed. It should be noted that carburetor adjustment should be carried out only on a well-warm-up engine. On a cold engine, the auxiliary fuel supply valve will not close and the engine will not operate properly due to its not fully warming up. Start adjusting immediately after you have ridden the scooter or after 10-15 minutes of warming up. Also, before adjusting, check, or better yet, replace with a new spark plug. Check the air filter for contamination, clean it or replace it with a new one. Make sure the exhaust system is clean. It is also advisable to rinse in gasoline and blow out all channels and jets in the carburetor with compressed air. Only after this you can start making adjustments. And now the carburetor adjustment itself. The needle in the air damper can move relative to it within small limits. To do this, there are grooves on the needle into which a corkscrew ring is inserted. We put this ring in the middle groove. Screw the mixture quality adjustment bolt all the way and unscrew it back 1 1/4 - 1 1/2 turns. We start the scooter. If there are no idle speeds, they are too low or high, we increase them by adjusting the idle speed screw; if they are high, then reduce them. Then again, by adjusting the mixture quality screw, we achieve maximum idle speed and screw it back by 1/4 - 1/2 turn. Let's try to go. If there are dips when accelerating from a standstill, tighten the mixture quality screw another 1/4 turn. After each adjustment using the quality screw, we adjust the engine idle speed using the idle speed screw. If there is excessive fuel consumption, you need to lower the spool needle one notch and make the adjustment again, as described above. If, on the contrary, the scooter still does not have enough fuel, there are dips, raise the needle one notch up and repeat the adjustment all over again. To some extent, the correct carburetor adjustment can be determined by the color of the spark plug insulator. If the color is brown, then the overall quality of the fuel is normal. Basically, the operating principle and design of all carburetors are the same, so it doesn’t matter what brand of scooter you own. Of course, only an experienced specialist can adjust the carburetor very accurately and correctly, but thanks to this article you can do it yourself quite well. (*Source - website moto.com.ua)
The design of a four-stroke scooter carburetor.
Well, now I will describe the features of the device and possible malfunctions (as well as methods for eliminating them) of the carburetor installed on 4-stroke scooters. Overall this carburetor is of good quality. Only the inlet pipe had irregularities and cavities on the inner surface, which had to be sanded with sandpaper and then polished with polishing paste.
Dismantling. Remove the seat with the helmet box (4 nuts and 2 screws under the mat, read more in the article “Adjusting the valve clearance”). Here it is, the carburetor.
Before removing the carburetor, it is necessary to clean its connections with the air filter duct, the suction pipe (the adapter between the cylinder and the carburetor) and the cold engine starting device (analogous to the “choke” on a car). This will prevent foreign particles from entering (both the carburetor and the cylinder).
We unscrew the 2 nuts (shown by red arrows) that secure the adapter to the cylinder (I find this method easier, but if you want, you can loosen the clamp screw on the adapter and remove it from the carburetor).
Loosen the screw of the air filter hose clamp and remove it from the carburetor pipe.
Disconnect the fuel hose and the hose from the pipe installed on the adapter. (Hoses are indicated by blue arrows)
We disconnect the throttle cable; to do this, we pass it through the slot in the throttle drive lever. Before this, you need to unscrew the locknut of the throttle cable tension regulator on the carburetor and pull the regulator out of the hole (this is easier, the cable will not be tensioned).
Remove the plastic cover from the starter and unscrew the two bolts securing the cold engine starting mechanism and remove it. If there is a connector nearby, disconnect the wire going to the thermostat. On my moped, to disconnect the plug, I would have to remove the entire trim, so I decided to unscrew the device itself.
That's it, the carburetor is free, but there is still gasoline in it (more precisely in the float chamber). To drain it, loosen the bleed screw located on the lower surface of the carburetor and drain the gasoline through the drain hose into a suitable container (I do not recommend draining it into the gas tank, since there may be water at the bottom of the float chamber).
Now you can loosen the adapter clamp and remove the adapter.
So, to the carburetor design.
Fuel needle
Remove the carburetor cover (vacuum chamber cover). It is fastened with two bolts of equal length. You must unscrew the cover carefully, as there is a spring underneath it.
Under the cover there is a spring, a diaphragm with a glass and a fuel needle with a cap. Remove the needle carefully! It is fitted with a washer and a rubber ring (which acts as a seal), they are very small and easy to lose.
The needle has 5 ring cutouts, one of which has a ring on it. By rearranging this ring, we lean (when rearranging higher) or enrich (when rearranging lower) the fuel mixture. Usually the ring is placed on the middle slot. The optimal position is one in which the motor does not choke.
Carburetor settings are shown above. I would like to note that the entire carburetor must be adjusted at once, that is, the position of the fuel needle and idle speed. Make adjustments only on a well-warmed engine!
How the needle rises. When the damper opens, a vacuum is created in the diffuser (as the flow speed increases). The air pressure in the vacuum chamber (above the diaphragm) decreases, tending to the pressure in the diffuser. (The vacuum chamber and diffuser are connected through a hole in the bottom of the damper glass) At this time, the air pressure under the diaphragm remains constant and equal to atmospheric pressure (the cavity under it communicates with the atmosphere through an arc-shaped channel, see photo). Due to the pressure difference, the piston rises, gradually opening the diffuser and raising the needle. Thus, the engine constantly receives a mixture of gasoline and air in the required ratio.
Float chamber
Remove the float chamber cover; to do this, unscrew 3 bolts of the same length.
This is what the float chamber looks like from the inside.
A tongue is soldered into the float, which is connected by a spring to a needle. If the fuel level in the carburetor decreases, the float drops and pulls the needle. The needle valve opens and gasoline enters the float chamber. When the float reaches its normal position, it presses the tongue on the needle, which in turn closes the valve. If dirt gets into the needle valve, it does not close and the float chamber overflows. The engine begins to choke, and gasoline begins to flow out of the carburetor. You can check the operation of the valve (even with the float chamber cover screwed on) using a rubber bulb. To do this, turn the carburetor over, put the bulb on the carburetor fuel supply pipe and press it. The pear should remain in a compressed position for about 20-30 seconds. If it immediately fills with air, then the needle valve is faulty and needs to be cleaned. To do this, unscrew the bolt securing the float axis and remove the float. We blow air through the valve and blow through the needle. If this does not help, then the needle will have to be changed.
Overfilling of the float chamber can also be caused by incorrect adjustment of the float position. In this case, you need to slightly bend the tongue towards the needle. You can check the fuel level in the float chamber using a transparent tube placed on the drain pipe of the float chamber. In this case, the tube must be held vertically, parallel to the side plane of the carburetor.
Jets
There are 2 jets installed in the center of the float chamber. To clean them, you need to blow them with compressed air. If you want to increase the power of the scooter by installing a larger diameter jet, this will bring nothing except increased fuel consumption. With a standard carburetor, the engine runs stably even when installing an 80 cc cylinder.
In addition to the main jet, the engine receives gasoline from an additional one. A thin metal plate with a spring is installed on the throttle cable mounting plate. (photo)
When the damper is opened sharply, its lever presses on this plate (using a plastic roller). This plate presses on the pump rod (this pump is called the “acceleration pump”), to the other end of which a membrane is attached.
Using this membrane, additional gasoline is injected into the carburetor. If the valve itself or its actuator is faulty, then the motor does not receive support and runs unstable when you suddenly add gas. Clean the valve by unscrewing its cap and blow out the channels.
If the drive is broken, fix it (use your ingenuity) or buy a new one.
Carburetor cleaning
You can clean the carburetor in gasoline using a suitable brush. You can also purchase a special spray or liquid and use it according to the instructions. For those who are completely “advanced,” I recommend taking the disassembled carburetor to a carburetor and cleaning it with ultrasound (if there is such a carburetor nearby).
When assembling the carburetor, carefully install the float chamber cover gasket. The membrane that controls the fuel needle is installed in only one position; for this purpose it has a semicircular protrusion, and a corresponding cutout in the receiving face of the carburetor. If the membrane has expanded, cool it (for example, in the freezer for 30 seconds), and then quickly replace it.
When adjusting the carburetor, use the idle speed screw:
and a screw for adjusting the mixture quality. This screw can be reached even if the plastic trim is installed. Use a long screwdriver and you will succeed!
That's all about the carburetor, if you have any questions or comments, write a review or leave a message in the forum. Author: Artem Petrov Source: china-scooter.ru
The structure of the scooter and its main components.
The structure of the scooter from the point of view of the organization of its main components can be viewed using the figures below.
The scooter is controlled, as a rule, by three elements: acceleration - 1) throttle; brake - 2) rear and 3) front. Of the two steering handles of the scooter, the gas handle is on the right. Brakes on both sides; rear and front - on the right or on the left, each manufacturer decides for himself how to arrange it.
In addition, the steering panel (so to speak) contains sensors, control buttons and switches (see picture). Usually like this: on the left - horn (1), turn signals (2), low/high beam switch (3); on the right is an electric starter (4), lights on/dimensions/off (5), and sometimes a stop button-switch (you can use it to turn off the engine without turning off the ignition, but you won’t start it until you turn it back on) (6). The number 7 indicates the throttle cable tension regulator. My scooter also has buttons to control the electronic clock. Sensors include a speedometer, sometimes a tachometer, a fuel level sensor; on two-stroke engines there is almost always an oil level sensor in the oil tank, light indicators, and turn signals. Also, scooters with hydraulic brakes usually have a “brake reservoir” (8) on the handlebars, which is used to determine the brake fluid level.
I don’t think there’s any need to explain why there’s an engine in a scooter. The scooter can be equipped with a two-stroke or four-stroke engine - depending on this, the scooter device can be supplemented with additional components, for example, an oil pump for a two-stroke engine. (Well, diesel, rotary and jet engines are not yet installed on scooters. At least not commercially
Replacing the carburetor on a scooter with another one
Scooter carburetor - disassembly, washing and assembly
Carburetor CV - Constant velocity - constant vacuum carburetor (English).
The plastic coverings on the rear of the scooter have been removed, and the seat and seat container have been removed (see page 66).
ATTENTION!
Before starting work on flushing the carburetor, we prepare the workplace: the workbench should be absolutely clean, it is desirable that there is also a minimum of dust in the air.
We lay clean paper on the workbench - we will put all the extracted parts on it.
1. Before removing the carburetor from the engine, close the fuel valve (if it is mechanical) and drain the fuel from the float chamber:
• Place the scooter on the center stand.
• We place a suitable container (0.5 l) under the central part of the scooter to collect gasoline (you must first find where the drain pipe is located under the bottom).
• Loosen and turn out the drain screw a few turns (shown on the removed carburetor).
The fuel will drain through the drain pipe into the container.
ATTENTION!
Do not unscrew the drain screw completely. It is enough to unscrew it one and a half to two turns.
1. Remove the carburetor from the engine. (see p. 123).
2. On constant vacuum (CV) carburetors, a rotary throttle valve is most often used. Remove the damper drive cable from the rotary sector.
3. Disconnect all hoses from the carburetor.
4. Unscrew the two screws securing the electromagnetic starting enrichment.
Tuning the carburetor of a two-stroke engine
One of the main components in the fuel mixture supply mechanism in a vehicle such as a scooter is the carburetor. Before moving directly to the description of the adjustment process, let's talk about why it is needed at all.
Carburetor - a device that ensures the formation and supply of a fuel mixture (consisting of air, gasoline and oil) directly to the engine
What exactly is the purpose of a carburetor? In a nutshell, this is a device that ensures the formation and supply of a fuel mixture (consisting of air, gasoline and oil) directly to the engine. That is, the quality of this mixture and, accordingly, the power that the power unit produces depends on it.
Scooters typically use carburetors of a type called “float” carburetors. The main element is a Venturi tube, which houses a damper that regulates the amount of air supplied to the mixture, as well as a needle that supplies gasoline. By unscrewing the throttle, we thereby open the throttle and raise the needle, increasing the amount of air-fuel mixture entering the engine.
Naturally, the movements of the valve and the needle must be clearly synchronized to ensure its (mixture) homogeneity. The float chamber is designed to ensure the constant presence of gasoline in the tube. The principle of its operation is based on the fact that when the fuel level drops, the float lowers and opens a channel for supplying gasoline to the tube. When it is full, the float rises and closes the valve, thereby stopping the flow of fuel.
If the scooter's engine power drops, it is impossible to start the engine or the engine stalls - these are signs of a carburetor failure
Signs that the carburetor is faulty may include:
- Engine power drop
- Inability to start the engine
- The engine stalls.
Another way to assess the quality of the carburetor (more precisely, the correctness of its operation) is as follows - unscrew the spark plug and look at its color. If it is white, it means the fuel mixture is lean, that is, there is too much air in it, and if the spark plugs have a black tint, it means the carburetor is “pouring” too much fuel. With any of these options, one thing is clear - it needs adjustment.
It should be noted that, globally, this process does not depend on the engine stroke, therefore the answer to the question of how to correctly adjust the carburetor on a Chinese 4t scooter and how to correctly adjust the carburetor on a 2t scooter will be the same. Let's now move on to describing the sequence of actions.
Carburetor cleaning
It is convenient to work with a special cleaner - ABRO, VELV, KERRY - the more expensive, the more effective: the thin tube fits well into the nozzle, the sprayer cap does not jam. The can is under high pressure and plays the role of a kind of compressor with the injection of a special flushing liquid. Do not forget about safety precautions: if the cleaner gets on your skin, it causes irritation, and you can get serious burns to your eyes. Safety glasses are required! Cleaning should be done in fresh air.
We insert the cleaner tube into the jets and blow through. We check the condition of all holes in the jets. If there are solid particles that the cleaner cannot remove, you need to clean the holes with a needle. When washing, a stream of solution sprays out of the nozzle. All carburetor channels are washed in the same way. Dirt actively accumulates in the float chamber cover - it is actually a fuel sump, so it must be wiped thoroughly.
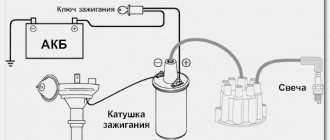
Starting enrichment, electrovalve
Sit back, we will talk about one of the most mysterious parts of the scooter - the starting enrichment. This detail is small, but very important. It is this that helps start a cold scooter engine without hemorrhoids in any weather. Only thanks to her, the scooter starts easily with half a kick, and for those who don’t, it means their arms are growing crookedly. Thanks to her, my dear, the scooter does not shoot into the muffler like domestic motorcycles, but idles quietly and smoothly. Thank the Japanese for inventing this thing! - I say in all seriousness.
So, what does it mean - a starting enrichment agent? This is essentially an additional small carburetor, standing parallel to the main one. It is connected to the main carburetor by three channels - air, emulsion and fuel, drilled in its body. The air is taken in before the throttle valve, the emulsion (mixture) is supplied after it, directly into the carburetor outlet pipe. Gasoline is taken from a common float chamber. Thus, with some stretch, the enrichment can be considered an independent device. It’s a stretch, because it is, nevertheless, structurally inseparable from the carburetor.
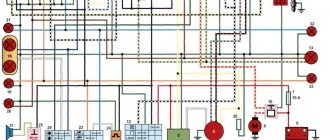
Now let's look at the drawing.
The carburetor has a small additional fuel chamber 7, which is connected to the main float chamber 8 through the start jet 9. The tube from chamber 7 leads to the mixing chamber into which air is supplied and from which the air-gasoline mixture goes into the engine. A valve 6 can move in the mixing chamber, similar to a carburetor throttle valve, only much smaller in size. Just like in the throttle valve, there is a spring-loaded needle in the starting valve, which closes the fuel channel when the valve is lowered. When starting a cold engine, the valve is raised (open). At the first engine revolutions, a vacuum is created in the emulsion channel and gasoline located in chamber 7 is sucked into the engine, causing a strong enrichment of the mixture and facilitating the first flashes in the engine.
After the engine has started, but has not yet warmed up, it needs a rich mixture. The enricher works like a parallel carburetor; gasoline enters it through jet 9, mixes with air and enters the engine. When the engine is running, alternating current from its generator is always supplied to the contacts of the ceramic heater 2 of the thermoelectric valve of the starting system. The heater warms up the drive 3. Inside it, obviously, there is a gas or liquid boiling at a low temperature and a piston connected to the rod 4. When the drive is heated, the rod gradually extends by 3-4 mm and through the pusher 5 sets the damper in motion. Valve body 1 is wrapped in thermal insulation (polyethylene foam) and covered with a rubber boot.
Thus, the engine warms up along with the thermoelectric valve and the mixture gradually becomes leaner. After 3-5 minutes, the damper closes completely and the degree of enrichment of the mixture on a hot engine is set only by the carburetor idle system. When the engine stops, heating of the valve stops, the damper drive cools down and under the action of spring 10, pusher 5, rod 4 and damper 6 return to their original position, opening the channels for subsequent start-up. Cooling down and returning to its original position also occurs within a few minutes.
This enricher design is used on almost all modern scooters. Older models may use a design without an electric heater; heat is transferred to the drive through a copper heat-conducting cylinder directly from the engine cylinder. Sometimes, there is also a manual drive of the damper through a cable from the handle on the steering wheel (“Choke”).
Now the “diseases” of the system
1. The air channel may be clogged with dirt. In this case, the mixture becomes very rich, even after the engine has warmed up.
2. The jet may be clogged with dirt. It is very thin and this happens quite often. In this case, the enricher works in the opposite way - it leans the mixture, making starting difficult.
3. Contact with the heater “tablet” is broken. The valve does not heat up and does not close. The engine runs all the time on an over-enriched mixture and does not develop the required power. The resistance at the valve contacts is easy to measure; it should be in the region of several ohms.
4. The antennae are broken off
Carburetor for a scooter - which one to choose, how to adjust
The function of the carburetor in the scooter mechanism is to prepare a combustible mixture for the engine.
Therefore, the level of engine performance quality is determined by the composition of the combustible mixture. The options for the development of this process are either operation is normal, or the engine will stall, and the mixture in the engine may detonate. When determining the standard indicator of the resulting mixture, they are guided by the standard ratio of air and gasoline equal to 15 parts of air to 1 part of gasoline. Measurement is carried out by weight. You will not be able to perform this measurement yourself. At the same time, there is no need to attribute the violation of the optimal mixture to the weather, since the quality of the mixture changes slightly depending on the air temperature. Choosing a separate carburetor does not make much sense when purchasing a scooter or moped. A carburetor on a scooter, also according to the site prokarbyrator.ru, like a carburetor on a moped, is installed by the manufacturer. If we are talking about the cost of components when replacing parts during repairs, then a carburetor for a 50 cc scooter (also known as a carburetor for a 50 cc scooter) costs approximately from 500 rubles to 2500 rubles; carburetor for a scooter 50 cubic meters 4t in the range of up to 2400 rubles.
Optimizing the quality of the combustible mixture in a working unit is carried out through adjustment.
Mixture control diagram
When considering how to adjust the carburetor on a 4t or 2t scooter, it is necessary to study the sequence of actions for such adjustment. First of all, the engine must be warmed up for 15 minutes. Then it needs to be silenced.
The screw is tightened clockwise until it stops. Next, you need to release it again by 1.5 turns (no more). The engine starts. At this time, the screw is tightened 1/3 of a turn. The motor runs for 2 minutes. If the speed increases, the screw is unscrewed a quarter turn counterclockwise. Again you need to wait 2 minutes. This is done until the revolutions begin to drop.
If the speed drops within 2 minutes, the screw is tightened in the opposite direction, also by a quarter turn.
Adjusting the mixture quality on a scooter
We indicated above that the mixture can be optimal, rich or lean. So, manufacturers of a certain scooter model recommend using specified proportions, which means that sooner or later you will have to make adjustments. Most 4t scooters have an adjustment screw, otherwise the procedure is done using a needle in the throttle. The mixture is enriched by turning the screw clockwise; when the screw is turned counterclockwise, the mixture becomes lean. Adjusting the indicator on scooters without a mixture quality screw occurs by increasing or decreasing the height of the needle.
Medium and high speed tuning
The quality screw prepares the mixture ratio at idle. Failures in operation at high modes are eliminated in other ways.
After opening the throttle valve, the fuel nozzle comes into operation. Its task is to supply gasoline to the diffuser while the scooter accelerates.
An incorrectly selected nozzle leads to deviations in the composition of the fuel mixture. During power build-up, the scooter may “suffocate”, until the engine stops completely.
The correct algorithm for tuning the carburetor at high speeds:
- cleaning internal channels from debris;
- checking the fuel level in the float chamber;
- adjusting the shut-off valve (needle) stroke;
- checking the jet's nominal value.
A sign of proper operation of 2t and 4t engines is a sharp increase in speed when the gas is opened. Any deviations from the stability of engine acceleration indicate a violation of the settings.
Signs of deviation in mixture preparation
An important indicator of the quality of fuel combustion in the cylinders is the color of the spark plug. An experienced mechanic only needs to look at its condition to understand what adjustments need to be made.
There are two characteristic colors:
- A white (grey) spark plug means the mixture is lean, the moped overheats and does not produce optimal power.
- Black with soot – excess fuel, excessive consumption.
The behavior of a scooter with an incorrect fuel mixture is specific:
- abnormal reaction to the throttle;
- pops in the muffler;
- smoke content of exhaust gases;
- noticeable decrease in power characteristics;
- sudden engine stop.
A normal moped spark plug is brownish in color. There should be no carbon deposits on it, its electrodes should be clean, without traces of melting.
Intermediate setup
Adjusting the carburetor of a 2t scooter is carried out after installing the air filter in its place.
Start the engine and let it run for about five minutes to warm up.
Adjust the idle speed (ISR) with the quantity screw: by tightening it, the throttle rises and the idle speed increases; and when unscrewing, the throttle is lowered and the CO is reduced.
Set the speed so that the scooter operates at a lower speed.
Setting up the carburetor in a Suzuki Sepia scooter
The Japanese scooter Suzuki Sepia is considered a fairly popular model in Russia and other countries, in particular due to its attractive appearance and simple design of the engine and other parts. But problems with this scooter are quite frequent and are caused by malfunctions of such components as the CPG, carburetor and variator
It is important to carefully monitor their condition to prevent damage. As for the carburetor, the Mikuni carburetor is used here, the Suzuki Sepia is ideal for this carburetor model, which is also used on other vehicles
In particular, you can see a similar model on the no less famous Suzuki Adress scooter. The carburetor is characterized by its simple design, good quality and the ability to quickly adjust. But judging by the frequent problems of owners, it will be extremely difficult to adjust the carburetor for optimal operation of the scooter; the entire procedure will have to be carried out exactly according to the specified rules. If you are the owner of a Suzuki Sepia, get ready to clean the carburetor frequently, because its location is so inconvenient that the carburetor becomes clogged with dust very often. Below is a carburetor setting option.
Final setup
Next, without turning off the scooter, we adjust the quality of the mixture. To do this, we lean or enrich the mixture. Slowly tighten or unscrew the small screw (quality) to set the maximum XO.
Then tighten the large screw again and reduce the CO to medium stable.
Tips and tricks
When performing adjustment operations, it is important to follow a number of rules:
- perform adjustments only after the engine reaches operating temperature;
- rotate the adjusting elements smoothly, observing the operation of the engine;
- Make sure there is no debris inside the fuel chamber and the jets are clean.
Before starting work on setting up the carburetor, you must study the operating instructions and clearly determine the location of the quality and idle screws. If you have a 150cc scooter, the carburetor adjustment is done in a similar way. After all, the process of regulating the fuel system is the same for engines of different powers.
Disassembling the carburetor
Before unscrewing the carburetor, remove external dirt from it - oil, dust, sand. This is conveniently done with gasoline poured into a bath. We put on gloves, take a brush and clean the outer part. Now you need to shake the carburetor, rotating it in different directions to remove any remaining liquid. You can unscrew the transparent drain hose and drain the gasoline. It is convenient to work on a wide table, since small parts can be lost during disassembly.
Carburetor disassembly sequence: 1. First, you need to unscrew the 2 screws of the float chamber and remove the cover. 2. We study the structure of the carburetor in the form of a white float, 2 jets (main and idle), and a shut-off needle on the petal. 3. The float axis is removed and the float with the needle is released. Particular attention to small details. 4. Take a slotted screwdriver and unscrew 2 jets. There is no need to unwind anything else.
Design and connection of a Yamaha scooter carburetor
The Yamaha Jog scooter is one of the most popular on the Russian market: this is explained by the simplicity and reliability of the model, and its affordable price. The carburetor design of this scooter is standard, so you can figure it out using the description given above. However, when installing it, inexperienced owners may encounter some difficulties, which we will help you sort out.
The device is worth considering in more detail. This will help you understand not only how to adjust the carburetor and use it correctly, but also how to connect it correctly.
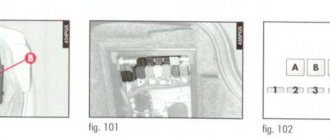
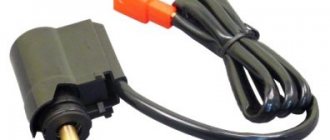
- A starter enricher is attached to the carburetor body: it is small in size and housed in a plastic case. It has two bolts with rubber seals. The enricher is powered via a 12 V battery. This device is used to start the engine when cold, as it allows you to automatically enrich the mixture with oxygen.
- The fitting is connected to the fuel supply hose coming from the gas tank tap.
- If the enrichment unit needs to be removed, you will need to not only unscrew the bolts, but also disconnect the electric valve, to which there are only two wires.
- The mixing chamber has a special cover to which a bolt is attached. If you unscrew it, you can get to the throttle valve. This allows you to check whether the throttle cable is connected, and also to get to the needle that regulates the level of fuel and air supply. If the carburetor needs cleaning, you will definitely need to remove the throttle.
- The enrichment connector has two wire outputs, the yellow one is connected to the generator, the green one goes to ground. In principle, if you reverse the polarity, nothing will happen and the device will still work.
- For the enricher to operate, voltage must come from the battery. When the element inside the device heats up, the needle will extend.
- A special fitting is connected to the air filter, and there is a rubber elbow between them.
- There are several screws on the carburetor body with which you can adjust the idle speed and mixture quality.
- The float chamber is screwed from below and has 4 mounting bolts.
- There is an additional fitting for oil supply: it is the smallest.
- The second fitting is needed for communication with the atmosphere; you do not need to put anything on it.
- The third one is connected to a gas hose. It goes to the gas tank vacuum valve.
Removing the carburetor
At the first stage, unscrew the 4 bolts and remove the seat compartment; on some models, the oil tank cover is also unscrewed. Then the air filter is removed, for which we release the screw of the clamp securing the cuff and 2 10-point bolts that secure the housing. The rubber cuff of the filter housing can be pulled off the carburetor with a certain amount of force. Now you need to disconnect the gasoline and oil hoses. For this purpose, the loops of the clamps are compressed and the two hoses are pulled together. Using a 10mm wrench, unscrew the nearest bolt attaching to the intake pipe. Unscrew the second bolt inside. At the moment, 2 hoses have already been released, 2 fastening bolts have been unscrewed. Now you need to remove the device, unscrew the throttle cover and remove the throttle. To finally release the device, you need to remove the protective cover of the starting enrichment from the latches and unscrew the 2 screws from the clamping bracket of the enrichment.
Why do you need to regulate?
During the adjustment process, the scooter carburetor needle is adjusted, the position of which affects the proportions of the air-fuel mixture, as well as a number of other adjustments.
Each tuning operation has a different effect on engine operation and fuel preparation:
- adjusting the idle speed ensures stable operation of a running engine when the transmission is turned off;
- changing the quality of the air-gasoline mixture using a special screw allows you to deplete or enrich it;
- adjusting the position of the carburetor needle affects the change in the quality of the fuel mixture;
- Ensuring a stable level of gasoline inside the float chamber avoids flooding of spark plugs.
A power unit with an adjusted carburetor operates stably in any conditions, is economical, throttle response, develops rated power and maintains speed, and does not cause problems for its owner.
Adjusting the idle speed on a scooter
After the engine is warmed up, you can adjust the idle speed, this is done using a special screw located on any carburetor. The idle speed is adjusted to ensure that the scooter operates correctly and smoothly when not in use. The location of the screw may vary depending on the scooter model. For example, on a Honda scooter the screw is located in the center, and the mixture quality screw is installed on the left side.
The adjustment process is quite simple, as soon as the scooter starts, rotate the screw, where when tightened the speed will increase, opening the jet reduces the speed. Again, adjustments are made only on a well-warmed engine.
Features of setting up the carburetor of a 2-stroke scooter
The carburetor on the 2t scooter is slightly different in design and does not fit the 4t motor. The question of how to set up such a device worries all owners of two-stroke machines.
Most Chinese models have a fairly simple carburetor without unnecessary adjustments. The enrichment here is mechanical, although if you are tuning a scooter or you have a Japanese model, the enrichment can also be electric. In order to use the mechanical option, you must first pull the trigger on it, and then try to start the equipment.
Adjusting the carburetor of a 2T scooter is not difficult, but it does require some patience. In order to do this, you will need to disassemble the carburetor: first you will need to unscrew the top cover. The needle in it is fixed with a staple; it needs to be pulled out. The quality of the mixture is adjusted in the same way as described above. A feature of the push-pull system is that the needle affects the quality of the mixture only in a certain position. If the throttle valve is raised to its maximum, only the main fuel jet will be responsible for the fuel mixture. Sometimes the idle speed system interferes with it. Depending on what carburetor you have installed.
For a cold start, you need to use a starting enrichment, which must be closed after the engine warms up; Simply put, it's a suction. In such carburetors, the fuel level plays an important role. It is also regulated by mechanical intervention in the operation of the float chamber. It is configured in the same way as in the four-stroke version. In fact, the carburetor for 2t engines differs from models for engines on a 4-stroke scooter only in jets and some other parameters, but it is designed similarly, and therefore is regulated in the same way.
Carburetor design (video)
For clarity, we suggest watching a video instruction about the design of carburetors and the principle of their operation:
Knowing the structure of the carburetor and understanding what needs to be connected where, you can easily disassemble, reassemble, clean and adjust it yourself, regardless of what brand and model of scooter you have, with some skill. All these procedures will not take much time and will help you save money on car services. The ability to carry them out will help you out when the engine does not want to start.
How to adjust engine idle speed
Work on setting up the power system is carried out after the engine has warmed up to operating temperature. All types of carburetors installed on scooters are equipped with a screw designed to regulate idle speed. Changing the position of the adjusting element allows you to ensure that the engine operates at stable speeds during idling.
Depending on the vehicle model, the adjusting elements are located in different places, so you need to carefully study the instructions and determine where the idle speed adjustment screw is located on the scooter.
Rotating the screw in a clockwise direction allows you to increase the crankshaft speed. Turning in the opposite direction, accordingly, ensures a decrease in speed. To perform adjustment operations, it is necessary to warm up the power unit of the scooter for a quarter of an hour.
Setting the engine idle
Then the screw is screwed in or unscrewed until a stable and precise speed of rotation of the vehicle engine is achieved. The adjustment is made in small increments by smooth rotation. After each manipulation, the engine should be run for several minutes to stabilize the speed.
How to change the quality of the fuel mixture
For all scooter engines, it is important to receive fuel with an adjusted ratio of gasoline to air. A lean mixture leads to improper operation of the engine, a drop in power and overheating of the engine, while a rich mixture leads to an increase in consumption and the formation of soot.
Adjustment operations are performed by changing the position of the quality screw and moving the throttle needle.
Turning the screw to the right causes the mixture to become richer, and unscrewing in the opposite direction causes it to become leaner. The same happens with the needle: when the needle is raised, the mixture becomes richer, and when lowered, it becomes poorer. The integrated use of both methods allows you to achieve optimal results during setup. However, not all carburetors have this feature, so, as a rule, one of two options is used.
Our production
Follow this link and choose the carburetor you need, which you can purchase in our online store at a low price.
Having bought a motorcycle, scooter or other motorized equipment, owners have to become familiar with the operation and adjustment of their main components. One of the important elements of a two-stroke or four-stroke power unit is the carburetor, which is responsible for supplying fuel to the combustion chamber and mixing gasoline with air in the required ratio. Many people do not know how to adjust the carburetor on a scooter using the adjusting screw. This need arises if the device does not start well, shows increased appetite, or the tachometer needle indicates unstable speed.