Crankshaft main bearing - design
One of the main parts of the crankshaft, no matter how strange it may sound, is the bearing.
It represents an assembly unit, and, accordingly, is the main part of the support. It also performs one of the main functions such as rotation. The bearings take on the entire load and transmit it further along the moving crankshaft assembly. They come in different types, it all depends on the specific use of the bearing. We are currently analyzing the car version, so they come in two types – rolling and sliding. As a rule, the automobile version has the form of a ring, along the entire perimeter of which there are gutters, or, as they are popularly called, raceways. It is along them that the body rolls during operation. If we analyze the principle of operation of a sliding bearing, then friction occurs in it during sliding of surfaces. Externally, it looks like a smooth body with a cylindrical hole.
Rolling and sliding bearings
Many people have a question - which is more durable: a liner coated with a soft alloy or a hardened metal ball bearing. Most will answer - of course the bearing.
There is always oil pressure in the liners (sliding bearings), which is supplied by an oil pump and the shaft does not work along the sliding plane, it lies on an oil cushion. During operation, it practically does not touch the metal plane.
Pumping effect of bearings
The bearing ball is exposed to more severe conditions. It runs in a gasoline-oil emulsion, barely lubricated. The ball bearing is subject to crazy loads: shocks from load changes, the own inertia of the balls and cage, loads from the connecting rod. The bearing begins to heat up. As it heats up, it intensively evaporates the oil from the treadmill, and this makes it even hotter. At speeds close to the maximum, the ball bearing completely stops lubricating. Centrifugal force throws out the oil film, and the bearing itself goes into the highest stage of load - the pumping effect of the balls themselves is connected to its destruction (in the figure, arrows show the directions of lubricant release). Each ball at 7000 - 7500 rpm begins to work like the blade of a centrifugal pump. At the same time, the balls degrease the treadmill. The bearing begins to “burn”. Only a press fit into the crankcase socket saves the situation a little - the duralumin crankcase takes away some of the heat. During disassembly, characteristic colors are observed on bearings operating at maximum speed - a clear sign of overload in speed.
In addition to the above-mentioned “torsion”, the durability is greatly influenced by the way you ride a two-stroke scooter. A sharp opening of the throttle and jerking the throttle handle transmits sudden acceleration to the support bearings. But the balls, having their own mass, moment of inertia and being burdened with a heavy separator, cannot immediately roll. At the moment of very sharp acceleration of the crankshaft, they slide and poke, rather than roll, which causes mutual wear of both the ball and the track.
Photo report: Replacing scooter crankshaft bearings
Typically, scooter crankshaft main bearings last as long as the big end bearing, if not longer. But there are situations when, after disassembling and carefully checking all engine parts, it turns out that the crankshaft is still suitable for further use, but its main bearings are not.
And there's nothing you can do about it. Either change the crankshaft to a new one, or get rid of it and change only the bearings, which, by the way, cost pennies, and a new crankshaft is very, very expensive - this is the first important point.
The second important point is that when choosing a repair or diagnostic method, you need to proceed from the available tools, and I have a welding machine and a bunch of various pullers and devices. Therefore, the option of engine repair with replacement of only the main bearings seems preferable to me. If you don’t have tools, replace the crankshaft with a new one and don’t worry (advice).
The oil pump drive sprockets and timing chains, which interfere with the removal of the main bearings, can be removed with a regular automotive three- or two-legged puller. I use a three-legged one because I kind of have it and it’s more convenient to work with.
If I didn't have one, I would remove all the sprockets and bearings using just one puller. And since I have a lot of pullers, I use whatever is more convenient for me.
The oil pump drive gear does not sit on the trunnion with its entire internal surface, but only with a small part in the form of a groove. It can be removed from the shaft very easily, literally with little effort.
The crankshaft journal is thickened where the sprockets fit.
The timing chain drive sprocket cannot be picked up with a simple puller, which I used to pull off the oil pump drive gear. Since it is placed close to the bearing and the puller’s paws rest against the bearing with their hooks and do not allow the sprocket to catch.
To remove the timing chain drive sprocket, it is best to use a regular two-legged automotive puller with a fixing bracket.
The timing chain drive sprocket sits on the axle with its entire inner surface and can be easily removed.
The stars have been removed and nothing stands in the way of further work. The hardest part remains - removing the bearings. The main difficulty is that the bearings sit close to the crankshaft cheek and there is no way to pry them off.
Crankshaft restoration
Due to the fact that recently the vast majority of people have begun to look towards Chinese scooters, their number has increased. As you know, the quality is not at the highest level, but it is quite acceptable for trouble-free operation for 2-3 years or even more. I don’t want to write about factory scooters, because their quality is high (they keep the brand), but not all of them.
In general, this article is intended for all scooter riders without exception and does not have clear boundaries in the brand and year of manufacture of the scooter. We will consider the KShM - the crank mechanism of a 2-stroke engine.
Brief information: The crankshaft is designed to convert reciprocating energy into rotational energy. In other words, the crankshaft. This unit is not very complicated in design, but requires very precise weight distribution and proper installation. Also, certain conditions are required for normal operation.
Crankshaft design
similar for all scooters.
I touched upon the Chinese because their raw material for the crankshaft does not meet any quality standards. Naturally, there are also normal ones, but, as a rule, they are installed on good Chinese scooters and fail very rarely. I had a case - they brought an AF34E engine removed from a scooter for repair. They said it is very difficult to start, pulls so-so, overheats and consumes fuel immeasurably. After a 1-2 minute diagnosis, it turned out that the radical dead were in the trash. He told me to come in 2-3 days. Imagine my surprise when I disassembled the engine... The indigenous people stood with Daelim (56-20-12), they were in a clear state. But the Chinese, self-installed knee
gave itself away immediately. The bearing seat on the crankshaft on the variator side was so broken that the crankshaft moved up and down by more than 1 mm. This is a very critical situation. The bearings had to be pressed out with a puller. And they put it on the knee so easily that no effort was needed at all. In general, the situation is bad, and I had to look for a replacement knee and resort to bearing seat analysis.
Main reasons for replacement
Each engine is equipped with a crankshaft. It moves the piston and also helps move the rear wheel. The crankshaft consists of two disks, the connection of which is ensured by a connecting rod journal. The role of the disks is similar to the tasks of flywheels: to provide uniform movement of this part in the required direction. In the center of the disks there are axle shafts with bearings. These bearings allow the crankshaft to rotate. Due to the ends of the shaft, rotational motion is transmitted directly to the scooter transmission and generator. And so, we list the main reasons for removing and replacing the crankshaft:
- Tuning. Speed lovers who want to get the most out of a scooter install tuning crankshafts.
- Removing the crankshaft is necessary to replace the scooter's crankshaft oil seals. Also, bearings rotating the shaft are often replaced;
- Engine noise, vibration, loss of dynamism.
If you have a garage and the necessary set of tools, then removing the crankshaft will not be a problem for you. First of all, you should have special pullers as tools. To remove the crankshaft, first remove the engine itself: disconnect all fasteners, hoses and wires, as well as the CPG.
Installing piston rings
Remove the set of piston rings from the box. A piston ring set for a Chinese four-stroke scooter usually consists of five items. Three of which are a single assembled oil scraper ring, the other two: upper and lower compression.
A typical set of piston rings looks something like this
Or so
Carefully unpack the kit with perfectly clean hands.
In the kit you will find two of the thinnest rings and one thick corrugated ring (expander) - this will be an assembled oil scraper ring that needs to be installed on the piston first.
We place an expander in the lowest groove of the piston
We place thin oil scraper rings in the same groove - one under the expander, the second on top of the expander
We find the lower and upper compression rings in the kit and install them, respectively, in the middle and upper grooves of the piston - with marks on the side surface to the cylinder head (cylinder head). The lower compression ring differs from the upper one in color (not always) and the shape of the working edge (always). In most kits, the lower compression ring is painted black, and its working edge has a slight bevel.
Tags
The top compression ring in the vast majority of piston ring sets is a uniform light color. But this is in most cases, but in practice it happens that the kit comes with upper compression rings that are black or even red
By and large, the color is not particularly important to us, something else is important to us: the working edge of the upper compression ring has small roundings (chamfers) on the sides, and the working surface of the edge of the upper compression ring is covered with a shiny protective coating
For example, in this kit both compression rings are black. But the working surface of the upper compression ring is covered with a layer of protective coating, and small chamfers are removed on the edges of the working surface.
The lower compression ring has a matte working surface, and the working edge is beveled at a slight angle. All these moments are clearly visible in the photo.
The compression rings in this kit are red and black. As in the first case, the upper compression ring has chamfers on the working edge and a protective coating, and the lower one has a matte working edge beveled at an angle.
On classic piston ring sets, the upper compression ring has a light color and a rounded working edge. The bottom is dark in color and the working edge is beveled at a slight angle.
When installing the piston rings, do not forget about the marks. The marks on the rings after installation on the piston should be oriented towards the cylinder head (cylinder head).
Interchangeability of scooter parts
Sooner or later, two-wheeled equipment begins to act up and some part fails, as a result of which the question of replacing it arises. And here we have three options:
- Buy an original part and forget about problems for a long time
- It is cheaper to purchase a non-original Chinese copy of a particular node
- Select an interchangeable part from a vehicle of another brand or type
It is not always easy to purchase a unique motorcycle spare part, especially if you live far from a big city or the brand of scooter is not common and, therefore, difficulties arise with spare parts. Not everyone can afford to shell out a bunch of bucks for an original oil seal, bearing, silent block and the like, which is why they have to look for a replacement from interchangeable parts.
Interchangeability of oil seals
In certain scooters, on the crankshaft on the variator side there are seals with a standard size of 31X20 or 31X19. A similar seal is found in some boat engines and on the crankshaft. For example, he has been working on one of the scooters for almost a year and continues to work. And you can buy it for only $0.3...0.4.
Bearing interchangeability
For example, the Honda Sky has 6004 supports. You can choose domestic ones of the same dimensions and they will work exactly longer than the Chinese ones. The price of two bearings is $0.9... 1. Many Honda models are equipped with a bearing that has no domestic analogues. Their thickness is a couple of millimeters smaller. In this case, it would be good to purchase original ones, although you can try to grind down the domestic one to suitable sizes. On Suzuki Sepia and Adress and the like, all crankshaft bearings have an analogue among our manufacturers.
If the bearing of the upper head of the connecting rod has crumbled and you cannot find something similar, you can temporarily install a simple bronze bushing (then it may remain that way if no visible difference is noticed over time). The bushing can be picked up at the “grandfathers” market. It is intended for Soviet mopeds as a transition, for installing a piston with a pin at 10 - on a crankshaft under a pin at 12. It costs a penny, but it fits flawlessly. But it is still preferable to find the original bearing.
Piston rings
These parts are more difficult to find. In many scooters they have a bevel on the top plane to increase compression. There is a similar bias in the engine piston. But if there is no bevel, you are allowed to purchase rings from a Simpson moped; they are more often on sale than for scooters. The most expensive ones cost $1.5. If the height of the ring is greater, it is necessary to grind it down slightly.
This can be done with sandpaper nailed to a piece of plywood or board. Place the ring on the paper, press it with a piece of hard rubber and grind it down to the appropriate size using circular motions. If you don’t feel sorry for the piston, or if it is already almost dead, you can carefully machine grooves for suitable rings and press in new pins.
Corkscrew rings that carefully protect the finger from falling into the cylinder are suitable for Soviet mopeds.
Scooter cylinder
If you can’t find a repair piston, and the wear in the cylinder is already large, you can try chrome-plating the cylinder. In some cases, you can also chrome it with an old used piston and drive it for a long time. You just need to find specialists who can chrome well. If chrome plating is successful, no chrome shedding or overheating will be noticed. The downside is that the WGU (cylinder-piston group) parts take a very long time to grind in.
Carburetor
It is better to find the original one for this unit. Although in some cases, a carburetor from the domestic Karpaty moped can be installed instead. Here we need to experiment.
Electrical equipment
If you are involved in radio electronics, it will not be particularly difficult to solder this or that box (except for the switch, of course), or select a relay. The ignition coil is suitable from our mopeds with electronic ignition, with the appropriate voltage.
Setting the valve timing ch2 (in collective farm style - ignition)
Without knocking the piston off from TDC, we orient the camshaft so that the large hole and marks on its sprocket become as shown in the photo and, while putting on the chain, install the camshaft in bed.
Ideally, the marks on the sprocket should be strictly parallel to the plane of the valve cover connector. In practice, unfortunately, such accuracy is difficult to achieve. And this is mainly due to the stretching of the timing chain. And there’s nothing you can do about it - either change the timing chain to a new one or catch the phase by switching the teeth, but this method of setting the valve timing is not acceptable to me personally.
Piston installation
Insert a retaining ring into any boss of the piston pin. It is most convenient to insert the ring with small round nose pliers. After installation, check how well and tightly the retaining ring fits.
- If the retaining ring does not cover the entire surface, but only a small part of it, replace it with a new one.
- If the retaining ring does not lie tightly in the groove and dangles, straighten it a little
Lubricate the bearings of the lower and upper connecting rod heads and the piston pin bosses with clean engine oil. We put the piston on the connecting rod, orienting it with the “IN” mark to the inlet port; if there is an “arrow” on the piston instead of the “IN” mark, orient the arrow to the exhaust port. We insert the piston pin into the boss - orient the piston on the connecting rod so that the pin hits the connecting rod - install the pin all the way into the locking ring and secure it from falling out with the second locking ring.
We install the cylinder guide bushings on the studs and put on the gasket. It is advisable to place the gasket on the sealant, but without fanaticism.
Dismantling engines and gearboxes of Alpha mopeds
In order to disassemble the engine you need to do the following:
Remove the screws located in the intake manifold.
Remove all cylinder covers and screws.
Remove the cylinder head.
The gearbox is disassembled to replace parts such as rotors, clutches or cylinders.
In order to disassemble the gearbox you need to do the following:
Remove the retaining ring, then the drive gear is removed.
Unscrew the locking gear screw, then remove the gear shift mechanism itself
Remove the shift fork and shaft, then the crankshaft and drum.
Put everything back to front.
And in conclusion, we would like to say that although the Alfa moped rarely breaks down, it is not worth disassembling and repairing it yourself if you lack knowledge and experience, or you are simply not completely sure that you can handle it, since if you want to save money, you can lose a lot more . Therefore, you should not refuse the services of professionals. But still, if you decide to repair the engine of the Alpha 110 moped yourself, do not forget to use the diagram or training video. And if there is no diagram, then mark the location of the parts on a piece of paper so as not to forget.
Alpha moped engine assembly (part 1)
Alpha moped engine assembly (part 2)
You might be interested in the Alfa 125 cc engine with automatic clutch, tuning
Bearing Failure Determination
Some recommendations will help you make sure that you need to replace the wheel bearing on your VAZ 2107: The easiest way to find out whether you need to replace the wheel bearing is to grab the front wheel and shake it in different planes
If you feel the presence of play, then it’s time for a more detailed diagnosis and most likely replacing the bearings
The front wheels of the car should be hung on a jack, while being sure to take precautions: pull the handbrake, install shoes and additional stands under the car
Grasp the top and bottom of the front wheel with your hands and then make movements. It is important to wobble the wheel, not the car as a whole.
Thus, you can accurately determine whether the product in question needs to be replaced. Another way to determine the need for replacement is to listen for humming, knocking, and grinding noises in the wheel as it rotates.
Having decided that you really need to replace the VAZ 2107 wheel bearing, you need to purchase new products and begin the replacement workflow.
Replacement features
The front hub of the VAZ 2107 car has a pair of roller bearings, one of which is called internal, and the second external. The manufacturer recommends replacing these products in pairs, on both front wheels of the car. We will find out further what the replacement of the parts in question is.
Initially, it is necessary to tear off the nuts securing the front wheel of the VAZ 2107 car. After this, install the jack and jack up the front part of the car. At the same time, do not forget to install shoes under the wheels, as well as a special safety stop to prevent the jack from falling.
- Removing the caliper. Changing the front wheel bearing is much more difficult than replacing the rear one, but it can be done even with no experience. First of all, the 2 bolts that secure the caliper are uncoiled, after which they are unscrewed. It is not necessary to disconnect the brake hose; it is enough to tie up the removed caliper so that it does not interfere with further work.
- Removing the outer product. The cap is removed using a screwdriver, behind which there is a hub nut. The nut must be unscrewed, for which you will need to use a chisel and a hammer. Behind the nut there is a lock washer that must be removed. Now you can pull out the outer bearing.
- Removing the hub. To remove the hub, you need to pull it towards you. It is removed along with the brake disc. To disconnect the disk itself after removal, unscrew the two “12” bolts. The brake disc is removed to make replacement easier, but it is not necessary to disconnect it.
- Removing the inner bearing. Using a screwdriver, you need to pry off the oil seal located on the inside and covering the inner bearing, then pick it out and pull out the split spacer ring. The ring may not stand, so we focus on the situation. After this, the inner bearing can be removed.
- Next, the old clips are removed using a special puller or an ordinary steel tube of suitable diameter. The next stage of replacement involves cleaning the inside of the hub from old grease, after which you can begin assembly.
Installation of a new product
After inspecting and preparing the working area of the scooter, you can install a new oil seal
Please make sure that it is installed with the correct side in the end, otherwise the functionality of the product will be impaired. Often the concave part faces the mechanism
To ensure ease of installation, the outer edge of the product should be lubricated. A small amount of lubricant is enough. When installing the ring on the seat, do not use a screwdriver or other sharp tools, otherwise the risk of damage to the working surfaces increases.
The product must be sunk, maintaining alignment. To ensure a good seal, a special mandrel should be used. This may be a tube or head of the appropriate size. The diameter should be smaller than the mounting socket. If you select the wrong size, the part may be damaged.
After pressing the ring, you need to check for distortions and lubricate the product. Next, the moving part is installed.
The renovation is complete. All that remains is a test ride on the scooter.
Don't forget to give a thumbs up
and subscribe to our channel to receive more useful information every day.
Source
Setting the valve timing ch1 (in collective farm style - ignition)
We push the cylinder all the way into the crankcase and set the piston to top dead center (TDC). It is best to set the piston at TDC using an indicator or, at worst, visually/touch. You can also align the piston according to a special mark on the generator rotor, but I have more than once encountered the fact that the marks on some engines are stamped incorrectly and, in order to avoid troubles, I advise you to use them only as a last resort, for example, when the cylinder head is not removed and you need to adjust valve
We insert the cylinder head guide bushings and the lower timing chain guide into the cylinder, degrease the surface and install the gasket.
We install the cylinder head, insert the valve bed guide bushings.
DionysKost › Blog › First engine capital in life (motor 139QMB)
In March 2015, the purchase of a scooter came my way...
I was told a lot that you shouldn’t get into the engine yourself without knowing how to do it, I often heard that I would only make things worse, etc. and so on. But! How then does one learn to cognize the material part?!) Just take it and do it! take risks, break, buy, change, but gain experience from mistakes!
Thanks to my own capital, I figured out the principle of the motor, it would seem that it’s just a scooter! I understood which compression rings, which oil scraper rings, valve seals, connecting rod pin, retaining rings, top dead center and other subtleties! Now I'm selecting engine parts for trucks! And I repeatedly remember my first experience on a scooter, thanks to it I can confidently say that “I can do it!” and I advise many to study confidently.
Specifically, we will talk about how they convinced me that the engine was excellent and how disappointed I was in this)) But there was no way to check it when buying, there was no smoke from the exhaust at all, it started in a click, it was good, how else can you understand?) no way.
Compression began to disappear, it became more and more difficult to start, and later it stopped completely and the leg rotated freely... therefore, compression was lost. I began to think that the compression ring could burst (a friend had one of these), and an autopsy was inevitable.
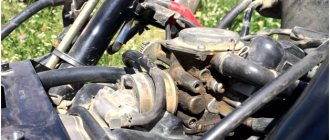
After dismantling the plastic and getting to the engine, I began to study what I had been driving for two months)) Having removed the plastic airflow casing from the cylinder, something similar to a rubber coating with oil leaks fell under suspicion...
I began to unstick this miracle Yudo... and it turned out that there was a small crack in the head through which oil was oozing and the former owner decided to wrap a bandage around the head and cover it all with sealant, which turned out to be extremely unsuccessful!)) although I don’t know about such a small thing what would I do))
Later, when tightening the spark plug, the thread was torn off... this seemed to hint at replacing the head (which cost me 370 hryvnia).
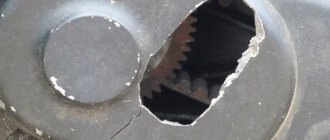
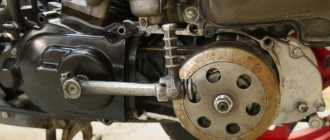
Having removed the old head, cylinder, chain and piston, I realized that the chain had stretched, was sagging a lot and needed to be replaced along with the dampers, which were pretty worn out.
But in addition to stretching, the chain was still slipping through the gear on the crankshaft, and the teeth were worn out. Fortunately, I found a new one on the market and the guys working at the service station at that time pressed/pressed in the new one quickly and reliably)
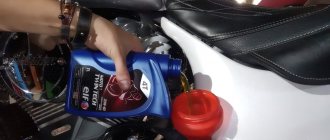
The oil I took was European Mannol 4t 1l. A standard Honda chain, a set of gaskets, rubber consumables, and I began to wash the body and begin assembly.
Assembly went relatively quickly, in particular, after watching training videos on YouTube there were no difficulties
I poured 800 grams of oil into the crankcase, the remaining 200 was enough for topping up.
Once assembled, I couldn’t start it… I suffered for a long time. It turned out that the crankshaft key that turns the magneto was licked, there was no spark and it was necessary to come up with something with it. We made it ourselves with a neighbor from an ordinary washer)) installed it - started it, drove it for a ride) Compression appeared, even with the old rings, maybe I’ll add it in the new season, we’ll see according to the circumstances) I bought a new battery and generally starts in a click!)
What was needed during the repair: - cylinder head 370 UAH - Mannol oil 130 UAH - muffler nut 2 pcs 10 UAH - muffler gasket 5 UAH - chain 50 UAH - chain guide 33 UAH - set of gaskets 40 UAH - piston retaining rings 10 UAH - engine silent blocks and shock absorbers 6 pcs 105 UAH - crankshaft gear 26 UAH - pendulum rubber 30 UAH - new battery 250 UAH
I learned a lesson that after rebuilding the engine myself there was more confidence than from the kind words of a person that everything was ok with him. You can only believe it yourself) Smooth roads everyone!
Important Features
Usually it is not possible to simply install the crankshaft back into the block; to do this you need
know a few tricks. Bearings must be installed with great difficulty, and to simplify the work, the landing site is heated with a hair dryer. Thermal expansion will help complete the job much faster. When the crankshaft is placed in the first part of the block, the joint is pre-treated with sealant. In the same way, the place of the second bearing is heated, after which the halves of the block are connected. Both parts should be aligned exactly, without deviations or unnecessary distortions.
Any repair involving engine disassembly is comparable to surgery, so all work is carried out extremely carefully. Before work, the engine is washed and the oil is drained. All repair operations must be carried out exclusively on a clean workbench. It is better to disassemble a scooter yourself for the first time under the guidance of a more experienced technician, this will allow you to avoid unpleasant mistakes.
How to change bearings on a crankshaft?
For quick and correct replacement, you need a hair dryer, which is used by builders and a vice. Clamping the crankshaft with one of the axle shafts, the inner part of the bearing is heated with a hairdryer to 100 degrees. Thanks to this operation, the bearing “seats” easily. To install a bearing millimeter to millimeter, you can lightly tap it through a pipe that has a suitable diameter. Using the same method, install the bearing on the other axis.
Replacing oil seals: nuances
Before removing unusable oil seals from the crankcase, mark for yourself the depth of the oil seals. New oil seals are installed in place of the old seals. Most motors require the installation of oil seals of different diameters on each side. They are inserted into a cleaned race with a pipe of a suitable diameter. That is, before purchasing new ones, you need to find the appropriate size oil seals.
Always consider the time-tested “moments”:
- In most cases, when the bearings fit into the races without much effort, the crankshaft will fail back.
- It is normal for the bearing to be difficult to install. It’s hard to imagine this installation without a hair dryer.
- When using a hair dryer, you should carefully protect the seal from heat exposure. Otherwise, it may melt and become deformed.
- The two halves of the motor are lubricated with sealant.
- The arrangement of blocks between each other should be parallel to each other.
- The crankshaft axles are thoroughly lubricated with oil to protect the seals from damage.
Before you start “splitting” the main power unit, you need to clean it of dirt and wash it thoroughly. The oil must also be drained. You need to unscrew all bolted connections with a high-quality tool so as not to lick off the bolt heads. The engine halves are washed with gasoline or kerosene. Before assembly, the engine must also be washed and always dry. Using a compressor, remove debris from all hard-to-reach places.
When repairing an engine, always follow the disassembly instructions. As a last resort, use the advice of experienced comrades. Best wishes!
https://www.youtube.com/watch?v=fLxkHznVTGc
Dismantling the old product
Installation of the O-ring must begin by dismantling the old
Attention! Remember the position of the product - this will be useful when installing a new one. You can carry out the work in the garage, even with a small set of tools.
The old oil seal is removed forever, so it is only important not to damage the seat and nearby parts. To do this, it is often necessary to remove the working part, bearings and other components.
If dismantling the cylinder itself is impossible, you will have to work “as is”. In this case, you need to be especially vigilant, as the risk of damage to the device increases significantly. This can lead to water, dirt and other undesirable components entering the workspace. Consequently, the unit will be subject to accelerated wear, and neither lubricant nor a high-quality oil seal will save the situation.
Installing the timing chain tensioner
If you have a 157QMJ series engine, do the following: unscrew the plug on the tensioner body; We insert a thin flat screwdriver into it and begin to tighten the bolt until the tensioner rod goes inside the body.
Without releasing the screwdriver while simultaneously holding the tensioner body, with your free fingers, insert the tensioner into the cylinder, screw it in with bolts, and only then release the screwdriver and screw the plug into place.
If you have a 139QMB series engine, then do this: unscrew the plug from the tensioner housing and remove the spring; push the rod inside the body; install the tensioner in the cylinder; insert the spring into the housing and screw in the plug.
After installing the piston, do not forget to adjust the thermal clearances of the valves and break in the engine.
valves
Why can’t you cope with the simplest operation? Let's learn: https://china-scooter. emont&Itemid=55 For four valves it’s almost the same. The size of the gaps is indicated in the service manual - go for it, but don’t break anything, it’s expensive.
#11 OFFLINE Benjamin Briggs
Founder of SYM Club
- Name: Alexander
- Moscow city
- Wheels: VT 1100C 94g
#12 OFFLINE slavian62
- Tel.: 891050435 zero nine
- Name: Vyacheslav
- Kasimov city
- Wheels: Honda NS700Integra
And what's the difference? In the location of the timing cover fasteners? This also has a zero value. Structurally the motor is exactly the same.
#13 OFFLINE phaeton399
- Tel.: +7 9776923151
- Name: Timur
- Lyubertsy city
- Wheels: JOYMAX
Why can’t you cope with the simplest operation? Let's learn: https://china-scooter. emont&Itemid=55 For four valves it’s almost the same. The size of the gaps is indicated in the service manual - go for it, but don’t break anything, it’s expensive.
Post edited by phaeton399: 22 May 2012 — 04:29 PM
#14 OFFLINE phaeton399
- Tel.: +7 9776923151
- Name: Timur
- Lyubertsy city
- Wheels: JOYMAX
on a joey everything is different, but it’s possible, but removing the engine is no longer for me - it’s better to suffer a little than to be very perverted!!!
Post edited by phaeton399: 22 May 2012 — 04:52 PM
#15 OFFLINE slavian62
- Tel.: 891050435 zero nine
- Name: Vyacheslav
- Kasimov city
- Wheels: Honda NS700Integra
And the risks, marks, etc. are they clear? What to combine with what? And do I need to buy new gaskets, or will the old ones work? Yes. the most important. What gap should there be?
#16 OFFLINE slavian62
- Tel.: 891050435 zero nine
- Name: Vyacheslav
- Kasimov city
- Wheels: Honda NS700Integra
here is a photo of the valve adjustment, if you have any questions please ask
Part 1 - VALVES
Extraneous sound when the engine is running, gas gaps, unstable engine operation, loss of power - one of the main causes of these ailments is unadjusted intake and exhaust valve clearances.
In order to adjust the valves on the Stels Flame 200, we need an 8 mm, 10 mm wrench, a flat screwdriver and a feeler gauge 0.05 mm thick, as well as an hour and a half of time spent usefully for business =). THE MOTORCYCLE MUST BE COLD!
First, you need to prepare the motorcycle - remove the seat from it and move the gas tank (you can skip this operation, I did this to better photograph the valve elements).
The seat is held on by 2 bolts that Chinese engineers hid under the rear fender; unscrewing them causes the seat to be pulled back. The tank is held on by 2 small bolts; after unscrewing them, we also carefully move the tank back; you may need to disconnect the tube from the gas tap BEFORE TURNING IT TO THE CLOSED POSITION!
Remove the engine cover by unscrewing 3 8 mm bolts. 2 on the right and one on the left.
After unscrewing the bolts, to make the cover easier to remove, tap it with your hand - it will come off easily.
Now our motorcycle looks like this:
On the left side of the engine, unscrew the inspection window cover with a flat-head screwdriver.
There is a shaft plug under the inspection window; by removing it with a hexagon, you can smoothly rotate the shaft. But we are not looking for easy ways =) The shaft can also be rotated by the rear wheel (in 5th gear it is most convenient) or by a kick starter. Now our task is to position the piston at TDC (top dead center), in English TDP this position corresponds to the shaft mark T|, it is important to know that the piston is at the top dead center during the compression and release cycle. We need a compression cycle, it’s easy to recognize: both valves must be closed, which means the rocker arms will be at the same height (you can look at the photo below where the valves are shown).
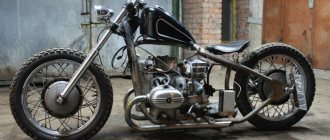
Replacing the crankshaft on a scooter
Any equipment fails. If we talk about scooters, problems can arise in various components and assemblies. In this article I would like to cover the topic of engine repair, or rather crankshaft replacement. This detail changes extremely rarely. If you replace the crankshaft properly, you won’t have to return to this issue for a long time. For example, replacing a piston can be done every two seasons. Looking ahead, we will immediately answer the question “how much does a crankshaft cost for a scooter?” On average, the price for this Taiwanese-made part fluctuates around 2000-2700 rubles. The exact price depends on the scooter model.