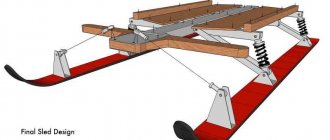
As you know, there are many ways to develop homemade snowmobile skis. Strictly speaking, the ski includes a base, a shock-absorbing element, a fork, a shaft, link legs and a bipod for the fork. In some designs, for strength, the amplifier and, accordingly, the ridge are welded.
Homemade skis can be made from plastic pads. Therefore, expanders are bought in a specialized store, which are attached to the snowmobile chassis using a homemade fastening. For example, you can easily make a small homemade snowmobile with plastic skis. Why small sizes? – such a snowmobile will not weigh much, which means the load on the skis will be minimal. These miracle “machines” are an engine from Soviet mopeds on a frame where a seat is mounted.
Metal skis are much more difficult to manufacture, much less implement on a snowmobile. To develop metal skis you will need:
- Dye.
- Bolts and screws to secure all elements.
- Hydraulic pipe.
- Metal pipe with a diameter of 6 mm.
- Polyethylene pipe with a diameter of 85 mm.
Parameters of the future ski track: length – 1000 mm; width - 25 mm. These skis are ideal for both small snowmobiles and large equipment such as utility snowmobiles. The weight of one ski will reach about 7 kg. Before starting the main work, it is extremely important to shape the skis. To do this, use a cardboard stencil. Cut out the shape directly and create a bend in front of the ski. The bend angle is at the discretion of the future owner of these skis. If you go too far with the bend, the ski track will not slide on the snow, but will collect it and thereby slow down the equipment. To prevent the skis from bending upon first contact with a stone or stump, a pipe is welded along the edges. The so-called stiffener will strengthen the structure. At the bend, the pipe must be welded strictly along the contour. Next, we create a platform for the shock-absorbing system. Its installation is carried out with bolts to the skis. The connection of the platform with the bow of the homemade skis is carried out thanks to a hydraulic pipe. Thus, the upper component of the ski track is completed.
The lower part will be created from the ridge. To do this, we fasten the hydraulic pipe at four points. Before final fastening, the pipe must be compressed. After this, we fasten the polyethylene pipe using self-tapping screws. In order for the pipe to fit perfectly on the metal base, it needs to be straightened. To do this, it will be enough to cut it. A good alternative to a polyethylene pipe is a polypropylene pipe. They are used when laying sewers. True, sewer pipes are afraid of low temperatures. The final stage is painting homemade skis.
Factory or homemade snowmobile skis?
Experienced snowmobile pilots do not recommend reinventing the wheel; they unanimously insist on giving preference to factory options. Only in case of a lack of funds or the impossibility of finding a specific model of skis, you need to develop your own “version” of skis for a snowmobile. You don’t need to be an expert to understand one simple thing - factory skis are made specifically for a snowmobile, developed by experienced engineers and undergo more than one test that confirms the quality of the final product. Moreover, if your snowmobile is not cheap, then it is better, if the standard ones break down, to buy the same model of skis in a specialized store. For example, it will not be difficult to purchase skis for a Dingo snowmobile. But, in the end, the choice is individual for everyone - to purchase in a store or develop homemade skis.
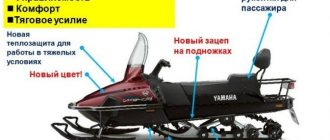
Key Benefits of Snowmobile Running Boards
The range of design elements is represented by unique developments that differ from standard samples in a wide range of advantages. Footpegs for snowmobiles are installed using fasteners to the body after dismantling the factory ones. High-quality snowmobile footpegs from the American company SKINZ solve many problems and ensure a stable foot position while moving. Due to the original tubular design, reliable grip on shoes and a clean support area are achieved. The joining of the external and internal sides of elements with a significant number of holes is carried out at a higher level, which allows you to clearly sense the boundaries of the site while moving.
Snowmobiles do not get stuck in snowdrifts and easily emerge to the surface due to weight reduction achieved through the use of light and reinforced aluminum alloy. The fastening element and studs supplied in the kit for better grip are installed individually in the required quantity. Unlike factory analogues, the footrests do not bend, which is due to the quality of the improved material and the use of special TIG welding technology.
Read also: Drawing of a wooden knife with dimensions
To add design personality to your snowmobile or replace broken elements, it is recommended to buy inexpensive colored plastic hooks for the inner steps, made using special equipment from heavy-duty hardened nylon.
A worthy competitor to SKINZ are footpegs for snowmobiles from the manufacturer VEL (analogous to SKINZ), produced in Russia and installed on SkiDoo, Polaris, ArcticCat. They are distinguished by a reduced width (by 3.81 cm), which effectively reduces the dimensions of transport, lightens the weight and demonstrates high wear resistance. Service life is limited by the durability of the frame itself.
What parts are needed?
For the remodel you will definitely need:
| Steering mechanism | You can use any automotive mechanism with a steering column and rods. The standard mechanism for one ski or another from motorcycle equipment will not work |
| Additional springs for skis | The easiest way is to use spring springs. You can take them both from a car and from various mechanisms. It is necessary that the springs be able to be adjusted and attached to the ski, and also have the same stiffness. The springs must provide the ski with a certain degree of freedom so that it can swing back and forth a little. |
| Two skis | They take shorter ones than the one for the single-ski circuit. They also need to have a curve at the back. This is necessary so that in case of reversing the snowmobile does not bury itself in the snow. Reverse gear on a snowmobile with two skis has to be engaged more often than with one, especially when driving through the forest. |
| New mask | Usually the snowmobile has to be rebuilt by changing its mask. A new mask can be taken from a serial two-ski snowmobile, but you can weld it yourself. |
| Additional fasteners | The skis and steering will have to be secured somehow to the snowmobile frame. This may require additional pipes, rods and other parts. |
Welding is almost always required for the job.
Step-by-step instructions for installing two skis on a Buran snowmobile
- The old ski and steering are removed.
- A new one is mounted into the steering pipe so that the steering rods on the left and right are above the snowmobile frame. This may require moving components under the hood of the Buran.
- Before putting two skis on the Buran snowmobile, an estimate is made of where the springs will rest and how the steering will be connected to the skis.
- Prepare the skis in such a way that they are tightly connected to the steering wheel. To do this, additional rod gussets and brackets are usually used, and a tube or rod is attached along each ski.
- The springs are being installed and adjusted.
- The steering is being checked.
It is desirable that the skis have a not too wide spread in width, without going beyond the boundaries of the track. When converting the caterpillar, most craftsmen recommend changing it to the MD type. Skis must be installed in such a way that when turning in place, their center area maintains its position.
JSC "Rybinsk Motors"
half-pulleys of the impeller, to the outer side of the inner half-pulley as follows:
· remove the air intake and the recoil starter assembly;
· Unscrew the nut securing the impeller pulley, holding the impeller from turning with the stopper included in the snowmobile tool kit;
· remove the outer pulley half, belt, adjusting washers and inner pulley half;
| Rice. 29 — Adjusting the fan belt tension |
· place the required number of washers, the inner half-pulley, the remaining adjusting washers, the front half-pulley on the impeller shaft and tighten the nut;
· insert the belt into the groove of the impeller pulley and, turning the engine crankshaft (the spark plugs are turned out), put it on the drive pulley;
· check the belt tension, reinstall the fan air intake and recoil starter.
Power system maintenance.
Changes in the technical condition of the power system during operation are due to the fact that fuel and air filters gradually become clogged, and fuel purification deteriorates. Due to clogging and violations of adjustments in the carburetor, the composition of the combustible mixture changes at different engine operating modes. In addition, during long-term storage of gasoline, the content of actual resins in it increases. The use of such gasoline causes rapid tarring of fuel lines and fuel filters, and the composition of the mixture is disrupted due to a decrease in the cross-section of the carburetor jets. To prevent many malfunctions of the power system, it is necessary to use only recommended gasoline and oils to prepare the fuel mixture, accurately maintaining the specified proportions and observing the requirements for refueling.
Maintenance of the power system consists of systematically checking the quality of fastening and tightness of all connections, washing the fuel tank, fuel lines and filter elements, cleaning and rinsing carburetor parts and channels and periodically making adjustments. The carburetor should be adjusted only after checking the technical condition of the engine and power system, the serviceability and correctness of the ignition system adjustments.
Due to leaks in the connections of the fuel system, air may be sucked into it, as a result of which the fuel pump becomes partially or completely inoperative. When air leaks through the seals of the carburetor and intake manifold, a sharp depletion of the combustible mixture occurs - the engine starts with difficulty and does not idle. Leaky connections can be eliminated by tightening fasteners and replacing damaged gaskets. Insufficient fuel supply is also possible if the vent hole in the fuel tank cap is clogged.
Maintenance of the settling filter comes down to its periodic cleaning. To do this, unscrew the wing nut, remove the glass and filter element and wash them in clean gasoline.
To wash the fuel tank filter, pull out the fitting from the rubber bushing of the tank and carefully remove the bushing from the hole using a screwdriver. Clean the filter without disassembling it.
Maintenance of the fuel pump consists of periodically removing mechanical impurities from the sump and washing the filter mesh. Disassemble the pump only if it is faulty, as disassembly may damage the diaphragm.
Perform complete disassembly of the carburetor only if it malfunctions, if during operation there is increased fuel consumption, a sharp decrease in power in transient modes and unstable operation at idle speed of the engine. After operating on leaded gasoline, before disassembling it is recommended to immerse the carburetor in kerosene for 10...20 minutes. Disassemble carefully, avoiding damage to the gaskets.
After disassembling, rinse all parts thoroughly and clean them of resinous deposits. Flushing should be done in unleaded gasoline. After washing, blow out the jets and channels with compressed air. If the jets are heavily tarred, they can be cleaned with a pointed stick made of soft wood, generously moistened with acetone. You cannot clean the jets with wire or other metal objects, as this leads to an increase in the throughput of the jets and additional fuel consumption. When assembling, install each jet in its place. To avoid warping of the flanges, tighten the carburetor mounting nuts evenly.
Adjusting the K65Zh carburetor
Adjust the carburetor at idle speed in the following order:
· before starting the engine, by rotating screw 5 (Fig. 30), set the throttle in such a position that a gap of 2...2.5 mm is formed between its base and the lower generatrix of the carburetor body;
· screw it in completely, and then turn out adjusting screw 4 by 0.5...1 turn;
· start and warm up the engine at average crankshaft speed for 2...3 minutes;
· by tightening screw 5, set the minimum stable speed of the crankshaft;
| Rice. 30 — Adjusting the K65Zh carburetor: 1 - float chamber; 2 — float sink; 3 — fuel inlet fitting; 4 — screw for adjusting the quality of the idle mixture; 5 — idle speed adjustment screw; 6 — screw for adjusting the tension of the throttle lift cable; 7 — housing cover; 8 — screw for adjusting the tension of the corrector control cable; 9 — body |
· by gradually unscrewing screw 4 until interruptions in engine operation appear, and then by slowly tightening it, find the optimal position of screw 4, at which the engine will operate stably;
· check the stability of the engine when suddenly opening and closing the throttle. If the engine stops working when the throttle is sharply opened, turn screw 4 a quarter to half a turn (the mixture will become richer), if the engine stops when the throttle is suddenly closed, turn it out the same amount (the mixture will become leaner). For an adjusted carburetor, screw 4 should be unscrewed no more than two turns from the fully screwed position. Turning it back to a large amount will lead to a lean fuel mixture at operating conditions and, as a result, to overheating of the engine.
The position of the float mechanism is adjusted with the carburetor removed from the engine and the float chamber removed by bending the float adjusting element. The optimal fuel level is ensured when the float is positioned in such a way that on an inverted carburetor the float is under the force of its own weight, and at the same time the casting parting line on the side surface of the float is parallel to the plane of the parting with the float chamber of the carburetor body.
Adjusting the quality of the mixture for engine operating conditions depending on climatic and other factors is done by rearranging the throttle metering needle in the needle lock. When the needle is raised, the mixture becomes richer; when lowered, it becomes leaner.
The optimal operating fuel consumption corresponds to the position of the throttle metering needle, in which the snowmobile under load is one driver, moving at a speed of 30 km/h on snow cover with a density of 0.3...0.35 g/cm3 and an ambient temperature not exceeding minus 4 °C , consumes no more than 22 liters of fuel over 100 km.
Adjusting the Mikuni carburetor
To adjust the quality of the idle mixture, fully tighten screw 2 (Fig. 31), then unscrew it 1 turn. When you turn the screw clockwise, the mixture becomes richer; when you turn it counterclockwise, it becomes leaner.
Speed adjustment
Rice. 31 — Adjusting the Mikuni carburetor:
idling is carried out
1 — idle speed adjustment screw; first pre-on
2-screw for adjusting the quality of the idle mixture with the engine turned off, thus finally approaching. For preliminary adjustment, turn out screw 1 (Fig. 31) until it does not contact the throttle. Screw in screw 1 until it touches the throttle body, then, while continuing to screw in the screw, ensure a 1.5 mm gap between the end of the throttle body and the surface of the carburetor outlet (engine side), using a piece of drill bit, etc. as a gauge. (Fig. 32). To make final idle speed adjustments, start the engine and let it warm up. Then adjust the idle speed to minimum steady speed by turning the screw clockwise to increase the speed or counterclockwise to decrease the speed.
Attention!
Do not adjust the idle speed using screw 2.
Adjusting the quality of the mixture for engine operating conditions depending on climatic and other factors is done by rearranging the throttle metering needle in the needle lock. When the needle is raised, the mixture becomes richer; when lowered, it becomes leaner.
The fuel corrector has two positions: “closed” and “fully open”. Open position
tion
Rice. 32 - Using a piece of drill as a gauge is used when starting the engine.
5.6 Transmission maintenance
Maintenance of snowmobile transmission components and mechanisms consists of adjusting them, tightening threaded connections, cleaning external surfaces of dirt and carrying out lubrication work.
Maintenance of variator with centrifugal regulator 110602800.
For reliable operation of the variator and increasing the durability of the variator belt, the relative position of the driving and driven cones is important.
Check the size indicated in Figure 8 (53±0.5 mm) from the end of the driving cone to the end of the stationary driven cone using two rulers. If necessary, make adjustments as follows:
· loosen the bolts securing the engine to the sub-frame;
· by moving the motor, set the required size, parallelism of the motor shaft and the drive shaft of the reverse box;
· Tighten the engine mounting bolts.
To ensure uniform wear on both working faces, the belt must be turned over with respect to the working surfaces of the variator every 150 - 200 km. To remove the variable speed belt:
· set the reverse gear shift lever to the neutral position;
· remove the variator casing;
· spread the driven cone and remove the belt through the edge of the fixed driven cone;
· Remove the belt from the drive cones.
Install the new belt in reverse order.
Notes:
1 Install belts only after keeping them for 24 hours at a temperature of plus 15...25 °C or for at least 30 minutes at a temperature of plus 50 °C.
2 Installation of belts in field conditions is allowed only after they have been kept in the engine compartment for at least 15 minutes after the engine has warmed up.
To lubricate the variator drive shaft and the reverse gearbox drive shaft:
· remove the variator casing;
· unscrew the bolt, remove the washer, cover and movable disk;
· disassemble the weights by unscrewing the nuts securing the axles and weights, and wash the axles and rollers;
· unscrew the bolt from the reverse box drive shaft and remove two washers;
· use a puller to remove the fixed cone;
· remove the variator belt;
· remove the retaining ring, half-ring and movable cone of the driven pulley;
· Lubricate according to the lubrication table and install the removed parts in reverse order.
Contact of lubricant on the working surfaces of the variator cones is not allowed!
Maintenance of centrifugal regulator 110602900
(Fig. 9) consists of carrying out lubrication and adjustments.
To ensure optimal operating conditions for the variator, the following requirements must be met:
· the axes of the pulleys must be parallel, the distance between them must be 278...283 mm;
· the width of the groove for the belt on the driven pulley of the variator should be 29+1.0 mm at a distance of 3.5 mm from its outer diameter. The size is ensured by placing adjusting rings 24 between cone discs 16 and 26. The size adjustment is made by the manufacturer when assembling the snowmobile;
· the distance between the planes of the ends of the fixed cones of the drive pulley 1 and the driven pulley 16 should be 53±0.5 mm.
Adjustment of the relative position of the pulleys is carried out by moving the engine in the grooves of its sub-motor base.
To lubricate the centrifugal governor:
· remove the snowmobile hood;
· remove the variator casing;
· remove the variable speed belt;
· unscrew the bolts and move the steering column to the side;
· stop the engine crankshaft from turning using a metal object installed under the tooth of the electric start gear on the sub-engine base;
· unscrew bolt 11;
· remove the housing 9 and the movable cone 3 from the shaft of the stationary cone 1;
· place cone 3 on the end and remove body 9;
· from the radial grooves of the cone 3, remove the clips 6 with rollers 4;
· Remove the rollers from the holders.
Carefully remove the old grease and lubricate the rubbing surfaces: cone shaft 1, cone bushing 3, internal cavity of the stop 7, rollers 4 and plates 5. Fill the cavity of the fixed cone shaft 1 with grease.
Reassemble in reverse order. When assembling, be sure to align the balancing marks, made in the form of small recesses on cones 1, 3 and body 9.
To remove the centrifugal regulator, unscrew the fixed cone 1 using a wrench.
Install the centrifugal regulator in the reverse order.
Attention! It is not allowed to dismantle the bolts 13 without first compressing the spring 10. Compress the spring by recessing the stop 7 in the housing 9.
Reverse box maintenance
includes checking and adjusting the chain tension, checking the level and changing the oil in the crankcase, eliminating oil leakage at the crankcase connector.
To adjust chain tension:
· unscrew the fixing bolt of the tension device and remove the rubber cover of the inspection window;
· put the reverse box control lever in the “Forward” position;
· by turning the drive cone disk counterclockwise, tighten the chain until it stops; by turning the disk clockwise, loosen it. The difference between the indicated chain positions should be 1...5 mm (see Fig. 33);
· Rotate the eccentric axis of the tension sprocket to set the required chain deflection. Fix the found position of the axis with a bolt.
The chain tension can be easily checked by the play of the stationary cone of the variator. The backlash measured along the outer diameter of the cone should be within 10...20 mm.
To wash the reverse box, do the following:
· Unscrew the crankcase drain plug and drain the oil;
— put the plug in place;
· pour 1 liter of flushing mixture into the crankcase through the hole in the cover, consisting of 75% gasoline and 25% MK-8 oil;
· start the engine and, with reverse switching, run in the snowmobile for 10...15 minutes; - after running in, drain the flushing mixture through the hole in the reverse box
Rice. 33 — Adjusting chain tension
in the lid, fill the reverse box with fresh oil in a volume of 350 cm3.
Check the oil level in the reverse box with a special dipstick through the inspection window from its lower edge. In this case, the oil level should be between the dipstick control marks.
5.7 Chassis maintenance
Maintenance of the snowmobile chassis consists of periodic inspection, adjusting the tension and centering of the tracks, timely lubrication and tightening of threaded connections.
The need to adjust the tension and centering of the tracks during operation arises due to wear of the undercarriage parts, especially the teeth of the drive and driven sprockets, and the stretching of the track surface.
Weak track tension when the snowmobile is moving can lead to the roller balancers turning over, the tracks falling off the sprockets, and poor alignment causes excessive wear on the track edges, balancer cheeks and sprocket teeth.
To check and adjust track tension and alignment:
· lift and secure the snowmobile so that the tracks can rotate freely;
· check the track tension. The distance between the inner surface of the upper branch of the caterpillar and the lower surface of the frame square at the middle bracket for fastening the balancer rollers in front of the snowmobile should be 55...65 mm (Fig. 34);
· if the tracks are not tensioned enough, loosen the nuts of the balancer axles of the guide sprocket shafts and turn the adjusting bolts clockwise with a wrench until the tracks are at normal tension (to loosen the tension, rotate the bolts in the opposite direction). After adjustment, tighten the self-locking axle nuts.
| Rice. 34 — Adjusting track tension |
When adjusting the tension, long
the ends of the balancer springs must be inserted into the middle slots of the combs welded to the snowmobile frame. These three-position combs only serve to change track tension depending on snow conditions.
When driving on deep, loose snow, the tension is reduced by moving the ends of the springs to the rear slots of the combs, and when driving on densely compacted snow, the ends of the springs are transferred to the front slots, thereby increasing the tension of the tracks.
After adjusting the track tension, center them in the following sequence:
· start the engine at a speed at which the tracks begin to slowly rewind;
· check that the sprocket teeth engage with the tracks. The gap between the engaging tooth and the corresponding track window must be at least 0.5 mm. The gaps between the edges of the tracks and the cheeks of the balancers should be the same on both sides of the track;
· on the side where the track comes closer to the balancer cheek, loosen the axle nut, rotate the tension adjusting bolt until the gap on both sides of the track is the same, and tighten the nut again.
After performing the tensioning and alignment operations of the tracks, tighten the nuts 5 (Fig. 12) until they stop, and then tighten the bolts 1 by turning them half a turn clockwise.
The operations of tensioning and centering the tracks are interconnected, and one of these operations cannot be performed separately from the other.
To carry out lubrication work:
· lift and secure the rear of the snowmobile;
· loosen the track tension mechanism;
· unscrew the bolts securing the roller balancer axles to the frame brackets and remove the roller balancers;
· take a syringe filled with grease with a grease nipple installed on the output end;
· sequentially removing the plugs from the outer cheeks of the rollers, insert the threaded end of the oiler into the hole and lubricate it;
· lubricate the axles with a thin layer of grease and install the roller balancers in the reverse order;
· unscrew the nuts of the balancer axles of the track guide shafts, remove the long ends of the balancer springs from the frame combs and remove the springs;
· unscrew the tension bolts, remove the balancer axes and remove the guide sprocket shafts from the frame;
· remove the plugs from the outer cheeks of the rear balancers and spray in grease;
· lubricate the spacer bushings of the balancer axles;
· unscrew the bolts securing the bearing housings of the track drive shaft;
· remove the bearing housings;
· wash the bearings and bearing housings in clean gasoline;
· fill the bearings and bearing housings with grease.
Reassemble in reverse order. Perform track adjustments.
To lubricate the hinge joints of the ski, spring support liner and spring leaves:
· lift and secure the front of the snowmobile;
· unscrew the nut, remove the axis of fastening the ski to the kingpin and remove the ski;
· unpin and remove the axles that attach the ski to the spring;
· unscrew the nuts and remove the spring coupling bolts;
· carry out lubrication according to the “Lubrication Table”.
Lubrication of the telescopic ski suspension is not required during operation.
5.8 Maintenance of control mechanisms
Maintenance of control mechanisms consists of their timely lubrication, tightening of threaded connections, adjustment of brakes and control drives.
During operation, the friction pads of the brakes wear out, the gap between them and the brake disc increases, and the stroke of the brake levers increases. Weak brake performance can also be caused by a decrease in the coefficient of friction between the brake friction pads and the disc due to oiling of the pads.
To restore normal operation of the brakes (Fig. 16), adjust them.
To adjust the left brake:
· loosen the bracket mounting bolts 18;
· by pressing the left control lever 1, bring the pads 7 and 8 together, and by moving the bracket 18 in the grooves of the steering column bracket 9, achieve simultaneous contact of the entire supporting surface of the pads with the disk 5. Tighten the bracket fastening bolts;
· by rotating the adjusting clutch 4, move the end of the brake lever from 10 to 25 mm until both pads come into contact with the brake disc;
· use adjusting bolt 14 to install the brake pads so that disc 5 rotates easily. It is allowed to lightly touch the pads in the places of greatest runout of the disc;
· secure the position of bolt 14 with nut 13. Adjust the right brake in the same way. Lubrication of control mechanisms requires partial disassembly of the components. To lubricate the steering column bearing bushings:
· remove the steering column mounting strips;
· remove the rubber bushings;
· lubricate the inner surface of the bushings with Litol-24 grease;
· Reassemble in reverse order. Lubricate the ski pin as follows:
· lift and secure the front of the snowmobile;
· unscrew the bolt securing the kingpin to the rocker and remove the ski together with the kingpin;
· Lubricate the pin with Litol-24 grease and put the ski in place. To lubricate the speedometer drive gear:
· unscrew the three nuts securing the drive housing to the reverse box;
· remove the housing and take out the driven gear;
· Fill the housing with Litol-24 lubricant;
· Reassemble the drive in reverse order.
After lubricating the brake, throttle and carburetor control cables, adjust them.
When the control lever is released, the throttle should be closed, and when the throttle is fully open, the control lever should not come all the way to the handlebar. In the initial position of the fuel corrector control lever, the corrector fuel channel must be closed.
5.9 Electrical maintenance
Maintenance of the electronic ignition system.
The electronic ignition system does not require special maintenance or adjustments. Maintenance of the ignition system comes down to checking the reliability of the contact connections on the stator, commutator and transformers, the connection points of the commutator and transformer with the ground of the snowmobile, and the mounting points of the ignition system components on the engine and snowmobile.
Attention! The functionality of the electronic ignition system and the engine is ensured by strict coincidence of the polarity of the magnets (Fig. 22) of the flywheel: the north (N) pole of the magnet must be opposite the keyway. Checking the polarity of the magnet can be done using a compass or other magnet with a previously known polarity. Like poles (N:N or 'font-size:14.0pt;letter-spacing:-.85pt; '>S:S) of magnets repel, unlike poles ('font-size:14.0pt;letter-spacing:-.75pt; '>N:S or S:'font-size:14.0pt;letter-spacing:-.75pt; '>N) - attract. When replacing the flywheel with a new one, it is necessary to check the polarity of the magnets.
| Rice. 35 — Setting the ignition timing: 1 - stator; 2 – engine crankcase |
Spark plug maintenance.
Check the technical condition of the spark plugs every 25 hours of engine operation or 500 km of the snowmobile. 24...280 at a rotation speed of 5500 min-1.
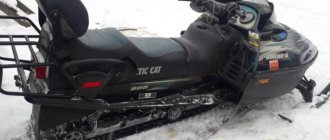
Snowmobile "Buran" with two skis: price
There is always a choice: installing 2 skis on a Buran snowmobile yourself or purchasing an existing model. As for the second option, it is much easier to purchase a two-ski model and not worry about modifications. “Lynx”, “Taiga” and most other snowmobiles are already equipped with two skis, they have shown themselves to be excellent when used in Russian conditions, there are enough spare parts for them and their maintenance can be carried out according to a ready-made technological map, without wondering how to fix it later.
The second option, when the owner has a Buran snowmobile and wants 2 skis, is more complex and will require time, effort, and knowledge. Most likely, you will need to purchase spare parts. You will definitely have to buy a new pair of skis. You’ll have to run around car markets, surf on sites like “Avito” or “Yandex-auto” to find some spare parts, and communicate a lot with people. And it is not a fact that the resulting result will be satisfactory.
Is such a scheme necessary if there is a ready-made snowmobile with one ski and there is no desire to buy another? As practice shows, most problems with "planing" of the Buran in deep snow are solved by installing a wide front ski. There is no need to alter anything; this is available at the spare parts store. Maneuverability of the Buran under normal conditions is not such an important task as cross-country ability. Moreover, most fishermen and hunters prefer to spend time outdoors, in the fresh air, rather than sitting in a garage or workshop.
Snowmobile tuning-Video!
© 2009—2018 All rights reserved. All rights reserved. Moscow, Dubninskaya street, 83
All products have undergone pre-sale preparation and are under warranty.
The materials posted on the site do not constitute a public offer. For information please contact the seller.
We use cookies to analyze events on our website so we can improve user experience and service. By continuing to browse the pages of our website, you accept the terms of the User Agreement.
Snowmobile owners are well aware of the situation when the running boards on a snowmobile in deep and puffy snowdrifts become clogged with ice or snow, which leads to the foot slipping and loss of control of the vehicle in an extreme situation. The simplest solution to improve safety and performance is to purchase innovative tuning products that significantly increase the endurance and service life of snowmobiles.
During extreme skiing or when crossing the taiga, standard thresholds are easily broken by large stones, branches and stumps due to shock loads. Installation of reinforced perforated models will allow you not to worry about the reliability of the structure. In difficult situations, you can stand up on them at full height, change the center of gravity and load the skis without the risk of your feet sliding down. The slightly raised webs in the front provide comfort to the toes, which now do not rest against the boots when riding.
Types of snowmobiles and parts for them
Before you buy a snowmobile or make one yourself, it is important to decide what specific task it will perform. All machines of this type are divided into the following types:
- mountain;
- tourist;
- sports;
- utilitarian;
- children's;
- mini snowmobile.
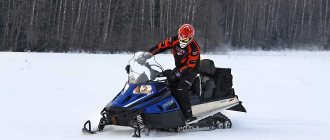
As a rule, they differ from each other not only in size, but also in the width of the leading caterpillar. Most often, snowmobiles on the market have two skis in front, which are attached to one suspension, it can be a lever or a spark plug. They differ from each other as follows: the lever system is designed for easy control, but in the forest it can break from any stump; the candle system is worse in control, but is much more resistant to impacts.
Among Russian snowmobiles there are models with one ski in front and two tracks in the back. Such cars are suitable for driving on the highway and for maneuvering in the forest. The bad thing is that as the speed increases, they lose controllability. Models from different manufacturers may vary in width and shape.
Factory parts are standardly made of reinforced plastic. There are also metal skis. [ads-pc-1]
How to properly change snowmobile shoes
In some cases, the purchased car requires replacement skis. This can happen for several reasons:
breaking;
- snowmobile modernization.
- for metal models;
- for plastic models, they have a groove along the entire surface;
- universal linings.
You have to replace it more often when it breaks. When replacing in the event of a breakdown, you can upgrade the snowmobile (or mini-snowmobile) using specially selected ski models. To do this, you need to know exactly what set of fasteners is needed. Upgrading a snowmobile doesn't always require new skis. Sometimes owners can easily make do with parts such as linings (extenders).
You can choose your own options for any car. Ski extensions are available in three types:
It is not always possible to select expanders the first time. Sometimes they don't fit the ski. If the problem is that there is a small gap left or the bend does not match, then it can be easily solved with your own hands. Some extensions are designed specifically for riding in the woods. By installing them, you can enjoy special cross-country ability and driving on loose snow.
Operation of the snowmobile should be easier after the following manipulations:
– additional shock absorbers are installed on the towed sled, and a windshield is installed to protect against oncoming flow; A hatch is cut into the bottom of a sled intended for fishing, equipped with a luggage compartment and a folding awning.
– boxes with a sealed housing for cargo purposes are mounted on the trunk of the snowmobile.
– muffs serve well to protect hands from snow and rain, strong wind.
– in case of unexpected collisions, special steering wheel protection in the form of a pad will absorb the impact and absorb it.
– special protection installed under the bottom of the unit protects the motor from impacts on the ground.
– the driver feels more comfortable with the heated control handles turned on.
– additional mirrors can significantly improve rear view.
– it is possible to install a cigarette lighter for greater comfort.
– colored reflective strips are glued on the body of snowmobiles for safety and appearance reasons.
Read also: Weld stainless steel with a regular electrode
– in order to monitor the temperature, a corresponding sensor is installed on the engine.
– to protect the body of the snowmobile, a reinforced bumper is mounted, and additional footrests are installed for a comfortable position of the legs.
– a special spacer helps adjust the height of the steering wheel.
– craftsmen make unique fasteners to transport faulty snowmobiles and devices made from rollers for moving them around the garage.
Snowmobile tuning to improve technical parameters
Improving the technical characteristics of a snowmobile
To improve the technical parameters, tuning snow machines provides:
– a device in the form of pads, installed on the ski chassis, protects against impacts and improves the stability of the machine.
– for traveling on ice, steel spikes are installed.
– skates made of special steel serve to stabilize snowmobiles when traveling on non-snowy and difficult trails.
– a shock absorber with adjustment and additional volume of gas chambers serves for a sporty driving style.
– a reverse engine is installed on the engine and an electric starter is installed to improve starting.
– a selection of sprockets with a certain gear ratio helps to develop maximum speed, but it should be borne in mind that acceleration will be more difficult.
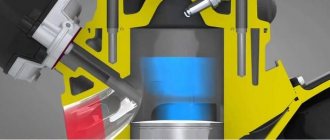
Snowmobile engine tuning
Snowmobile engine tuning
When tuning the engine, it is important to do it in such a way that the snowmobile at the start has good dynamics and decent traction forces in nominal mode. This condition is quite simply met on an 800 cc engine. This engine uses reed valves between the carburetor and the engine body. These parts are produced in small quantities by American companies. So, by replacing standard petal valves with tuning ones, and their opening is much easier because they have more petals, our engine will become much faster and gain speed faster.
Snowmobile capabilities after tuning
But there is one circumstance here: you need to know which petals to install. Some petals are soft in quality, while others are hard. Delicate petals give a high effect and allow you to increase the speed of acceleration by 20%, however, their resource is short. Quite reliable, rigid reed valves, but they do not work with such acceleration. So, an athlete, before resorting to tuning his engine, needs to figure out what he needs most at the moment.
Read also: How to set the angle on a knife sharpener
Choosing between homemade and factory options
When it comes to this topic, the root of it lies in a financial problem or the inability to find a particular ski model. It is at this moment that a person thinks about whether he can make the necessary part with his own hands. Homemade options are also offered by craftsmen who easily make not only skis, but also snowmobiles themselves.
Of course, factory parts? this is the standard of quality. They are created for a specific model by experienced specialists, and snowmobiles on these skis are first tested in various conditions. If the car is an expensive sports car, then it is better to purchase components for it from the factory. How to proceed ? Buy a new model in a store or make everything yourself? The choice is up to the owner of the winter vehicle.
There are several manufacturing options: you can use tin, wood, plywood, old hunting skis and snowmobile extensions. [ads-pc-2]
Manufacturing process
Let's consider several options for making skis with your own hands. First, let's determine what this part should consist of. Typically, a ski consists of a base, a shock absorber, a link leg, a fork, its rod and a bipod. Also, sometimes an amplifier is welded and an additional ridge is installed.
First DIY option? skis based on plastic linings. To do this, purchase expanders from the store and install homemade connections to the suspension. One of the simplest models of snowmobiles is a mini snowmobile. An old moped is used for it, including the engine and frame with a seat. Any skis are suitable for this option, as the design is lightweight.
Snowmobile design
Such engines have a gearbox that reduces speed by half and an automatic clutch in an oil bath. They are used on mini-tractors, walk-behind tractors and other garden equipment. When making my snowmobile, I took some components and parts from the Buran snowmobile: a caterpillar track, two pairs of bogies with four rollers, a caterpillar driven shaft assembly and drive sprockets. I bought all this in stores that sell spare parts for snowmobiles.
A rear pendulum with a driven shaft and rollers supporting the track (wheels from a children's scooter) was attached to the resulting balancer of two bogies.
Reference by topic: DIY snowmobile
High-quality footrests at an attractive price
Tuning the running boards significantly increases their performance capabilities and level of comfort. Products from trusted brands SKINZ and VEL are suitable for all types of snowmobiles. Universal running boards are reliable protection against unforeseen situations and guarantee controllability and reliability. In our store you can select or order the ideal version of thresholds and other accessories. When buying running boards for a snowmobile, pay attention to other useful products from the catalog, the existence of which you may not have previously suspected. Take advantage of free consultation with managers and purchase high-quality products at an affordable price. Prevent unnecessary, expensive repair costs and increase the life of your equipment!
Footboards for snowmobile "BURAN"
Footrests can be installed on the body of the BURAN snowmobile. Footrests are installed instead of standard ones using rivets or bolts. The main purpose is to securely secure the legs of the driver or passenger while the vehicle is moving. The snowmobile's footpegs have gear racks, the height of the teeth is selected in such a way as not to affect the sole of the boots. The main advantage over standard ones is their reliability ; the footrests do not burst at low winter temperatures, and are also inert to the effects of fuels and lubricants . The material of the footrests is metal , 1.6 mm , powder painting. Footrest length: 395mm , width 165mm .
Cost of running boards for a snowmobile (1 piece): 380 rub.
Ordering running boards for a snowmobile
Delivery calculation by transport company
Delivery of footrests to a snowmobile is carried out by transport companies (TC) or by Russian Post. To select a transport company, follow the link.
What else is interesting?