What to do if the ATV won't start?
The ATV can be used in a variety of conditions, which increases the load on all its systems.
This is especially noticeable when driving on severe off-road conditions, when you have to overcome significant obstacles. It is not uncommon for the ATV to not start for various reasons. Both newbies and experienced drivers encounter this problem. There are several common reasons why an ATV won't start. Perhaps this situation is caused by a breakdown in some components of the vehicle. However, sometimes it happens that the all-terrain vehicle does not start due to incorrect actions by the driver. If the ATV was purchased recently and the driver does not have sufficient experience and certain driving skills, similar problems may arise. If a children's or adult ATV does not start, you must first understand the intricacies of starting it. Having purchased a four-wheeler, it is recommended to read the manufacturer’s instructions.
Newer models are usually equipped with an electric starter. This makes starting the vehicle much easier. Starting the engine is somewhat more difficult in older models that have a kick starter installed. In this case, difficulties arise for beginners more often. You will need to gain sufficient experience, for which you should consider the starting procedure in theory:
- Before driving, be sure to check the fuel level in the gas tank. The ignition key is turned to the “on” position. The switch on the control panel should be in the same position.
- The transmission is moved to neutral. If there is a clutch, it is squeezed out, after which the lever is moved to neutral. On the panel in most models at this moment the corresponding indicator lights up. To check if your actions are correct, you can push the ATV. If the wheels spin, then everything is done correctly.
- When starting in the cold season, it is recommended to pull the choke lever towards you. This will enrich the fuel mixture with air, which will facilitate the starting procedure. In the warm season, such a procedure is not necessary.
- In the model with an electronic starter, you simply press the button and hold it until the engine starts. If the ATV does not start with the electronic starter, you can use the kick starter. To do this, the driver must sit on the ATV and press the lever until the engine starts. The gas must be squeezed out before performing this action in both cases.
- Next, the lever is pressed back, closing the air damper. After the above steps, the ATV should start.
Features of engine autostart
Different types and models of car engines behave differently when connecting autostart, and this should be taken into account when installing, connecting and configuring the system.
Temperature dependence
In the winter season, the internal combustion engines of a car start with difficulty, especially in diesel engines. Autostart failures are possible due to damage to the electrical wiring or oxidation of the signal system contacts, which reduces the voltage level in the electrical circuits. In addition, the contacts in the ignition system may be damaged, the battery may be discharged, or the ignition lock bypass module may not be working correctly.
Check the operation of the ignition and starting the engine with the key: if the engine starts immediately, it means that the autostart failure is associated with the operation of the anti-theft alarm system.
Dependence on gearbox type (manual gearbox)
If autostart does not work in cars with manual transmission, try setting the program neutral option. With the ignition on and the parking brake on, switch to neutral, press the first button on the key fob and hold it for 3 seconds, wait for a single signal from the device, then quickly:
- turn off the ignition and remove the key from the lock (the engine should continue to run);
- get out of the car and close the doors (the engine should turn off on its own and the alarm will go off when activated).
If after these manipulations, autostart still does not work, it means that either the alarm does not detect the operation of the door locks (the system is installed incorrectly and requires reinstallation), or the limit switches on the doors do not work (they should be reinstalled).
Auto start failure with triple signal flash
If, during autostart, the car does not start, and the lights flash three times, it means that there is a voltage drop in the electrical circuits. This may be due to a faulty/discharged battery, oxidation of the terminals, or the use of cables with the wrong cross-section in the electrical wiring.
The first reason has been dealt with
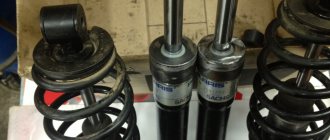
The second reason is leaky crankshaft oil seals or a broken flange on which the dynostarter stator is installed. Indirectly, there is little evidence of a leaky oil seal on the cooling fan volute. If you see oil dripping from the cavity of the dynostarter, immediately remove it and see what’s wrong there.
The inside of the snail is covered in oil: a sure sign of a dead seal
Pull off the rotor
That’s right: the cavity is full of oil, the oil seal is dead, the flange is not screwed to the crankcase. Here’s your “capital”...
The spring is either original, or it was found in a trash heap and then stuck here - it’s not clear. Another thing is clear: the spring should stand on the cuff, and not hang snot on the shaft
Behind the flange it’s the same story: a broken spring
The flange was unscrewed and something like Niagara Falls was siphoning through it... This is evidenced by the presence of oil on the gasket
Another point: a new crankshaft was installed in the engine. Naturally they took the Chinese shaft, but there were no others. How is this shaft working? The bad: the keyway on this one was broken. Most likely, the metal from which this obscenity is made is raw and the cone is machined incorrectly. If you decide to buy a new crankshaft, it’s better to buy a used Soviet one, restore it, and don’t mess with this crap
What to do if the starter does not turn when starting the engine?
In 99% of cases out of a hundred in which the starter does not turn when starting the engine, this is a problem with the battery. But wait, you seem to be saying that you already changed the battery just a few months ago..? All the same, despite this, check your battery again, regardless of when you bought it. This can be done using a multimeter, thus measuring the voltage. At the same time, also check the high-voltage wires and the condition of the terminals, which should not be oxidized or damaged.
If everything is in order with the battery and high-voltage wires, then you need to check the starter relay in the power distribution block. Even if you think that this is not the reason for the starter failure, you should still check the starter relay to prevent its failure.
Finally, check the starter itself (pictured above). First of all, tap on its body with something heavy, for example, a mount. Next, try starting the engine again. If after this you hear a slight noise from the starter and the car still does not start, then it is likely that the starter has failed. Remove the starter from the car and take it to a workshop that diagnoses and repairs starters. You can also immediately purchase a new starter.
The engine is low-powered and consumes a lot of gasoline
- Air filter dirty, air intake system clogged: clean / replace the filter. Make sure that all air intake openings are not blocked and that air flows freely into the engine.
- Ignition or electrical system failure: Make sure the battery is charged and properly connected, the ignition contacts are dry and the wiring is good.
- Voltage in the ignition system is too low: charge the battery, check the condition of all connections, remove rust.
- Faulty spark plugs: check the condition of the spark plugs; Check the gap between the electrodes, adjust if necessary, screw in new spark plugs.
How to start a cultivator - methods for repairing faults
If the motor cultivator does not start, this may be due to malfunctions of several main components of the unit. Below we will consider typical breakdowns of the main mechanisms of a household cultivator and methods for eliminating them independently in more detail.
Malfunctions in the ignition system
Elements such as magneto, spark plug, pre-installed cap and high-voltage wire most often succumb to oxidation, as a result of which they inevitably fail. If dirt and moisture are found on a high-voltage wire, then they are the cause of its breakdown.
A weak spark or its complete absence most often indicates a lack of efficiency in the spark plug, which is why the cultivator refuses to start. In this case, you should check the condition of the gaps and the distance between them. It is best to do this with a special probe - the normal value for work should be 0.8 mm. If there is such a need, then it is necessary to completely remove the deposits that have formed from the outer surface of the insulator and the metal parts present in the spark plug.
The readiness of the engine before starting is affected by the serviceability of the piston group elements. Since they constantly operate under difficult operating conditions, their surfaces are subject to strong heating, which leads to damage to the internal combustion engine cylinder, pistons and rings. If the unit does not start, you will need to check its exhaust and intake valves. It often happens that they do not fit tightly to the saddles, and in this case you will need to fix the problem as quickly as possible, and then try to start the cultivator again.
Another part that often breaks down is the standard cultivator muffler. Combustion products and exhaust gas residues inevitably accumulate on the walls of the element, which leads to the inability to start the cultivator. If there is a large amount of these substances, the engine will sooner or later stop starting. To fix this problem, you will need to completely remove the muffler and clean it with compressed air from a cylinder.
Carburetor breakdowns and methods for repairing them
Often, the cultivator does not start due to blockages inside the jets or carburetor filter. A sign of this will be a completely dry and clean spark plug of the unit. Repairs are carried out in the following order:
- First remove the carburetor of the unit;
- Disconnect the fuel connection and blow it out with compressed air from a cylinder;
- After this, blow out the combustion chamber and fuel pipes;
- Reinstall the carburetor and try to start the cultivator.
If after this the cultivator does not start, then you should check the position of the float placed in the combustion chamber of the unit. The part is adjusted using special screws - by turning them clockwise, you raise the float, and when you turn the screws counterclockwise, the part is lowered.
Cultivator will not start - engine repair
Another mechanism whose breakdown prevents the cultivator from starting is the engine of an agricultural machine. If low-quality fuel is used or the proportions for preparing the fuel mixture specified by the manufacturer are not followed, the fuel will begin to flood the spark plug, which will lead to a lack of spark.
In this case, you will need to turn off the fuel supply, disassemble the engine and thoroughly dry the cylinder. After this, you need to unscrew the spark plug and start the cultivator using a manual starter. In most cases, after the above steps, the cultivator will start. At the end, you need to screw the spark plug back in and continue operating the unit.
Engine doesn't work, exhaust gases are blue
- Too high an oil level leads to oil entering the combustion chamber, the crankcase ventilation system transfers drops of oil into the air filter container, from where it is sucked back into the engine: check the oil level with a dipstick or eyelet, clean the air filter.
- Worn cylinders and/or pistons, worn or broken piston rings: measure compression ratio; if it is too low, remove the pistons and piston rings and check the installation dimensions, replace, repair the engine.
- Worn guides or valve stems: disassemble the cylinder heads, check the installation dimensions of the valves and guides; replace them if necessary. Install new valve stem seals.
Is it possible to drive without a battery?
Experienced owners of scooters and mopeds can start them in any way - from kickstarter to using the most ordinary drill. There are amateurs who even write about this on their forums: “I’ve been driving without a battery for a month now and don’t bother about it.”
Why does this happen? Let's find out the reason.
If the moped has a battery, it is regularly recharged from the generator. But when it is not there, the current generated by the generator begins to flow into all devices: it simply cannot evaporate or dissolve in the air. As the driving speed increases, the voltage begins to increase, and the entire lighting system of the moped can “fly” at any moment. And the lamps themselves, in the absence of a battery, work much worse, because they simply do not have enough energy. They can shine dimly, blink, or even burn out due to uneven distribution of energy.
It is best to purchase a suitable battery for your scooter - despite the fact that for some lovers of “trouble-free” riding, caring for the battery seems cumbersome. However, it is precisely to such people that we owe the fact that we now have at least several ways to start a moped without a battery in an emergency.
Snowmobile Lynx: features and modifications
During the development of the new 500 model, the manufacturer paid great attention to practicality and technical additions. The goal was to create a reliable device. It turned out to be quite universal, has increased productivity, thanks to a fairly powerful and fairly economical power plant. Typically used on farms, in the prevention of oil and gas pipelines.
- wide track (ensures confident movement on almost any snow);
- comfort while driving;
- capacity.
According to owner reviews, the machine requires frequent maintenance.
The Lynx 500 travels considerable distances with a loaded sled of 250 kg, while also weighing and operating at very low temperatures of -39, -41 degrees. This became known during testing in Yakutia.
The ATV will not start: looking for a fault
22.10.2015
ATV won't start? Don't know where to start troubleshooting? Then let's try to find out the main reasons why an ATV may refuse to start.
Unfortunately, equipment from any manufacturer sooner or later begins to act up, no one is immune from this, but finding a fault and starting an ATV that refuses to start is not so easy, especially if you are far from a service station.
No matter how trivial it may sound, the first thing you need to do is check the presence of gasoline in the gas tank: believe me, very often a person tries to start an ATV with a dry tank.
Look to see if the engine power button is turned off; it is usually located on the left side of the steering wheel, and also pay attention to the fuses, perhaps one of them has blown. The ATV will not start: reason No. 1
The ATV will not start: reason No. 1
Next, take a multimeter and measure the charge level of the ATV battery: a charged battery should produce from 12.6 to 12.8 volts and confidently turn the starter, but if the battery is discharged, charge it.
It is also necessary to pay attention to the battery terminals; they must be clean and not oxidized, and the clamping bolts must be tightened. If, when trying to start the ATV, you notice that the starter does not turn, you must first check and, if necessary, replace the starter relay
To check whether the starter itself is working, you need to make sure that the engine mass is in good condition (oxides, lack of contact, damage to the wire) and apply positive to it directly from the battery (observing the polarity); if the starter spins, look for a problem in the wiring. If there is no response to your actions, the starter is most likely faulty
If, when trying to start the ATV, you notice that the starter does not turn, you must first check and, if necessary, replace the starter relay. To check whether the starter itself is working, you need to make sure that the engine mass is in good condition (oxides, lack of contact, damage to the wire) and apply positive to it directly from the battery (observing the polarity); if the starter spins, look for a problem in the wiring. If there is no response to your actions, most likely the starter has failed.
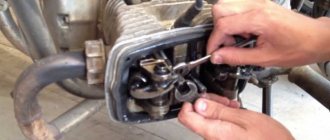
Check the condition of the spark plug and the presence of a spark. This is roughly what a spark plug looks like when installed in a serviceable and tuned engine:
The ATV will not start: reason No. 2
If you notice a significant change in spark plug color, your ATV carburetor may need to be adjusted.
In order to check for the presence of a spark, you need to unscrew the spark plug, insert it into the spark plug cap, lean it against any metal part of the ATV (don’t forget about safety precautions: there should be no gasoline leaks nearby) and turn the starter, the spark should be confident and clearly visible. If there is no spark, you need to replace the spark plug; if a spark does not appear, check the wiring, and also replace the ignition coil.
Make sure your ATV's air filter is clean and saturated and that the air pipe from the filter to the carburetor is not damaged or clogged.
Determine whether fuel is entering the carburetor, whether the fuel filter is clean, whether the fuel pipes are intact, clean the carburetor using cleaning fluids and purging the channels.
The ATV will not start: reason No. 3
Determine whether the fuel pump is working properly. After turning on the ignition, you should hear the sound of the fuel pump turning on and gasoline being pumped into the fuel system. It is also necessary to check the functionality of the fuel pump relay.
The ATV will not start: reason No. 4
A very common cause of poor engine starting is a worn piston and, as a result, poor compression (as a rule, this applies to ATVs with decent mileage); compression can be measured with a special device called a compression meter.
The ATV will not start: reason No. 5
Here are, perhaps, the most common malfunctions, in the presence of which the ATV will not start. We hope that the provided manual was useful to you, and finally we invite you to watch a video that shows how to properly start an ATV with a manual starter, because it is not as simple as it seems at first glance.
Source
Causes of ATV breakdowns and troubleshooting
No starter after turning the key
- The shut-off valve is closed: open it or set it to the “reserve” position. There is old and/or contaminated fuel in the tank: empty the float chambers (the small screw at the bottom of them), check if necessary if they are dirty and add new fuel.
- The fuel vacuum valve does not open: remove the hose from it and crank the engine. If fuel is not flowing, the vacuum diaphragm at the valve or the vacuum suction line is likely to blame. Turn the tap to the PRI or Reserve position.
- Clogged fuel tap pipe or filter: Remove the pipe from the tap and check if fuel flows when you open it. If so, the secondary fuel filter is clogged and needs to be replaced. If not, remove and clean the faucet.
- Flooded engine: Remove the spark plugs and dry them, close the fuel valve, turn off the lights if you can. Turn the throttle fully and engage the starter - the spark plugs should be on the wires and on the engine. Don't touch the candles. Put them on and start the engine.
What should I do if my ATV won't start outside my home?
If the ATV refuses to start in the field, there are several steps you will need to take. It’s good if the driver has the necessary parts and tools with him. Using hand tools, the main systems of the ATV are sequentially checked. In most cases, you can identify the problem yourself. If you don’t have the equipment, you can try to start the device from the pusher.
Almost all ATV Stels 300 ATVs develop a floating fault after several thousand runs. A cold ATV will start and run normally until the engine warms up. As soon as the engine on the Stels 300 warms up, it immediately begins to stall. The engine will not start until it has completely cooled down. Many Stels 300 owners try to repair their ATV themselves. They try to find the problem by replacing various spare parts. They change the spark plug, coil, switch, basically everything that is responsible for the spark on the ATV. But in 90% of cases the problem lies in something completely different.
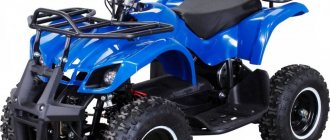
ATV RM Lynx 50
RM Lynx 50 is designed for young drivers. The maximum weight that this small-sized machine can withstand is only 45 kilograms, but in terms of its characteristics, the ATV is not much inferior to its “adult” counterparts. The model is equipped with spring shock absorbers, an automatic transmission and truly off-road wheels on steel discs, the rubber of which is covered with excellent lugs.
RM Lynx 50 is designed taking into account the skills of young drivers - it is the most simple, reliable and safe car. As an added safety measure, the kit includes a remote control that makes it easy to turn off the ATV's engine from a distance.
More detailed specifications are presented below.
Comments
Gasoline does not flow. While it was working in the carburetor, it stalled. Drive longer until gasoline is pumped into the carburetor.
Login or register to comment.
It’s possible, but there is gasoline in the filter and from the hose at the bottom, if you unscrew the screw, it flows, so it probably does.
Login or register to comment.
Try to warm up the carburetor, water might get in and freeze.
Login or register to comment.
Does he at least have the grasp to understand whether there is a spark or not?
The ATV can be used in a variety of conditions, which increases the load on all its systems. This is especially noticeable when driving on severe off-road conditions, when you have to overcome significant obstacles. It is not uncommon for the ATV to not start for various reasons. Both newbies and experienced drivers encounter this problem. There are several common reasons why an ATV won't start. Perhaps this situation is caused by a breakdown in some components of the vehicle. However, sometimes it happens that the all-terrain vehicle does not start due to incorrect actions by the driver.
If the ATV was purchased recently and the driver does not have sufficient experience and certain driving skills, similar problems may arise. If a children's or adult ATV does not start, you must first understand the intricacies of starting it. Having purchased a four-wheeler, it is recommended to read the manufacturer’s instructions.
Newer models are usually equipped with an electric starter. This makes starting the vehicle much easier. Starting the engine is somewhat more difficult in older models that have a kick starter installed. In this case, difficulties arise for beginners more often. You will need to gain sufficient experience, for which you should consider the starting procedure in theory:
- Before driving, be sure to check the fuel level in the gas tank. The ignition key is turned to the “on” position. The switch on the control panel should be in the same position.
- The transmission is moved to neutral. If there is a clutch, it is squeezed out, after which the lever is moved to neutral. On the panel in most models at this moment the corresponding indicator lights up. To check if your actions are correct, you can push the ATV. If the wheels spin, then everything is done correctly.
- When starting in the cold season, it is recommended to pull the choke lever towards you. This will enrich the fuel mixture with air, which will facilitate the starting procedure. In the warm season, such a procedure is not necessary.
- In the model with an electronic starter, you simply press the button and hold it until the engine starts. If the ATV does not start with the electronic starter, you can use the kick starter. To do this, the driver must sit on the ATV and press the lever until the engine starts. The gas must be squeezed out before performing this action in both cases.
- Next, the lever is pressed back, closing the air damper. After the above steps, the ATV should start.
What to do if the malfunction affects the fuel supply system
The boat engine may not start due to problems related to the fuel supply:
- First of all, you need to check the tank for the presence of fuel as such. It happens that the engine does not start because the tank is simply empty.
- If there is fuel, but it does not reach the carburetor, make sure that the air valve and gasoline tap are open. Check whether the fuel filter and the vent hole located in the plug are clogged (clean it with a one-millimeter wire).
- If the float chamber is filled with fuel liquid, and the engine refuses to start, or “shoots” into the carburetor, you need to check the jets. Most likely they are clogged. They are cleaned with a bicycle pump or soft copper wire (but not steel!). If the manipulations did not give the desired result, all that remains is to remove the carburetor and clear all its channels by washing and blowing.
- It happens that a boat engine refuses to start due to an excess of fuel in the crankcase, as a result of which the spark plugs are splashed with fuel liquid. In such a situation, everything unnecessary that is in the float chamber is drained. To do this, the throttle valve is fully opened and the petrol valve is closed. The spark plugs are turned out and wiped dry, and the engine itself is purged with a starting cord several times.
- If the power unit model is equipped with inlet vane valves, then failure to start may be caused by their failure. Eliminating this drawback involves removing the carburetor and inlet pipe, removing the valve partition and careful inspection. If broken valves are detected, they should be replaced with new ones.
- And finally, the boat engine may not start due to water entering the fuel. And sometimes too much oil gets into it. Symptoms are usually accompanied by occasional popping noises from the carburetor. The panacea for a good outcome will be the complete replacement of the low-quality fuel mixture with normal fuel.
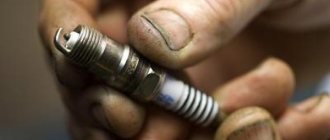
If everything is in order with this, then we look at the spark plugs.
Unscrew the spark plugs. Are they damp and smell like gasoline? This means they are flooded. This can be for two reasons - you filled them or there is a malfunction in the motorcycle.
If you did this, for example, you turned off or started the motorcycle incorrectly, then you can fix it as follows.
Dry the spark plugs, blow them out and heat them. !We do not clean with a wire brush!
Next, put the dry spark plugs in place and try to start the motorcycle. If the motorcycle works, then !hurray! we continue our way.
TIP: purchase and carry a spare set of candles with you; once filled candles can stop working at any time, even if you bought them just yesterday.
If after the above steps the motorcycle does not start, then there is a clear malfunction either in the presence of a spark or in the fuel supply. You will have to take the motorcycle to a specialist motorcycle service center.
The candles are fine, they are dry.
Spark test
To check the Minsk motorcycle, you need to remove the spark plug and unscrew the spark plug. Next, you should immediately determine (wet or dry) the spark plug contact.
If the contact is wet, then most likely there is a problem with the spark plug in your motorcycle. If the contact is dry, then you should look for a problem in the carburetor.
Since the spark plug has already been unscrewed, you can diagnose and verify its functionality. Before checking for a spark, the correct gap between the spark plug electrodes should be set.
According to the technical recommendation of the Minsk motorcycle manufacturer, the required gap should be from 0.4 to 0.7 mm, depending on the model. The gap is set using a feeler gauge, which can be purchased at any auto or motorcycle parts store. If you work on the Minsk motorcycle yourself, then this tool should already be in your kit.
To check the spark on a removed spark plug:
- insert the candle into the candle holder;
- short-circuit the spark plug body to ground;
- activate the winding stem.
It should also be noted that spark is different. The correct working spark should always be the same, clearly visible, and always pass in the same place.
If a spark does not jump between the contacts of the spark plug, then it is necessary to check again, but using a different spark plug. If after re-checking a spark appears, this indicates that the installed spark plug was faulty and should be replaced. If there is still no spark, then you need to check the ignition system of the Minsk motorcycle.
The first reason has been dealt with
The second reason is leaky crankshaft oil seals or a broken flange on which the dynostarter stator is installed. Indirectly, there is little evidence of a leaky oil seal on the cooling fan volute. If you see oil dripping from the cavity of the dynostarter, immediately remove it and see what’s wrong there.
The inside of the snail is covered in oil: a sure sign of a dead seal
Pull off the rotor
That’s right: the cavity is full of oil, the oil seal is dead, the flange is not screwed to the crankcase. Here’s your “capital”...
The spring is either original, or it was found in a trash heap and then stuck here - it’s not clear. Another thing is clear: the spring should stand on the cuff, and not hang snot on the shaft
Behind the flange it’s the same story: a broken spring
The flange was unscrewed and something like Niagara Falls was siphoning through it... This is evidenced by the presence of oil on the gasket
Another point: a new crankshaft was installed in the engine. Naturally they took the Chinese shaft, but there were no others. How is this shaft working? The bad: the keyway on this one was broken. Most likely, the metal from which this obscenity is made is raw and the cone is machined incorrectly. If you decide to buy a new crankshaft, it’s better to buy a used Soviet one, restore it, and don’t mess with this crap
Low battery
If the battery is low, the ATV will not start. The battery may be discharged if the driver forgets to turn off the headlights or other electrical appliance. A similar situation can also arise when the all-terrain vehicle is idle for a long time. You can charge the battery yourself at home using a special device. Often, the battery in new ATVs is of poor quality, so it needs to be replaced before you start using the four-wheeler. It is also recommended to buy a battery before the start of the new season. The cost of battery models designed for ATVs depends on the capacity, manufacturer and quality.
Broken contacts
If the fuel system or battery is working properly, the starter may not operate. In this case, you will need to close the contacts located on the starter relay. This procedure is performed using a screwdriver. The relay in most models is located under the seat. There are 2 wires connected to it. They are quite thick, so they are not difficult to find.
This method will allow you to start the vehicle without a key if the system does not have a central control unit, otherwise such an action will trigger the lock.
If after such a procedure the engine starts, this indicates a breakdown in the starting system. In this case, you need to find the place where the circuit breaks.
Another reason why the engine may not start is a loose pin. This is an element of the ATV's safety system. The check is a cable that is attached at one end to the driver and at the other to a special socket on the four-wheeler. If the owner of the ATV falls out of the saddle while driving off-road, the ignition will turn off. The pin, which at this moment falls out of its socket, blocks the system. Therefore, if the driver forgot to fasten it before driving, the engine will not start. If you lose the pin, you will have to close the contacts manually.
Fuel system
Poor engine starting may be due to a dirty fuel filter. As you know, there are two such elements in a car. This is a coarse and fine filter. As a rule, the last element is clogged. This happens at a mileage of about 60-90 thousand kilometers. The filter itself is a corrugated paper element with micropores. They are the ones that hold dirty particles. Over the years, these pores become clogged and the pump is no longer able to pump gasoline through the filter. What is the solution to the problem? The solution is obvious - replacing the fuel filter with a new one. This is the only way to guarantee quick and trouble-free engine starting in any conditions.
Among the less common causes of poor starting, experts highlight contamination of injectors (applies to diesel engines) and injectors. In this case, replacement will be expensive, so many owners prefer ultrasonic cleaning of these elements. But this is done only at specialized service stations.
The relay clicks, but the ATV does not start
Sometimes the following effect occurs: you press the starter button, and a relay under the seat clearly clicks, but the starter does not start moving. Or at some point it (the starter) seems to catch on for a split second, but immediately stops working. This is especially common in winter, when a large current is required to crank the starter. There may be two reasons for this.
And there is a second option - oxidation of the contacts of the starter wires. I didn’t even think that there could be significant oxidation there, but this is what I saw in reality.
I removed the connector and, using a 10 mm socket, unscrewed both terminals of the starter power cable.
I took out the relay and it turned out that the contact pad was noticeably oxidized. But this is where the current flows. Great, let's clean it now.
But that’s something else! Having removed the green part with the contacts (you need to hook it with a thin screwdriver by the locks), I saw that it was a nightmare.
There is even more oxidation on one contact, and on the other there is generally a thick layer of rust! How it even worked is unclear. I scraped off the rust with scissors and cleaned it with a Dremel.
Now everything is in order. You can bet.
Only beforehand I lubricated all contact surfaces with a thin layer of grease. Of course, it would be nice to have a conductive lubricant for contacts or for battery terminals - but where can I get it at the dacha... Never mind, my Castrol LMX lubricant is also suitable for electrics ;). At least all the contacts that I have ever lubricated with it were in excellent condition, there was no oxidation or corrosion anywhere, and the current passed through. So it'll do. In general, it is correct to lubricate not the contacts themselves, but their outside sides, but I do exactly that, incorrectly.
Yes, and of course, you must not forget to clean and lubricate the wire terminals. Fine sandpaper works well for cleaning - for example, I used 1000-grit sandpaper.
So even if everything works well for you, I advise you to spend 10 minutes disassembling, cleaning and lubricating the contacts of this unit.
Opening the relay
So, the lid is held in place by three pressed-in clasps. And I haven’t figured out how to straighten them out. The metal is thick, so neither a thin screwdriver nor an awl can straighten it back.
So I just took a Dremel and cut out these locks with a router bit.
I opened the relay, and it wasn’t exactly a swamp, but it was very humid. And metal parts are heavily coated with oxides
Yes, here I would like to point out that the relay cannot be separated into two halves, since it is held by wires on the contact side
Morning imbalance or difficulty starting the Renault Logan engine in the morning: possible reasons
Not only crankshaft position and coolant temperature sensors are at risk. A jammed idle speed control also affects the way the engine starts: the power plant does not start without lightly pressing the gas pedal. Appears both cold and hot. It is treated by replacing the IAC with a known good unit.
Insufficient pressure in the fuel rail
Sometimes Renault Logan has difficulty starting in the morning due to a malfunction of the fuel pressure regulator. Relevant for both versions 1.4 and modifications 1.6. Diagnostic measures will help verify this fact, the essence of which is to measure the pressure in the ramp.
How to check
From the equipment you will need a special pressure gauge with fittings, a small piece of wire (7-10 cm) and a puller for influencing the pipeline tip clamp. The diagnostic technique consists of several points:
- Relieve pressure in the fuel system (turn off the power to the fuel pump by removing the block and start the engine).
- Disconnect the fuel line from the rail.
- Connect the pressure gauge.
- Remove relay K5 (Logan phase 1) or Er3 (Logan phase 2) - located under the hood.
- Bridging the power contacts of the platform under the relay with a piece of wire.
- Turn on the ignition (return the fuel pump power supply block to its place).
- Record the readings on the pressure gauge.
- Turn off the ignition.
- Observe the change in the position of the arrow of the pressure fixation device.
- Remove the pressure gauge and a piece of wire, restore the original state of the gasoline supply circuit and the power supply to the gasoline pump.
A pressure of 3.5 atmospheres when the fuel pump is turned on indicates the serviceability of the check valve. If lower, replacement is inevitable. When the power is turned off, the needle may deviate towards lower readings by no more than 0.7 atmospheres.
What to change for
Starting from model year 2007, the fuel pressure regulator is integrated into the fuel pump module. There is no need to change the assembled equipment, as recommended by the official dealer - the check valve is completely interchangeable with a VAZ part of identical purpose, containing the numbers 380 in the marking (intended for Lada with a 1.6 16V engine). The issue of interchangeability is not as important as the choice of brake fluid for Renault Logan that meets the factory requirements.
The difference between the “renowned” original and the VAZ product is in the calibration of the limit pressure that determines the operation of the drain valve. The standard version opens when it reaches just over 3.5 atmospheres, the VAZ version - at 3.8 atmospheres. There is nothing critical about this.
You can also supply an original part, if it were not for the price issue. The original for Logan will cost 2,200 rubles, and the RDT, say, for Priora costs about 400 rubles.
What else
The peculiarity of the main causes is that they are identified by simple diagnostics. Subsequent defects are difficult to identify due to their ambiguous symptoms. For example, it is not easy to calculate the incorrect operation of the control program of the electronic engine control unit or determine the lack of air at the inlet.
When Renault Logan has trouble starting hot or cold, there is every reason to assume that:
- The injectors are clogged.
- The throttle valve is dirty.
- The “crooked” firmware is installed.
With a reduced working cross section of the injectors, the engine starts successfully on the second or third attempt. Related symptoms help identify the fact: poor throttle response and increased fuel consumption. A critical state of the throttle assembly will result in a sharp release of gas, resulting in instability of the idle speed or even stopping the engine.
Other reasons why the car won't start.
Having thus checked all the main car systems that could affect the car’s engine starting, you, dear motorists, should know that there are still a number of specific tips that you can resort to and perform them yourself to find out why your car does not start. If you have patience and time to do this kind of troubleshooting, you can do the following yourself:
– Loose starter mounts: Sometimes the starter mounts become loose, which can cause the ignition to fail.
– Bad injectors: A faulty injector affects the entire fuel system, which can cause the engine to fail to start. Especially when starting when the engine is still warm.
– Faulty starting valve: If this part of the car is in a faulty condition, then when starting the engine (especially in cold weather), a malfunction may occur and the car simply will not start. This faulty valve can also cause uneven operation of the engine after it warms up.
– Chips on the flywheel: The starter not only ignites the car, but also transmits torque to the flywheel, which is connected to the transmission. If the flywheel teeth are chipped or damaged, when the starter rotates, you can hear a characteristic sound (squealing, creaking) produced by the flywheel itself which has a defect. It is noteworthy that a similar problem can also be the reason for the engine failure to start.
– Malfunctioning immobilizer or engine control unit (ECU): If your vehicle's main computer is malfunctioning, it can significantly affect the performance of the ignition system itself and fuel injection. Including, if any electronic system malfunctions, then in many modern cars the engine management system can simply block the engine from starting itself. Also, a common reason for failure to start the engine is a specific malfunction in the electronic anti-theft system (immobilizer).
When it breaks down, as a rule, this electronic unit simply does not recognize your key, which contains a chip with an electronic code that disables the security system.
Unfortunately for us, you simply cannot check all these electronic systems yourself, since expensive equipment is needed to diagnose the electronics of the machine.
Stels UTV 700H - won't start
Kozak
Brought to "Tie" ATV - Stels UTV 700 H Will not start.
Motor control unit - Delphi MT-05 +30 +15 mass arrives. The main relay turns on. The signal is removed from the crankshaft and comes to the block. But the pump does not turn on, there are no pulses on the injectors and no spark.
Everything comes to the conclusion that the ECU is faulty.
Has anyone come across an ATV with an MT05 ECU for repair? Do they have problems with control units?
And where is the diagnostic connector on this ATV? Thanks in advance everyone!
Veteran of the forum
Kozak
Are there any programs for diagnosing this Quad-Cycle? We started this miracle! The problem was a broken wire to the ignition coil. But the logic of the work is interesting. If the connector is removed from the coil, or there is a wire break, no pulses are sent to the injector. This is either an interesting protection or just a feature.
Car diagnostics: Why the engine won't start.
The worst start to the day for any driver is when, after getting into the car and trying to start the engine, we begin to realize that our car will not start. We have seen more than once in movies how, at the most inopportune moment, a movie character’s car will not start. Surely a certain number of motorists are familiar with many reasons why the engine in a car may not start. But still, for most car drivers, this nuisance is very frightening and annoying. Let's, dear friends, find out together why the car may not start.
Sometimes some drivers of modern cars, to a certain extent, believe that as long as the “Check Engine” signal symbol does not light up on their dashboard, there cannot be any problems with starting the engine. But in reality this is far from the case. There are many reasons why a machine, i.e. its engine may refuse to start even if there is no “Check Engine” warning on the dashboard. Unfortunately, many car owners often believe that if the engine in the car does not start, then a serious malfunction has occurred that requires competent qualified assistance. Of course, this is partly true. But, before heading to the technical center, each driver can independently try to determine the cause of the engine failure.
In order for the engine to start successfully, four main elements are needed, that is: spark, oxygen (air), fuel and compression ratio. Let us, friends, go over with you in detail and sequentially each step that will need to be taken in order to establish the cause of this malfunction and eliminate it yourself.
Remember, friends, everything that is described in our article is only the basis of certain knowledge of troubleshooting such a problem and most of these tips really apply to most cars. But, nevertheless, you need to understand that for some and certain vehicles you may need completely different methods of diagnosing and eliminating the causes of the engine not starting.
The engine does not work and overheats
- The mixture is too lean due to clogged carburetor nozzles: drain all gasoline from the tank, disassemble the carburetor and clean it, refill with fresh gasoline.
- The mixture is too lean due to incorrectly adjusted carburetors or injectors: adjust the carburetors.
- Carburetor traps left air: Carburetor is not installed correctly/tightened, intake manifolds are cracked or porous.
- Pinched, jammed or kinked fuel line: check its condition along its entire length.
- Oil level too low: add oil as needed.
- Oil pump malfunction or oil circuit clogged: Stop the engine immediately and contact a workshop.
What needs to be done to improve the situation? There is a screw at the bottom of the carburetor that screws in horizontally (the guide can serve as a return pipe with a fitting next to it). This screw must be unscrewed to allow the old gasoline to drain out. The liquid will be cloudy and yellowish. Once it turns into clean gas, the fuel must be drained. To do this, just tighten the screw.
Now you can try to run the quad: most likely there will be no problems. Therefore, before leaving the ATV in the garage for any period of time, you need to drain the gasoline remaining in the carburetor. Upon return, it is filled with fresh fuel, so you can continue driving the ATV with peace of mind.
Source
Engine idles rough
- Valve clearance is too large or too small: Set the valve clearance correctly according to your motorcycle manual.
- Incorrect setting of the mixture ignition timing: adjust.
- Spark plug sockets or wires are not touching the spark plugs properly: Pull/unscrew the ignition wires, cut them piece by piece, and reinstall/screw them in again.
- Malfunctioning ignition module: You will find if you try how the equipment talks to a properly working module from another motorcycle of the same type; Make sure the ground is properly connected.
- Unsynchronized carburetors: Adjust the carburetors using a vacuum gauge.
- Incorrect idle speed adjustment: adjust.
The ATV stalls: The engine starts hard, chokes, runs erratically and stalls often
- Dirty fuel, rust in the tank, dirt in the fuel lines, in the carburetor: drain the gasoline, clean the tank and carburetor, pour a fresh bottle.
- Idle speed is too low: increase it using the speed control knob.
- Fuel tank vent is clogged: Clean the vent hole (in the plug) or the vent tube at the outlet of the engine.
- Stuck choke line or lever causing engine to run too rich: Remove and clean this item.
- Due to damage to the carburetor nozzles, the engine sucks in left air: tighten the rubber nozzles and check for cracks.
- The battery is too weak: charge it, check all connections, remove tarnished cables, replace spark plugs if necessary, check ignition pipes or cables.
- Incorrect gap between the electrodes or ground connection to the spark plug: check the type of spark plugs and their condition, set the distance between the electrodes, replace the spark plugs if necessary.
- Broken/broken wire or ignition coil/spark plug tube connector, incorrectly installed tube: Pull out or unscrew the ignition wire, cut a small piece and reinstall/screw in again. Make sure the tube is not rusted and the hoses are installed correctly. The engine starts reluctantly and there is little power at low speeds.
- Incorrect valve clearance, worn valve levers; Broken valve springs or worn camshafts: Check valve clearances and adjust them correctly, assess the wear condition of valve clearance adjustment bolts, valve springs and camshafts.
- Burnt out valve seats, worn valve guides, stuck valves: check compression.
- Damaged cylinder head gasket, bent or cracked cylinder head: check the cylinder head for oil leaks, pay attention to the color of the exhaust gases. On a liquid cooled engine, white indicates head gasket damage.
The procedure for lighting an ATV from a car
It must be said that you can launch from any vehicle if you follow the rules:
- Warm up the car to generate the required amount of energy, then turn off the engine.
- The red positive wire is connected to the corresponding terminal of the donor machine, then to the positive terminal of the ATV battery. Then black to the minus of the car, the other end to the ground of the all-terrain vehicle. This can be any unpainted part of the body or engine.
- Start the car engine, then after 10-15 minutes of operation, start the ATV engine.
After this, the motors are turned off and the wires are removed in the reverse order.