01/18/2022 4 920 Ignition system
Author: Ivan Baranov
The driver of any vehicle may encounter a malfunction such as a non-working engine. The inability to start the power unit, in particular on mopeds and scooters, may be due to failure of the starter device. What to do if the scooter does not start, the starter does not turn - the main recommendations for diagnosing and repairing the mechanism are described in this article.
[Hide]
Scooter rider
If the electric starter on a scooter does not work, then there is always a kick starter that will help out. But using a manual starter is not always convenient. Therefore, in this article we will find out why the starter on a scooter does not work. The electric starter is powered by a battery and passes through a special relay. Therefore, the first reason why the starter on a scooter does not work is the battery . It may have malfunctioned or simply run out of power. If you hear a spinning sound when starting the scooter through the electric starter, then the problem is with the battery. In this case, check the contact at the terminals .
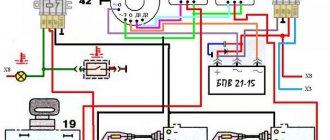
If it's not the contacts, it's the battery. If it is simply discharged, then it is enough to start the scooter with a manual starter and drive several tens of kilometers. This is enough to slightly charge the battery. If it still does not charge, then most likely it is faulty and needs to be replaced. But if you hear the starter relay click when you press the starter button, then the problem will be more complicated. In this case, you can find out what the problem is by using the diagram:
Using this diagram, you can easily determine why the starter does not work on a scooter . This can be done quite quickly, since it does not require much effort and there are only a few things to check.
If you have any questions , leave them in the comments and you will receive an answer as soon as possible.
Now you know why the starter does not work on a scooter.
Source
Bendix scooter: design features and operating principle
Such a unit as a starter is already available on almost every scooter and motorcycle.
Even on one that completely belongs to the category of budget motor vehicles. And some 20 years ago, motorcyclists, even in their rosy dreams, could not see how a scooter would start by pressing just one button. Theoretical part
Electric starting of a motorcycle and scooter is carried out using a starter, which in its structure is nothing more than a DC motor. By pressing the “Start” button, the driver allows current from the battery to flow to the starter.
As soon as this motorcycle part receives a current signal, it begins to perform rotational actions, which are transmitted to the bendix. The Bendix is connected to the starter, and its functions are to transmit the rotational impulse directly to the engine. When the engine has reached the desired speed, the Start button is turned off, the starter stops rotating, and Bendix disconnects the engine from the already stopped starter.
Bendix does not have one clear location, so for each model of scooter or motorcycle you need to look for it in a specific place. Sometimes it is even completely absent, but then instead there is an overrunning clutch. But most often the bendix of a scooter is located in the upper part.
Practical part
The theory is over, now we should move directly to practice, which will help every motorcyclist keep his motorized horse in perfect condition. It is best to disassemble this unit yourself at least once in order to see with your own eyes all the design features of the Bendix scooter.
The step-by-step plan for disassembling the Bendix is as follows:
The Bendix scooter consists of 2 gears that have a rigid connection. This rigid connection is ensured by a helical gear located on the same shaft along which the second gear moves during operation. The movement occurs towards the axis of the first gear.
Also, each Bendix scooter has such an element as a stabilization mechanism. Its task is to firmly fix both gears at the right time.
How the Bendix scooter works
As soon as the start button on the scooter is activated, the starter motor begins to rotate, which drives the main gear. The second Bendix gear has a much larger mass, so its rotational movements seem to lag behind. Under the influence of its weight, the second gear, slowly rotating, moves along the helical gear of the shaft, and at the exact moment of time comes into contact with the variator ring gear.
Once this engagement has occurred, the engine starts. And then actions in a completely opposite direction occur. The crankshaft picks up speed, and when they become higher than at startup, the second gear begins to experience a reverse force, but which acts on it in the opposite direction. The heavier second gear, under the influence of this force, is wound onto the helical gear, and the engagement stops. Next, the ring gear, under the force of the spring, returns to its place.
An important feature of the Bendix scooter
Everything described looks simple and understandable, if not for one feature. Sometimes it happens that a running engine suddenly stalls, and then starts to jerk again. And at the time of the first start, the second gear had already disengaged from the gear shaft, and the engine had already stalled. The driver continues to hold the start button pressed, and the engine begins to make characteristic sounds (as if the starter was mistakenly started while it was running).
To start the engine completely, you should immediately release the “Start” button and only then press it again. This is not always convenient at first, but drivers quickly get used to this principle of operation. To ensure that the scooter's bendix does not turn off on its own during an unstable engine start, there is one more unit in its design that ensures stable operation.
The bendix stabilization mechanism is located on the second (moving) gear. The principle of its operation is based on a centrifugal clutch formed by three weights. Under the influence of the force generated during rotation, they are all pressed against the surface of the outer drum of the main gear, and since there is a rigid connection between the gears, these weights do not allow the second gear to disengage with the shaft during an unstable start.
The stabilization mechanism is susceptible to breakdowns such as spring deformation, but most often it simply becomes dirty. Failure of the entire mechanism is possible if the driver did not take into account the advice of professionals and installed a stiffer spring, which prevents the Bendix from working at all. There is no need to lubricate this unit.
Bendix starter maintenance rules
The first “bell” indicating a malfunction of the Bendix scooter can be considered uncharacteristic sounds in the starter. The crankshaft does not rotate at all. Then the starter needs repair.
To correctly diagnose, the Bendix must be dismantled, washed in gasoline, and the helical gear thoroughly lubricated (but under no circumstances fill it with lubricant). Quite often, these manipulations are quite enough to return the Bendix scooter to combat readiness.
Source
Where is the starter on a scooter?
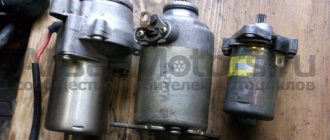
Finding a starter on a scooter engine is very simple: remove the front plastic hood of the engine and the seat tank, inspect the engine and find a small cylindrical part on it (approximately the same as in the photo) located perpendicular to the longitudinal axis of the engine to which a thick power wire fits - this will be the starter.
On most scooter models, the starter is mounted at the top of the engine, just behind the cylinder. In rare cases, the starter is installed at the front or bottom of the engine.
Starter malfunction and cause
The starter hums, but does not turn the engine.
Indicates that the electrical circuit is being closed and power is being supplied to the motor brushes. The electric motor is in working condition. The holding coil of the solenoid relay does not operate and the bendix does not move. Bendix gear does not engage with flywheel gear. The electric motor runs in idle mode. The cause may be either mechanical or electrical in nature.
Mechanical part. The force from the relay retracting element is transmitted to the bendix through a plastic lever shaped like a grip. If there is high resistance to the movement of the bendix along the rotor shaft, this plastic part breaks. The Bendix does not move to the working position, and the starter rotates without transmitting torque to the flywheel.
An indirect cause of failure of the plastic grip may be wear of the teeth on the rotor shaft of the electric motor or wear of the teeth on the mating part of the bendix. For repairs, you will need to disassemble the starting unit and replace either the lever itself or the lever and bendix.
Another mechanical reason for the starter idling is the destruction of the teeth on the engine flywheel. The malfunction refers to a motor failure and is not directly related to the operation of the drive. The likelihood of such a malfunction may be indicated by the activation of all working elements of the starter, the spin-up of the electric motor and the transfer of the bendix to the working position, which is detected by a characteristic click when turning the ignition key.
Price examples
Taking into account the model ranges of engines and the principle of arrangement of attachments, implying the possibility of both lower and upper placement of the starter, the following starters can be classified as reliable and affordable:
- Honda LEAD 90 (mounting holes 7.5 mm, total flange length 70 mm, one contact) – 952 rub.
- GY6, 150cc/4-stroke (output shaft with a centering plane, complete with power cable and terminal) – RUB 1,218.
- 139QMB (two-point mounting, complete set) – 1,200 rub.
- DKY for 2-stroke Japanese scooters (2 years warranty) – RUB 1,799.
Honda LEAD 90
How to check the starter of a scooter?
If, when you press the start button, the starter does not turn, then this situation cannot always tell us about its malfunction. In addition to the starter itself, the scooter's electrics have several elements that control its operation. Such as the battery, relay, start button and power supply wires. And if at least one of these elements fails, a completely serviceable starter will not work.
Therefore, in order not to waste a lot of time and not do unnecessary work later, we will not guess, but will do it simpler: we will use the elimination method: we will connect the starter directly to the battery - bypassing the relay, the start button circuit and the standard power wires, thereby completely eliminating malfunctions in the elements responsible for the operation of the starter.
Is it possible to mix it up and install a left-hand starter instead of a right-hand one?
All starters are different at the point of connection and there is no such thing that the starters are exactly the same, only one is left and the other is right, so erroneous installation is impossible.
A similar starter, with a different direction of rotation, will not work not only because it spins in the opposite direction, but simply because it has a different connection point. A starter can only be installed that is designed specifically for this engine.
If you just hold the starter in your hands, it is not clear in which direction it will rotate. If this is important, then you can twist the bendix with your finger. Where the bendix spins easily is the direction of rotation of the starter.
Starters are made by different manufacturers; in appearance, starters, for example BOSCH and VALEO, are noticeably different, they consist of completely different parts, but if they are intended for the same engine, then their connecting places are exactly the same, and they naturally rotate in one and the same the same side.
What does the price depend on?
The price of a starter directly depends on the volume of the internal combustion engine. The cheapest models are for single-piston engines with a forced air cooling system. But, in addition to general purpose and compatibility, other factors also influence the cost of the finished product, namely:
- Overrunning clutch star material.
- Contact pad type.
- Method of fixing the output shaft (cotter pin, retaining ring).
- Quality of stator varnish filling (number of layers).
- Height of the stator commutator plates.
- Type of fastening of copper-graphite brushes.
Of course, the cost of an electric starter for a scooter is also affected by the brand and country of production. The cheapest are Chinese starters with a warranty of up to one year. An important point is the packaging of the product. Wires, mounting chips, starter circuit damper and the three-position relay itself are best purchased separately. The cost of the kit without the modular hinged unit will not exceed 270 rubles .
Checking the starter
Without removing the starter from the engine, we look for the power terminal on its body and disconnect the wire from it. We remove the battery (charged) from the scooter, look for it, ask someone for it, or buy two pieces of thick copper wire. Connect the wires to the battery terminals. Then, we apply the wire coming from the negative terminal of the battery to the starter housing, and the second wire - coming from the positive terminal of the battery - is applied to the starter power terminal
- If the starter works, then it is fully operational and the cause of the problem must be looked for in the relay, start button or wires supplying power to it
- If the starter does not work, then the fault lies in itself and it needs to be removed, disassembled and checked. It is quite possible that it can still be repaired and save a lot of money
Main breakdowns and methods for solving them
On scooters, the electric starter often fails. Of course, Kickstarter can help out, but it’s not very convenient to use. The engine may not start due to a faulty battery: the contacts have come loose, the charge has run out, the device is worn out. If there is no spinning sound when the starter turns on, then the problem is in the battery. If you can’t charge it, it means it’s out of order, worn out and you’ll have to install a new one.
If pressing “Start” does not produce a click in the electric starter relay, the problem is more serious. The unit may be faulty and needs to be replaced. The problem can arise when various components wear out. Most often they need to be replaced.
You can fix some scooter problems yourself
Electric starter does not work
If the scooter does not start from the foot, then its operation is impaired. If the electrical circuit is working properly, but the relay clicks when you press “Start,” then the problem is a bad contact or a broken starter.
To evaluate its performance, you need to apply voltage to it without activating the relay. If the electric starter does not turn, then it needs to be replaced.
Starter relay failure
The relay maintains the voltage at the required level for further distribution to headlights, dashboard indicators and other elements. Its durability depends on the battery. If the voltage in the generator increases or decreases, the relay is faulty. Because of this, the starter does not start. In this case, the relay needs to be replaced.
Problems with the button
When the Start button is pressed, the starter rotates and drives the engine gears. If the scooter does not start with the electric starter button, there is a malfunction. The wiring in the engine starting system could have come loose. If the scooter starts from the foot, but not from the “Start” button, then the fuse is faulty: the voltage in the generator drops, so the button does not work.
To check the functionality of the fuse, you need to measure the voltage at the battery terminals and in the fuse. If losses are detected, a new fuse must be installed. After replacing the part, the moped will start from the “Start” button.
If the scooter breaks down, the electric starter may not work.
Broken brake contact (toad)
The brake system needs regular inspections, as driving safety depends on it. A breakdown of any other scooter system is easy to identify, since engine operation is disrupted. Brake failure can only be detected by diagnosing the vehicle. During the inspection, you need to check the integrity of all parts and the amount of brake fluid.
Replacing brake fluid is necessary every 8-11 months, depending on the intensity of use. In this case, you need to use the liquid recommended by the manufacturer. If the brake pads are worn down by 2 mm, they need to be replaced. Hoses need to be replaced if there are cracks or abrasions.
If system parts are worn out, brake contact is lost. Because of this, the engine will not start.
Contacts have come loose or oxidized
If the scooter does not start, the reason may be the contacts with the battery. It is necessary to check if they are charged. This must be done carefully to avoid electric shock. If there is no spark, you need to check the electronics. Most often the reason is oxidation of the terminals. When they become coated, the scooter does not start moving from the starter. You can clean the contacts with sandpaper or gasoline.
Contacts with the battery may be the reason if the scooter does not start
Bendix doesn't work
The starter fails due to careless handling of the bendix - the starter wire that engages with the engine flywheel and powers it. When the engine starts, a special mechanism with a relay pulls the bendix into the starter, stopping the engagement. Inexperienced drivers most often encounter Bendix breakdowns.
If in winter the engine does not start on the first try, they hold the "Start" button for a long time and spin the engine. The flywheel cannot rotate at the specified speed, causing the drive to jam. As a result, the starter overheats and the bendix fails. This may cause the starter housing to burst. Depending on the degree of damage, replacement of the bendix or the entire system is required.
The battery is dead or damaged
If the scooter refuses to move after starting the starter, you need to try starting it using the kickstarter. The battery may have run out. If you couldn't charge it, it means it's completely out of order.
Fuse blown
Due to damage to the power system, no current flows to the battery, so it does not charge. When the battery is charged, the engine stalls and does not start either with the kickstarter or the electric starter. The most common reason is that a fuse with a lower capacity than recommended by the manufacturer is installed. If the new fuse fails quickly, the electrical circuit is faulty. If a short circuit occurs, the wires need to be replaced.
Starter diagnostics before replacement
The mechanism can be checked without removing it from the motor. Find the power contact on the case, then disconnect the cable from it. The battery should be removed from the moped, but you must be sure that it is charged. You will need two pieces of copper cable, which should be thick - they are connected to the battery terminals on one side, and the other - the negative wire is connected to the mechanism body, and the positive wire to its power terminal.
Then the following should happen:
- If the device works, this indicates that it is working; accordingly, the cause of the malfunction will be in the relay, ignition switch or wiring that is connected to the device.
- If the mechanism does not start, this indicates its failure. As stated above, there may be several reasons, so the device will need to be dismantled and disassembled (the author of the video is Sanya Slesar).
If the scooter starts with the kickstarter, but does not start with the button
If the scooter starts without problems from the “leg”, but does not want to start from the electric start button, then you should pay attention to the central fuse (it is located in the compartment with the battery). If the voltage in the scooter’s electrical network is too low due to a faulty fuse, it will no longer start using the “Start” button.
To check the serviceability of the central fuse, you should measure the voltage at the battery terminals and compare with the voltage after the fuse.
If losses are detected during measurements, the fuse should be replaced. In most cases, after replacing the faulty fuse, the scooter starts without problems.
The problem when the starter button on a scooter does not work may not only be in the fuse. It is likely that the integrity of the connecting conductors in the engine starting circuit is broken.
VIDEO INSTRUCTIONS » alt=»»> It will be difficult for a beginner to deal with such a malfunction, so for a complete diagnosis of the electrical circuit it is better to contact an auto electrician.
How to remove the starter on a scooter?
After we have found the starter and provided free access to it, we look on its body for the terminal to which the power wire fits and unscrew the wire from it. Then, we determine where the starter is attached to the engine body, unscrew the mounting bolts and remove it from its seat.
Mounting bolts, in this case they are located at the end of the housing
In this case, the starter is flanged and its mounting bolts are located at the base of the housing.
To facilitate dismantling, on some engine models, there is a special technological gap between the starter housing and the engine housing (depending on the engine model). We insert a flat screwdriver into it and loosen the starter with it.
DIY mechanism repair and replacement
How to dismantle and disassemble the starter:
- First, you should find the device - as a rule, it is located in the upper part of the power unit, immediately behind the cylinder. There is a power connection on the case; it should be disconnected.
- Next, unscrew the screws that secure the device to the power unit housing, and then remove it from the vehicle. If the device is equipped with a flange mount, then its screws will be located at the base of the case.
- After this, you need to unscrew the screws that secure both parts of the device’s body; their number may vary depending on the design features of the model. The shaft should be visible from the housing; it should be carefully clamped, and then, slowly, disconnect the halves.
- Having done this, you can remove the rotor element from the device body. Carefully inspect the condition of the commutator, as well as the brush assembly. If you notice that the first one is dirty, then you should clean it of dirt and then treat it with clean fuel. As for the brushes, worn components should also be removed and replaced with new ones. Before changing them, check their length - in optimal condition it should be at least 5-6 mm.
- All worn parts must be replaced. As stated above, problems with windings are usually not solved.
Loading …
Principle of operation
Inside the body there is a movable cylindrical element called a rotor (in collective farm language - an anchor). An insulated copper wire is wound on the rotor in a strictly defined order, forming several independent coils, circuits, windings, poles, circuits - which, in fact, is the same thing. The ends of each of the coils have their own independent outputs in the form of lamellas (contacts) on the collector.
Inside the main body, two permanent magnets are glued exactly around the rotor. Each of the magnets has a different pole N (north) S (south) in relation to each other. Anyone who went to school will understand...
After you press the start button, the electric current from the battery will begin to pass through the power terminal, the brush and then, passing through the lamellas of one and the rotor windings - it forms a constant magnetic field along the axis of the armature.
I think there is no need to explain that the magnetic field that forms a constant electric current has different polarities? So that's what I'm talking about. Oh yes, the magnetic field of the rotor will begin to interact with the magnetic field of the permanent magnets and the armature will deviate by a certain degree. The commutator will turn, the next pair of lamellas will approach the brushes and the rotor will deviate again. Thus, it will rotate exactly until you lower the start button.
The starter turns in the wrong direction! — logbook Lada 2114 2007 on DRIVE2
How to determine the polarity of magnets? It’s very simple, magnets of the same polarity will attract each other, as a result you should get two stacks of magnets like this:
One stack of magnets of one polarity and the other stack of magnets of reverse polarity. This may not be news to some, but there are probably people who do not know about this and are faced with the same problem. I hope this article will help people find a solution to this problem and save valuable time.
Malfunctions
There is nothing special to break in the starter and all its malfunctions consist of wear, sticking of the brushes and contamination of the commutator, which often happens due to engine oil getting into the housing from the engine crankcase. It is worth noting that faults associated with commutator contamination and brush wear are typical for DC electric motors.
Worn brushes, as well as a dirty commutator, prevent the passage of electric current through the brushes to the lamellas of the rotor windings and therefore the starter stops working. In this case, to restore the functionality of the starter, we just need to clean and wash the commutator and replace the brushes with new ones or make them ourselves (more on that later).
In addition to purely mechanical faults associated with wear and contamination of current-carrying elements, there are also a number of faults associated with a short or interturn circuit of the rotor windings, as well as with a violation of the contact of the winding output with the commutator lamella and burnt wire insulation.
All these malfunctions are characterized by increased noise and heating of the starter during operation and a drop in its speed. If, after cleaning the commutator and replacing the brushes with new ones, the starter turns poorly, gets hot, and hums, then most likely not everything is in order with the rotor windings. Either they shorted out, went to ground, or simply burned out. And nothing can be done about it.
Rules for operating a moped
The service life of a moped depends on maintenance. Care comes down to following the rules recommended by the manufacturer.
The main ones include:
- Testing a new scooter. The first concerns the running-in of a new scooter. The scooter must not be overloaded for the first 1000 km. When driving for a long time, you must stop every 30 minutes to prevent the engine from overheating.
- Correct use in winter. You need to drain the fuel before storing the scooter in the garage for the winter. Remaining fuel can destroy the tank and flood the carburetor. If you plan to use the scooter in winter, you need to change the fuel, check the battery charge, oil level, condition of the filters and tire pressure (it should be about 1.5 atmospheres).
- Correct use in summer. In hot weather, it is important to prevent the scooter from overheating. When driving for a long time at 30 degrees, the cylinders will be constantly overheated. This could cause the belt to break or the engine to break down. You should also not squeeze the throttle for too long, and when stopping, immediately turn off the engine.
- Use quality fuel. Gasoline must be at least 92. On a new moped, you need to change the oil for the first time after a run of 500 km. Subsequent replacement will be required every 1000 km. The first time to change the oil in the rear gearbox is after 200 km, then every 5000 km.
- Replacing the variator belt. This part is considered a consumable item, as it wears out quickly due to the high power load. If the moped stops squeezing out high speed, then the part and its components need to be replaced.
- Carburetor maintenance. The procedure includes a visual inspection for leaks and gasoline consumption levels, checking the condition of the connecting elements and the serviceability of the unit elements.
- Filtration quality control. The filter must be replaced promptly and impregnated with a special product after installation. This is necessary for high-quality air purification. Dirty air reduces the life of the motor.
JavaScript is disabled in your browser
How does a kick starter work?
The scooter engine can be started in two ways:
- using an electric starter;
- using a kick starter.
The kick starter is designed to start the scooter engine and serves as an alternative unit in case of problems with the electric starter. There is also an undeniable advantage of the so-called “pump” the starter pedal and carefully monitor how quickly it returns to its original position. If it slowly and difficultly rises back, or even hangs down, then it’s time to disassemble this scooter assembly and check its parts. Another reason to look inside the kick starter system will be the inability to start the engine using the pedal and the extraneous sounds that arise under the variator cover.
Before disassembling this unit, you need to clean (or wash) the variator cover and wipe it with a clean rag. After this, unscrew the bolts securing the front and back parts of the cover and carefully remove it. Inside the cover is the kick starter system, which must be disassembled. The ratchet is easily removed if you turn the “winding leg” a little and pull it towards you. It contains a washer and an installation bracket, which should be removed and placed in a container of gasoline to clean them. The ratchet should also be cleaned in the same way. The remaining parts of the system and the interior of the variator cover must be cleaned with gasoline using a brush.
After removing dirt, you need to check the parts for chips, abrasion and other damage. Such spare parts must be replaced with new ones. If no damage is found, then the technical inspection in this case will be limited to lubrication of all parts of this system.
To do this, all parts must be thoroughly wiped with a rag and begin lubricating. Using a syringe, you need to inject a special lubricant into the bushing under the crescent for its free rotation. To ensure that the lubricant is evenly distributed inside, press the starter pedal with your hand several times. The teeth of the crescent should also be well lubricated. Solid oil is ideal for this, since its thickness will prevent excessive abrasion of parts during system operation. You should also generously lubricate the bracket, ratchet, and ratchet washer. Now you should reassemble in reverse order and check the operation of the kick starter.
The most common breakdowns
Violation of operating rules and careless handling of the scooter often lead to damage to the variator cover or kick starter leg. If the scooter rider hits the pedal sharply and hard, this may result in the appearance of cracks and breaks in the area where the leg is attached to the variator cover. This is due to the poor quality of the material used in the manufacture of scooter parts. In this case, the variator cover should be replaced. You can purchase high-quality spare parts for this scooter system on the website or in an online store at an affordable price.
Why does the kick starter break?
There may be several reasons for the breakdown, because they are the ones that most often happen to most scooter riders.
Kickstarter build . If you decide to change the kick starter or another part, be sure to do it correctly. You will need to assemble the spring, retaining rings and other elements according to the instructions. If you miss something, the kick starter leg simply will not return to the right place (see photo).
Worn teeth . Another common failure. If you press the kick starter foot sharply and often, the teeth connecting the foot and the variator will simply wear off, which threatens the same slippage of the foot. The result will be the inability to start the scooter, so keep an eye on the condition of the teeth.
Broken variator cover . Most often it happens with Chinese scooters, which I myself have witnessed more than once. If you press the leg with great force or sharply, the cheap and low-quality material of the variator cover will simply crack around the leg. Here, repairing a variator on a scooter is unlikely to help, as well as welding. The Chinese variator cover is difficult to weld, the weak material does not allow this, so the only option is to buy a variator cover.
We looked at several reasons why the kick starter breaks down; repairing this rather problematic element may take you a little time, but when you have a similar breakdown on the road, you will have to roll the scooter. There may also be three repair options. In the case of cracked teeth, the only possible solution is either replacement or welding. In the case of replacing a kick starter, you simply need to correctly assemble the entire structure, which will be discussed in another article. And if the variator cover is cracked, all you have to do is replace the cover itself. You can try to weld it, but I’ll tell you right away that there is little chance of fixing it this way.
How to make brushes for a scooter starter?
There are no problems with the rotor commutator: they cleaned it, washed it, dried it and that’s it. But what about worn brushes? They are not on sale and never have been, and a new starter is very expensive, what should I do? There is a way out: make the brushes yourself, or rather, not make them, but remake them from others.
To make new brushes, a set of new brushes for the dynastarter of the Soviet Ant scooter is ideal for us. This kit costs only 150 rubles and includes two pairs of brushes, enough for exactly two starters. You can buy such a set at any store selling spare parts for Soviet motorcycles. Why exactly from “Ant”, and not from a drill, for example? Because ant brushes are designed for high current and are very resistant to abrasion, while brushes from conventional power tools are soft and quickly burn and wear out.
We take a brush, it is initially much larger than the original one, and we grind it on all sides using sandpaper so that it fits easily into the socket and at the same time does not dangle there too much. Ideally, you should try to sharpen the brush so that it sits in its socket as tightly as possible and at the same time walks in it without the slightest, even barely perceptible resistance.
We insert our freshly ground brush into the socket and check its mobility without fail.
Solder the wire of a homemade brush to the power terminal
We install our homemade brushes in place.
That’s the whole secret and the most important thing - with such homemade brushes, which also cost a penny, you can completely restore the operation of the starter. And for many many seasons. And this has already been tested on more than one copy. At least I have never received any complaints about the operation of the starter with brushes from “Ant” implanted into it.
The secret to reassembling
To avoid the long and tedious hassle of installing the rotor into the housing, secure the brushes from moving out in their sockets with toothpicks, lubricate the rotor axles with some refractory grease, install the rotor in the housing and remove the toothpicks. This will make it much easier and faster, and most importantly, you won’t break or twist anything.
And one more thing: if after assembly the starter rotates in the other direction, do the following: unscrew the bolts holding the housing together and rotate the housing with magnets 180 degrees relative to the second half of the housing and the problem will go away.
Source