- "Affiliate Material"
How often should you change the oil in your motorcycle engine? The answer to this question is not as obvious as it looks in the operating instructions... After all, the conditions of this very operation may differ, and quite significantly, from the region in which the equipment is used and ending with the driving style of a particular owner.
In addition, the road infrastructure is also of considerable importance (compare, for example, the unlimited autobahns of Germany and the road network of Karelia, where dirt roads are quite common).
The oil dipstick and inspection window in the crankcase of your motorcycle will be invaluable assistants in this delicate matter. Or a transparent tube, as is done on some KTM motorcycle models.
CHANGING OIL IN A MOTORCYCLE
Changing the oil in a motorcycle is perhaps one of the main components of the good health of your two-wheeled iron friend.
This procedure should not be neglected - the new engine stands like a wing from a starship. It’s easier and more reliable to have your bike serviced on time. Engine oil consumption and service life depend on operating conditions, engine and oil type. But all manufacturers agree on one thing: the oil must be changed at least once a year. Recommendations for changing the oil specifically for your motorcycle are best found in the instruction manual (usually the change interval is from 6,000 to 12,000 kilometers). What you need to know when changing oil: 1) DO NOT mix oils with different bases. 2) DO NOT mix oils from different manufacturers. 3) Adding fresh oil to used oil does not improve lubricating properties.
Preparing the site. This step is one of the most important. You don't want to be running around looking for tools, containers or rags while your motorcycle is leaking oil and your hands are dirty. What you will need: 1) Oil filter; 2) Oil; 3) A set of keys; 4) Oil collection pan; 5) Filter removal tool; 6) Rags for cleaning; 7) Funnel; Gloves; 9) Flushing fluid*
*Note: Do I need to flush my motorcycle engine before changing the oil?
Flushing the engine before adding new oil is necessary if: 1) Switch from one type of oil to another; 2) The mileage of the motorcycle has been exceeded; 3) Mineral grades of oils were used; 4) The engine overheats; 5) Refueling the motorcycle with low-quality gasoline. There are two means for flushing a motorcycle engine: flushing oil (full-volume flushing) or “five-minute” (kerosene-based).
Method I Flushing oil is poured into the engine after draining the used oil, without changing the filter. The engine idles for 15-20 minutes, the wash is drained, the filter is changed and fresh oil is added. The disadvantage of this method of flushing the engine is that it is not possible to completely drain the flushing oil, and its residue reduces the viscosity and service life of freshly filled oil.
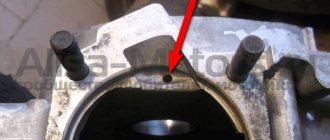
Stage 1. Drain old oil. Place the motorcycle on a side, center or rear stand (the motorcycle should be level). We remove the plastic, if any, so that there is free access to the bottom of the motorcycle. The pan should be installed directly under the bolt. Try to foresee where the oil will spill out, and also monitor it during the draining process. You will almost certainly have to move the pan several times as the old oil drains out more and more slowly. Using a suitable tool, remove the bolt at the bottom of the crankcase. The main thing is not to break the thread! We wait for the oil to drain, about 10 minutes, and you can even shake the motorcycle a little from side to side so that the remaining oil drains.
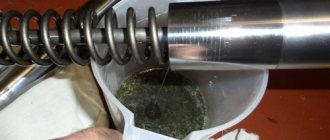
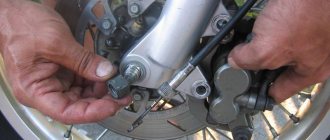
Stage 2. Replacing the filter. The filter is a small barrel with a diameter of 5–10 cm. It is usually located in the front part of the crankcase (right behind the front wheel). Sometimes it can be covered with a plastic shell for protection or be mounted in a special niche in the crankcase. Unscrew the filter carefully (counterclockwise) using a filter wrench. Be careful not to hit or damage the filter to prevent contaminants from accidentally entering the engine. There may be some oil left in the filter, so it's best to have a container on hand in case of any spillage. If the filter is sitting very tightly, then try to drive a screwdriver into the side of the filter and loosen the fit. After removing the old filter, take a new one and lubricate the rubber gaskets on the filter with fresh oil. This way you can ensure reliable contact with the engine, and at the next oil change it will be much easier to remove it; pour a little oil into the filter (about 50-100 ml).
You should clean the filter seat in the engine of any dirt and wipe the inside surface with fresh oil to ensure proper clean contact, then screw the new filter back in. Screw in by HANDS ONLY!
Stage 3. Installing the drain bolt. Before installation, check that the bolt is clean. Don't forget that it's usually screwed into cast aluminum, so don't over-tighten it!
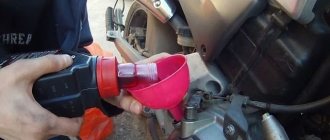
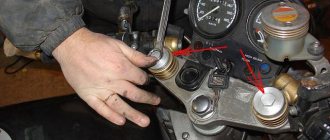
Stage 4. Filling with new oil. Move the dirty oil pan away from the motorcycle to avoid spilling it. Check your manual for the capacity of your oil tank and use a funnel to fill in the oil, leaving about half a liter until the tank is full. Check the level, some motorcycles have an inspection window, while others have a dipstick built into the cap.
Add or drain oil until the level is in the lower third. Don't add too much oil! It places excess pressure on the seals in the engine and can shorten service life. Remember, to check the oil level, the motorcycle must be standing upright and not on the side stand. Stage 5. Final. Wipe the motorcycle clean and make sure all caps and bolts are installed. Do not pour oil on the ground. It is not absorbed, does not evaporate and is generally very dangerous for the environment. Plus, pouring oil on the ground is definitely against the law!
How to replenish the amount of lubricant?
If, when measuring the volume of car oil, you notice that it is not enough, you need to top up to increase the amount of oil. It’s not so scary if during a long trip the lubricant level drops to the minimum mark. It's worse when it fell significantly lower. In this case, you need to immediately add oil, right on the road.
Topping up is carried out through the oil filler cap, which you will see at the top of the engine. Often there are different inscriptions on it - signs like Oil Fill. In certain cases, a mark is applied to the surface of the cover indicating the type of optimal lubrication.
Remove the cover and install a watering can into the hole. Fill slowly. It is advisable to add oil in small portions. It is necessary to stop from time to time so that the fairy tale settles in the crankcase. After topping up, you need to check the volume again. Pull out the dipstick and test again.
You will also be interested in:
Does a manual transmission need to be changed?
The need to change the oil in a manual transmission is one of the most controversial topics of discussion among car enthusiasts. There are several diametrically opposed opinions about when to change the oil in a manual transmission and how to do it correctly. To make the right decision, you need to understand what function this lubricant performs and how its replacement affects the performance and service life of the transmission. We will talk about this topic, useful for all drivers, in the article.
Motorcycle repair and maintenance manual.
Let's be honest: most of us are terrible auto mechanics. These days, fewer and fewer people understand the workings of a car, not to mention the ability to independently maintain and repair a vehicle. All this happens because modern cars have become more complex. As a result, even simple maintenance of many car models often requires special equipment and new knowledge. But when it comes to motorcycles, everything is much simpler. Each of you can easily maintain your bike yourself. Moreover, even those who previously could not even check the oil level in the car.
The thing is that motorcycles in general are much simpler than their four-wheeled counterparts. Unlike cars (especially modern ones), almost all components of motorcycles are in a visible place. This allows the owner to reach any part of the bike quite easily.
See also: The most useful tools for an inexperienced auto mechanic
Also, to repair and maintain your bike, you do not need to purchase expensive special tools, which are often necessary for motor vehicles. A simple set of wrenches and hex keys will allow you to disassemble your motorcycle virtually down to the screw.
In addition, even if you have never changed the oil in a car yourself because of fear, lack of knowledge, or due to some difficulties, then you can do it on a bike without any problems. We offer you our motorcycle maintenance guide, with the help of which even a teenager can learn how to maintain his motorcycle in a short time.
Why change the gearbox oil?
Experts identify three main functions of oil in a manual transmission.
Changing the oil in a manual transmission is often not regulated by the manufacturer, however, constant use of the car leads to wear and tear of even the most durable parts of the car, regardless of the brand. At 150-250,000 kilometers, the smallest particles of exfoliated metal fill the liquid, thus changing the physical properties of the oil and increasing its thermal conductivity. The design of the “mechanics” does not provide for the presence of a special filter, which means that the “garbage” will be in constant motion inside the box.
The result of constant heating of the oil may be the formation of foam inside the assembly. A foamed oil mixture mixed with wear products loses its lubricating and protective properties, which is especially dangerous for an automatic transmission. At the moment of critical contamination of the oil in the automatic transmission, the torque from the engine simply stops being transmitted, which makes it impossible for the car to move. The answer to the question of whether it is necessary to change the oil in the gearbox is quite obvious in this case.
Tips and tricks
In parallel with checking the level, regular monitoring also allows you to visually assess the condition of the oil. Taking into account the fact that there is still no clear answer when to change the engine oil, this approach allows, in some cases, to promptly identify the premature loss of the protective, detergent and other beneficial properties of the lubricant.
If the oil looks suspicious, the formation of foam or emulsion is noticeable, strong blackening is observed beyond the norm, or the presence of suspensions is detected, or an odor unusual for this material appears, then it is necessary to stop operating the internal combustion engine.
In this case, it is optimal to seek help from specialists, completely drain the lubricant, conduct an in-depth check and diagnostics of the engine, and replace the oil with fresh oil (possibly flushing the engine before replacement).
Types of oils and features of their use
All gear oils differ in the type of base. Inexpensive mineral oils are almost never produced today and are mostly used in rear-wheel drive vehicles. A significant “disadvantage” of such compositions is their short service life and the absence of substances that promote self-cleaning.
Semi-synthetic oils can be found in gearboxes of front-wheel drive economy class cars. Under normal operating conditions, oils of this type can protect parts from wear until the car travels 50,000 - 60,000 km. Special additives included in the composition of “semi-synthetics” protect the metal well from destruction as a result of friction and corrosion, and the reasonable price makes these oils the most popular on the market.
The most expensive and high-quality oils are rightfully considered to be synthetic oils that can withstand strong temperature changes. “Synthetics” are most popular in areas with frosty winters and hot summers. High-tech additives make synthetic oils truly durable.
Paying attention to the types of oils, the car owner should know that the characteristics of the composition intended for manual transmissions differ significantly from those for automatic transmissions. You cannot replace one with the other.
Single-barreled gun requires good oil
Single-cylinder engines of enduro and even more so cross-country motorcycles are demanding on the quality of oils. One of the most important parameters that should be monitored when operating a motorcycle is the oil temperature, but alas, as a rule, there are no oil temperature sensors on motorcycles.
Liqui Moly oil is a good alternative to Motul oils
Air-cooled engines are more susceptible to oil overheating, which is why Honda XR engines begin to smoke. Overheated oil loses its properties, cokes the oil scraper rings and oil waste appears, and the lack of proper lubrication finally kills the engine, the owner ends up with major repairs and a lot of money. Off-road driving also has a negative impact when speeds are low and dirt covers the engine and it stops cooling properly.
Water-cooled engines handle oil temperature much better, but be careful because coolant temperature is not the same as oil temperature! The difference can reach several degrees, which can be critical for lubricating properties.
Preparation
The first step is purchasing the oil that you are going to pour into the motorcycle engine. Remember that it must exactly match the parameters specified by the vehicle manufacturer. This applies to viscosity, as well as to the presence of special additives in the technical fluid. For two-stroke engines, a special oil is produced that is added to gasoline, so here we will look at replacing the lubricant in a four-stroke engine. “Two-stroke” oil cannot be poured into it, since it is not designed for long-term use and can cause damage to the power unit.
Before changing the oil, the engine must be flushed, since remnants of old fluid and chips accumulated as a result of wear of internal components can quickly damage the unit. The best option is to purchase flushing fluid, which is added to the old oil. It effectively removes all foreign objects from the hydraulic system and does not reduce the life of the power unit. In addition, there is a flushing agent that is added after the old oil has been removed from the engine. In any case, you should follow the recommendations of the fluid manufacturer - when flushing the engine, you need to start the motorcycle and let it run for 10-15 minutes, depending on what is indicated on the canister.
Draining the technical fluid is carried out only when the engine is warm - it must run for at least 2-3 minutes at idle so that the oil temperature reaches 100 degrees and its viscosity decreases significantly. Since you will have to deal with such a high temperature, prepare thick gloves in advance that will protect your hands from painful and difficult-to-heal burns. First you need to find the drain bolt, which is usually located at the bottom of the power unit, and in motorcycles with a dry sump - on the frame. There may be a plastic protection on it - it must be carefully bent to gain access to the neck.
Taking the key to 17, carefully begin to turn the bolt counterclockwise - if you sharply pull it in the opposite direction, you will not be able to avoid crankcase failure. When the bolt turns easily, quickly turn it out with your hands and remove your palms before hot oil pours on them. The lubricant will flow for approximately 15 minutes due to its high viscosity. To ensure complete removal of used oil, you can rock the motorcycle sideways to speed up the process. The oil should be collected in a previously prepared container so as not to cause damage to the environment or create a fire hazard.
If a bolt falls into a can of oil, try to get it out as quickly as possible using a wire hook or a powerful magnet. If dropped in such a way, its sealing copper washer may be damaged, which will lead to depressurization of the lubrication system. In such cases, you need to purchase a new bolt, since repairing it will not provide guaranteed reliability.
How to check the oil: on a cold or hot engine
So, we sorted out the need for constant monitoring. Now let's look at how to properly check the engine oil level. Let us immediately note that on this issue motorists are divided into two camps. More precisely, the debate revolves around the topic of what is the correct way to check, on a cold or hot engine.
Some believe that the best and most reliable way is to check “cold”. The main argument is that in this case the lubricant has time to completely drain into the pan, allowing the situation to be assessed most objectively.
However, opponents of this method object, citing the natural property of oil to “expand” when heated and “shrink” after cooling. It turns out that if on a cold internal combustion engine (especially in winter) the level may be underestimated, then after warming up the volume will increase, that is, everything will return to normal.
Also, excess oil can enter the crankcase ventilation system and penetrate the engine cylinders. Excessive amounts of lubricant contribute to rapid failure of the catalytic converter. Taking into account the above, you need to understand how the level is checked. First, here are some general recommendations:
Let us add that on some internal combustion engines the manufacturer has provided the ability to check the level both on a cold and on a warm engine. In this case, the dipstick additionally contains HOT (hot) and COLD (cold) marks.
To eliminate possible errors, it is recommended to first check on a cold internal combustion engine, then warm up the engine and repeat the analysis according to the scheme described above. Only after this can you make a decision about topping up and the amount of lubricant to be added.
Let us add that in the summer, as a rule, the deviations between “cold” and “hot” are not so significant. This means that if you pour oil into a cold engine so that the level is in the middle (strictly between o and “max”), then after warming up there will be no significant deviations from the norm.
Replacement
When there is no old technical fluid in the lubrication system, you will need to change the oil filter to get rid of the chips or dirt accumulated in it. On some motorcycles it is located on the surface of the motor, while on others you have to remove the plastic lining and protective components to gain access. It is better to remove the oil filter using a special puller or a wrench with a chain, so as not to damage the threads. An emergency option is to pierce the body of the cleaning element with a screwdriver and use it as a lever. However, you need to make sure that the rod does not touch other components of the engine and fuel system.
A little hot oil may spill out of the filter mounting hole, so you should not remove the container for collecting it and gloves yet. A little clean oil is first poured into the new part. It is also necessary to lubricate the rubber O-ring to ensure the tightness of the hydraulic circuit. The filter is twisted until it stops by hand, after which it is pulled out a quarter turn with a wrench. However, you should not show excessive enthusiasm - a broken thread can cause complex, expensive repairs.
After screwing on the filter, reinstall the drain plug and plastic protection. Experts who know how to change the oil on a motorcycle advise to stock up on a funnel in advance that will fit well against the walls of the filler neck. If the diameter differs significantly, some of the lubricant may splash out, which leads to contamination of the vehicle. The filler plug is screwed on as tightly as possible, but you should not be zealous here either. To check the oil level, you need to run the engine for 2-3 minutes and then cool it for 5 minutes.
Lack of oil in a motorcycle engine often causes cylinder scuffing, which requires a major overhaul of the power unit. Therefore, if the level on the dipstick is below the minimum allowable, it is necessary to add the required amount of lubricant, and then repeat the procedure with warming up. Excessive amounts of lubricant also negatively affect the reliability of two-wheeled vehicles - so you should not be lazy to drain the excess if there is any. The most common problems associated with oil overfilling are squeezed out oil seals and seized pistons. Therefore, it is necessary to follow the manufacturer’s instructions, which are indicated in the instructions or on the official website.
Correct determination of the amount of lubricant
In any engine, checking the engine oil level is carried out using a dipstick located within easy reach of the motorist. One end of the dipstick is installed in a sealed hole in the cylinder block. The other end of the dipstick is lowered into an oil bath located in the crankcase compartment of the power unit.
Description of the probe
On any dipstick, regardless of the engine brand, there are 2 marks that indicate the minimum and maximum oil volume. Please note that under certain conditions the dipstick may not indicate the oil volume correctly. To minimize the influence of external factors and to accurately determine the volume of lubricant in the engine crankcase, you need to follow simple rules.
Correct oil change
The procedure should be performed in a garage in good lighting and at normal ambient temperatures. If the garage is not heated, it is better to avoid changing the oil in winter - it may thicken and not completely drain from all moving joints, which will subsequently cause them to break. The garage must be clean so that dust and other foreign impurities do not get into the oil - this is why the procedure is not recommended to be performed in the open air. After replacing the technical fluid, the engine should be run in, which will allow it to achieve a high level of reliability. You need to break in the motorcycle at medium speeds - at idle speed, solid deposits can form in the hydraulic system, and at high crankshaft speeds, the engine can wear out very quickly.
Source
What does lack of oil lead to?
The engine is designed for a certain amount of lubricant, with which it can operate in all modes. If the amount of lubricant is insufficient, the engine begins to starve of oil. Car manufacturers have long made sure that the driver can monitor the amount of lubricant and have placed sensors on the dashboard. The volume of oil fluid must not be allowed to be less than the minimum specified. Because of this, various parts of the power unit may fail. When oil starvation occurs, the oil rings that fail most quickly, then the bearings (main bearings, connecting rod bearings, in the crankshaft). In addition, the engine overheats, because a small amount of lubricant poorly washes the engine elements and removes heat from them. The piston may jam, which will lead to final breakdown of the power unit. The wear of the shaft and drive bearing increases, resulting in jamming of the oil pump elements.
There are few reasons for a decrease in lubricant volume, but you need to know them:
How often should transmission oil be changed?
The average life of one cycle is about 80,000-100,000 kilometers, or 6-8 years of operation. The numbers are conditional, since the degree of lubricant fatigue depends on the specific model of the car and the nature of driving. Naturally, a sporty style uses the gearbox with greater intensity, which affects the quality of its lubricants.
Advice: during the next inspection, pay attention to the condition of the transmission oil, especially if you feel from the car’s behavior that the time has come.
Should I use automotive motor oil for motorcycles with a 2-stroke engine?
Two-stroke and four-stroke engines are fundamentally different from each other and require different properties from lubricants. Therefore, it is strictly forbidden to fill in oil intended for a four-stroke unit, in fact, and vice versa.
The principle of operation of a two-stroke engine is to mix oil and fuel, the resulting mixture washes all components of the unit, after which it burns. Therefore, lubricants should not contain any of the additives found in 4-stroke engine lubricants. The combustion products of additives produce strong carbon deposits that pollute the entire space and “injure” all surfaces of the engine.
Specially developed oils for two-stroke engines protect all engine parts from premature wear and do not form dangerous compounds that negatively affect the operation of the unit.
Changing transmission oil
This operation distinguishes between a simple oil change and a gearbox flush. In the first case - for a manual transmission - the used oil is drained through the drain plug, after which fresh oil is poured in. But for an automatic transmission this is not enough: it is necessary to flush the transmission with old oil under pressure to remove all excess. Then, with the engine running, new transmission oil is pumped in along with cleaning additives and the cleaning is carried out. Contact a car service center, they will do everything right.
Attention!
However, we draw your attention to the fact that such often imposed automatic transmission flushing procedures can damage sensitive automatic transmission components, which can cause serious damage much later during the further operation of the vehicle. Therefore, many car service centers do not offer automatic transmission flushing at all or offer to flush the transmission at lower pressure.
What happens if you don't properly break in your motorcycle?
Incorrect break-in
Not
It’s worth listening to them, as metal parts wear off, and all this ends up in the engine oil. Driving for a long time at maximum speed can cause metal shavings to clog the oil filter and enter the engine.
Interesting materials:
How to remove scratches from the screen? How to remove gray screen on Xiaomi? How to remove a wide screen on a computer? How to remove a wide screen on a laptop? How to remove the curtain on the MIUI 10 locked screen? How to remove the speech synthesizer from the screen? How to remove messages on the lock screen? How to remove a dot when you tap on the screen? How to remove a dot from the Honor screen? How to remove a scratch from a tablet screen?
Method No. 3 - Determine the interval between oil changes based on fuel consumption
This is the most interesting and, for some unknown reason, the least known option. Both oil consumption and fuel consumption are essentially derivatives of the same factors. They both correlate most with the amount of work performed. And this is logical.
The task of motor oil (motor oil, engine oil) is to prevent, as far as possible, engine wear. Wear normally depends most on the amount of work performed. And the distance and time of work are only components of the work itself. And they are suitable for measuring oil degradation time only for this reason. And fuel consumption more accurately reflects the work done by the device than the previous parameters. Because the incoming gasoline (gas, diesel, alcohol) provides just that. No one needs to explain that 100 engine hours at 2000 rpm is far from the same as 100 engine hours at 6000 rpm. Moving a car weighing 2 tons over a distance of 1000 km is different from moving a one-ton car over the same distance. Switched on climate control (car air conditioning, any other electronics), system malfunctions, all this increases both the work performed and the load on the engine. And fuel consumption. And, of course, it shortens the life of motor oils. Everything is logical and even almost everything is clear... except for the most important thing. How to count? Exactly how much fuel should be consumed before the next oil change? And how can you find out the total fuel consumption? Count all refuelings and refuelings, write them down on stickers and paste them all over the cabin? Some people do just that. Someone pays with a card and, having calculated expenses for a certain period (a month or two), extrapolates the data for a longer period. Someone delegates this work to automation. Some engine hour meters actually count fuel consumption and then automatically convert them into standard engine hours. This is the easiest and most convenient way.
If for some reason you want to do the recalculation yourself, but at the same time save time, then you can take it as a rule that in today's gasoline engines, oil consumption is approximately 0.2% of fuel consumption. Turbo engines need significantly more lubrication, diesel engines even more, and rotary engines more than even diesel engines. For a more accurate calculation, you can use fuel consumption calculators from the Internet. The name of one of them is so impressive that we decided to give the name in full - “Calculator for empirical calculation of oil change intervals based on actual fuel consumption.” If you replace a calculator with an electronic computing device, oil with a lubricating fluid for an engine, and fuel with a calorific fluid for an internal combustion engine, then the name of the calculator will become so long and scary that people will begin to be afraid to count and will take your word for it. And here it is, available at the link:
https://etlib.ru/calc/oil-change-by-fuel-consumption
You are required to enter three parameters:
- Mileage recommended by the car manufacturer before changing the oil
- Fuel consumption declared by the manufacturer per 100 km
- Actual fuel consumption per 100 km
and you are given the interval to change your engine oil.
Drivers who are not intimidated by formulas can use one of the formulas for calculating the engine oil change interval, such as the Kublin formula.
Kublin's formula:
Mileage (km) = (244.38 x TBN x Vm x Vdv) / (L100 x Pls)
Vm = number of liters of oil when changing; Vdv = nameplate engine volume in cubic centimeters; L100 = fuel consumption in liters/100km; Pls = nameplate engine power in horsepower; TBN = oil base number.
It contains a key indicator for calculating fuel consumption, but the last point is the alkaline number of the oil. And this brings us to method number 4