So, let's look at how to replace wheel bearings efficiently and correctly at home without unnecessary steps, in compliance with safety rules, and also without damaging other parts of the motor vehicle through your actions.
Let's replace the bearings using the example of an IZH motorcycle. It can be immediately noted that all models and modifications of this brand of motorcycle are identical in terms of wheelbase, regardless of the year of manufacture. First, let's look at what a wheel is made of.
The motorcycle wheelbase includes:
- hub with brake drum;
- rim;
- a set of spokes and a tire with a tube. The standard for newer models is 18 radius; on earlier models, 19 wheel radius is also found.
Attention!
It is important to know that the bearings go to size 203 wheels, two per wheel.
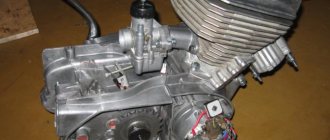
Photo report: Repair of the engine of the IZH-Planet motorcycle 2, 3, 4 and fifth model
Nowadays it’s rare to find a “Planet” anywhere, especially in stock form.
Grandfather's sheds where they once stood in abundance have long been cleaned out by the suffering, and the garbage dumps where they once lay are overgrown with grass... The only place where you can still find something more or less decent is local newspaper advertisements. You can also search on Avito, but before you buy it there, see the product in person, otherwise they will send you a bag of bricks instead of an engine...
I was lucky: I found an advertisement in a local newspaper for the sale of an engine from a sidecar, went to the place, inspected it, made an agreement, bought it and brought it home. Don’t let the fact that the engine is from a motorized stroller scare you - the engine is completely identical to the original Planetovsky one.
In general, when I tossed the engine around, I was happy and immediately upset... I was happy because the engine was stock and had no signs of interference. There was also original oil and a USSR spark plug. I was upset because the piston and lower connecting rod bearing were killed.
I had a good factory cylinder in stock: bored to repair size + a factory piston, chrome rings and pin were purchased for it a long time ago.
I bought the connecting rod from an online store. We managed to find a factory one - not plasticine. I modified it a little: I made a small cut in the lower head to improve bearing lubrication, decompressed the crankshaft, threw out the old connecting rod, installed a new one and then centered the crankshaft using an indicator.
Preparation for repair
When starting work, initially prepare the place where you will disassemble your pet. Wash the area where you will park the motorcycle thoroughly so that unnecessary objects and dirt do not interfere with your further actions. You also need to wash the motorcycle before disassembling, although many do not want to do this, but for your own convenience and the comfort of removing vehicle spare parts, this must be done.
To disassemble a motorcycle, you need to prepare the necessary tools, without which it is impossible to replace the bearings.
Tools that will be required to work with the Soviet motorcycle IZH:
- Phillips screwdriver;
- flat screwdriver;
- hammer;
- wooden block;
- open-end wrenches for 10,12.13,14,17,19,22,24,27;
- pliers;
- breakdown.
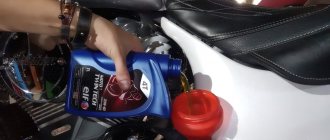
You will also need lubricating oil. You can use regular diesel oil to lubricate bolts and during assembly; solid oil or litol-24 - for impregnation of a new bearing. Decarbonizing WD-40 (or a similar penetrating lubricant) may be useful to remove rust from bolts that are difficult to remove.
Tools
Tools you will need:
- Drill or screwdriver
- Metal drill 4 - 5 mm
- Flat file
- Technical hair dryer
- Mandrels. Plumbing fittings can be used as mandrels
- Powerful flat head screwdriver
- Open-end or socket wrench 14
- Clamp
- Hammer or mallet
- Oil can or syringe
- Sealant
Preparation
To perform a high-quality repair, the engine parts must be clean, the threads in the crankcase must be threaded, the seals and gaskets must be new.
First, we clean the oil channels in the crank chambers. There are two channels in the Izh-Planet engine: one in the left half of the crankcase, the other in the right. We find the channels and if they are very clogged, we clean them with wire, rinse them with clean gasoline and blow them with compressed air.
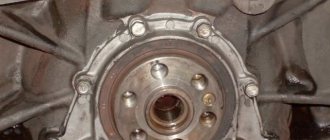
Installation of bearings and seals
We install a retaining ring in the left half of the crankcase.
Depending on the model of the main oil seal, we install a spacer sleeve in the mounting hole of the main bearing, or, if the oil seal was initially wide (there are some), we heat the crankcase and, on the inside of the crankcase, place the oil seal until it stops against the retaining ring.
My engine had a regular narrow oil seal, so I put in a bushing.
Using a mandrel, install the main oil seal into the preheated crankcase.
Quickly, before the crankcase cools down, place the oil guide washer on the oil seal. The oil guide washer has a saucer-shaped profile. We place it on the oil seal so that the concave side faces us, and the curved side faces the clutch basket.
While the crankcase has not cooled down, we press the outer race of the main bearing into it using a mandrel.
If you are going to replace the main bearings with new ones, don’t be lazy: find a sheet of iron 7-8 mm thick, cut a wedge in it for the connecting rod, pass the sheet of iron between the cheeks of the crankshaft and use a mandrel to drive the main bearing onto the axle.
This way you will protect yourself from damage to the crankshaft. The main bearing has a very high interference and fits into the axle with a very large force. It is not uncommon for people to simply knock out the axle (the axle on the planetary crankshaft is pressed into the cheek) inside the crankshaft, but they were never able to put the bearing on.
Native made in USSR 2505 KM
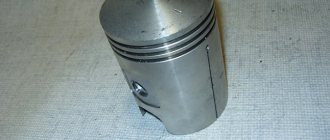
Installation of the cylinder-piston group
It is not advisable to remove the gearbox cover until the sealant has dried; there is no need to rush in this matter. It’s better not to rush things and install the cylinder while the sealant dries.
Add some motor oil:
To improve lubrication, it is advisable to drill holes in the piston bosses. But you don’t have to drill - it depends on your desire.
Install the piston pin retaining ring into the boss. Before installation, it is advisable to bend the locking ring a little and be sure to check how it fits after installation:
We heat the piston with a hairdryer and, using a mandrel, drive the finger into the piston so that it comes out no more than 5-6mm.
We look for an arrow-shaped mark on the bottom of the piston.
We orient the piston with the arrow towards the exhaust port of the cylinder (“towards the exhaust”), put the piston on the connecting rod, hammer in the piston pin and install the second retaining ring.
We insert the rings into the cylinder and measure the gap between the locks with a feeler gauge:
To improve the wearability of the rings and reduce noise from engine operation, it is advisable to chamfer the edges of the rings. If hunting gets too much trouble: place the ring on a flat surface and use a file to slightly round the edges.
We put the rings on the piston, fill the piston with the rings with oil, install a gasket under the cylinder (preferably with sealant), tighten the rings with a clamp. We cut the clamp out of tin and from the same tin we bend the bracket with which we will fix it.
After the rings go into the cylinder, unfasten the clamp, lower the cylinder and screw it to the crankcase.
Source
Assembling the crankcase halves
We degrease the connector of the halves, knock out the guide bushings a little so that they extend 5-6 mm above the plane. Depending on your desire, we assemble the checkpoint. Personally, I assemble the gearbox only after assembling the engine, it’s more convenient for me.
We apply any automotive sealant to the connector, install the second half of the crankcase, tap it with a mallet, install the gearbox cover and tighten the crankcase with bolts.
We do not pull the bolts anyhow, but strictly according to Feng Shui: we pull about a third of the force, first the middle crosswise, then the periphery, and gradually increasing the force over several circles, we tighten the bolts as much as is sufficient.
Crankshaft bearing IZH Planet 5 sizes
The wheels of an IZH motorcycle consist of a base (hub), a metal rim and connecting steel elastic spokes. Hub material: aluminum alloy. The steel brake drum is cast on the right side, and the splined part is located on the same side. If the front wheel is fitted with splines, the gear of the speedometer drive gear is put on, if it is the rear wheel, then the splines are connected to the driven sprocket of the main gear. The bearing housings have been prepared. A spacer is provided between the ball bearings. On the left side the bearing is protected by an oil seal. On the right, the speedometer drive or the driven star of the main gear are protected in the form of an oil seal with seals.
Front wheel of an IZH motorcycle
Let's look at the design in pictures and photographs of hubs, spokes, rims and tires with tubes. What a spoked and cast front wheel looks like in cross-section. Visually consider the order of arrangement of all installed parts.
Since the 90s of the last century, alloy wheels began to be used. Made from aluminum alloy.
Rear wheel of an IZH motorcycle
Shown with sprocket housing.
Part installation
In order to install bearings, you need to perform the following steps:
- You must first press in the bearing on the right side. Lubricate it with lithol 24;
— next we put the spacer sleeve in place;
— install the lubricated other bearing on the left side;
— adjust the hub washer and lock it using a locking ring;
- close with a decorative lid;
— screw the housing that closes the oil seal.
You have all installed the bearings.
Now you need to mount the wheel on the fork.
The time for final installation will depend on how you do this correctly.
Don't make the mistake of a novice motorcyclist.
There is no need to rush to tighten the brake drum.
When you have installed the wheel and secured it with a nut through the bolt, you need to tension the chain.
For this, special tension bolts are used.
The chain must be optimally tensioned. A loose chain may fall off.
High chain tension can lead to rapid wear of the bearings.
After checking that the chain tension and wheel installation are correct, we proceed to further actions.
You need to tighten the drum, and then do the same with the wheel.
We connect the electrical wiring.
Your iron horse is ready for use.
That's it, you have completed the task of replacing the front wheel bearings on an IZH motorcycle, thanks to reading this article.
And they didn’t spend a penny for this purpose.
If you still have questions when repairing or replacing parts, feel free to contact me in the comments.
I will definitely find the time to answer all your questions and help with advice.
And note the advice, you will get it completely free.
What bearings are in the Izh Planet 5 engine?
Reader A. Ustinov from Kemerovo asks what bearings and seals are used on the IZH-Planet and IZH-Jupiter motorcycles, and asks for their numbers. The crankshaft of the Planet motorcycle (all models) rests on two 2505K roller bearings and one 304 ball bearing (on the left). Its trunnions are sealed with an oil seal designated IZH-49 sb. 1-30-1 with cover (right) and seal IZH-49 sb. 1-40-3 (left).
The Jupiter crankshaft (also of all models) is mounted on three 205 ball bearings and on 304 ball bearings (on the left). The oil seals are as follows: right - IZH-49 sb 1-30-3 with a cover, left - IZH-Yu sb. 1-50 and one oil seal IZH-Yu sb. 1-14-1 in each of the two crank chamber covers.
The secondary shaft of the gearbox for both Planeta and Jupiter is supported by roller bearing 192906 K1M and sealed with an IZH-49 sb oil seal. 1-28-1.
The primary shaft of all motorcycles on the left rests on a 204 ball bearing, and on the right - on a bronze bushing inside the secondary shaft
Izh Jupiter 5 bearings
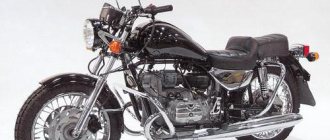
?Izh Jupiter - 5 (Izh 6.113 - 020 - 03) - a regular class road motorcycle, designed for movement on roads with different surfaces. Produced by the Izhevsk Machine-Building Plant since 1985. The motorcycle can be attached to or passenger trailer, as well as a universal cargo module. The weight of the side trailer is 95 kg, the cargo module is 480 kg.
? 1985 Izh Jupiter motorcycle began with an engine whose power, compared to the previous model Izh Jupiter - 4, was lowered from 28 to 24 hp. , but the torque appeared up to 3.5 kgf m (with shorter expressions). The fins of the cylinders and heads have changed, the fastening of the exhaust pipes to the cylinders has changed (it has become flanged). An “emergency start” button has appeared, which closes the generator excitation winding to ground, bypassing the voltage relay, when starting with a dead battery. Other consumers do not depend on this button. The steering wheel mount has become flexible, the front brake has two cams. In 1988, the model received an index - 01 appearance like the Izh Planeta - 5: gas tank, boxes, wings, seat and instrument panel.
Gear shift: foot lever with semi-automatic and manual clutch release Transmission to the rear wheel: single-row drive roller chain Main gear ratio: for IZH - 6.113: 2.21 (2.63) Gearbox ratios: 1st gear: 3.17 II gear: 1.81 III gear: 1.26 IV gear: 1.0 Frame: tubular, welded, single front wheel : a telescopic type with spring-hydraulic shock absorbers with pneumatic adjustment (travel 200 mm) or without pneumatic adjustment (travel 160 mm) Rear wheel suspension: lever with spring-hydraulic shock absorbers (travel 85 mm) Tire size: Standard 3, 50?18 "(90 - 459) Front wheel on motorcycles 6.113 - 015 - 01, 6.113 - 025 - 01, 6.113 L - 015 - 01, 3, 25?19" (82 - 484) Spare wheel: for 6.114T, 3, 75?18" (90 - 459) Brakes: rear: single-cam drum type with mechanical traction drive front : single-disc single-piston with hydraulic drive or two-cam drum type with mechanical cable drive of side trailer wheel : single-cam drum type with mechanical drive
Provide a list of bearings and oil seals for Izh motorcycles, indicate their installation locations and dimensions
To begin with, let's agree that all bearings and seals will have the same size designations: the first number is the outer diameter, the second is the inner diameter, and the third is the height (or width). And now - the list itself: bearing 104 - outer clutch drum and input shaft: 42X20X12; bearing 203 - engine crankcase and intermediate shaft, wheel bearings: 40X17X12; bearing 204 - engine crankcase and input shaft: 47X20X14; bearing 205 - crank chamber covers, engine crankcase and crankshaft axle shafts, rear wheel sprocket: 52X25X15; bearing 2505KM - engine crankcase and crankshaft axle shaft of the Izh-P4 engine: 52X25X18; bearing 192906K1 - engine crankcase and secondary shaft: 46.4X30X13; bearing 778706 - steering column: 48X30X12; right crankshaft oil seal “Izh-49” 1—48—3: 30Х16.5Х10.5; secondary shaft oil seal “Izh-49” 1—47—2: 52 X 34.5 X 9; left crankshaft oil seal "Izh-Yu" Sat. 1—49: 52.2X24.4X10; crankshaft oil seal (for “Izh-Yu4”) “Izh-Yu” coll. 1—15—1: 52.2×24.4X6; wheel seal "Izh-56" coll. 4—29: 36.5X21.5X6.5; front fork oil seal "Izh-P" sb. 3—10—1: 43X32X8.5; left oil seal (for “Izh-P4”) “Izh-49” coll. 1—49: 52X24.4X20; cuff Izh-P2-222: 84X58.5X8; rear shock absorber oil seal “Izh-56” 2—99—1: 24Х9.2Х X12.7; sealing ring for gear shift shaft “Izh-P2” 1—421: 17.7X13.7X2; secondary shaft nut cap “Izh-P2” 1—416: 43.5X4.5X14.5; trigger shaft oil seal (for Izh-Yu4) “Izh-Yu2” 1—132—1: 32X23X14; sealing ring for the trigger shaft “Izh-P2” 1—423—1: 28.4X22X6.
Pressing out the wheel bearings
Unscrew the cap that covers the oil seal;
Using a multifunction wrench, unscrew the housing under which the oil seal is located.
Using round-nose pliers, remove the retaining ring.
We take out the washer that is located in the hub.
Carefully knock out the bearing.
We remove the part on the left side using a hammer and a metal insert.
After dismantling the spacer sleeve, we press out the product located on the right side.
We do this with a wooden block, the diameter of which passes through the wheel hole.
The wooden block can be replaced with any soft metal pipe. The most important thing is that you do not damage the inside of the hub.
If you damage it, then you will need to replace the entire assembly.
For information, I’ll tell you to monitor the tension of the spokes. Because if the tension is incorrect, the wheel bearing will fail much earlier. This is done with a special key. There is no need to remove the wheel.
When you are finished removing the bearings, do the following.
Clean the seat for the new product from dirt, rust and dust.
Rinse with kerosene or diesel fuel.
Make sure that no sand or dirt gets in with the lubricant.
Operation and repair of IZ motorcycle wheels
When operating the motorcycle, monitor the tension of the spokes around the entire circumference of the rim. Check periodically, for example, every time the cameras are pumped in or removed. You can simply check it by hand. Pass around the entire circle, touching each knitting needle. Finding loose spokes. Urgently take measures to delay them.
Loose knitting needles should not be tightened immediately. You need to go through all the spokes and tighten each spoke a little. If the loosened knitting needles do not tighten. Repeat the tightening process.
Let's say that only one loosely tightened knitting needle was tightened. As a result, when you hit the wheel, a “figure eight” will appear. It will be very difficult to fix it, but it is possible.
Minor tightening of the spokes can be done without removing the tire from the rim. For replacing broken spokes, as well as eliminating rim runout and tightening the spokes more strongly. The tire must be removed.
After major troubleshooting. Be sure to check the tips of the knitting needles under the rim tape; cut off any that stick out too much.
Proper operation includes timely lubrication of bearings. Old grease is removed not only from the bearings, but also from the spacer sleeve. The parts are washed and carefully inspected. After that, fresh lubricant is poured into the bearings and inside the hub.
Five random articles about motorcycles:
Using a chain cover from a motorcycle Voskhod on Java 634
Covers for Java On some Java-634 motorcycles (from the first batches of delivery), chain covers fail quite quickly, and it is still difficult to purchase new ones. Instead, you can use covers from the Voskhod motorcycle to protect the chain. Alteration of the casing: 1— frame; 2—plate; 3— spacer sleeve; 4 - old part of the casing; 5 - extension To secure them. it is necessary to make two extensions 5 (see figure) and two spacer bushings 3, through which we connect the halves of the casing. We make extensions using a mandrel. We weld (or solder) frames 1 to them, which we first cut off from the old casings using a thin chisel. It is advisable to seal all connections on the casing by soldering or another method. For more reliable fastening of the covers, you should make new clamps or strengthen the old ones by welding metal plates to them. On my motorcycle, after a run of 5,000 kilometers, the covers have their original appearance.A. KORNILOV 606230, Gorky region.
Removing the stroller wheel
1 — front adjustable rod; 2 — middle adjustable fastening rod; 3 — rear collet clamp; 4 - front collet clamp
Removing the wheel on the stroller also does not take much time. It is recommended to remove the sidecar from the motorcycle and then carry out repairs. To do this, you need to unscrew the two bolts of the lower fastening cams (3 and 4 in the figure), which, when unscrewed, are loosened and make it possible to disengage.
You also need to unscrew the two control rods (in the figure - 1 and 2), which go to the top of the frame. They are fastened with bolts that go into special ears. Having unscrewed the lower and then the upper links, we simply move the stroller to the side.
During this operation, the motorcycle must be placed on a cross stand to avoid falling. You can also prop it up with another convenient object if there is no footrest, or you can simply put the motorcycle at speed and, lifting the sidecar, place a stump - in the future, this will ensure safe removal of the wheel.
In order to unscrew the axle nut, you need to pull out the cotter pin. Only after this do we unscrew and remove the wheel. The axle, along with the drum and brake pads, remains in place. To avoid losing the nut, screw it back onto the axle.
Removing the sidecar wheel of an IZH motorcycle
How can you replace a motorcycle part yourself?
The correct bearing replacement depends on many conditions.
Especially if you are doing home renovations in your garage.
Repairs can be made at a service station. However, you will need to spend money.
It is not a fact that the repairs will be carried out efficiently.
Decide to repair and replace the bearings yourself.
To do this, diagnose bearing failure.
Do it like this:
Get behind the wheel of your motorcycle and pick up speed along a straight, flat road.
Assembly and disassembly
Before you think about power, you need to understand motorcycle maintenance. Often, chasing speed and appearance, owners forget about the basic rules for operating their pet. Due to negligence, and not only, various types of breakdowns occur. You can troubleshoot problems yourself. Considering that disassembling and assembling the IZH Planet 5 engine is very simple, they can be done at home. However, it is recommended that you consult the factory-produced motorcycle operation and maintenance book.
There are cases when the maintenance book was lost long ago, or was not received at all upon purchase. In this case, here is a simple procedure for disassembling the engine:
It should be noted that the cleaner your workplace is, the better the repair will be done, since dirt that gets inside the engine can make it difficult to operate and even cause another breakdown. Don't be too lazy to wash the engine well before work .
Write down or mark the progress of your actions. This will help with assembly. Group the parts in the order they are disassembled and assemble them by location. The more organized the disassembly process is, the faster you will assemble the IZH Planet 5 engine, the technical characteristics of which will once again delight you.
Bearings IZH-7.107 “Planet-5”. Catalog 2002
Attention: The electronic auto parts catalog is intended for reference purposes! Our company only sells those products that have prices listed.
| Number | 203 |
| Name | Bearing GOST8338-75 |
| Quantity per "for IZH 7.107 (Planet 5); for IZH 7.107-01 (Planet 5-0" | 2 |
| OKPO class | 46 Rolling bearings |
| Number | 203 |
| Name | Bearing GOST8338-75 |
| Quantity per "for IZH 7.107 (Planet 5); for IZH 7.107-01 (Planet 5-0" | 2 |
| OKPO class | 46 Rolling bearings |
Part number on drawing: 1
Bearing GOST8338-75
Serial number: 203 Quantity per model: 2
| Number | 304 |
| Name | Radial ball bearing (d=20, D=52, B=15) |
| Quantity per "for IZH 7.107 (Planet 5); for IZH 7.107-01 (Planet 5-0" | 1 |
| OKPO class | 46 Rolling bearings |
Removing the front wheel of an IZH
Use the cross stand to support the motorcycle.
If you have a stroller, you need to disconnect it.
Let's say your motorcycle doesn't have a kickstand.
Place an old wheel or a wooden stump under it.
This is necessary for insurance purposes and also to avoid damage to the fork.
We unscrew the bolt that secures the fork axle at the front.
Turn it all the way in any direction.
The brake drum cover must be removed.
No need to bother and disconnect the cable that goes to it.
Next, loosen the nut of the bolt that tightens the wheel axle.
Turn the axle out from the left side, while you need to rotate it from right to left.
Place the wheel on a flat surface.
Installing the motorcycle at the workplace
Once you are fully prepared for disassembly, start by placing the motorcycle on the cross stand, first removing the sidecar if you have one. This action is performed solely for the convenience of repair, therefore, if for some reason you do not want to disconnect the stroller or it is not possible, you can replace the bearings along with it.
Before repairing the motorcycle, it must be placed on a cross stand.
If you do not have a central stand, then install a beam (stump) under the frame in the engine area to secure the device so that when removing the wheel it does not fall on the front fork or rear suspension, depending on which wheel you remove. A fall or load on the chassis can damage it, which in the future will only complicate your repairs, both financially and physically.
Crankshaft bearings Izh Planet (2505KM 2 pieces metal cage)
Characteristics of bearing 2505 / N2205
| Parameter | Designation | Meaning | Units |
| Bearing inner diameter | d | 25 | mm |
| Bearing outer diameter | D | 52 | mm |
| Bearing width | IN | 18 | mm |
Please note, these are new bearings. They are declared to be manufactured in Russia, although in fact it is impossible to verify the manufacturer of the components, since often modern Russian factories are only assembly sites.
Which 2505 is installed in IZh or Ural?
Unfortunately, it’s difficult for me to answer this question, because... the first reference book says that they install bearing 2505 AEM - 10 GPZ with tectolite, and the second 2505 KMU (the plant is not specified). High-level specialists, whom I have no reason to distrust, claim that 2505KMU has always been there. Ideally, if there was an IL on which the bearings were not changed, everything would become clear, but since... IZH has not been produced for 10 years, the likelihood of this dropping every year.
My opinion doesn’t matter what. Structurally, they are absolutely identical in size and geometry, which means that on such a relatively simple unit as an IZH crankshaft, the bearings are interchangeable. According to generally accepted standards, textolite is less noisy and the metal is more reliable. Therefore, decide for yourself, but if you know for sure, do not be lazy - write to the chat or email, I will be grateful.
Removing the rear wheel
Let's move on to removing the rear wheel. We remove the seat by pressing the lever, which is located in the front part of the base of the seat, open it and see that there are wires connected to it, connected on chips, which go to the brake light mounted in the pencil case, located at the back. We disconnect them, and, pulling the seat back, remove the seat along with the frame wing.
Removing the seat from an IZH motorcycle
Now nothing bothers us. We proceed to loosen the drum, tension bolts with lugs, which are located on both sides of the wheel and are tightened with a bolt (axle), then carefully knock out the axle itself and take it out, after which we screw the nut back onto the bolt and put it in a clean box or cloth. We also put a spacer sleeve there. Do not forget that the threads are left-handed everywhere, that is, they unscrew clockwise.
The process of dismantling the axle of an IZH motorcycle
We remove the wheel by lifting it up and, slowly rocking it, moving it left and right out of the drum. The drum can be left on the suspension if it does not require any intervention.
Bearings
(use in motorcycles IZH-Yu, IZH-Yu2, IZH-Yu3, IZH-Yu5) On the website of the Tehnoprofsnab Company, in the section “Bearings (application)”, you will find information about the applicability of bearings in motorcycles, brands such as: IZH- Yu, IZH-Yu2, IZH-Yu3, IZH-Yu5. The information is presented in the form of tables, which indicate: Bearing designation, Bearing type, Bearing installation location, Quantity (in this unit). The brand of equipment is indicated at the top of the table. Follow the links below with a description of the model you are interested in.
Installing wheel bearings
Pressing the bearings is done in the reverse order, but there are some nuances here. You need to act more responsibly, since performance and durability will depend on how correctly you do everything.
- install the right bearing (having previously lubricated it with lithol-24);
Press in the first bearing. To do this, place an old unnecessary bearing on top of it and carefully hit it with a hammer (as in the figure below) Insert a spacer sleeve on the back side of the wheel
- install the left bearing and lubricate it well;
The process of pressing new bearings
- put the hub washer on and lock it, put on the retaining ring;