Timing tags moped alpha
Checking the timing belt by marks on the Delta EX 50
moped engine 1P39FMB (139FMB)
Comments from those interested:
Roman Khimchenko 2 weeks. reverse And if it doesn’t match WHAT to do
Vladimir Voronov 2 weeks. reverse Set it to match.
Vladimir Voronov 1 month ago This is nice. )) And of course there will be new videos, just wait a little.
Vladimir Voronov 1 month ago Yes! Another thing, don’t install two gaskets; it won’t make things any better; an increase in the combustion chamber will result in a drop in power.
Hunter38767 3 weeks reverse And if you have a 50cc head and a 72cc piston, then you need to change the head.
Hunter38767 3 weeks reverse Two gaskets are not allowed, look, the valves may be overtightened, unscrew the two caps on the head, and look at the gap, it should be 0.05 on the feeler gauge. But if they hit the piston, then there is no gap.
Sergey Vasiliev 1 month back Vadim, thank you, I read a lot of useful information, thank you, I will be glad to see new videos on alpha, I’m really looking forward to it
Arkady Novoselov 1 month back, well done, thank you for you!
Principle of operation
Twin Spark technology has a fairly simple operating principle. In a conventional 4-stroke engine, the operation of the valves is not specially controlled; they open simultaneously.
The Twin Spark engine has two camshafts rather than one, and the valves are controlled by one of them. When the intake valve opens, the exhaust valve closes and vice versa. The valve timing is thus shifted, resulting in less fuel consumption.
In addition, using two spark plugs provides advantages:
- Ignition of the mixture from both sides gives a more powerful effect. The torque increases significantly.
- The advance angle decreases because ignition can occur later. Therefore, when moving upward, the piston does not have to overcome the resistance of the fuel mixture, as in a conventional engine. The efficiency becomes higher, the engine does not have to overcome its own resistance near the “top dead center”.
The exhaust valve has a larger diameter than normal, which allows for more efficient ventilation of the combustion chamber. And at all stages of operation of such an engine, fuel consumption is much lower.
LITTLE BIG. FARADENZA (official video)
Subscribe
Opened 3 days ago
#128544; ANTI-POSITIVE RUSSIAN TOUR #128544; 19.10 Moscow vk.com/littlebig_stadium 26.10 St. Petersburg vk.com/littlebigice buy tickets here: www.littlebig.info/ 04.10 Surgut vk.com/littlebig_surgut 05.10 Tyumen vk.com/littlebig_tymen 06.10 Ekaterinburg vk.com/ekb_littlebig 09 .10 Izhevsk vk .com/littlebig18 10.10 Kazan vk.com/little_big_kzn 12.10 Nizhny Novgorod vk.com/little_big_nn 13.10 Kirov vk.com/little_big_kirov 15.10 Yaroslavl vk.com/club169324976 16.10 Ivanovo vk.com/club16932503 3 17.10 Cherepovets vk.com/littlebig_35 08.11 Krasnoyarsk vk .com/event169050668 09.11 Irkutsk vk.com/event169050994 11.11 Tomsk vk.com/littlebig_tomsk 12.11 Kemerovo vk.com/event169050627 13.11 Novosibirsk vk.com/littlebig_novosib 15.11 Barnaul vk.com/even t169050518 16.11 Omsk vk.com/littlebig_omsk2018 18.11 Chelyabinsk vk. com/littlebig74 11.19 Ufa vk.com/little_bigufa 20.11 Samara vk.com/littlebig_smr 22.11 Saratov vk.com/event169047067 23.11 Volgograd vk.com/event169048052 25.11 Rostov vk.com/event169048121 2 6.11 Krasnodar vk.com/event169048172 27.11 Voronezh vk.com /littlebig_vrn18
SCOOTER. ENGINE TIMING GEAR ASSEMBLY (50CC)
ATTENTION!
The cylinder head gasket is made of soft metal (copper, aluminum) and after tightening the cylinder head nuts it is deformed, thereby ensuring a tight connection. Reinstallation of the cylinder head gasket is not permitted. 2. Install the timing chain guide. 3. Install the cylinder head. 4. Set the piston to TDC according to the marks on the flywheel. This is usually the "T" mark on the flywheel. Align the mark with the tide on the engine crankcase.
ATTENTION!
The following operation is one of the most important when assembling the engine. It is important to align all the marks very accurately. An error in installing the chain even by 1-2 teeth will result in the engine not working correctly, and it will probably even lead to serious damage to the timing and cylinder-piston gas parts when trying to start the engine! 5. After making sure that the timing chain has not jumped off the drive sprocket on the crankshaft, install the camshaft into the cylinder head, at the same time putting a chain on its sprocket so that the marks on the camshaft sprocket are parallel to the plane of the edge of the cylinder head, and the cams are directed downward (inside the head).
6. Install the rocker arm support, orienting it according to the installation marks. Lubricate the cams and camshaft bearings.
On the rocker arm support are the letters “EX” - which means “EXHAUST” - release. The "EX" mark should be located above the exhaust valve.
ATTENTION!
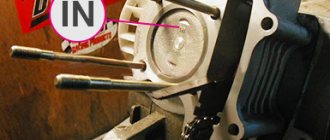
• Check the correct axial alignment of the camshaft (make sure that the camshaft bearings are correctly positioned on the beds). It is likely that on some scooter models there will be an “IN” - “INTAKE” - inlet mark on the holder. Accordingly, the “IN” mark must be located above the inlet valve.
ATTENTION!
If the copper washers are severely deformed (flattened), they must be replaced, since if the washers do not fit tightly due to oil leakage, the pressure in the lubrication system will drop and the motor will quickly fail. Sealing this connection with any sealant is unacceptable. 7. Install sealing copper washers on the studs. 8. Screw on all four cylinder head nuts without tightening them. 9. We recess the working rod of the timing chain tensioner inside the housing. 10. Reinstall the timing chain tensioner and tighten its mounting bolts.
11. Insert the working bolt and the timing chain tensioner spring, tighten it. In this case, you can hear characteristic clicks - the ratcheting mechanism of the tensioner working rod will be activated, which, under the influence of a spring, will come out of the housing and tension the timing chain.
12. Sequentially, crosswise tighten the cylinder head nuts in 3-4 steps. The final tightening torque is 10-15 Nm (More accurate values can be found in the repair instructions for the specific scooter model). 13. Screw in and tighten the additional cylinder head bolts. 14. Using a socket wrench for the central bolt of the flywheel, or with your hands holding the flywheel, slowly turn the engine crankshaft clockwise 3-4 turns to make sure that the timing timing is set correctly and the piston does not collide with the valves.
15. We install the crankshaft at TDC of the compression stroke and once again check the correct installation of the camshaft according to the marks.
16. Adjust the valve clearances (see). 17. Rotate the crankshaft several turns and once again check that the valve clearances are set correctly. 18. Install the cylinder head cover and tighten its bolts. 19. Place the crankcase ventilation hose onto the fitting in the cylinder head cover. 20. Install the cylinder cooling casing.
How to set the timing phase and what is ignition timing
Our VKontakte group In this video I will tell you how the ignition timing differs from. A LITTLE BIG: : com/littlebigbandofficial soundcloud: soundcloud.com/littlebigrussia vk: vk.com/littlebigband twitter: twitter.com/LITTLEBIG_BAND website: thelittlebig.com Send by email: Booking (Ru, USA): Booking (Europe): 33 608 815 807 Fabristi www.base-productions.com Music: Ilya Prusikin, We Love Lyrics: Ilya Prusikin, Alina Pasok, Eldar Dzharakhov LITTLE BIG production: Idea: Alina Pasok Script: Alina Pasok, Ilia Prusikin, Eldar Dzharakhov Director: Alina Pasok, Ilya Prusikin Co-director: Yuri Muzichenko Additional director: Alexander Pavlov Executive producer: Anastasia Antipova Line producer: Ekaterina Mironova Stylist and art director: Vadim Ksenodokhov Stylist assistant: Rada Sokolova Location: Dmitry Chernov Coordinator: Ivan Veselov Assistant: Eduard Gaisin, Roman Konshin , Ivan Savchenko Casting: Anastasia Antipova, Vasilisa Lubenko Actor coordinator: Vasilisa Lubenko MUAH: Masha Francisch Assistant Muah: Anna Sokolova Hairdresser: Svetlana Tilishevskaya Gaffer: Stas Gerasimov Lighting technician: Pavel Ilyuk, Igor Savchenko Editing: Alina Pasok, Ilya Prusikin Color: Dmitry Novikov VFX, CG: Maxim Semenov Sound design: Stas Kravets
Starring: Ilya Prusikin Sonya Taurskaya Polina Sokolova Zhenya Meck Nikita Gorin Tatyana Andriyanova Irina Grigorieva Marina Tsurkova Yulia Shelobugina Khachatryan Arthur Svetlana Deykun Camila Larisse Elena Lisenkova Nadezhda German Svetlana Ivanova Zoya Timofeeva Nikolay Goncharov Leonid Paranin Mikhail Simonov Valery Sizov Denis Makotra Anatoly Toporov Yuri Ivanov Technical equipment. Lenfilm
The ignition adjustment on the Alpha moped is carried out similarly to the Racer and Delta models, which in the vast majority are equipped with the same power units.
Many owners of these mopeds experience difficulties in this matter, since the specifics of the engines of Chinese mopeds are quite different from the usual Soviet and post-Soviet models.
Alpha's electrical system consists of:
The system itself operates on a single-wire principle: the power source is connected to the consuming node by only one wire , while the functions of the second are assigned to the metal parts of the moped and the steel frame itself.
When wondering how to set the ignition on an Alpha moped, motorcyclists act on two principles:
Correct ignition setting implies a symbiosis of both points. It is important, following all the technical requirements of the manufacturer, to adjust the operation of the starting system according to your personal needs. The exclusive use of manuals (even official ones) is problematic due to constant modifications of the electrical systems of models produced from the assembly line.
Anyone, even a beginner, knows that a precisely set ignition is the key to controllability and high dynamics of a vehicle. In the case of Chinese mopeds, namely Alpha, Delta and Racer, the manufacturer stipulates that the ignition is set exactly from the factory and cannot be adjusted. But in practice everything is somewhat different.
When and why to check the circuit
Manufacturers recommend checking every 1,000 kilometers. Under intense loads, if you have to travel hundreds of kilometers per day, inspection is required much more often. But by installing a high-quality chain, the motorcyclist will be able to reduce the number of checks.
Just by looking at the moped from the outside, it is not difficult for a specialist to determine if the chain is not tensioned correctly. Such an error when servicing a moped can lead to a break in the chain during a trip. Over-tightening occurs quite often and, despite the presence of lubrication, leads to accelerated wear of the chain. As a result, the suspension begins to work incorrectly. Over time, the hub may fail.
How to set timing marks on an alpha moped
Checking the timing belt by marks on the Delta EX 50 moped
engine 1P39FMB (139FMB)
Comments from those interested:
Roman Khimchenko 2 weeks. reverse And if it doesn’t match WHAT to do
Vladimir Voronov 2 weeks. reverse Set it to match.
Vladimir Voronov 1 month ago This is nice. )) And of course there will be new videos, just wait a little.
Vladimir Voronov 1 month ago Yes! Another thing, don’t install two gaskets; it won’t make things any better; an increase in the combustion chamber will result in a drop in power.
Hunter38767 3 weeks reverse And if you have a 50cc head and a 72cc piston, then you need to change the head.
Hunter38767 3 weeks reverse Two gaskets are not allowed, look, the valves may be overtightened, unscrew the two caps on the head, and look at the gap, it should be 0.05 on the feeler gauge. But if they hit the piston, then there is no gap.
Sergey Vasiliev 1 month back Vadim, thank you, I read a lot of useful information, thank you, I will be glad to see new videos on alpha, I’m really looking forward to it
Arkady Novoselov 1 month back, well done, thank you for you!
We repair the following Alfa Romeo 147 engine models
2000-2010
- Alfa 147 3 DOORS 1.6 TS (105), Mechanical, 1598 cc, 105 hp.
- Alfa 147 3 DOORS 1.6 TS (120), Mechanical, 1598 cc, 120 hp.
- Alfa 147 3 DOORS 1.9 JTD (101), Mechanical, 1910 cc, 101 hp.
- Alfa 147 3 DOORS 1.9 JTD (115), Mechanical, 1910 cc, 115 hp.
- Alfa 147 3 DOORS 1.9 JTD (140), Mechanical, 1910 cc, 140 hp.
- Alfa 147 3 DOORS 1.9 JTD (150), Mechanical, 1910 cc, 150 hp.
- Alfa 147 3 DOORS 2.0 TS (150), Mechanical, 1970 cc, 150 hp.
- Alfa 147 3 DOORS 3.2i V6 (250), Mechanical, 3179 cc, 250 hp.
- Alfa 147 5 DOORS 1.6 TS (105), Mechanical, 1598 cc, 105 hp.
- Alfa 147 5 DOORS 1.6 TS (120), Mechanical, 1598 cc, 120 hp.
- Alfa 147 5 DOORS 1.9 JTD (101), Mechanical, 1910 cc, 101 hp.
- Alfa 147 5 DOORS 1.9 JTD (115), Mechanical, 1910 cc, 115 hp.
- Alfa 147 5 DOORS 1.9 JTD (140), Mechanical, 1910 cc, 140 hp.
- Alfa 147 5 DOORS 1.9 JTD (150), Mechanical, 1910 cc, 150 hp.
- Alfa 147 5 DOORS 2.0 TS (150), Automatic, 1970 cc, 150 hp.
- Alfa 147 5 DOORS 2.0 TS (150), Mechanical, 1970 cc, 150 hp.
LITTLE BIG. FARADENZA (official video)
Subscribe
Opened 3 days ago
#128544; ANTI-POSITIVE RUSSIAN TOUR #128544; 19.10 Moscow vk.com/littlebig_stadium 26.10 St. Petersburg vk.com/littlebigice buy tickets here: www.littlebig.info/ 04.10 Surgut vk.com/littlebig_surgut 05.10 Tyumen vk.com/littlebig_tymen 06.10 Ekaterinburg vk.com/ekb_littlebig 09 .10 Izhevsk vk .com/littlebig18 10.10 Kazan vk.com/little_big_kzn 12.10 Nizhny Novgorod vk.com/little_big_nn 13.10 Kirov vk.com/little_big_kirov 15.10 Yaroslavl vk.com/club169324976 16.10 Ivanovo vk.com/club16932503 3 17.10 Cherepovets vk.com/littlebig_35 08.11 Krasnoyarsk vk .com/event169050668 09.11 Irkutsk vk.com/event169050994 11.11 Tomsk vk.com/littlebig_tomsk 12.11 Kemerovo vk.com/event169050627 13.11 Novosibirsk vk.com/littlebig_novosib 15.11 Barnaul vk.com/even t169050518 16.11 Omsk vk.com/littlebig_omsk2018 18.11 Chelyabinsk vk. com/littlebig74 11.19 Ufa vk.com/little_bigufa 20.11 Samara vk.com/littlebig_smr 22.11 Saratov vk.com/event169047067 23.11 Volgograd vk.com/event169048052 25.11 Rostov vk.com/event169048121 2 6.11 Krasnodar vk.com/event169048172 27.11 Voronezh vk.com /littlebig_vrn18
To change or not to change?
Suppose you are overhauling your engine: changing oil seals, crankshaft, gaskets and other devices, but you doubt whether to replace the timing chain with a new one or not. If you have any doubts, change it for a new one at the first opportunity. And now I will explain why.
See for yourself: a chain has an average service life of approximately 18,000-20,000 km of a scooter (personal experience), approximately the same as the average service life of the engine itself. And for example, after driving 6,000 km, the crankshaft jammed or the engine leaked, or something else happened that requires complete disassembly of the engine. Naturally, you disassemble the engine, replace the crankshaft with a new one, and leave the chain, which by that time has exhausted a third of its service life.
And what happens? The chain, after 12,000 km, will exhaust its service life and become unusable, but the crankshaft and other parts will be in good order and whether you like it or not, you will have to halve the engine again, because of the chain alone. Is it necessary? The chain is a consumable. Never skimp on it!
Personally, I never check timing chains. I simply throw them in the trash, no matter how awesome they seem to me. A chain is a consumable item for me, just like a spark plug, oil or oil seal. But if you are important, or money is tight, you can use the old fashioned way.
How to set the timing phase and what is ignition timing
Our VKontakte group In this video I will tell you how the ignition timing differs from. A LITTLE BIG: : com/littlebigbandofficial soundcloud: soundcloud.com/littlebigrussia vk: vk.com/littlebigband twitter: twitter.com/LITTLEBIG_BAND website: thelittlebig.com Send by email: Booking (Ru, USA): Booking (Europe): 33 608 815 807 Fabristi www.base-productions.com Music: Ilya Prusikin, We Love Lyrics: Ilya Prusikin, Alina Pasok, Eldar Dzharakhov LITTLE BIG production: Idea: Alina Pasok Script: Alina Pasok, Ilia Prusikin, Eldar Dzharakhov Director: Alina Pasok, Ilya Prusikin Co-director: Yuri Muzichenko Additional director: Alexander Pavlov Executive producer: Anastasia Antipova Line producer: Ekaterina Mironova Stylist and art director: Vadim Ksenodokhov Stylist assistant: Rada Sokolova Location: Dmitry Chernov Coordinator: Ivan Veselov Assistant: Eduard Gaisin, Roman Konshin , Ivan Savchenko Casting: Anastasia Antipova, Vasilisa Lubenko Actor coordinator: Vasilisa Lubenko MUAH: Masha Francisch Assistant Muah: Anna Sokolova Hairdresser: Svetlana Tilishevskaya Gaffer: Stas Gerasimov Lighting technician: Pavel Ilyuk, Igor Savchenko Editing: Alina Pasok, Ilya Prusikin Color: Dmitry Novikov VFX, CG: Maxim Semenov Sound design: Stas Kravets
Starring: Ilya Prusikin Sonya Taurskaya Polina Sokolova Zhenya Meck Nikita Gorin Tatyana Andriyanova Irina Grigorieva Marina Tsurkova Yulia Shelobugina Khachatryan Arthur Svetlana Deykun Camila Larisse Elena Lisenkova Nadezhda German Svetlana Ivanova Zoya Timofeeva Nikolay Goncharov Leonid Paranin Mikhail Simonov Valery Sizov Denis Makotra Anatoly Toporov Yuri Ivanov Technical equipment. Lenfilm
Checking the timing belt by marks on the Delta EX 50 moped
Roman Khimchenko 2 weeks. back
And if it doesn’t match WHAT to do
Vladimir Voronov 2 weeks. back
Set it to match.
Valentin Sidorov 1 month ago
Thank you for the video. Everything is described carefully and clearly, in Russian. If you continue to make videos like this, I will be all for it!
Vladimir Voronov 1 month ago
It's nice. )) And of course there will be new videos, just wait a little.
Danil Pugachev 1 month ago
Vladimir Voronov 1 month ago
Yes! Another thing, don’t install two gaskets; it won’t make things any better; an increase in the combustion chamber will result in a drop in power.
Danil Pugachev 1 month ago
Hunter38767 3 weeks back
And if you have a 50cc head and a 72cc piston, then you need to change the head.
Danil Pugachev 1 month ago
Hunter38767 3 weeks back
You can't have two gaskets, look, the valves may be overtightened, unscrew the two caps on the head, and look at the gap, it should be 0.05 on the feeler gauge. But if they hit the piston, then there is no gap.
Sergey Vasiliev 1 month ago
Vadim, thank you, I read a lot of useful information, thank you very much, I will be glad to see new videos on alpha, I’m really looking forward to it
Arkady Novoselov 1 month ago
well done thank you for you!
Danil Pugachev 1 month ago
Alpha 110 (Timing chain replacement)
Foam filter for Digital Temperature Indicator.
Alpha 110 (Changing the timing chain)
They brought a moped
(Alpha 110) with a complaint about a knocking noise in the engine, as it turns out it is
the timing chain
. Foam rubber.
Vladimir Voronov 1 month ago
Guys, check if the piston is installed correctly, there are recesses on the piston for the intake and exhaust valves, a large recess where it says IN is for the intake valve, i.e. the larger one is undercut upwards. You may have turned the piston back. Check it out!
Danil Pugachev 1 month ago
Danil Pugachev 1 month ago
Danil Pugachev 1 month ago
Vladimir Voronov 1 month ago
It is unlikely that the piston was defective! Maybe they forgot the gasket between the head and the cylinder, the fit has become lower and the piston is reaching the valves, or maybe the chain has flown off the damper and makes such a sound, or you can really feel it when you turn the generator and it jams. Maybe you missed something??
We repair the following Alfa Romeo 147 engine models
2000-2010
- Alfa 147 3 DOORS 1.6 TS (105), Mechanical, 1598 cc, 105 hp.
- Alfa 147 3 DOORS 1.6 TS (120), Mechanical, 1598 cc, 120 hp.
- Alfa 147 3 DOORS 1.9 JTD (101), Mechanical, 1910 cc, 101 hp.
- Alfa 147 3 DOORS 1.9 JTD (115), Mechanical, 1910 cc, 115 hp.
- Alfa 147 3 DOORS 1.9 JTD (140), Mechanical, 1910 cc, 140 hp.
- Alfa 147 3 DOORS 1.9 JTD (150), Mechanical, 1910 cc, 150 hp.
- Alfa 147 3 DOORS 2.0 TS (150), Mechanical, 1970 cc, 150 hp.
- Alfa 147 3 DOORS 3.2i V6 (250), Mechanical, 3179 cc, 250 hp.
- Alfa 147 5 DOORS 1.6 TS (105), Mechanical, 1598 cc, 105 hp.
- Alfa 147 5 DOORS 1.6 TS (120), Mechanical, 1598 cc, 120 hp.
- Alfa 147 5 DOORS 1.9 JTD (101), Mechanical, 1910 cc, 101 hp.
- Alfa 147 5 DOORS 1.9 JTD (115), Mechanical, 1910 cc, 115 hp.
- Alfa 147 5 DOORS 1.9 JTD (140), Mechanical, 1910 cc, 140 hp.
- Alfa 147 5 DOORS 1.9 JTD (150), Mechanical, 1910 cc, 150 hp.
- Alfa 147 5 DOORS 2.0 TS (150), Automatic, 1970 cc, 150 hp.
- Alfa 147 5 DOORS 2.0 TS (150), Mechanical, 1970 cc, 150 hp.
How to correctly set timing marks on an alpha moped. The only video that tells everything. —
How to correctly set timing marks on an alpha moped. The only video that tells everything. If it helps, thumbs up. After I surfed YouTube and realized that no one explains how to set the timing marks correctly, watch my video. Alpha 72cc with transition to 90cc. max speed 85 km/h 9 thousand according to tachometer 13/41
scooter repair. creation of motorcycle projects. inventions. tests. culibinization. service. Video reviews. Test Drive. scooter repair. creation of motorcycle projects. And
A little about spark plugs and chain tensioners from personal experience. It will be useful for those who often clean spark plugs from carbon deposits, as well as for those who like to put a bunch of washers and ha
VK group-https://vk.com/public117276594 soon there will be rides, reviews, and more repairs..
In today's lesson we will tell you about setting up the carburetor on the Alpha The WinDay Show moped VKontakte: https://vk.com/thewindayshow
Foam filter for Alpha moped https://goo.gl/MF6F3b Digital Thermometer 1 - http:/
How to install the cylinder and adjust the timing chain correctly
alpha tensioner repair 149 fmb
Our VKontakte group https://vk.com/club97862391 In this video I will tell you how the ignition timing differs from the timing phase (since many people confuse this) and show you how
Repair of a Chinese moped. There was a strong knocking sound in the engine.
Design features
Alfa Romeo for the second generation Twin Spark engines prescribed replacement of spark plugs every 100,000 km. In this case, it is necessary to change both spark plugs, and not just the large ones.
The second generation Twin Spark, unlike its predecessor, is equipped with a timing belt. Initially, replacement was recommended after 100,000 km, but subsequently the interval was reduced to 60,000 km. The reason is premature wear of the belt and its breakage.
The smaller 1.4, 1.6 and 1.8 liter versions have only one belt driving both camshafts. The two-liter version received two additional balancer shafts, which have their own, narrower belt. Mechanics call it a “time bomb.” Although the manufacturer prescribes replacing the belt every 120,000 km, it is still better to update it after 60,000 km. There have been cases where the balancer shaft belt breaks and then gets caught under the main timing belt. As a result, the valves met the pistons.
Only 1.4-liter engines and a weak 1.6 version with a return of 105 hp. did not use a variable valve timing system. All other units were equipped with a phase regulator (variator) of the intake camshaft.
How to adjust valves on an Alpha moped: instructions
Advantages of the Alpha moped engine
The Alpha moped has a motor - an exact copy of the engine produced by Honda for many years. The scheme, worked out over the years, works on the Honda Supe Cub, on the Monkey, Gorilla and Jazz models. They performed inhumane experiments on this engine, pouring sunflower oil instead of motor oil. There was a slight smell of roasted sunflower seeds, but the engine was running. This video is very popular among owners of any equipment that has such a motor. The Chinese motorcycle industry has spoiled almost nothing. If you monitor the condition of the moped in general and the motor in particular, the equipment will last quite a long time.
Internal structure of the Alpha moped engine
Proper Engine Maintenance
When purchasing a new Alpha moped, after a thousand kilometers of gentle mileage, you need to change the oil and adjust the valves. The engine parts have become accustomed to each other, the excess has been scraped off and now the unit can be returned to normal operating modes. Semi-synthetic oil is quite suitable, this engine does not rev high, and valve adjustment is a necessary maintenance item for any moped and even motorcycle.
What happens in the motor?
During engine operation, thermal expansion of all parts and valves occurs. If the valve clearance is greater than the nominal one, the shock loads on the entire gas distribution mechanism will increase and, ultimately, it will fail. When the gap is larger than required, such a roar is heard from the engine that it will be impossible to ignore it. If the gap is smaller, then the valves will simply tighten due to thermal expansion and stop opening. The moped will not start. It is worth watching a video once about the principles of operation of a four-stroke engine to understand how the moped works and how to adjust it. You can make a video yourself showing the process of setting up the engine of the Alpha moped.
Customization Tools
So, how to adjust the valves on an Alpha moped? What is needed for this? It is necessary to provide access to the adjustment mechanism. There are two small hexagonal caps in the engine head, on top, there are the intake valves, and on the bottom, towards the exhaust pipe, there are the exhaust valves. Adjusting the intake valves is easier, everything is visible. When removing the lids, do not lose the rubber ring that seals them. And in order to adjust the exhaust valves, if there is no lift, it will be more convenient to place the moped on its left side. You will need a special square wrench for the adjusting screw and an eleven wrench for the locknut. Feeler gauges for measuring gaps.
How is the adjustment done?
You can preview some video on this topic. The gap is measured between the top of the valve and the adjusting screw. We take the dipstick that says “0.05”. We loosen the nut, and, placing the feeler gauge under the bolt, use a special four-sided wrench to adjust the gap until the tip of the bolt easily touches the feeler gauge. If the dipstick comes out with little effort, the gap is smaller than necessary.
The first time it is quite difficult to feel the necessary effort. And each time, you will need to start the moped to understand how the adjustment went. But over time the skill will develop. Typically, the valve clearance at the intake is smaller than at the exhaust. This is due to the fact that the exhaust valves heat up more due to the temperature of the exhaust gases. But in this motor the clearances are the same and easy to remember.
Additional tool
In the standard set of tools for the Alpha moped there is no special key to adjust the gas distribution system of the moped. It is customary to contact specialists with this question. If you plan to thoroughly maintain your moped, you should get one. Also on the list of useful wrenches and accessories is an alternator puller and a castle wrench for unscrewing the clutch castle nut.
When handling any equipment, production culture is important. If you do not carry out all the work with a hammer and chisel, the moped will serve faithfully for many years.
Twin Spark from different manufacturers
Alfa Romeo model range
Initially, this technology was used in racing cars, mainly by the Alfa Romeo brand, as the owner of the development. Over time, this company moved to the Fiat Group, and Twin Spark was introduced into budget cars of the Fiat brand. This provided decent power with a small volume. In addition, environmental requirements have become more stringent, and this technology solved the problem well.
In recent decades, cars have on-board computers that make it possible to control many processes by software and simplify many components. Therefore, Twin Spark technology has experienced a new birth - electronic control has made it possible to transfer it from the category of expensive to the category of affordable. Today it is found in Mercedes, Honda and Aston Martin cars.
But at the moment this technology is already outdated and is not used in new models. The direct injection system is considered more promising and is becoming increasingly widespread.
Adjusting valves on an Alpha moped. Moped "Alpha"
Why do you need valve adjustment on an Alpha moped? The engine of the FMB 139 moped is equipped with a gas distribution mechanism with the camshaft located in the cylinder head. The valves are driven by rocker arms. During engine operation, the valves experience thermal expansion, so a small gap is provided between the rocker arm and the valve to compensate for thermal expansion. Insufficient or excessive clearance may cause serious engine damage.
The negative effect of incorrect clearances accumulates gradually and can cause valve burnout, seat destruction, decreased compression, overheating and deformation of important timing components. Adjusting the valves on the Alpha moped should be done several times a season. If the thermal clearances are set incorrectly, a characteristic knocking sound may appear when the engine is running, which is also a reason for adjusting the valves.
Alfa moped engine FMB 139
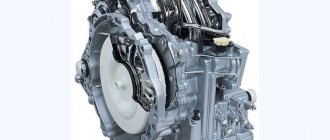
The FMB 139 four-stroke engine is one of the main advantages that the Alpha moped has. A photo of the engine is shown above. This is a very reliable and economical lightweight engine. Its volume can vary from 49 to 125 cm3, and its power can range from 5 to 8 hp. Modifications of this engine may have different cylinder volumes. You can install a more or less powerful version of the cylinder-piston group at home. The engine is equipped with a four-speed gearbox. Above it is the carburetor of the Alpha moped.
The gas distribution mechanism of the FMB 139 engine is equipped with a camshaft located in the cylinder head. The valves are arranged vertically and V-shaped and are driven by a rocker arm, which in turn is driven by the camshaft lobes. This system is very similar to the Moskvich 412 timing belt, only there is only one cylinder and two valves.
The camshaft is driven by a chain drive. It, in turn, is driven by a gear located on the axis of the generator rotor, which is the axis of rotation of the crankshaft.
Prevention of timing belt and consequences of its breakdown
All timing elements of the FMB 139 engine require periodic and constant checking of their degree of wear. Stretching of the timing chain and wear of its tension elements can lead to its breakage, which will require quite a troublesome repair associated with the need to remove the generator rotor, or disassembling the entire crankcase to replace the oil pump gear. In addition, a broken timing chain can cause deformation of the valves, which will require their replacement and grinding of new valve plates onto the seats. Failure of individual timing elements can cause a number of other serious breakdowns.
Signs of improper valve adjustment
If the thermal gaps are too large, this can cause a characteristic knocking or ringing sound that occurs when the engine is running. Loss of compression can also be an indirect consequence of improper valve adjustment. Indirect consequences of incorrect valve settings may be an increase in fuel consumption with a decrease in power due to depressurization of the valves, as well as loss of synchronization of their operation, when the operation of the valves begins to advance or lag behind the piston operation cycles.
Valve design and grinding in
The valves on the Alpha moped are made according to the same design as for the car. They have a plate and a rod that elongates due to thermal expansion when the engine operates. The normal gap should be 0.05 mm. When the valves warm up, the thermal gap almost completely disappears. The valve plates fit tightly into the seat, and their edges must be perfectly ground to the edges of the seat. Grinding in valves on a moped is no different from a similar operation for car engines and is done using the same paste manually or mechanically using a drill. To remove the valves from the FMB 139 cylinder head, a special tubular puller is used.
Negative consequences arising from incorrect valve settings
The pusher on the rocker arm should press on the valve, but as the thermal gap increases, it begins to hit the valve, which causes a characteristic ringing knock when the engine is running. This can lead to accelerated wear of critical engine components. The valve plate begins to hit the seat harder, which causes defects to appear on the edge of the seat and valve. At high temperatures, the surfaces of the edges in places of minor deformations begin to burn and cease to fit tightly to each other. The tightness is lost, hot combustion products break through the valve and destroy the surface of the edges even more. The valve overheats, and in some cases both the seat and the valve itself begin to fragment, small fragments of which enter the combustion chamber, scratching the piston and cylinder walls.
In the absence of a thermal gap, the exhaust valve suffers first. Its operating cycle is extended, which leads to overheating and melting of its edges. If the valve is overtightened, it may stop closing altogether. During operation, the size of the thermal gap usually increases, which is the reason for the need for regular checks of this value.
Adjusting valves on an Alpha moped
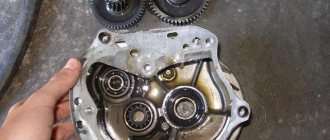
The valves on the FMB 139 engine are located at the top and bottom of the cylinder head. To get to them, you need to unscrew the covers. Adjusting valves on a moped does not require removing the entire head. But you need to set the cylinder to dead center. To do this, there is a hole on the top of the generator rotor cover, which in turn is closed by a plastic cover. By unscrewing it, you can see the generator housing with marks on it. Using a kick starter, you can carefully rotate the generator rotor until the “T” mark appears. The same operation can be performed using a wheel. The moped must be placed on the center stand, engage fourth gear and carefully turn the wheel until the “T” mark appears in the inspection hole.
To accurately control this process, you can remove the cover from the timing sprocket block, which is located on the left side of the cylinder head. This star has a mark in the form of a dot. If this mark is in the extreme left position, it will mean a dead center. After installing the cylinder at the dead center, the valves on the Alpha moped can be adjusted. You need to loosen the locking nut and pusher. Then you need to insert a 0.05 mm feeler gauge between the pusher and the valve stem, manually tighten the pusher, but so that the feeler gauge can be removed. Then the position of the pusher must be strengthened with a locking nut.
Source
Replacing fluids and belts logbook Chevrolet Spark 0.8 Mechanics 2005 on DRIVE2
Alfa Romeo Brera
Over the weekend we went to the service center for a scheduled replacement of both liquid and other consumables. With this replacement of all fluids, the car was completely switched to Liqui Moly products. Only manual transmission remains.
Changed the oil. Liqui Moly leichtlauf special AA 5W-30 oil was purchased a little earlier, and 0.7 l was left over from Goetz. This is the last time the oil was added. The manufacturer changed the additive package for Euro-4, but it does not last long with our fuel. In the future we will switch to Liqui Moly Special Tec LL 5W-30.
Leichtlauf special oil AA 5W-30
We always use Mando MOF4476 oil filter. Inexpensive and high quality filter.
Mando MOF4476
We replaced the power steering fluid for the first time in 9 years. Since the operating instructions indicate Dexron IIE or IID, then the analogue from Liqui Moly is Top Tec 1100. Just a liter of liquid.
Liqui Moly Top Tec 1100
Liqui Moly DOT 4
We replaced the antifreeze with Liqui Moly KFS 2001 plus. Like the original one, it is also red. System volume 4l.
antifreeze KFS 2001 plus
Before changing the oil and antifreeze, special Liqui Moly flushes were poured into the systems. An effective oil system cleaner for the engine, and a cooling system cleaner for the radiator.
both flushes
The cooling system was flushed twice with distilled water. The liquids were all gone, then all external drive belts and the timing belt were replaced. All belts are still original from the factory. In the summer I removed the cover and inspected the timing belt. It didn't look bad at all. But the rubber ages and hardens, so we decided to replace it.
original timing belt
The timing belt was taken from contitech
Contitech CT910
Optimal 0-N973
Replaced roller tension spring
spring 94580140
The power steering and air conditioning belt 4pk910 is original GM 96239401. The old belt was already very dry and oaky.
power steering and air conditioning belt 96239401
But I made a mistake with the generator belt. The 0.8l engine has a 3PK665 belt, and I took a 4PK665 for the liter engine. They didn’t change it, because... The original one is still fine, no cracks. So I’m thinking about cutting off one stream from it and installing it later.
The length is the same, the sizes of the streams are the same, why not. I'll make a device and cut it off. We replaced the rubber bushings at the ends of the stabilizer bar. The ones in the levers. I ordered by number 96380586, but they received analogues from Suzuki 42451-70B00.
bushings 96380586
analogue 42451-70B00
And cotter pins.
cotter pins 94535757
clamp 96434270
We checked, cleaned the rear drum brakes and tightened the handbrake.
This maintenance was the most expensive so far, both in terms of money and time.