MY MOTORCYCLE
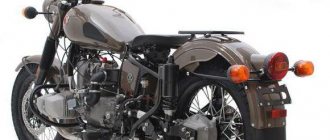
It is hardly possible to surprise anyone today with a disc brake on Ural motorcycles. Of course, this only applies to newer models! But if you try, you can put something on the old man. I want to tell you a little about the disc brake circuit. The info may be a little outdated, but it might be useful:
Currently, two modifications of the front wheel brake have been developed - single-disc and double-disc. The first modification is intended for a single motorcycle, and the second for a sidecar version. Although there may also be a second option on a single person.
In both cases, the design is as unified as possible - the only difference is in the design of the disks and in the methods of attaching them to the wheel. To simplify the design and to avoid complications in the technological process, the brake disc in the single-disc version is installed on the wheel instead of the drum brake pads, while the wheel does not change. A scheme is also provided with a change in the design of the wheel hub, but it is unknown (to me personally) whether it will be used or not. In the version with two discs, the wheel receives a completely updated hub. Let's take a look at the design of a double-disc brake:
Front wheel double disc brake design; 1 - main cylinder; 2 — drive lever; 3 — connecting hoses; 4 - tee; 5 — bracket with pistons; 6 — compound brake disc; 7 — wheel hub; 8 — front fork: 9 — wheel axle; 10 - wheel.
It consists of a master cylinder located on the right handlebar, brake calipers mounted on the movable pipes of the front fork, three hoses and a connecting tee. The design is simple and reliable. Its operating principle is as follows: when the driver presses the lever, the piston of the master cylinder creates pressure, which acts on the brake calipers. The pressure in the system is proportional to the force on the lever: the intensity of braking depends on it. If the lever is released, the piston returns to its original position. The brackets have a so-called “floating” design. When the pressure in the system increases, the piston located in the caliper presses on the brake pad, which rests on the disc. However, the “floating” bracket begins to move to the side and moves the second pad, which, after removing the gap, also rests against the disc, thus beginning the braking process. The gap between the discs and pads always remains constant, regardless of the wear of the latter. Maintenance comes down to replacing worn pads and checking seals. After replacing the pads, sometimes you have to remove air from the system - “bleed” it. I think the robot with this is no different from passing air on foreign cars. And there is plenty of this information on the Internet.
Brake disc assembly for installation instead of a brake drum: 1 - disc; 2 — protective cover; 3 — support bushing; 4 - toothed disc hub; 5 - bearing; 6 - special bolt.
A few words about the design of brake discs. In the single-disc brake version, the disc is made one-piece and ventilated. With a double-disc brake, the hub design has undergone significant changes, and the discs are made of composite parts.
1. Double disc brake of the front wheel. 2. Tee for hydraulic brake drive.
Source
Messages [1 to 20 of 56]
1↑ Topic from Roma 04-08-2013 17:28:59
- Roma
- Uralomaniac
- Inactive
- Name: Roman
- From: Shentala, Samara region.
- Registered: 23-10-2012
- Messages: 6 104
- Reputation: 498
- Motorcycle: Ural IMZ 8.103-10
Topic: Setting up the brakes of the Urals.
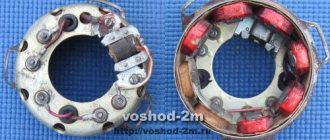
I'll tell you how I set up the brakes. I’ll take my motorcycle specifically as an example. Attention! The degree of pad wear affects the tuning. So. We hang up the rear wheel. We begin to tighten the brakes. To “pull” the rear brake, there is a brake actuator on the gearbox. To tighten the brake you need to turn this nut. To tighten it you have to twist it. The nut is on the bottom, on the long brake drive that goes to the pedal.
Check the tightness by pressing on the brake pedal. If the pedal goes too far down, tighten it more. If the pedal is pressed a little and the wheel is already wedged, loosen it. Then we press the pedal all the way and try to turn the wheel with our hands. If it doesn't work out, good. If you have turned it, we tighten it. At the end of the setup, I start the motorcycle, roll back to the gate, take off, and brake, thereby checking how the brakes work. If the motorcycle stops immediately, then good. We roll out and roll, do not accelerate too much at first. About 20 mph is enough. We gain 20 km and slow down. If when you press the pedal all the way, the motorcycle goes into a skid, then everything is fine. Speed up to 60 and check. When you press the pedal to 50% of its travel, the motorcycle should not skid. When braking, try not to skid. I know from myself that on a bicycle, or on a car, it is better to jerk off the pedal, braking jerkily, or brake so that it would be on the verge of skidding. The front brake is adjusted in the same way. Only it doesn’t have a pedal, but a handle on the right side of the steering wheel. The main thing is to use the front brake correctly! Yuz is not allowed. Otherwise fall. When you have adjusted the brakes, before adjusting, you need to set the brake pedal correctly. On the pedal axis there are slots on which the “slide” is fitted, to which the brake “drive” is attached. You need to adjust the brakes and put the pedal so that it rests on the footrest. That's it. It's simple. On the inside of the frame, on the pedal axis, this “scene” is placed and tightened with a nut. We unscrew the nut, remove the “link” and lift the pedal all the way up. We put everything back and screw it on. You can pull out the pedal and lubricate it with salidol, for example. Or azmol. And put it back together. Lubrication will allow the pedal to rotate easily.
Edited by Roma (04-08-2013 20:59:08)
Disc brake for the Urals
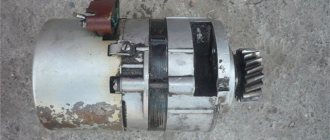
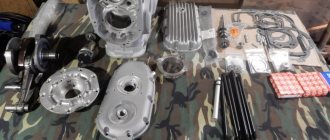
So I’m ready to write another post. For some reason, inspiration (if you can call it that) attacks me exclusively at night, but let’s not talk about it... Everyone knows what stock brakes are in the Urals, especially the front ones. I understand that with proper adjustment they should brake, but either my hands are in the wrong place, or the wheel drum was already worn out, no matter how I adjusted or adjusted the pads, it absolutely refused to brake. Instead, when you pressed the lever hard, the brake cable was pulled out (the shirt was compressed, to be more precise). Having suffered quite a bit with it, I thought that I should install the disk. I don’t know why, I don’t remember now, but I decided not to grind the hub from scratch, but to disassemble the original “drum” hub, and instead of the drum put in something like an adapter, which I would grind at a turner. “This is the beginning,” I thought and went to local stores to look for a brake disc. I came across this copy from the Middle Kingdom, I don’t remember where from, it seemed to be from Cobra, but along with it I bought the entire brake circuit assembly.
I disassembled the hub, cut off a piece of the brake drum on which the pads are attached, in order to subsequently pull the bushing out onto the axle, and began drawings.
On the left is the original hub, on the right is the adapter that is put on it and attached to the drum mounting holes.
This is the kind of crap that should have turned out according to my calculations. I took out a steel blank, took it to a turner at our factory, and picked up the finished product the next day.
I drilled all the holes in the garage using a drill. I marked the holes using my own drawing, printing it 1:1, cutting out the necessary parts and placing it on the workpiece.
(working hours)
I assembled it to see what it would all look like...
I took the original rim from the same wheel from which I took the hub apart. I cleaned the paint off so much that it was a pity to even paint it)
Well, the hub is ready, and it even looks pretty good.
The assembled wheel looks even more beautiful)
However, together with the tire, the disk looks somehow small...
Next I started making the caliper mounting plate. On one side it is put on the wheel axle, and on the other it is attached to the reaction rod, which went to the brake drum. To do this, the thrust had to be shortened. A few photos of the working process...
And so, after several hours of fitting and fitting, the caliper was installed...
Well, then I decided to paint the mounting plate and wheel boot.
And everything seemed fine, but when I started pumping the brakes, it turned out that this caliper was leaking, an infection. The cuffs are poisoning the brakes. When I disassembled the caliper and put these cuffs on the piston, they fell freely on it and the gap was about a millimeter. We don't have repair kits in the city. Order on the Internet... I don’t know what to order, I don’t know exactly what this caliper is from, and it doesn’t seem to have a name. Therefore, I bought rings of suitable diameter from a rubber shop, installed them and everything is fine (despite the fact that the caliper cuffs have a square profile, and the rubber bands that I bought are round).
Here are a couple of photos of the fully attached caliper.
How to summarize... The brakes make me happy, now I’m no longer afraid of pedestrians who unexpectedly run out onto the road)
Source
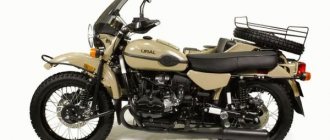
How to ride with a stroller
The purpose of this material is not to make you an experienced “wheelchair rider”, but rather to simply give you the idea that this vintage way of operating a motorcycle also has a right to exist and can be fun. Try it, maybe you'll like it?
For most motorcyclists, their first experience with a sidecar is even less inspiring than their first sexual experience. And the better you are at riding a two-wheeled motorcycle, the more disappointment you can experience, because when riding with a sidecar, all your automatic control skills stop working! A classic plot - an experienced motorcyclist gets behind the wheel, takes off, during the first 100 meters flies into the bushes or falls into a ditch, gets out of there and says: “Hear, Harley, never, never. “And it results in moral trauma for life. To get on and ride, you need to forget the skills of driving a regular motorcycle and relearn.
The second deterrent factor is the presence of motorcycles with sidecars that miraculously survived from the times of socialism, which are in terrible technical condition, do not correspond to the realities and pace of modern road traffic, and when they appear sinusoidally on the highway, they cause a feeling of anxiety for the driver driving them. In fact, they, too, could drive smoothly, predictably and safely, if not for broken wheel bearings, incorrect adjustments of wheel alignment and braking forces on the stroller wheel, non-functioning steering dampers, and crooked wheels with never pulled spokes.
But you still decided to try. What should you remember?
When riding a motorcycle with a sidecar, it is very important not to forget about the presence of a sidecar. It is difficult to immediately feel the size protruding to the right on a subconscious level. You have to constantly control yourself so as not to hit the garage cooperative gates, parked cars, the side of the road, or the car you are overtaking. Having a passenger in the stroller screaming loudly in fear helps to gain a sense of reality and increases the level of riding safety, so it is better to put one passenger in the stroller rather than in the back seat.
Unfortunately, geometry is an exact science, and the motorcycle will behave differently in left and right turns. In the left ones, he rests on the stroller wheel and is stable to some extent, but in the right ones, very early he begins to hang the stroller wheel in the air, trying to tip outward. This is another reason to put a passenger in a stroller - if you load it more, the hanging occurs later, and the right turn can be taken at a higher speed. Don’t be shy about working with your body, “hanging” inside the turn, and force the passenger to help you - this has a positive effect on the dynamics of movement in space.
If, in a left turn, the rear wheel of the motorcycle begins to leave the ground, then straighten the trajectory slightly (take it to the right) and use the foot brake. Trying to brake sharply with the front will help you roll forward. In a right turn, the algorithm is similar - take it a little to the left, but you can already use both brakes, most importantly, gently.
On a flat, slippery surface, a motorcycle with a sidecar easily and predictably goes into a controlled skid and allows you to enjoy the Siberian Drift. Difficulties can arise on uneven surfaces - if the outer wheel hits a bump during a skid, the motorcycle will begin to flip over this bump, throwing the rider and passengers into the air, as in a classic highside.
Riding with a sidecar wheel hanging in the air is undoubtedly harmful to the motorcycle, because it quickly kills the wheel bearings and suspension of the motorcycle, but it is useful in terms of a sense of balance, suppressing the fear of capsizing, gaining control over the behavior of the motorcycle on the road and confidence when making right turns. You understand at what speeds and turning radii the rise begins, what impulses are required to stop it and smoothly lower the wheel to the ground. You need to learn how to ride like this, but you don’t have to ride like this all the time. Aerobatics is to hang the wheel and ride in a counter-clockwise circle, leaning to the left and touching the asphalt with the knee slider, MotoGP style.
Correctly adjusting the wheel alignment of a sidecar in relation to a motorcycle is a delicate science. The values recommended in the motorcycle manual are based on the experience of more than half a century ago, when the roads were worse, the speed was lower, the motorcycles were different and the blitzkrieg was upon us. They can be used as a starting point for a search, but should not be taken as dogma. The speed of movement, the loading of the sidecar, its aerodynamics - all this affects which direction the motorcycle pulls while moving. And the balance of braking forces between the rear wheel and the sidecar wheel determines where the motorcycle pulls when braking. With proper adjustment, the motorcycle rides straight without trying to go into a ditch or into the oncoming lane on its own. Consult with wheelchair practitioners, experiment, find your settings.
Disc brake for the Urals
So I’m ready to write another post. For some reason, inspiration (if you can call it that) attacks me exclusively at night, but let’s not talk about it... Everyone knows what stock brakes are in the Urals, especially the front ones. I understand that with proper adjustment they should brake, but either my hands are in the wrong place, or the wheel drum was already worn out, no matter how I adjusted or adjusted the pads, it absolutely refused to brake. Instead, when you pressed the lever hard, the brake cable was pulled out (the shirt was compressed, to be more precise). Having suffered quite a bit with it, I thought that I should install the disk. I don’t know why, I don’t remember now, but I decided not to grind the hub from scratch, but to disassemble the original “drum” hub, and instead of the drum put in something like an adapter, which I would grind at a turner. “This is the beginning,” I thought and went to local stores to look for a brake disc. I came across this copy from the Middle Kingdom, I don’t remember where from, it seemed to be from Cobra, but along with it I bought the entire brake circuit assembly.
MY MOTORCYCLE
It is hardly possible to surprise anyone today with a disc brake on Ural motorcycles. Of course, this only applies to newer models! But if you try, you can put something on the old man. I want to tell you a little about the disc brake circuit. The info may be a little outdated, but it might be useful:
Currently, two modifications of the front wheel brake have been developed - single-disc and double-disc. The first modification is intended for a single motorcycle, and the second for a sidecar version. Although there may also be a second option on a single person.
In both cases, the design is as unified as possible - the only difference is in the design of the disks and in the methods of attaching them to the wheel. To simplify the design and to avoid complications in the technological process, the brake disc in the single-disc version is installed on the wheel instead of the drum brake pads, while the wheel does not change. A scheme is also provided with a change in the design of the wheel hub, but it is unknown (to me personally) whether it will be used or not. In the version with two discs, the wheel receives a completely updated hub. Let's take a look at the design of a double-disc brake:
Front wheel double disc brake design; 1 - main cylinder; 2 — drive lever; 3 — connecting hoses; 4 - tee; 5 — bracket with pistons; 6 — compound brake disc; 7 — wheel hub; 8 — front fork: 9 — wheel axle; 10 - wheel.
It consists of a master cylinder located on the right handlebar, brake calipers mounted on the movable pipes of the front fork, three hoses and a connecting tee. The design is simple and reliable. Its operating principle is as follows: when the driver presses the lever, the piston of the master cylinder creates pressure, which acts on the brake calipers. The pressure in the system is proportional to the force on the lever: the intensity of braking depends on it. If the lever is released, the piston returns to its original position. The brackets have a so-called “floating” design. When the pressure in the system increases, the piston located in the caliper presses on the brake pad, which rests on the disc. However, the “floating” bracket begins to move to the side and moves the second pad, which, after removing the gap, also rests against the disc, thus beginning the braking process. The gap between the discs and pads always remains constant, regardless of the wear of the latter. Maintenance comes down to replacing worn pads and checking seals. After replacing the pads, sometimes you have to remove air from the system - “bleed” it. I think the robot with this is no different from passing air on foreign cars. And there is plenty of this information on the Internet.
Brake disc assembly for installation instead of a brake drum: 1 - disc; 2 — protective cover; 3 — support bushing; 4 - toothed disc hub; 5 - bearing; 6 - special bolt.
A few words about the design of brake discs. In the single-disc brake version, the disc is made one-piece and ventilated. With a double-disc brake, the hub design has undergone significant changes, and the discs are made of composite parts.
1. Double disc brake of the front wheel. 2. Tee for hydraulic brake drive.