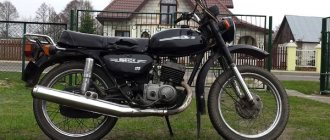
The Minsk motorcycle is a legendary product of the Soviet and post-Soviet era, one of the most popular two-wheeled vehicles in the CIS latitudes. It is a lightweight vehicle with an engine capacity of 125 cc. cm was very popular and was released in quite a large volume. The secondary market is literally filled with offers for the sale of this motorcycle. It is simple in design and maintenance, unpretentious, fairly cheap, and is perfect for a beginner. All these qualities also attracted individual craftsmen, thanks to whom tuning for the Minsk motorcycle became very popular due to its comparative simplicity and decent results. Thanks to technical tuning in Soviet times, these models participated in sports competitions and cross-country races.
Why do you need tuning?
The point of any tuning is, first of all, to customize the vehicle to suit your needs. This applies to both the technical side and appearance. Internal (technical) tuning of a motorcycle involves boosting the engine, changing the suspension and brakes. Refinement of the appearance includes painting, polishing, chrome plating, installation of additional, including aerodynamic body kits. Tuning the Minsk motorcycle, both external and internal, is not only possible, but even necessary. The fact is that when releasing this vehicle, engineers were primarily guided by accessibility and simplicity. And yet, no matter how simple everything may look, Minsk has potential, which means there is room for improvement.
Ignition system
The standard Minsk ignition system does not always successfully cope with its tasks. Therefore, it makes sense to carry out the revision carefully and carefully. Just like with Izh Planet 5 tuning, here they primarily work with the ignition timing.
The model has a good generator, as well as contactless ignition with an electronic switch. But, there is no possibility to change the advance angle depending on the operating mode of the moped engine. Therefore, it is recommended to install a device that forms the angle depending on the need at a given time.
You can buy it in a store; a part from any motorcycle with a similar volume will do. The connection is not complicated, so there shouldn't be any problems. The use of such a device allows you to change the ignition timing depending on engine speed. This approach significantly improves engine efficiency and also increases its power.
Reduced intake losses
The engine is the main component of any vehicle. For motorcycles, it is the power unit that provides the basis for the design and shape of the frame and suspension characteristics. Boosting the engine is the main operation of tuning a motorcycle, both as a whole and for individual components. The purpose of boosting is to increase engine power.
One way is to reduce intake losses. The first barrier to air supply is the air filter. As a rule, the original air filter on the Minsk is paper, less often nylon or metal. It would be superfluous to clarify that the throughput of such filters leaves much to be desired.
Foam-based air filters used on foreign motorcycles have become widespread. Such filter elements have minimal resistance to air at the inlet, while having good cleaning characteristics. To reduce vibration and noise levels of the air inlet, a receiver is installed between the carburetor and the filter - a container (usually made of plastic) with a volume approximately 10 times larger than the cylinder.
How to boost a Minsk go-kart engine
Many people want to become motorcyclists, but not all beginners have enough money to purchase a ready-made sports motorcycle. There is only one way out in this situation - to prepare a standard car yourself. The Minsk engine is considered one of the simplest in design and can easily be slightly boosted. It should be taken into account that in this case the engine resource decreases in proportion to the increase in power.
Improving the quality of the air-fuel mixture
The formation of the air-fuel mixture in this vehicle occurs in the carburetor. To reduce losses, at this stage the jets and diffuser surface are polished. This kind of tuning of the Minsk motorcycle can be done with your own hands using thick, rigid thread and Goi paste. The amount of fuel mixture entering the cylinder depends on the diameter of the diffuser.
A significant increase in maximum speed can only be achieved by replacing the carburetor. In the 90s, Japanese carburetors, produced at that time in India, were installed on the Minsk. With proper adjustment, the motorcycle accelerated more dynamically and had greater traction at low speeds.
When setting up a carburetor, the parameters specified in the instructions should serve only as a starting point, but not as reference values. Any carburetor is customizable. An important detail is the tightness of the contacting planes: the carburetor and the adapter. The tightness of the connection significantly affects the life of the engine.
Increase in working volume
One of the most common ways to increase engine power is to increase the displacement. Tuning the Minsk motorcycle engine involves boring the cylinder liners, but no more than the second repair size. Exceeding this standard will inevitably lead to problems with strength and selection of ring and piston sizes. In the end, the result will not justify the costs. As an option, you can completely replace the cylinder with another one of larger displacement, but in this case difficulties with matching the purge channels are inevitable, so this technique should not be considered optimal either.
Tip 3: How to boost the Minsk engine
Many people want to become motorcyclists, but not every beginner has enough money to buy a ready-made sports motorcycle. There is only one way out in such a situation - to prepare a standard car yourself. The Minsk engine is considered one of the most primitive in design and can be easily boosted. It should be considered that in this case the motor source decreases in proportion to the increase in power.
You will need
Modification of a standard cylinder
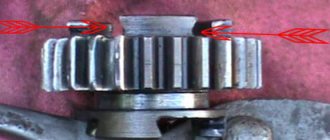
The best solution is tuning the Minsk 125 motorcycle with modifications to its standard cylinder. First of all, it is necessary to eliminate possible displacements of the purge and bypass windows. The purging of the fuel mixture in a two-stroke engine depends on their correct position, which directly affects the acceleration dynamics, efficiency and top speed. To do this, excess metal is removed from the liner, previously removed from the cylinder, using a mechanical or hand tool. All work involves raising the window by 2 mm, boring the radius of the curves and rounding the sharp edges. Such internal tuning of the Minsk motorcycle can increase the number of maximum revolutions by 1000.
Read also: Massive accident on the Serov highway
Exhaust System Tuning
The exhaust system has a significant impact on the power of two-stroke engines. Tuning the Minsk motorcycle does not include modifications to the exhaust system due to its inexpediency. The best solution would be to replace it completely; as an alternative, you can make your own muffler like a resonator. In addition, the exhaust system needs to be adjusted, which, if done correctly, can add 10 to 15% of power.
In this article we will look at all the stages by which tuning a Minsk motorcycle can occur - the most affordable and popular motorcycle in the USSR. We will reveal the secrets of tuning the Minsk 125 engine, increasing its power, maximum speed, as well as improving its appearance.
Minsk 125 is one of the most popular famous Belarusian motorcycles, which have been produced since 1951. They have proven to be unpretentious, cheap to maintain, and are also famous for their reliable gearbox. This motorcycle is widely used in training and passing exams for category A, as well as in the “ Minsk cross 125 ” version for teaching the basics of motocross in many sections of the country. Minsk's foreign competitor is the Yamaha YBR 125 road motorcycle, which is perfect for beginner motorcyclists.
Tuning Minsk can be divided into two main parts:
- Engine tuning Minsk
- Appearance tuning
Tip 2: How to boost a motorcycle engine
Instructions
1. Before boosting any engine, remove the installed power limiter. Without this, the forcing process loses every sense. Often, instead of a power limiter, a maximum cycle limiter is installed. Remove that too. After boosting the engine, most likely, the engine will develop maximum power and torque at higher cycles.
2. Chip tuning is the reprogramming of the engine control system so that it develops higher performance. In practice, everything looks simpler: to force it, the injection control unit is changed. To do this independently does not require extensive knowledge. Buy such a block for your motorcycle at a motorcycle store that sells tuning kits. Installation instructions will be included with the product. This boost method is extremely suitable for modern foreign-made motorcycles.
Engine tuning Minsk
An important principle of increasing motorcycle power is increasing cylinder volume . Since the motorcycle discussed in our article has a light, small-capacity engine, a couple of horses can be raised by boring the cylinder walls and replacing the piston with a larger size. At the same time, it will be useful to use new rings coated with chrome, as they minimize friction on the surface of the cylinder, thereby increasing engine life. The next step to increase power is to replace the fuel system. The standard carburetor has a primitive design and does not allow the engine to get maximum power, so you can replace it with a Keihin PWK flat-choke carburetor .
Compared to analogues, its flat throttle allows you to speed up the flow of the intake mixture by 30%, as well as an additional jet that comes into operation when the gas is fully opened, which, together with a good air filter, is an excellent do-it-yourself Minsk motorcycle tuning. In order not to disrupt the operation of the new carburetor, it will be useful to treat all intake channels from rough deposits and roughness that impede air flow.
It is worth paying attention to two main ways of tuning a Minsk motorcycle:
Firstly , the intake system can be significantly improved by installing a reed valve at the inlet of the cylinder after the carburetor. The reed valve will prevent the mixture from being pushed back into the fuel system when the piston makes its power stroke.
Secondly, replacing the standard muffler with a resonator made of sheet steel will not only allow you to lose weight, but also very significantly increase the power at medium and high engine speeds of the Minsk 125 motorcycle. Such tuning of the Minsk will not only improve power, acceleration and maximum speed, but and will make your faithful friend much more economical!
A good preventative measure for the engine would be to replace all its bearings with imported analogues. Due to the increased power of the motorcycle, the load on them will increase. Any Japanese bearing company has decent workmanship and a huge selection.
Another easy way to increase engine power is to increase the compression ratio . To do this, you need to trim the surface of the engine cylinder head by a couple of mm, this can be done on a lathe, or manually, using a piece of glass for this, placing it on a flat table, you get a perfectly smooth surface on which a sheet of sandpaper is glued to double-sided tape. Then the metal layer is ground off in a circular motion. After such tuning, the compression ratio in the cylinder will increase, which will also allow for fuel savings and increased power of the motorcycle. In this case, you will need to fill in 92nd gasoline.
Due to the increased power, it may be necessary to improve the clutch basket. To do this, remove the standard clutch discs, process them to a thinner state, removing 2 mm of metal from each disc, which will allow you to add several more of these clutch discs. Since their number will increase, which means the contact area will become larger, the efficiency of transmitting torque to the wheel will increase.
Tuning Minsk is not limited to the above. Installing a microprocessor-based non-contact ignition system (MPSZ) will improve the response of the Minsk motorcycle engine to the throttle, eliminate problems with starting the engine in cool weather, and also allow for smooth engine operation throughout the entire range, due to the fact that the spark occurs in proportion to the increase in the number of revolutions crankshaft The higher the speed, the earlier the spark occurs. Cam ignition will never achieve such results; it is not reliable and often goes astray.
Read also: Nkm tachograph what is it
“Pressed standard” or force “Minsk”
More than once on our website questions have been asked about the “fine-tuning” or, as they say now, “tuning” of Minsk-made engines. “How do I make this engine work?” “How to improve its performance and how to increase power?” You will find answers to these and other questions in this article.
This article was published in MOTO magazine in 1994, but to this day the information in this article is valuable for most owners of Minsk engines, for which many thanks to the author! I also want to thank the user of our site Urfin for finding this article and sending it to me. Unfortunately, the article was in the form of a heavily packed graphic file, so the text had to be rewritten manually, and the drawings turned out to be of poor quality, for which I apologize, I did everything I could...
“A pressed standard” For many motorcyclists, “Minsk” has become a “school desk”. A considerable number of these motorcycles, still in relatively good condition, are simply abandoned in garages and sheds. However, they can still serve, for example, as an ideal object for acquiring skills and testing various technical solutions. Today, Vladimir Turaev, a karting driver and motocross racer from Pavlograd, shares his experience in fine-tuning the Minsk engine. Its option is interesting, first of all, for its accessibility. Of course, you shouldn’t expect too much from the engine - at best it will produce 15 hp. But at the same time, it becomes more economical, and perhaps even more durable (due to the thoroughness of the work). Another advantage of the proposed path is the possibility of “partial” modification of the engine, in proportion to one’s strengths and capabilities. Naturally, the results will also be partial. Please note that work on the cylinder must either be completed completely or not begin at all; similar situations with the cylinder head and with the crankshaft-crankcase pair. In addition, you should not tinker with the crankshaft if the cylinder is not finished first. The last thing to remember is that the success of a job is proportional to the thoroughness of its execution. Carelessness can easily ruin all your hard work. Do not ignore the warnings, treat the matter carefully!
To paraphrase Gogol, we can say: “And what Russian (read: Belarusian, Ukrainian, etc.) doesn’t like a powerful engine!” I bring to your attention my version of the “pressed standard”. This is a Minsk engine with minimal modifications to original parts. Making a “cool” motor on your knees is, to put it mildly, difficult, so be prepared to use machines, devices, and, most importantly, ingenuity and plumbing skills. Because tuning engines is a matter bordering on art. First, let's determine its condition. If it’s new and broken in, great! If it’s old, that’s okay too - tighten the belt, buy a crankshaft, a piston with rings, bearings and seals (seals).
Cylinder The liner of the Minsk engine is poured into the jacket and it is impossible to turn it or press it out, therefore, to ensure that the windows in the liner coincide with the channels in the cylinder jacket, one must remove the metal. Remember that the thickness of the walls of the cylinder jacket and crankcase neck must remain at least 3 mm. Processing canals is a rather labor-intensive process, and a drill with a set of cutters, abrasive cutters and various scrapers (flat, triangular) can make it easier. The ultimate goal of refining the purge channels is to achieve their symmetry and high surface cleanliness. It is not necessary to polish the channels, but their surface should be smooth both in appearance and to the touch. Remember, do not change the height of the upper bypass windows - this may degrade engine performance if the other windows are not changed accordingly. In addition to the upper windows, the vertical blowing angle in the bypass channels should also remain unchanged. My technique for measuring angles is as follows. From a soft wire with a diameter of 2-3 mm I make a “stick” with a tip bent almost at a right angle, 10-12 mm long, and by inserting this tip into the purge channel, I ensure that the “stick” fits both to the “ceiling” of the channel and to the mirror of the cylinder . I determine the horizontal angles of the blowing again with a “stick”, but this time I apply it to the side walls of the channel, and the curved tip indicates the place where the channel exits the back wall of the sleeve. (In reality, you will need a set of clubs of different lengths - ed.) Value "A"
The displacement of the apex of the angle from the longitudinal axis of the sleeve ranges from 0 to 10 mm and should be the same for both channels. The value “B” - the distance from the edge of the outlet window to the leading edge of the bypass window is also one of the important values for controlling the symmetry of the channels. The leading edge of the bypass window must be sharp so that the purge jet “comes off” from the channel wall without turbulence. The lower edge of the upper purge window should be filed along a radius approximately equal to the thickness of the liner so that the purge jet is tangent to the surface of the piston at the point of separation from the window. The upper edge of the lower bypass window should also be filed along the radius. Since the holes in the cylinder jacket are much larger than the diameter of the studs, displacement is possible, and therefore a mismatch of the bypass channels along the mating plane of the cylinder. To ensure unambiguous assembly, a stud with a centering collar is manufactured.
The stud material is steel 20. Check that the cylinder skirt fits freely into the crankcase assembled without a gasket. If not, use a scraper to remove excess metal in the crankcase neck. The sleeve should fit in without tension. Now you can adjust the cylinder jacket to the centering pin. The bypass channels at the jacket-crankcase connector are adjusted using a template that follows the contour of the jacket bypass channels. Under no circumstances should the sleeve skirt block the bypass channels. If there is a jumper, remove it and adjust the windows in the sleeve according to the windows in the crankcase. Unlike bypass windows, the inlet window can be “sawed” a little, but only to level the surface. It is important that there is a smooth, step-free transition from a round diffuser to a rectangular, rounded exhaust window. The exhaust channel must not only be well aligned, but also be polished, which will reduce the inhibition of gases at the outlet to a minimum. By filing the top and bottom edges of the window, you can give it an oval shape. The chamfers on both the exhaust and upper bypass ports soften the transition of the piston rings through their transverse edges. The piston rings should also be chamfered, preferably on a diamond wheel, as it provides low roughness. The rings should be coated with matte chrome with a thickness of 50-80 microns (µm). The gap in the ring lock should remain the same - file it down to 0.2-0.3 mm. The surface of the cylinder liner is processed by grinding, honing or lapping. Surface roughness Ra 0.32, deviation from cylindricity up to 0.01 mm. The gap between the piston skirt and the cylinder mirror of 0.04-0.05 mm is measured quite accurately using a set of feeler gauges.
Piston The windows in the piston skirt must match the windows in the liner skirt. All edges on the piston skirt are rounded with a radius of 0.5 mm. And the surfaces indicated by arrows on must be polished. Transverse scratches should not be allowed in these places. At bottom dead center, the piston should not cover the lower edge of the upper bypass port. Otherwise, either the flats are removed, or the piston head is ground along a radius of 70 mm to the required amount. The piston bottom after grooving should be no thinner than 5 mm. Since the connecting rod is centered on the cylinder, process the ends of the bosses on a milling machine. Dimension “A” for both bosses should not differ by more than 0.1 mm. Washers pos. 4 are made of steel 40X, heated to a hardness of 45-50 according to NRSe and ground from the ends. The piston pin is lightened by grooves on the cone. The length of the inner cylindrical part should be 2-3 mm greater than the length of the rollers of the upper needle bearing (cage). The wall thickness at the ends of the finger is 1-1.5 mm. When reworking your finger, protect its working surface from damage.
Crankshaft If the crankshaft is not new, check its suitability for further use. The radial clearance in the upper bearing (cage) of the connecting rod is allowed 8 µm, in the lower one up to 12 µm. Assembly of bearings (cages) without clearance is unacceptable. Maximum trunnion run-out according to indicators
– up to 30 microns. To compensate for the clamping force of the centers, a screw spacer 4 is used. The pin is pressed out separately from each cheek; do not “drive” it through, as this will damage the rolling surface and deform the connecting rod. The standard balancing holes are caulked with aluminum, its weight is compensated by lead plugs 2 caulked into the lower part of the cheek. Grind the cheeks to a diameter of 100 mm, clamp the trunnions into soft fists so as not to damage their surfaces. Choose a gentle cutting mode to avoid rotation of the pin in the jaw. Reduce the diameter using fine sandpaper (“zero”) to a size of 17-0.11 mm. Clean, oiled trunnions should fit easily, but without noticeable play, into their respective bearings. The connecting rod on the side of the inlet window is filed, as shown in. All surfaces must mate smoothly; marks on the mates are not allowed. Be sure to polish the outer surface of the connecting rod. Before assembling the crankshaft, rub all parts of the lower bearing (separator) of the connecting rod with molybdenum disulfide; It is permissible to use any other lubricant intended for semi-dry and dry friction areas that does not lose its lubricating properties at high temperatures. Tighten the crank pin using guide mandrels; they will help avoid distortion. The axial clearance between the lower head of the connecting rod and the cheek in the assembled crankshaft should be 1.6-1.7 mm. The assembled and centered crankshaft is subject to static balancing on prisms or rollers. Weigh the upper head of the connecting rod as shown in, with an accuracy of 1 g. Calculate the weight of the balancing weight using the formula: Mb = 0.65Mp-0.35Mvg , where Mb is the mass of the balancing weight; MP is the mass of the piston with compression, retaining and centering rings, piston pin and bearing; Мвг – mass of the upper head of the connecting rod. During subsequent repairs, the weight of the new piston assembled with the above parts should not differ by more than 1 g from MP. Now let's start with the balancing itself. Install the crankshaft with a balancing weight on horizontal prisms or rollers. By drilling holes of equal depth on both cheeks, achieve indifferent equality of the crankshaft, that is, it should not independently return to any one position. This completes the balancing.
Carter The surface of the crank chamber is bored clean relative to the axis of rotation of the crankshaft. The aluminum rings are secured into the chamber with epoxy resin and three M5 countersunk screws. All gaps between the walls of the crank chamber and the rings must be filled with epoxy resin. Attention! Epoxy resin is vibration resistant. Therefore, use aluminum powder as a filler or use a plasticizer - ed.
Cylinder head The combustion chamber is “set” at 2.5-3 mm. For processing, a lathe and a mandrel on which the cylinder head is fixed are used.
, and a rotating cutter. The size of the “visor” should be increased to such an extent that the “cap” along the rim is reduced to a diameter of 38 mm. The processing scheme is shown in
. This head allows the use of gasoline with an octane rating of at least 93.
Exhaust System This engine will require a new exhaust pipe - a tuned resonator. Its general dimensions are shown in, wall thickness is 0.8-1 mm. With a smaller thickness there will be burnouts, with a larger thickness there will be no resonance effect. It is better to weld the resonator parts using argon-arc welding, but gas welding is also possible. In the latter case there will be large leashes. It is important that before welding the parts are fitted to each other as closely as possible and the weld seam does not “fall out” inside the resonator. A “smooth joint” from the inside will be ensured by a solid copper lining under the welding site. Before welding the piece of hardware, you should make a model of the exhaust system from thick cardboard and “lay” it on the motorcycle (map), and after that “unfold” it onto the metal. The length of the last pipe of the resonator can be increased to the required length. The exhaust noise muffler will, of course, reduce the power, but the traffic police (federation) is unlikely to allow you to drive without it. A variant of the muffling nozzle is shown on
. A mixture of titanium and stainless steel shavings is loosely packed into the muffler body and separated from the inlet and outlet pipes by a coarse mesh. The muffler body should be made dismountable to replace the muffling material. The muffler is attached to the resonator with a clamp with a “lock”, as well as to the frame at one or two points. Sufficient muffler capacity is 1-2 liters.
Assembly The crankcase is assembled using sealant, without gaskets; VGO-1, KLT-30 or their analogues are usually used. The gearbox shafts should rotate easily with the force of two fingers. The crankshaft is installed in the center of the crankcase neck and is secured against longitudinal displacement
two washers 3 and 5. It is advisable to assemble all critical threaded connections, such as the crankshaft drive sprocket nut, the clutch driven drum nut, using anaerobic sealants such as Anaterm, Unigerm and the like. To reduce friction of the cuffs (oil seals) from the trunnion, their springs should be loosened. The cylinder is placed on a gasket made of whatman paper or thin soft cardboard, lubricated with grease. Make sure that the gasket does not protrude into the bypass channels. Otherwise the assembly proceeds as usual. Use a carburetor with a diffuser diameter of 28 mm. It will ensure a fairly reliable engine start. It is advisable to secure the carburetor using a durite hose and clamps. This will reduce vibration and reduce heat transfer from the cylinder. Use oils of the highest quality possible, intended for two-stroke engines, in a ratio of 1:20 to gasoline.
Running in The assembled engine should be run in at idle for 10-15 minutes. Please note that there is no overheating. Let the engine cool, then “drive” it at low loads in gears 1-3 for 30 minutes, let it cool again, remove the cylinder head and inspect the piston - its surface should be slightly shiny with symmetrical traces of purging. Assemble the engine, “drive” it at medium loads in all gears for 20-30 minutes and finally, if the engine does not overheat, drive 2-3 km “at full throttle”. Remove the head and cylinder, inspect its mirror - there should be no coating of aluminum, the piston should have a matte surface without traces of carbon below the rings and without sticking marks - shiny stripes or spots. Aluminum coatings on a cast iron liner can be removed by etching them with concentrated alkali until bubbles stop appearing, and sticking on the piston can be removed with a small needle file. Never use abrasives or sandpaper! If everything is in order: the mixture is slightly enriched, there is no sticking, the engine does not overheat - you got what you wanted!
Good luck!
V. Turaev
Appearance tuning Minsk
Every Minsk 125 owner has at least once thought about the appearance of his motorcycle. Perhaps we should start by repainting the frame and other parts of the motorcycle. The first thing to do is remove the handlebars, seat, tank, engine, wheels, fork and other parts to leave a bare frame. Sandblast the parts to be repainted or remove the old paint layer using special attachments for an angle grinder/drill. An attachment on a drill for an emery wheel with Velcro is also very effective for this. Be sure to get rid of pockets of corrosion. The next stage is puttying. This is necessary to get rid of deep scratches and level the surface. Parts with a leveled surface are degreased to prepare for priming. Apply primer in 2 layers. The dried soil should be sanded with 400 grit sandpaper. Then we paint it in the color we like in 2-3 layers, followed by a layer of varnish in 3 layers. The metallic color on your Minsk 125 motorcycle will look very impressive.
The next method of tuning Minsk is polishing the engine crankcase to a mirror finish. This procedure can also be done with your own hands using a set of sandpaper with grit from 120-180 to 2500. By sanding the surface of the engine in steps from coarse to finer, you will achieve an ideal matte surface. At the end of this work, use GOI paste, a felt circle and a drill to achieve the final mirror surface. The Minsk motorcycle engine will immediately be transformed!
This procedure applies to the rims, spokes and muffler - this will help them shine in a new way.
New road tires would be a good investment. The new tread pattern is not only effective when driving on wet asphalt, but also looks attractive. Replacing lighting equipment will also appeal to everyone. For example, LED turn signals and brake lights will not only give a modern appearance, but will also reduce the load on the generator, and will also increase road safety when driving at night. Separately, it is worth noting the efficiency of xenon installation. The recommended heat of light is 4300k as it is the most neutral white light, does not cause eye fatigue and provides the best illumination. A useful tuning in Minsk will be the installation of new chrome mirrors, which will also significantly increase riding safety and complement the transformation of the motorcycle. In conclusion, I would like to note that these tuning actions can be carried out selectively at will and combined according to your taste and financial capabilities.
Minsk was perhaps the most widespread and accessible of the motorcycles of the Soviet Union. Produced at the Minsk plant, it enjoyed deserved popularity among motorsports enthusiasts and ordinary citizens for its low price, ease of operation and good maintainability. This unpretentious motorcycle could serve as both the first vehicle for a novice motorcyclist and a workhorse for many residents of cities and rural areas.
The ancestor of the Minsk motorcycle was the motorcycle of the German DKW center, the equipment for the production of which was exported from Germany as reparations in 1945. The production of the first models was established in Moscow, but then by 1951 production facilities were transferred to Minsk. The first motorcycle rolled off the assembly line of the Minsk Motorcycle and Bicycle Plant back in 1951. For more than 60 years of production of motorcycles of this brand, more than 6.5 million Minsk motorcycles have been sold worldwide.
Tuned motorcycle Minsk 125
But this mass-produced motorcycle, like any other equipment, of course, has its certain drawbacks. The main ones include:
- The rather weak engine is the most powerful available in the basic version, only 13 hp.
- A poorly designed clutch that can slip even after the motorcycle has been driven for a long time.
- On early models, the arrangement of the crankshaft bearings was poorly thought out.
- Weak braking system.
But this amazing motorcycle provides its enthusiastic owners with ample opportunities to implement tuning ideas. And, although in the basic version, even with the most powerful engine, the Minsk motorcycle could hardly accelerate to 100 km/h, as a result of competently and responsibly carried out tuning from this beloved, but still not very technically advanced product of the Minsk plant, it is possible to make a truly nimble, responsive and fast motorcycle, not much inferior to its expensive foreign counterparts.
Motorcycle styling Minsk 125
Boosting a motorcycle engine Minsk – Soviet motorcycles
The engine needs to be disassembled. The following work should be done with the engine crankcase: insert and securely fasten the rings into both halves of the crankcase, reducing the diameter of the crank chamber to 121 mm, change the seals so that they can withstand a pressure in the crank chamber of at least 0.8 kg/cm2. In the engine cylinder, set the phases: exhaust - 164°, purge - 108° and intake - 128° (Fig. 66).
Increase the compression ratio to e = 9.5. Install a K-36 I carburetor with a diffuser diameter of 27 mm, the main jet must have a flow capacity of at least 250 cm3/min. The purge windows in the piston should be cut to 25 mm (Fig. 67) so that they coincide with the purge windows in the engine cylinder.
To increase the effect of supercharging, the total length of the intake pipe should be 300 mm (the length of the intake pipe from the cylinder mirror to the carburetor is 100 mm; the length of the pipe with an internal diameter of 40 mm, between the carburetor and the air cleaner is 150 mm (Fig. 68). Ignition from the G-416 generator works poorly due to interruptions at high speeds. For normal engine operation, it is recommended to install an M-24G magneto. Ignition timing is 2.2-2.5 mm before top dead center. Spark plug PAL-14-8 or BOSCH-260-280 .
In the crankshaft, the bronze separator of the lower head of the connecting rod should be replaced with another one, for example, duralumin (D-16T, V-95) or made of cyanidated steel (it is also possible from steel 45 without heat treatment) with subsequent silver-plated surfaces. After running-in and final adjustment, the engine develops a power of 12 hp. and has excellent pickup.
Uprated engines for motocross M-105, M-106 and M2-125. Piston with two L-shaped rings and piston pin bosses shifted upward by 7 mm (compared to the standard size). The diameter of the crankshaft cheeks is 120 mm. The length of the connecting rod at centers is 125 mm. The length of the piston skirt is 62.5 mm, on the intake side the piston skirt is cut by 1 mm and is equal to 61.5 mm. Compression ratio e = 15.
Particular attention should be paid to the processing of the cylinder channels, their throughput and the correct angles of the purge exit (Fig. 69).
Head with an offset “jockey cap” sphere. Magneto ignition. Recommended ignition timing is 2.2-2.3 mm to top dead center. Candle PAL 14-15. Gasoline B-95, B-100. A-98. MS-20 oil in a ratio of 1:20. The engine is equipped with one carburetor with a diffuser diameter of 28 mm. The length of the pipe from the cylinder mirror to the center of the nozzle is 135 mm. The total length of the intake tract is 170 mm.
Be sure to install a large air filter (tank volume 2.5-3 liters) with paper filter elements. After all the work on boosting, running in and fine-tuning the engine, the maximum power is 14-15 hp. With. at n = 6600–6800 rpm. An engine like this can be increased to 20 hp. With. increasing the speed to 9000 rpm. But this will require a special crankshaft, piston, rings and higher valve timing, a new muffler and carburetor.
Let's start tuning a Minsk motorcycle with our own hands
To increase power we will tune the engine, clutch, ignition system, cooling and exhaust.
Engine tuning in Minsk - adding a few horses
The most powerful engine in the base, as mentioned above, is a maximum of 13 horses. Of course, this is completely insufficient for modern dynamic riding, motocross, and stunt riding (depending on what the motorcycle tuning is for). Modifying the Minsk engine is not very difficult. To increase power, you will have to work on the cylinder and piston of the motorcycle engine. We reduce the combustion chamber by grinding. This increases the compression ratio and engine power. The engine is now suitable for using high-octane gasoline and this will have a positive effect on increasing power.
Read also: Replacing glass on a smartphone with your own hands video
Motorcycle engine Minsk
So let's get started:
- It is necessary to change the overall dimensions of the inlet, bypass and exhaust holes in the cylinder to improve the filling of the gas-air mixture and more dynamic release of burnt gases.
- You can replace your original pistons with Japanese ones with improved performance.
- A reed valve must be installed at the inlet of the cylinder itself.
Tuning Minsk for sports
Such tuning of the engine of this motorcycle will allow you to add several horsepower to the power , which will immediately noticeably affect the dynamics and acceleration speed. The increased power as a result of engine modification will require replacing the standard crankshaft bearings with more durable ones. For this, it is best to use imported bearings produced by the Japanese company NTM.
Photos of tuning the Minsk 125 motorcycle
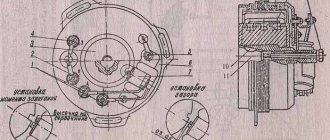
Reworking the ignition system
The standard ignition system with a very powerful and reliable generator, a contactless ignition system and an electronic switch require modification in terms of additional installation of a device to change the degree of ignition angle advance depending on the engine speed. With the help of such tuning, the Minsk motorcycle engine will run more smoothly and quietly, and its service life will increase significantly.
Motorcycle tuning Minsk
Exhaust tuning for a Minsk motorcycle
How to make a Minsk motorcycle quieter? To improve the power performance of this engine, it is very important to install a resonator in the exhaust system. A resonator is an oscillatory system where vibration energy is accumulated due to resonance with the driving force. A properly selected resonator allows you to ensure that some of the lost working mixture is returned to the cylinder by the time the exhaust window is closed. It is very difficult to find such a device for free sale, because... it was produced in limited quantities and only for cross-country versions of the Minsk motorcycle. But you can make it yourself using drawings available on the Internet.
Tuning the exhaust system on a motorcycle Minsk Tuning a motorcycle Minsk
Cooling system tuning
Increased power as a result of engine tuning will require a more efficient cooling system. It is necessary to purchase and install a more serious radiator.
Clutch modification in Minsk
Now, after engine tuning, the standard clutch will not be able to cope with the increased power in all operating modes of the motorcycle engine. It needs to be improved by replacing springs and discs. It is necessary to cut off a few millimeters of steel from the standard clutch discs and insert three more selected discs into the free space. As a result of this replacement, the clutch will become slightly stiffer in first gear, but overall the motorcycle will gain more dynamics and drive.
Now we can replace the rear wheel sprocket with a similar one, but with fewer teeth, which will add dynamics to the acceleration of the motorcycle. We replace the standard brakes with good disc brakes - do not forget about driving safety. All these measures, if carried out correctly and responsibly, will allow you to increase the power of a 125 cc motorcycle engine from the standard 13 to 20-23 horsepower, which of course will make your iron horse much faster and more interesting. A technically savvy owner can do the tuning of a Minsk motorcycle engine on his own, or you can contact a motorcycle center, where all the necessary work will be carried out not only quickly and efficiently, but also where you can quickly purchase all the parts and elements necessary for tuning a motorcycle.
Instructions
If you're choosing a base engine, go for the M-125. Compared to the previous models M-105 and M-106, it has improved cooling, which increases the possibility of boosting it for sports purposes. If for models M-105 and M-106 the power is 9 hp. is almost the maximum, then for the M-125 model you can achieve 10.3-10.8 hp. in the conditions of an average mechanical workshop. The engine must be well run-in and have serviceable parts and mechanisms.
Completely disassemble the engine. Insert and securely fasten rings into both halves of the crankcase, which will reduce the diameter of the crank chamber to 121 mm. Replace your crank chamber seals with specially designed sport models. They must withstand pressure of at least 0.8 kg/sq.cm. Change the valve timing: exhaust phase should be 164 degrees, scavenging phase should be 108 degrees, exhaust phase should be 128 degrees.
Instead of the standard one, install a K-36I carburetor with a diffuser diameter of 27 mm. Its main fuel jet must have a flow rate of at least 0.25 l/min. Cut the purge windows in the piston to 25 mm so that they coincide with the purge windows on the motor cylinder.
Extend the intake manifold to 300 mm. In this case, the length of the intake pipe from the cylinder mirror to the carburetor should be 100 mm, the internal diameter of the intake manifold should be 40 mm, the length of the manifold from the carburetor to the air filter should be 150 mm. Install an M-24G magneto in the ignition system. Set the ignition timing to 2.2-2.5 mm before TDC. Screw in a spark plug type PAL-14-8 or BOSCH-260-280.
Replace the bronze separator of the lower head of the crankshaft connecting rod with an alloy type D-16T or V-95. A homemade one made from cyanidated steel or grade 45 steel without heat treatment with mandatory silvering of the surface is also suitable.
Carry out additional polishing of the cylinder channels, check and correct, if necessary, the cross-section of these channels, as well as the angles of the purge outlet. The factory level of processing of these surfaces is insufficient for sports purposes.
Replace the air filter with a larger one, with a reservoir volume of at least 3 liters and paper filter elements. After running in the engine boosted in this way, install a carburetor with a 28 mm diffuser, increase the length of the pipe from the cylinder mirror to the center of the nozzle to 135 mm, increase the length of the manifold from the carburetor to the air filter to 170 mm.
In an engine boosted in this way, use B-95, B-100 or A-98 gasoline. Motor oil - MS-20 in a ratio of 1:20. To further increase power, you will need to install a sports crankshaft, piston and piston rings, switch to higher valve timing, as well as use a racing muffler and carburetor.
Source
External motorcycle tuning Minsk
It all depends on your desires and financial capabilities. The most obvious option is to replace the wheel rims. A simple technical operation will immediately transform your motorcycle.
New tuned wheel for a Minsk motorcycle
To improve the appearance, you can install steel leg protection. This will not only make the appearance of the Minsk motorcycle more sporty, but will also increase your safety when operating it. In addition to this, you can repaint the motorcycle, replace the seat, replace the fuel tank, change the shock absorbers, make a sports body kit, or attach luggage bags to it. It all depends on your ideas and available funds.
Tuned motorcycle Minsk 125
Ultimately, if you have a great desire and with a relatively small investment, you can completely transform a Minsk motorcycle with your own hands, turn it into a cross-country, sports, or fashionable road motorcycle. Many people want sports motorcycle tuning, but cross-tuning is better suited to this model. Photos of Minsk tuning for cross
Cross tuning Minsk 125