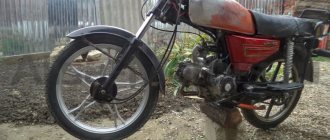
“We bought a scooter, but I don’t know how to ride”
“I bought a scooter, but I don’t know how to ride it” - this was one of the search queries that brought the visitor to this site.
It seems funny, but nevertheless - when I myself was a complete novice in scooters and was just getting ready to buy, I also looked for advice on “how to ride a scooter.” But I didn’t find it. Therefore, I will try to briefly explain for beginners how to start riding a scooter from scratch.
The scooter's controls are very simple. On the left is the rear brake lever, on the right is the front brake. The right handle of the steering wheel is rotary, it is responsible for the gas.
Electrical devices are controlled using buttons and switches: these are low/high beam and turn signal switches, as well as horn and electric starter buttons.
Refueling a scooter with gasoline
First of all, you need to refuel the scooter. If you just bought a scooter, then most likely you are unlikely to ride it to the gas station. It’s easier and more convenient to fill it with gasoline from a canister. To do this, you will need a special funnel for gasoline, because it is impossible to pour straight from the canister without spilling.
How not to overfill gasoline? This is important because spilled gasoline will stink, and it’s not entirely fireproof.
After refueling, close the gas tank cap and the flap.
How to start a scooter for the first time
If your scooter is freshly purchased and has never been started before, or even if it was refueled but was transported on its side in a car, then most likely gasoline has leaked from the fuel line. The scooter won't start until the gas gets back to where it should be. Therefore, do not be alarmed if the scooter takes a long time to start for the first time.
Before starting the engine, make sure the scooter is on the center stand.
So, insert the key into the ignition and turn it to the “ON” position. At the same time, the instrument panel should turn on - at least the needle on the fuel level scale should move from the zero position.
There are two ways to start a scooter engine.
Getting started on a scooter
After starting the scooter, you need to leave it idling for a couple of minutes. This is necessary for the engine to warm up, operate steadily and without failures.
Push the scooter forward until it is lifted off the kickstand. Sit on the scooter with your feet on the ground and gently turn the throttle forward. The scooter will start moving.
The more you twist the throttle, the higher the speed. Since the scooter does not have a gearbox, acceleration is always smooth and you don’t have to worry about anything.
Braking
The main thing when driving is to be able to brake correctly. The scooter has two separate brakes, and you can brake in three ways: front, rear and both brakes at the same time.
Braking can be smooth or emergency. Emergency braking on a scooter is a rather dangerous joke, because it only has two wheels and poor stability.
If you only need to slow down a little, then it doesn't make much difference which brake you use. The main thing is to press the handle smoothly. The front brake is more effective, but the rear brake is safer.
However, it is best to use two brakes at the same time, especially during emergency braking. If you brake sharply with only the front brake, the wheel will lock and the back of the scooter will move forward (especially on an unstable surface - a dirt road or if there is sand on the asphalt), resulting in a fall is inevitable. If you brake sharply with the rear brake, the rear end may wobble, so this should only be done in a straight line and on good surfaces. Although this is not as dangerous as front braking.
When cornering, be sure to slow down before turning.
First trips
It is very easy to master the control of a scooter; 15 minutes of riding is enough for this. At first, you need to learn not to confuse the gas with the brake, choose the right speed when entering a turn, and also brake while maintaining stability.
For the first time, a low speed, no more than 20 km/h, will be enough. Then it will be possible to accelerate to maximum speed (usually 50-60 km/h). And the final skill will come with practice.
Until you have mastered the controls well enough to perform maneuvers without hesitation and without errors, do not drive onto roads with traffic.
Please note: This article and the images in it are subject to copyright. Partial or complete reproduction on other resources without permission is prohibited.
Source
Why are the rear brakes drums?
Often, an important role in solving this issue at the engineering level is played by the feasibility of using a hydraulic system with a disk where a conventional cheap “drum” is sufficient. As a rule, this slightly increases the cost of the scooter as a whole, which means it does not allow it to compete with other scooters in a similar segment.
The main part in the drum brake system is the pads. The efficiency of the drum brake system as a whole depends on their quality (rather the quality of the linings, rather than the pads themselves) and the material of manufacture. The linings are made of a special material that is resistant to overheating and fits perfectly into the metal drum of the wheel. Since the strength of this material is inferior to metal, over time the lining wears out and the pads must be replaced.
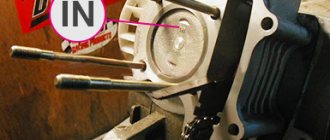
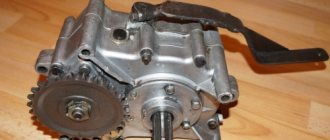
Scooter braking system
The drum brake consists of a drum, made integral with the wheel hub, and a support disk located inside it. The arrow indicates the adjusting nut of the cable end.
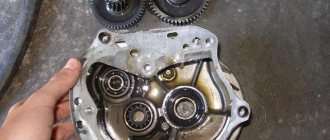
Drum brake device:
When you press the brake lever, the expansion cam rotates, the pads move apart and are pressed against the drum.
The resulting friction forces slow down the wheel. When the force is removed, the pads (and the brake lever on the steering wheel) return to their original position thanks to the springs that tighten the pads. Some scooters have an additional return spring installed outside the platter. The hydraulic brake system consists of a master cylinder (Figure 1, A) and a caliper (B), connected by a brake hose.
In addition, the master cylinder is connected to a special reservoir, which is located on the scooter’s handlebars and has a viewing window to monitor the brake fluid level. The tank communicates with the cylinder through a channel that is open when the piston is in its original position; it allows the system to be constantly fed. Under the action of the brake handle on the piston (1), the cuff (2) closes the return channel (3), creating pressure in the master cylinder. Since the fluid is practically incompressible, the pressure instantly increases and is immediately transmitted through the brake hose to the caliper. A return spring is installed between the inner surface of the piston and the cylinder, and the piston is kept from falling out by a retaining ring.
The brake fluid reservoir for the master cylinder is mounted on the steering wheel near the brake lever. The master cylinder body also contains an electrical brake light switch that turns on the brake light circuit in the rear light when braking begins.
Brake slave cylinder
A movable type caliper (Fig. 3) works in a similar way, only it usually has one piston. This piston acts under fluid pressure on one pad. When you press the brake lever, the caliper body (1), being able to move along the guide pins (2) together with the second pad, presses it against the disc. When the brake is released, the caliper takes the middle position, ensuring an even gap between the pads and the disc.
Movable type disc brake caliper
Scooter disc brake caliper
The master cylinder and caliper are connected by special reinforced hydraulic hoses, allowing unlimited suspension movement. Standard hoses are made from brake fluid compatible rubber. However, rubber loses its properties over time and may crack; this means that under pressure the hose will expand and absorb braking force. Therefore, rubber brake hoses must be replaced at least every four years. To strengthen some hoses along their length, nylon coiling is placed in the rubber.
The steel brake disc is rigidly attached to the wheel hub. During braking, the disc is clamped on both sides by the brake pads. The working surface of the brake pads is formed by friction linings, which are molded to the steel base of the pads. The brake disc has round holes that improve disc cooling, help drain water and dirt, and make the disc lighter.
Front brake of scooters from Chinese, Taiwanese and Korean manufacturers
Operating principle of the front brake master cylinder
A return spring is installed between the inner surface of the piston and the cylinder, and the piston is kept from falling out by a retaining ring.
When the brake handle is depressed, the piston moves along the cylinder, forcing fluid through the control release valve into the hydraulic brake hose. When the handle is released, the fluid and piston move back to their original state. The tank communicates with the cylinder through a channel that is open when the piston is in its original position; it allows the system to be constantly fed. At the beginning of the piston movement, the channel is closed, preventing fluid from flowing back into the tank under pressure in the system. The master cylinder piston is sealed by synthetic rubber seals called lip seals, which prevent fluid and pressure from escaping from the system and air and water from entering the system. An internal seal, called the primary lip (shaped like a cap), is installed on the inner end of the piston and serves to pump fluid. The outer seal is called the secondary seal and is installed on the outside of the piston, sealing it against the cylinder wall.
Rice. 3
When braking (Figure 3).
The end of the brake lever (2) acts on the master cylinder piston (3), moving it inside the cylinder. After the primary cuff (4) closes the return channel (5), the liquid is pumped through the check valve (6) through the hose to the caliper.
End of braking (Fig. 3)
. When the brake lever is released, the spring (7) acts on the piston, moving it back out of the cylinder. As long as the pressure in the brake hose significantly exceeds the pressure in the master cylinder, the check valve remains closed and fluid flows through the primary cup through small bypass holes in the piston. Once the check valve opens, fluid returns from the caliper to the master cylinder until the pressure stabilizes.
Completing the reverse stroke. After the piston returns to its original position, the fluid continues to flow through the check valve into the reservoir (1) of the master cylinder. When the check valve closes under the influence of the return spring, liquid continues to flow through small recesses in the end of the housing until the pressure in the system stabilizes. The secondary seal, or seal (9), is installed on the outside of the piston.
Caliper
The actuator of the hydraulic system is a caliper consisting of one or more pistons and cylinders, depending on the type of caliper used. When you press the brake lever, the piston moves out of the cylinder and presses the brake pad against the disc. Unlike the master cylinder, the piston diameter is larger, and it is this difference in size that creates the hydraulic boost effect. The caliper pistons are sealed using synthetic rubber seals, which eliminate pressure and fluid loss from the system and prevent air from entering it. Two seals are used for each piston. The inner seal is called the piston lip and prevents fluid leakage. External seal, dust collar, prevents dirt from getting inside. The piston seal performs a very important secondary function. It is given a special shape so that when the piston extends, it twists slightly; this is enough to return the piston to the caliper at the end of braking, thereby returning the fluid through the hose back to the main cylinder, and the friction material moves away from the disc (see Figure 4).
Figure 4. Operating principle of the piston o-ring
The piston seal is designed to deform slightly during braking and force the piston back into the cylinder once braking is complete. As the brake linings wear, the piston will mix in the O-rings to compensate for the gap, but it will always return within the specified distance. This means that the caliper automatically compensates for brake lining wear.
In fact, the amplitude of movement of the pads is very small and is only sufficient to ensure that the pads release the disc when the lever is not engaged. As the friction material of the pads wears, the caliper piston must move further to bring them into contact with the surface of the disc. The piston deforms the cuff as before, but when a certain wear is reached, it mixes in the cuff and takes a new position. Thus, the system has automatic adjustment and can automatically compensate for brake pad wear.
There are two types of calipers: fixed and floating type. Most Chinese-made scooters have a floating caliper. Calipers are rated based on their stiffness, or ability to withstand bending under extreme braking pressure. Obviously, any deformation of the caliper reduces braking force.
The floating caliper consists of a body and a bracket. The bracket is rigidly fixed and contains pins that allow some lateral movement of the caliper located on them. Figure 5 shows a two-piston caliper.
Fig 5. Two-piston floating caliper: 1 Caliper body; 2 Brake pad lock pin; 3 Plug; 4 Piston (2); 5 Piston seal (2); 6 Dust seal (2); 7 Anti-creaking gasket; 8 Anti-noise spring; 9 Brake pads; 10 Rubber cover; 11 Guide pin; 12 Guide pin; 13 Rubber cover; 14 Caliper bracket; 15 Brake pad guide; 16 Caliper bracket mounting bolt; 17 Nut; 18 Air bleeder; 19 Dust cap.
Brake fluid
Since fluid is incompressible, it is used to transmit force and movement in hydraulic systems.
There are currently four brake fluid options for motorcycles and scooters: DOT 3. DOT 4, DOT 5 and DOT 5.1.
DOT 3, DOT 4 and DOT 5.1 fluids are hygroscopic, meaning they absorb moisture from the air. The presence of moisture in the fluid reduces its boiling point; the operating temperature of the brake disc and pads usually exceeds it. That is why the boiling points of dry and moisture-containing liquids are indicated. The boiling point of wet fluid is measured at a moisture content of 3.5% Hygroscopicity causes the need to replace brake fluid at least once every two years. The friction material on the brake pad serves to insulate the caliper from the heat generated by the disc, which is a very good reason to replace the pads long before they wear out. DOT 5 liquid is not hygroscopic and does not mix with water. When water enters the system, it sinks down and is located near the hottest area of the system. This means that it will boil very easily and quickly, forming gas bubbles that are easily compressed, which in turn gives the brakes a springy feel. Another problem with DOT 5 is that the liquid itself becomes compressible as it approaches boiling point; This leads to a feeling of elasticity in the brakes with frequent and prolonged use.
Source
Moscow Scooter Club
Time zone: UTC + 4 hours [Summer Time]
Forum Rules
BE SURE to indicate the model, unit and symptoms of the malfunction in the title of the topic.
Heading form: [SCOOTER MODEL] - unit malfunction Example: [Dio] electric starter does not work.
If the topic concerns general repair issues, the model may not be specified.
The main rule is that the title of the topic should be brief, but as fully as possible reflect its content. Topics whose title does not indicate at least the approximate essence of the question, such as “AAA. Save!”, “I have a problem, tell me,” will be DELETED .
Scooter controls
All main scooter controls are located on the handlebars (except for models with a foot brake). They are distributed as follows:
On the left side of the handlebar: - Rear brake or clutch lever (lever is not available on scooters with a semi-automatic transmission) - Turn signal switch - Low/high beam switch - High beam switch (on some models)
On the right side of the steering wheel: — Front brake lever — Engine start button (electric starter) — External lighting switch off/dimensions/headlights (Not on all models. Often this switch is missing, because by design the light is always on) — Emergency stop button or “hazard light” (on some models) - Engine stop button (on some models)
Depending on the make and model of the scooter, the scooter's instrument panel may contain: - Speedometer - Odometer - Tachometer - Fuel gauge - Coolant temperature gauge (for liquid-cooled models) - Turn signal indicator - And low oil level indicator - Gear indicator
The scooter's ignition switch performs the following functions: - Turning on the ignition - Locking the steering wheel - Opening the underseat luggage compartment "pit" (on some models)
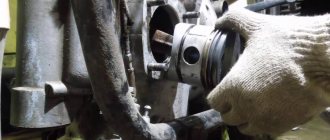
What is needed to maintain the system?
Before adjusting the brakes on your ATV, have the necessary tools ready. To bleed the system you will need:
- Container for collecting waste liquid. It is best to take a bottle and a tube from a dropper, which can be connected to the drain fitting. Thus, the used composition will not get on the parts of the all-terrain vehicle.
- 8 key. This is a standard tool for unscrewing the drain fitting. Although some devices require a different size key.
- “Fresh” brake fluid. Choose only a high-quality composition, because the operation of the entire system depends on it.
- Screwdriver. With its help you can open the reservoir on the steering wheel.
- A rag to remove excess composition.
Scooter power system
The power supply system refers to the fuel supply system.
Main elements: - Gas tank - Fuel line - Carburetor - Intake manifold - Air and fuel filters
CONTROL ON THE ROAD
It’s one thing to master the skills of driving a scooter in an empty lot, and quite another to join the hustle and bustle of city streets. Need I remind you that while driving, all your attention should be focused on what is happening around you? If all you are doing is trying to control how you maintain your balance, including when turning, then it’s too early to hit the road.
Riders of 50cc scooters have few legal options for positioning on the roadway. They are instructed to drive in the far right lane, as close to the sidewalk or curb as possible. In life it’s different: you have to drive closer to the middle in order, say, to go around potholes or foreign objects... Blindly following traffic regulations and driving at the very edge is dangerous. What if a pedestrian takes a step off the sidewalk? Or will a careless car owner open the door of his car?.. It’s safe to stay in the middle of the right lane or even a little to the left.
You should not trail along in the same lane with a slowly moving truck or bus. And it’s better not to approach them: it gets boring quickly. In addition, it is so easy to miss an open hatch or brick that your “leader” missed between the wheels.
The difficulty of driving through city intersections is not even heavy traffic, in which it is difficult to maneuver. Multi-level interchanges in modern cities, tricky lane layouts, prohibitory traffic light signs - all this baffles even an experienced driver. Learn by heart difficult sections of the route on frequently repeated routes, master the algorithms for driving through intersections and junctions.
Law-abiding scooter riders are required to remember the restrictions prescribed for them (the main one is the prohibition of left turns on a multi-lane street). Let's hope that the outdated rules will be rewritten to take into account the increased capabilities of scooters, but until then, let accumulated experience and common sense become guides and good advisers when riding.
Hydraulic disc brake device on a scooter
The brake disc is attached to the wheel, usually with three bolts. Chinese scooters are often equipped with a single-piston caliper that is mounted on the fork. This applies to budget models with a small engine capacity. Advanced models with an engine capacity of more than 150 cubic centimeters can be equipped with a two-piston caliper.
The pads compress the disc on both sides, but the load from the brake machine on the steering wheel is transferred to only one pad by means of a piston, the second is pressed with the same force thanks to the special floating design of the caliper itself.
The brake machine on the steering wheel is equipped with a reservoir for brake fluid. It is important to promptly monitor the amount of liquid in the tank and, if necessary, add liquid to the maximum permissible level. Every 2 seasons, it is recommended to replace all the scooter brake fluid in the system.