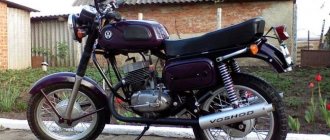
The Alpha moped is one of the most popular in the post-Soviet countries. This is not surprising, because this model is excellent value for money. The characteristics allow us to consider the moped practically a universal one, and the wide possibilities for modification help to significantly expand them. The use of such a moped is not only convenient, but also economical - fuel consumption per 100 km is only about 2 liters with a factory equipped engine. The combination of low weight (about 80 kg) with a load capacity of up to 120 kg makes this model very attractive.
However, used models sometimes experience problems with ignition, which negates all the advantages of the moped. It’s not very difficult to get your iron horse back into service and understand why the Alpha moped won’t start. To do this, it is not even necessary to contact specialists - with due attention, all the work can be done with your own hands.
Photo report: Adjusting the brakes of the Alpha moped
It’s good for those who have a moped with disc brakes: add brake fluid to the reservoirs on time and change the pads and all the troubles end there.
We, the owners of simple Alphas, have to constantly adjust the brakes: tighten the chain - adjust, replace the pads - adjust, replace the cable - adjust... In a word: adjust, adjust, adjust... We put the moped on the stand
We unscrew the wheel by hand and begin to turn the adjusting wing nut in the desired direction: if the brakes are weak, tighten the nut, if the brakes are too tight, unscrew it.
As soon as the pads begin to cling to the brake drum (the wheel begins to slow down slightly), pump the brake lever/foot several times until it stops, spin the wheel again, and if the pads still continue to cling to the drum, unscrew the nut a turn and a half.
Unfortunately, adjustment does not always help, especially when you need to tighten up weak brakes. It's all due to worn out pads. And if with the rear wheel in this regard it is a little easier: you can throw the lever on the rear support along the splines and at the most inopportune moment plow your nose on the asphalt and knock the pads almost to the metal, then with the front wheel this method will not work for you.
On the front support the lever cannot be thrown over the splines; it is placed in one position. Therefore, whether we like it or not, worn out pads will have to be replaced with new ones.
Source
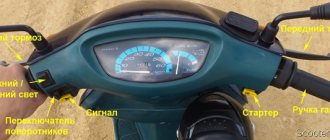
Learning to brake correctly on a moped or scooter
To master effective braking , a novice scooter rider needs to learn a few things. No matter what experience you have behind you and no matter how well developed your reflexes are, you must be constantly prepared for the maneuver. So how do you need time to identify a threat and have time to react?
Let's analyze with numbers how this happens. In order to identify a threat, it takes an average of about 0.7 seconds, an error of 0.3 seconds is necessary to comprehend the danger and begin braking. In total, from awareness of the danger to the actual braking itself, it takes only one second. Now imagine that in this second a scooter travels almost 27 m at a speed of 95 km/h. The reality is that of this second you have already allocated 0.7 to realizing the danger that has arisen, and you can miss the remaining 0.3 seconds by banal stupidity. But if you make it a rule to keep your hand on the front brake lever, this will give you the opportunity to gain at least 0.1 seconds. And three meters can be a salvation.
As it was established by design engineers, on a dry road a driver can stop a moving vehicle with a negative acceleration of 4.57 m/s2. That is, under such conditions, a person can control the deceleration and “pacify” the vehicle without losing control. If the road is wet (for example, after rain), this figure drops to 3 m/s2.
Let's imagine that a scooter is driving on a wet road at a speed of 96 km/h, and its deceleration speed is 3 m/s2. Under the current conditions, it will take the motorcyclist about 8.8 seconds to come to a complete stop (if you count the time from the moment the threat occurs, then 9.8 seconds). It turns out that the distance to a complete stop will be about 145 meters. In dry conditions, braking time is reduced to approximately 6.9 seconds, including one second for recognition of the threat. The braking distance under such conditions will be more than 105 meters. Therefore, the better the weather conditions and related factors, the more effective the braking and the less time will be needed to stop. As a rule, in such cases the braking distance is shorter.
As a rule, scooters brake better than other types of vehicles. With active braking, scooter riders create negative acceleration of up to 1g (9.75 m/s2) or more. If you learn and practice braking on a scooter, almost any person can achieve a negative acceleration of 6 m/s2 when braking. In other words, it will take you about 5.4 seconds to come to a complete stop; the braking distance will be about 86 meters.
In a word, in order to reduce the time by 1.5 seconds and the braking distance by up to 20 meters, you need to train hard and gain experience. Well, if you don’t forget to keep your hand on the brake lever, then with 100% probability you can save another three meters. To summarize, I would like to note that 23 meters is almost the length of five wheelbarrows! So draw your own conclusions.
How rim brakes work
From the name it is clear that braking is carried out by acting on the wheel rim. The most common type today is the V-brake, characterized by good braking force, low price and low weight.
The rim brake on a bicycle is located on the rear stays of the bicycle frame and on the fork. The device performs braking when the pads are brought to the rim. The pads are made of rubber - a soft material, so that when braking they wear out, not the bicycle rim.
The principle of operation of the device is that when you press on the brake handle, the cable tightens, bringing the brake mechanism together, i.e. bringing all the pads to the rim at the same time.
Next is the cable. It weakens over time and requires periodic tightening.
Another disadvantage is that the pads wear out quickly and get sand or dirt on them. Braking performance in these cases deteriorates noticeably. But there are nuances here: not everyone drives through mud, since this activity is difficult and unpleasant.
Well, those who drive don’t drive fast, because you can’t reach high speed through mud, so you don’t have to slow down. To combat this drawback, you can install pads on your bicycle with special grooves to remove dirt.
Next, about the frame stays and fork legs: their rapid wear is associated with a large force during braking, from which they expand. To eliminate the shortcoming, additional rigidity is added by installing special rocker arms.
Pads and tires also wear out quickly due to the heating of the wheel during braking. Despite the fact that the consumables to which they belong are inexpensive and easy to replace, this causes some inconvenience.
Another disadvantage is the inability to install tires wider than 2.5 inches on the wheel.
What is the difference between disc brakes and drum brakes?
There is a big design difference between disc and drum brakes. They have only one thing in common - braking by rubbing pads and a rotating surface. If in the second version the pads are located inside the drum and are pressed against it from the inside, then in the first the pads cover a special disc. This is the main difference between disc and drum brakes.
Therefore, we can assume that the principle of operation of brake systems is the same, but they are designed differently. Accordingly, their advantages and disadvantages will be different.
Disc brakes have also been known for a long time; they were used on Soviet Zhiguli cars. But at first they had a rather complex design. They were placed on the front wheels, where they are more efficient. Since there are two brake pads on each wheel, each of them was pressed to the disk by its own hydraulic cylinder. Nowadays, ordinary budget cars use one hydraulic cylinder for each wheel - this has greatly simplified the design.
The design of disc brakes is much simpler. They are easy to take apart and have few parts. But opening the drum itself can be a problem - over time, the lid can stick. And there are more details, and the device is more sophisticated. In modern versions, a non-specialist may not understand how to disassemble it and then reassemble it correctly.
Another big difference between a disk system is good ventilation. When braking at high speeds - more than 100 km/h, the drum version, due to its closed design, experiences severe overheating. Disc brakes are exposed to all winds and are well cooled by air
But now speeds of 100-120 km/h are the norm, and good cooling is very important. Brake discs, in addition, began to use ventilated ones, which further improved the performance, and the hub bearings do not overheat
Car disc brakes
Tuning features
Tuning an Alpha moped is a rather fertile topic. There are a lot of options for improving the qualities of the model, and the cost of tuning is much lower than for a Chinese scooter of the same price category. The simplicity of the structure makes it possible to improve both the engine itself and external elements at your discretion.
Tuning Alpha can be carried out in different directions and, before starting improvement, it is worth paying attention to those qualities that will be changed. This modification should not be confused with styling - it only changes aesthetic indicators and does not in any way affect the functional characteristics.
Tuning an Alpha moped with your own hands is a very interesting task, which over time can greatly captivate the owner. The ability to refine the characteristics implies making both external and internal changes that can improve the functionality of the model. Many hobbyists purchase an Alpha moped as a future base for realizing their own ideas.
Which is better - main pros and cons
When compared, drum brakes and disc brakes have different pros and cons. The first have the following advantages:
- The pads are well protected from dirt and dust thanks to the closed housing.
- Significant resource of pads that can withstand long mileage of 120 thousand kilometers.
- Combines well with the handbrake.
But there are many more disadvantages:
- The design is heavy and bulky.
- When overloaded it gets very hot.
- Efficiency varies depending on temperature.
- If the pads overheat, they may stick to the drum, and if there is severe frost, they may freeze.
- The front pads wear out faster than the rear ones.
- Due to the closed housing, dust gradually accumulates inside, which leads to squeaking and increased wear.
Now let’s compare which brakes are better – disc or drum. The former have the following advantages:
- Lightweight, compact design.
- Easy to assemble and low cost.
- Good airflow ensures efficient cooling.
- They are practically independent of temperature. Cools down quickly under load.
- Replacing pads and discs is very simple; you can do it yourself.
- The wear is clearly visible.
There are few disadvantages:
- Open design, which may cause contamination. This is a small minus, since any dirt is quickly erased.
- A short resource - from 40 thousand kilometers, with careful driving a little more.
- If the car sits idle for a long time, corrosion appears on the discs. They require pre-treatment before long-term parking or the rust will have to be removed later.
That's why disc brakes are now widely used, and this in itself serves as an answer to the question of what is better, at least for passenger cars. In general, their older brother, despite his advanced age, also continues to be used, but only where it has an undeniable advantage.
Disc brake device
Borrowed from cars and motorcycles, they are the most modern and consist of:
- cable (or hydraulic line);
- pens;
- caliper;
- pads;
- rotor - a brake disc attached to the hub, clamped by the pads using a caliper, which is attached to the frame in the area of the dropouts.
The force from the handle is transmitted through a cable or hydraulic line to the caliper. The hydraulic line is filled with special oil or brake fluid.
The advantages of this type are:
- not susceptible to contamination, since they are located in the center of the wheel;
- smooth braking;
- insensitive to “eights” and rim geometry;
- do not damage the rims;
- do not require maintenance.
There are also disadvantages:
- difficulty in selecting pads due to their wide variety;
- heavy load on the bicycle fork, hub, spokes;
- difficulty in maintenance and impossibility of repair far from civilization;
- heavy weight;
- high cost;
- problems with installing the trunk (the caliper interferes).
Knowing now the structure and principle of operation of the main types of brakes, you can decide which brakes are better - disc or drum brakes? Or maybe rim ones?
Video: V-brake vs. Disc mechanics Vel Com - Battle
Tuning of external parts
By improving the external parameters, you can improve not only the aesthetic appearance of the Alpha moped, but also increase its aerodynamic performance and make movement more comfortable. The following is usually used for tuning external elements:
- Replacing the seat with a wider and more comfortable one.
- Installing protective panels will help prevent leg fractures and protect them from damage.
- Replacing the wheels with wider ones will increase the stability of the moped. This is especially true when replacing an engine.
- Installing a windshield helps improve travel comfort. But at a speed of more than 40 km/h it already begins to affect the aerodynamics of the moped.
- Replacing disks has a more decorative meaning. The standard wheels on the Alpha are also quite drivable.
- Replacing the plug. If the Alpha moped will be used to travel on uneven roads, for example, in the forest or outside the city, you can replace the forks. Strengthening the shock absorbers helps soften the load on the wheel.
- Replacing LEDs can also be a great solution. You should not use xenon diodes, as they will dazzle drivers and will not be better in terms of lighting quality than conventional ones.
If desired, tuning can be completed by styling the moped by performing airbrushing or changing the color of the body. An excellent solution to highlight a moped would be to install LEDs under the fenders or on protective panels.
Tuning an Alpha moped is a very rewarding activity that can captivate the owner in the direction of improving his model. Design and assembly features make it possible to improve Alpha in absolutely any direction. This makes it very convenient for both beginners and experienced hobbyists.
Malfunctions
There are seven main problems:
Worn drum or pads. The most dangerous thing will be the simultaneous wear of these parts, then the wheel can simply block tightly. If there is slight wear on the drum walls, a groove is needed to grind off the sides and level the surface. After this, the pad tension system should be adjusted. They are replaced when:
- For glued ones, the thickness of the friction layer reached 1.6 millimeters.
- For riveted linings, wear reaches 0.8 millimeters from the rivet. Warping of the pads is a fairly common cause of damage to the drum, its uneven grinding, as a result of which it has to be replaced.
- Springs, struts or spacers break.
- Cable rupture or handbrake lever breaking off
- Peeling of linings from pads
- Destruction of the cuff, scuffing of the cylinder, rupture of the hose, depressurization of the pipeline, resulting in fluid leakage from the system and its airing. Brake failures occur.
- Corrosion of springs, resulting in them not working as expected.
To avoid troubles associated with brake system malfunctions, it is recommended:
Check the condition of the linings every 20 thousand mileage, change if necessary; buy a repair kit for rear pads in a store
Here it is important not to make a mistake with the brand and model, the similarity is confusing, so it is better to have old pads with you for a sample
Pay attention to drips and stains on the ground where your car was parked. Watch the brake fluid level inside the reservoir on the master cylinder.
Maintenance of the Alpha moped engine
In order for the motor to work stably and properly, it is necessary to carry out periodic maintenance. It is important to change the oil in a timely manner by choosing appropriate lubricants. The condition of the pistons is checked, the presence of carbon deposits on them. If dirt accumulates on parts, it negatively affects other systems, such as cylinder heads.
In order for the engine of the equipment to work properly, you need to fill it only with high-quality and proven oil. If fuel consumption has increased, there is a burning smell or other signs of improper engine operation, you need to perform maintenance or overhaul the engine. When servicing the engine, the following consumables are changed:
- Valve cover seals.
- Rubber seals.
- Spark plug.
You should also check the battery operation and replace the filters if necessary. If engine repair is required, it is dismantled together with the gearbox. This is a difficult task that is best left to professionals.
Problems when paying with bank cards
Sometimes difficulties may arise when paying with Visa/MasterCard bank cards. The most common of them:
- There is a restriction on the card for paying for online purchases
- A plastic card is not intended for making payments online.
- The plastic card is not activated for making payments online.
- There are not enough funds on the plastic card.
In order to solve these problems, you need to call or write to the technical support of the bank where you are served. Bank specialists will help you resolve them and make payments.
That's basically it. The entire process of paying for a book in PDF format on car repair on our website takes 1-2 minutes.
If you still have any questions, you can ask them using the feedback form, or write us an email at [email protected]
Drum brakes on a scooter
Are drum brakes really that popular? We'll try to figure it out with you...
The principle of operation of drum brakes is quite simple: you press the handle and it pulls the cable (unlike cars on scooters, this moment is carried out by the cable). The second end of the cable is connected to the brake mechanism and releases the pads. When you release the brake lever, the spring compresses them back. It seems that what else is needed?, it seems like a simple and fairly reliable mechanism:
- The inner shell of the wheel, against which the pads rub during braking;
- A special plate that unclamps these pads;
- Return springs;
- Brake pads;
- Cam.
But then the disadvantages begin, which prompted the creators to switch en masse to their disk analogues:
- Braking efficiency is much lower, this is explained by a different method of adhesion of the pads to the road surface;
- The cable is not as effective as brake fluid. When using brake fluid, almost all the force is transferred to the piston, which compresses the pads.
- Over time, the brake cable loses strength and becomes a “rubber band” (the brake handle sinks further when pressed, like a spring when pressed).
- The brake cable may break (very rare, but it happens).
- They squeak a lot and quite often (especially Chinese ones) in order to lubricate the cam and clean the linings, you have to remove the entire wheel, which is very inconvenient.
Having a fairly large number of disadvantages, this type of brake is still installed on the rear wheel today. Of course, with this type of brake it reduces the cost of the scooter, slightly, but still. Manufacturers also explain this step by the fact that, in their opinion, the rear wheel should not take an active (main) part in the braking process, but only slow down, and drum brakes do this fully. (information - How to check brake pad wear)
If the mass of your scooter is not very large, and you prefer to ride alone, then the ratio is as follows: front-disc, rear-drum. But if the scooter weighs more than 100 kg and you often ride together, then the efficiency of the rear ones is quite low for this. And if such brakes are installed at the front, then be very careful, you will not be able to completely control the situation on the road.
MY MOTORCYCLE
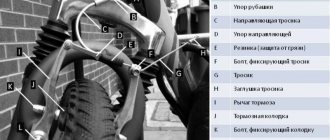
Adjusting the rear brake involves setting the free play of the rear brake lever.
The free play of the rear brake lever is determined by the distance from the start of movement to the “grasping”. Normal free play, measured at the end of the front brake lever, should be within 10-20 mm (Fig. 1).
Procedure for adjusting the rear brake:
Fig 2. Rear brake adjusting nut and rear brake brake pad wear marks: 1-adjusting nut; 2-brake lever; 3-nut for rear brake lever; 4-mark on the brake drum; 5-mark on the brake lever. Fig. 3 - rear brake adjustment
• place the scooter on the central support stand;
• adjust the free play of the rear brake lever by rotating nut 1 (Fig. 2). located on the rear wheel hub (to decrease the free play, you need to rotate the adjusting nut clockwise, and to increase the free play, you need to rotate it counterclockwise);
• after adjustment, you must make sure that the rear wheel rotates freely and without jamming;
• check the serviceability of the brake cable and rear brake lever. If the threaded part is not enough to adjust the free play of the control lever, then you can adjust the rear brake by moving brake lever 2 by 1-2 slots (Fig. 3).
REPLACING REAR BRAKE PADS (for models with rear drum brakes)
To indicate the degree of wear of the brake pads, marks 4 and 5 are used, located on the controlled brake lever (located near the rear wheel hub) and on the brake drum (Fig. 2).
When the control lever (located on the steering wheel) is fully pressed, there should be some distance between the marks. If, after pressing the lever, the marks align or come close to each other, this indicates critical wear of the brake pads - they need to be replaced.
The pads must be replaced when the friction layer thickness is 1.5-2 mm.
The procedure for replacing brake pads is as follows:
• place the scooter on the central support stand;
• having unscrewed the fastening nut, move the muffler to the side (Fig. 4.1) (on scooters with two shock absorbers, you need to unscrew the fastening nut of the right shock absorber and move it to the side);
• unscrew the fastening nut and remove the wheel (Fig. 3.2-3):
• prying it with a screwdriver, overcoming the force of the springs. REMOVE worn brake pads (Fig. 4):
• clean the brake drum and wheel hub:
• having installed new brake pads, reassemble the mechanism in the reverse order......
Source
Spare parts for mopeds
- home
- Spare parts
- Spare parts for imported motorcycles (CHINA)
- Spare parts for mopeds
Sort by:
- All
Tachometer Zodiak, Dingo, Delta, Atlant, Mustang…
Art.30-1711
Rear trunk under Nitro case
Art.30-1951
Gvalior Street Brake Pedal Spring
Art.30-1148
Fighter125 front hydraulic assembly (brake…
Art.30-1693
Brake handle with hydraulic Storm right (as...
Art.30-1203
Rear brake traction Sprinter
Art.30-1649
Front fork leg 110cc under axle, d12 mm, color...
Art.30-1282
Fighter125 Driver Footpegs Base
Art.30-1359
Rear sprocket silent block chopper Gvalior…
Art.30-1184
Pad spring Alpha, Delta, Zodiak, Nitro…
Art.30-1150
Storm pendulum fork axis
Art.30-1352
Gasoline crane Fighter125 (attached with a self-tapping screw) for…
Art.30-1844
Steering Column Nut Nitro
Art.30-1696
Windshield XY110-17A
Art.30-1111
Front brake disc Sprinter
Art.30-1543
Evolution hydraulics front assembly
Art.30-1694
Alpha 15A fuse assembled with housing
Art.30-1169
Tire 17×2.50-17 (70/100-17) Alpha, Delta,…
Art.30-1176
Steering column bearings 1Р54FMI Storm
Art.30-1398
Stingray rear shock absorber
Art.30-1970
Gvalior rear brake rod
Art.30-1655
Rear shock absorber 110NC BS-22 FASTACE (L-270mm)
Art.30-1971
Front caliper Storm right std.
Art.30-1717
Driver footrest rubber Alfa2017
Art.30-1233
Shift pedal locking ring...
Art.30-1585
Muffler XY110-17A
Art.30-1675
Central stand Sigma
Art.30-1384
Throttle cable SIGMA, Storm M10 curved (810 mm)
Art.30-1756
Front side light SKYMOTO FOX-50 (2 stroke)
Art.30-1934
Front fender Nitro
Art.30-1497
Alfa mechanical speedometer (120 km/h)
Art.30-1119
Left front fork stay RACER TROPHY NEA2B0107G
Art.30-1449
Driver's footrest right Storm
Art.30-1462
Muffler Elbow Fighter125
Art.30-1588
Chain guard RACER TROPHY K01C1807G
Art.30-1598
Star 17 leading 428 Alpha
Art.30-1520
Fighter125 throttle grip (with rubber band) + left steering wheel...
Art.30-1216
Right glove compartment lid Alpha (for painting)
Art.30-1485
Rear rim 17 Storm 1.85-17 for disc 4…
Art.30-1418
Saddle RACER TROPHY NEAC005P9
Art.30-1135
Tire 17×3.00-17 (90/100-17) Alpha, Delta,…
Art.30-1173
Brake light assembly with turn signals Sprinter
Art.30-1733
Front brake bracket assembly Nitro
Art.30-1565
Air filter assembly Nitro
Art.30-1803
Gas tank cap (faceted) + locks (set) Alpha
Art.30-1248
Windshield Storm
Art.30-1823
Rear fender Gvalior Street
Art.30-1511
Camera 17 3.00-17 Alpha, Delta, Zodiak…
Art.30-1618
Headlight mounting bracket, right RACER TROPHY…
Art.30-1571
Brake/clutch handles Alpha, Delta, Zodiak,…
Art.30-1196
Front wheel axle assembly with Stingray nuts
Art.30-1334
Rear hydraulic brake main cylinder...
Art.30-1774
Bushing for the pendulum fork Fighter125 metal.
Art.30-1878
Left steering wheel + gas handle Fighter125 (rubber bands)
Art.30-1210
Rim 17 bare front 2.15-17, TTR125
Art.30-1425
Crankcase protection BSE PH10-125
Art.30-1531
Right Stingray crankcase cover, Vortex…
Art.30-1259
Front wheel axle M12X1.25X215mm TTR125
Art.30-1338
Fighter125 handlebar holder assembly (2 top 2 bottom…
Art.30-1553
Tire (PetroShina) L-263 2.50-17…
Art.30-1402
Sprinter trunk
Art.30-1959
Headlight RUBIKON (SHURIKEN SPORT) ALPHA 2017
Art.30-1638
Rear rim 17 cast No. 0 old model MOTO...
Art.30-1423
Rear rack VORTEX, SHURIKEN ALPHA 2022…
Art.30-1956
Tire 14-2.50 (80/90-14) front 32P...
Art.30-1409
Rear rack Delta, Zodiak
Art.30-1952
Nitro carburetor (with gas tap) D18
Art.30-1616
Rear Sprocket Bolt + Plate (Sigma)
Art.30-1926
Front frog with wire Alpha, Delta, Zodiak
Art.30-1269
Sigma steering wheel switches (left + right)
Art.30-1294
Rear bumper VORTEX
Art.30-1946
Fork housing Usha Alpha (with nut for cathode)
Art.30-1604
Nitro rear fender without fender liner
Art.30-1517
KAYO 140cc kickstart spring.
Art.30-1151
Brake lever hydraulic Fighter125…
Art.30-1185
Traverse Zodiak 25 mm
Art.30-1705
Rear fork spacer for Jordan axle
Art.30-1156
Rear fender XY110-17A
Art.30-1509
Fighter125 chain tensioner pulley assembly with...
Art.30-1229
Rear Sprinter brake pedal assembly
Art.30-1302
Oil seal 20x40x7 rear wheel Alpha, Delta,…
Art.30-1179
Rim 17 front cast Nitro 1.4-17 No. 22…
Art.30-1413
Jordan throttle cable (860 mm)
Art.30-1758
Glove compartment lid left+right VORTEX Alpha2017…
Art.30-1488
Rear wheel axle Alpha, Delta, Zodiak, Nitro...
Art.30-1345
Plus wire with Alpha terminals, Zodiak
Art.30-1166
Steering wheel switches right Nitro assembly (button…
Art.30-1295
Front fork leg Alpha (pair) 27 mm axle 10…
Art.30-1277
Rim 17 front cast Nitro 1.4-17 No. 22…
Art.30-1377
Chain catcher Fighter125 (curved)
Art.30-1644
Kickstarter TTR125 curved Scout
Art.30-1606
Front inner glove compartment cover Storm
Art.30-1487
Oil seal 37x50x11 front fork KAYO T2…
Art.30-1140
Front glove compartment Storm left half
Art.30-1860
Battery compartment cover Storm
Art.30-1263
Stingray rear fender
Art.30-1507
Gas tank Sprinter
Art.30-1847
Rear brake lever Alpha, Delta, Zodiak,…
Art.30-1195
Jordan Brake Pedal Spring
Art.30-1144
Brake light SHURIKEN ALPHA 2017
Art.30-1729
You can buy spare parts for mopeds inexpensively and at a competitive price in the online store 'MotoMir69.Ru'. The store offers spare parts for mopeds with descriptions, as well as detailed technical specifications, photographs and reviews from visitors. We offer spare parts for mopeds from the world's leading brands with a guarantee and delivery.
Rules for operating and maintaining a scooter with a disc brake
- The fluid fills the entire line and is stored in a special tank, which is usually located on the steering wheel. It cannot work forever and over time it loses its properties, after which the entire effectiveness of the braking system decreases. You can also add wear to the pads and discs, and the appearance of moisture from the air in the circuit.
- During operation of the scooter, brake fluid must be added to the reservoir in accordance with the indicated marks inside or outside the reservoir. The reservoir can be metal or plastic. Metal tanks are usually equipped with a special window for monitoring the liquid level. Plastic ones allow you to control the level due to the translucent material of manufacture.
- The brake fluid level must not be allowed to fall below the marked position, as this entails air leaks into the circuit and the efficiency of the system is reduced due to the fact that the air is perfectly compressed and takes the force upon itself. To add new brake fluid, you need to remove the reservoir cap, which can be secured with screws or simply unscrewed. There is usually a membrane or gasket under the cover; it needs to be removed to the side. Fresh fluid is added to the top mark, after which the gasket and cover are installed in place. This procedure must be carried out as the liquid level in the tank decreases; therefore, the level must be constantly monitored.
- It is permissible to use only the brake fluid recommended by the manufacturer of a particular scooter model. Usually the marking is always indicated on the tank cap and there is no need to look for it in the manual.
- The brake fluid level should decrease gradually as the pads and disc wear. A sharp decrease in level may indicate a leak in the circuit. This should alert you and checking the entire circuit, in particular the brake hose, is mandatory. Perhaps there are cracks in the hose, or maybe the fastenings just need to be tightened.
- Periodically, preferably once every two seasons, it is necessary to completely replace the brake fluid in the circuit, as it absorbs moisture from the air and gradually loses its properties. How to properly bleed the hydraulic system was discussed here.
- It is strictly forbidden to store brake fluid in open or loosely closed containers. If this happens, its further operation is not allowed.
- The wear of the brake pads is controlled without removing them. The pads are always visible and the thickness of the linings is very easy to determine. If the pads are covered with special protective covers, they must be removed to ensure sufficient visibility.
- You should monitor the wear of the linings. Typically the minimum acceptable value is within 2mm. If the scooter manufacturer does not indicate other parameters, this rule should be followed. Measure the thickness of the linings; if it is less than 2mm, the brake pads must be replaced.
- Before replacing the pads, read the repair and maintenance manual for your scooter model. If the latter is missing, determine for yourself how the caliper is attached to the fork. Usually these are two bolts that can easily be unscrewed and the caliper removed from the disc.
- After installing new pads, most likely you will not be able to put the caliper on the disc, since their thickness has increased and the clearance for the disc has decreased. In this case, it is necessary to push the piston of the mechanism a little deeper to free up clearance for the disk.
- If you feel vibration when braking, the brake rotor is most likely slightly warped. The distortion could have occurred as a result of a fall, hitting a pothole, etc. The disc runout can be determined with a special indicator in the workshop. The indicator is installed at a distance of about 1 cm from the outer edge of the disk, after which the wheel is spun. The maximum permissible runout is 0.3 mm.
Thus, regular checking of the elements of the hydraulic disc brake system on a scooter, timely replacement of fluid and worn parts will allow you to feel confident on the road.
Good day, friends! Today I would like to share my option for replacing the rear drum brake with a disc brake.
Those interested, please take a look 
I think most owners of Chinese (or maybe not Chinese) vehicles sooner or later, often or rarely encountered the problem of very bad brakes... in particular rear brakes, namely drum brakes... Personally, I was 100% convinced of this, since there are no complaints about the front - At least it’s a disc one, but the rear drum just didn’t want to console me with adequate braking in addition to the front one... I was filled with anger, but I didn’t get mad for long. Inflamed with enthusiasm, I decided to get down to business. The information is partially incomplete, since I did not take photos all the time... but I think the essence will be clear... Let's go. Initially, having bought parts (used) in a motorcycle store, namely: the main brake cylinder (left), brake hose, brake disc and caliper... I cleaned them and brought them into divine shape... spitting on the incomprehensibility and relying on my own education and partially collected information began to make drawings and sketches of the future design... Since the drum wheel disk does not itself provide for the installation of the disk, it must be raped first morally, and then mechanically. A preliminary drawing of a certain spacer was awarded to my very good friend, an edge, side, or even whole body friend with a branch of a foundry company in my city... After much waiting, torment, suffering, modifications, redrawings, castings, milling, finally... from the likeness of this drawing:
I received this aluminum blank: As you can see, instead of widened holes, milling was made - this is so that the bolts do not have to be held with a wrench... and the 10 holes were made for M8 with a groove 10 mm deep for the original brake disc bolts... angrily and tastefully))) Most sizes at a glance, but this is for the better - further understandable... Then a short search for materials, drawing all the details 1 to 1, fitting them to each other virtually, so that there were fewer problems in reality) I began to bring the drawing to life. A piece of 3.6 mm iron, a grinder, a round file and a drill, they gave me a part - a bracket for attaching the caliper: While I put it aside and began to connect the wheel and spacer together: It seemed to work, putting the wheel aside I started working on the second shock absorber strut... it not only performs this function, but let it there will be a “stand”... So, we saw the picture - let’s try it on live: Everything seems to be fine, but when I came to the garage and tried it on... to my surprise, not everything is as simple as I wanted. At first I was shocked - the height of the spacer would have been chosen “by eye” and the gap between it and the stand turned out to be too small for the bracket to fit between them: In the end I had to figure out how to place the bracket from the outside - I slightly bent the bracket itself, put washers under mounting the caliper and tried it on: It turned out even better than I wanted - if the spacer were a little thinner, the caliper would simply be impossible to place on the disc, and the bracket has more welding points. Then I welded it semi-automatically, cleaned it and painted it: It’s a pity I couldn’t find the angle - everything is right next to each other...
Using similar fasteners, the tract is laid along the frame
Well... everything seems to be going well... another cup of coffee and thoughts flow like a river again, only the channel is different - to figure out how to mount the mirror on the steering wheel, because the new brake machine did not have a mount for the mirror...
So I had to make fun of the mount... there was very little space and I had no choice but to ruin the original brake handle bracket for the sake of the mirror post... as you can see in the photo - everything is so tight that there is almost no gap, but neither of the two parts complete the necessary functions lost:
On the same day I went to check the new brakes - of course, in comparison with the drum - the earth and the sky) And confidence on the road increased and the fear of finding out how much the rear bumper costs on some Mercedes decreased)))
Thank you for your attention, I hope someone will find at least some of the above useful)
Smooth roads without holes and nails to everyone) Lots of positive and kindness, and since it’s winter - good health!)
Replacing Rear Brake Pads on a Chinese Scooter
Scooter maintenance and repair
Replacement drum brake pads on a scooter
replacement
Brake drum brake pads are required when the pads are worn out, the pads themselves are defective, and in some cases where the scooter does not perform satisfactorily with the existing pads due to poor quality of the pads. So, let's take a look at the process of replacing a brake drum with a scooter brake pad.
The process of replacing brake pads.
Even a beginner scooter who cannot handle equipment repairs can replace the brake pads on his own.
We recommend that you read the following articles before you begin rebuilding your drum brake:
The most common drum brakes can be seen on the rear wheel of a scooter, we will look at it. Front wheel steering is not fundamentally different. Let's take a look at the entire repair process to:
Removing the rear drum brake.
Place the scooter on a flat, hard surface. Use central support. The muffler usually does not allow the rear wheel of the scooter to be removed, so we continue to remove the muffler. It's very simple. Remove the two bolts that secure the muffler to the crankcase. And also two pins attached to the cylinder. If the rear wheel has a tight-fitting plastic fender that will prevent the wheel from being removed, the fender should also be removed. Now unscrew the wheel nut. Remove the rear wheel from the axle. After removing the nut, you only need to remove it from the grooves on the shaft. Remove the brake pads. They are held in place only by the tension of two springs, which are attached to the cam and eccentric. Carefully inspect the inside of the wheel hub (which touches the brakes). If the drum itself is worn out, replacing just one liner will not help. The inner diameter of the drum is determined by the manufacturer of each scooter model and is indicated in the operating instructions. If the inner diameter exceeds the limit, the wheel disc must be replaced. Check the thickness of the brake pads on the pads. If the pads are worn beyond the limit specified in the scooter's operating instructions, the pads must be replaced
Please note that you need to replace two panels at a time rather than just one if it is worn out.
Replacing rear brake pads
Removing the HORS MOTORS 056 wheel.
This video was processed in the YouTube video trunk () scooter
Do it yourself.
Rear drum brake assembly.
- Reassemble in reverse order. First, rotate the mark on the cam towards the rear wheel axis.
- The wear indicator of the pads located on the grooves of the eccentric shaft should be returned to the mark on the eccentric.
- Now install the wear indicator and lever onto the slots, aligning the eccentric groove with the eccentric seat.
- Be sure to lubricate the cam and cam with a small amount of lubricant before installing the pads. Lubricants should be kept to a minimum to prevent gaskets from coming into contact with the work surface during operation. Grease on the pads will significantly reduce the quality of the drum brake in the future.
- If any traces of dirt are visible on the pad(s) and inside the brake cap (on the wheel hub), wipe them with a cloth dampened with solvent or mineral spirits.
- Replace the brake cable and tighten the adjusting nut so that the free play of the wheel brake handle on the wheel is 10-20 mm.
Engine tuning
First of all, a moped is a vehicle. Therefore, you need to start tuning the Alpha with the engine. Correct modification can increase the power by almost 2 times.
Increasing engine volume
Initially, the engine volume is 50 cubic cm. If necessary, you can replace the engine and increase its volume to 110 cm. Such measures will require registration of the vehicle, but at the same time the engine power increases significantly. When tuning the engine of an Alpha moped, you can immediately get rid of the low-quality pistons that usually come included.
The simplest would be to install a 72cc cylinder. It will allow you to “boost” the engine by almost one and a half times. Moreover, its replacement does not require complete disassembly of the engine.
By installing the engine at 110 cubic cm, you can get the maximum speed that the moped is capable of. With such power, it will already be more of a motorcycle than a light vehicle. Expanding the volume to such figures will require complete disassembly of the moped.
When replacing the cylinder, you can pay attention to parts from the Delta or Active models. But using parts from another model will require installing not only a new cylinder, but also a crankshaft, chain, seals, rollers and even, quite possibly, a carburetor.
Replacing sprockets
To improve engine efficiency, you can replace the sprocket. This may result in increased speed. For example, according to reviews from other users, replacing a sprocket with a 15-tooth one has virtually no effect on increasing speed. That is, to get a tangible result, you should try installing a 16-tooth sprocket in combination with an enlarged cylinder.
Important: When replacing the front sprocket, you must also check the condition of the chain and rear sprocket. A worn chain causes accelerated wear on the sprockets.
Switch replacement
Alpha tuning can be done by replacing the switch. When selecting this component, it is important to pay attention to the ignition timing generator (ignition timing generator). Alas, there are practically no such switches specifically for Alpha and it is very difficult to find them. The solution is to use a switch from four-stroke Chinese mopeds - it is ideal for tuning an Alpha moped with your own hands.
Drum brake device
Detail of a drum brake. 1.3 – fixed parts; 2 – rotating part
Structurally, drum brakes include the following elements:
- a drum mounted on the wheel hub;
- brake pads, on the working surface of which friction linings are attached;
- a working brake cylinder with pistons, sealing collars and a bleeder fitting;
- return (coupling) springs attached to the pads and fixing them in the non-activated position;
- brake shield installed on the hub or axle beam;
- brake pad support stand;
- lower pad support (with adjuster);
- mechanism .
In addition to single-cylinder drum brakes, there are systems with two cylinders, which will perform significantly better than the first option. In this case, instead of the lower support, a second brake cylinder is installed, thereby increasing the contact area between the drum and the shoe.