What is the model
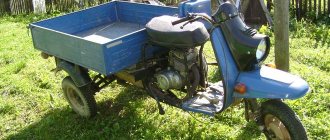
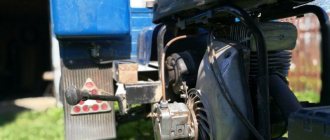
The Ant motorcycle features a reliable metal trike, made in the form of a platform with a rear side. Moreover, such a trailer is large enough so that many different items can fit into it. The vehicle is widely used to transport:
- seedlings;
- building materials;
- fertilizers;
- beehives, etc.
On the other hand, the Ant moto is quite maneuverable and unpretentious. The turning radius of the bike reaches 3.5 m. The vehicle does not take up much space in the garage.
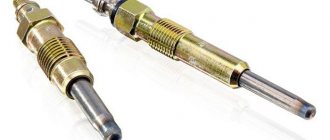
In the winter season, the Ant moped should be filled with a mixture of motor oil and 76 gasoline. In the summer he drives on M8B fuel.
Compared to sidecar motorcycles, this bike is not only lighter, it also takes less fuel. At the same time, the vehicle cannot be called economical. Ant 2 requires about 8 liters of mixture to operate, and after the piston system wears out, this figure increases to 10 liters.
The Ant cargo scooter has a fairly simple design.
As a result, you do not need to have any special knowledge or skills to repair it. In addition, repairs can be performed almost anywhere, without having to go to a workshop. At the same time, such a device, like a large number of post-Soviet vehicles, breaks down quite often.
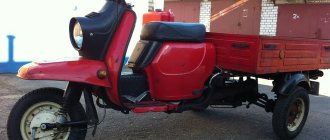
At the same time, the vehicle looks very modest. Photos of the Ant scooter show us a standard tricycle with a small platform at the back. The designers of the model did not add any special elements - everything was just the most necessary and practical.
Several different configurations were available, including vehicles with an additional passenger seat, as well as a moped with a covered body. At the moment, there are many analogues of the Ant motorcycle, photos of which strongly resemble the original vehicle. This is especially true for eastern countries. Due to increased traffic, three-wheeled motorcycles have become the most popular means of transportation in Asia.
Video test drive of the power of the Ant scooter:
https://youtube.com/watch?v=2MhpRbXWPT0
Photo report: Engine disassembly
In the article: Disassembling the engine of the Ant scooter, the process of completely disassembling the TMZ engine was shown in detail, after which all parts were carefully inspected and checked for acceptable wear and damage.
All the oil seals and bearings of the engine did not pass the test for suitability for further operation, the cylinder - it had to be bored to a repair size, the motor chain, and the first gear gear - due to wear on the bushing, and some other small things. Not so much if you take into account the age and “quality” of service of our “ant”...
We managed to buy all the worn-out parts without any problems, so all that was left was to collect all this “Soviet junk” to the heap. What exactly are we going to do today?
Before assembly, all planes and parts of the engine are thoroughly washed and cleaned of dirt, oil and remnants of old gaskets and sealant. We pay special attention to the condition of the crankcase and threaded connections, the main work on repairing the crankcase is described in detail in the article: Repairing the crankcase of a scooter engine, we prepare ourselves a clean workplace, and proceed to a very interesting and exciting activity...
We lay the right half of the engine on the blocks, clean and blow out the oil channel (marked with an arrow), degrease the plane of the dynastarter mounting flange, lay a new gasket and be sure to cut it a little along the contour of the oil channel in the place where it is marked with an arrow.
It is not advisable to apply sealant to this connector, since there is a danger that the sealant will get into the oil channel and cut off the oil supply to the oil seal and the crankshaft main bearing. What this leads to is written in the article: Repair of the dynastarter of the Ant scooter
We install a new oil seal in the dynastarter stator mounting flange, degrease the surface, apply “blue” thread locker to the fastening bolts and finally tighten the bolts. The bolts must be tightened very well, as they are constantly unscrewed, which leads to serious engine damage.
We turn the half over, heat the seat of the main bearing with a heat gun and, using a mandrel, install the new main bearing (in our case) into the crankcase.
We take the other half of the crankcase, be sure to clean and blow out the oil channel (marked with an arrow), insert a retaining ring into the seat of the main bearing and, in the same way, install the second main bearing in its place.
We are looking for a sheet of metal of suitable thickness (7-8 mm), insert our sheet between the cheeks of the crankshaft and in this position, using a mandrel, press the inner race of the main bearing onto the axle.
The crankshaft of this engine was carefully checked for faults and correct geometry; the main work on diagnosing the crankshaft is described in detail in the article: Methodology for determining faults in the crankshaft of a scooter or motorcycle
Also, on this crankshaft it was necessary to replace the bushing of the upper head of the connecting rod; this work is described in more detail in the article: Replacing the connecting rod bushing of the motorcycle “Izh-Planet”, “Jupiter”, “Ant”
We insert the crankshaft into the left half of the crankcase, we carry out the final installation of the crankshaft into the crankcase using a simple device; details of the correct installation of the crankshaft into the crankcase can be found in the article: Repairing the Voskhod-ZM motorcycle engine, not with a sledgehammer. As they often like to do on “collective farms”...
After the final installation of the crankshaft into the crankcase, we assemble the gearbox in the correct order, how to assemble the gearbox is written in the article: Repair and assembly of the gearbox (box) of the Ant scooter,
We lay the crankcase half with the assembled gearbox on planks so that the shafts hang freely in the air and do not interfere with work, degrease the crankcase planes, install the guide bushings (marked with arrows) in their places so that they extend slightly above the crankcase plane (5-6 mm) , apply sealant to both halves and place a new gasket.
Lubricate the lip of the oil seal and the main bearing of the crankshaft with engine oil and place the second half of the crankcase on top.
We fill the tendril of the gearbox shaft retainer spring inside the crankcase.
Using a wooden mallet, tap the halves until they come together completely and tighten the crankcase mounting bolts.
Lubricate the main bearing and the edge of the second crankshaft oil seal with engine oil, then use a mandrel to install the oil seal in its place.
We put the locking ring in its place.
We also install the crankshaft support bearing there and secure it with the second retaining ring.
Now all that remains is to install the piston group on the engine, check and assemble the clutch parts and install the kickstarter mechanism. After which you can install the engine on the frame.
Just a couple of months ago, an old client asked to overhaul the engine of his Ant for the season. He is not greedy for money - he promised to buy everything needed for repairs. We agreed, the client pulled the engine off the frame and brought it for repairs. After disassembly, an unpleasant picture emerged: the piston, crankshaft, motor chain and almost all bearings were worn out.
The customer insisted on purchasing a new crankshaft. They are now in abundance in any store - I don’t want to take them, but their quality is still good... I resisted for a long time and in the end the client found a used engine from which I pulled the crankshaft. Of course, it was slightly worn out, but the bearing of the lower head of the connecting rod was intact and intact, and we didn’t need anything more.
How to disassemble and reassemble the engine of the Ant scooter?
The motor design is simple. But even this does not protect it from breakdowns, which are often associated with age. You shouldn’t just disassemble the engine, but if the following symptoms appear, you should take up the tools:
- Startup problems.
- Oil leak.
- Lack of traction.
- Increased background noise.
- The winding lever does not return to its place.
Possible breakdowns:
- Worn seals.
- Poor quality assembly after previous repair.
- CPG failure.
- Worn bearings.
- The return spring in the kickstarter has broken.
Note! Before overhauling the power plant, it is not necessary to wash it. Just drain the oil and remove it from the frame.
Cylinder block
After unscrewing several bolts, you need to remove the cylinder head.
Pay attention to the worn cylinder head gasket. Opposite the outlet window you should probe the so-called excavation
If a characteristic wave or step is felt, then such a cylinder needs to be changed or bored.
The piston should be examined for wear. Some “Kulibins” manage to refine it with sandpaper.
Clutch
Removing the clutch cover and kickstarter shaft
Pay attention to the return spring - it often breaks and the kickstarter does not return to its place. Also at this point you can check the timing chain tension. Clutch disassembly
To do this, you will need to unscrew the nuts and remove the pressure plate from the basket. The lock washer must be bent and a stick must be inserted under the tooth of the main gear sprocket. Please note that the threads on the crankshaft journal nut are right-handed. The nut needs to be unscrewed. There will be another lock washer that needs to be straightened. We take a puller and fix the clutch drum. The clutch nut has a left-hand thread. The disc and drum are removed, as well as the clutch basket is removed from the shaft along with the chain and drive sprocket.
Dinostarter
Remove the following elements:
- Cooling casing.
- Ignition chopper cam, but provided that the power plant was not converted to a magneto. In this case, it is necessary to fix the dyno starter rotor. This can be done using the cooling fan or by fixing the crankshaft with improvised means.
- The rotor is dismantled using a puller - standard or homemade.
As a result, the rotor was removed.
Music on the road: how to connect speakers to an amplifier in a car, and which ones are better to choose?
How to fill out the European Protocol in case of an accident, how long is the document valid? Find further information.
Analysis of previous repair errors
We remove the flange on which the stator is mounted and carefully inspect the connector plane for interference by “drop-dead handles”.
No matter how many times I repair Ants, I come across the fact that all sorts of “drop-dead little hands” seal the oil channel through which oil flows to the crankshaft main bearing and oil seal. I'm already tired, honestly - how much can you? Why cover it up???
The gearbox, with the exception of one fork, did not cause any complaints. By the way, the clutch too.
Now the question is: what to do with all this junk? Buy a “plasticine” crankshaft from no one’s making and mold it into the engine??? I was initially against this idea. In general, we found a used engine for a ruble and removed the crankshaft from it. Of course I had to tinker with him. Since the thread was clogged, I sharpened it and straightened it with a sharpening tool.
After correcting the threads, I checked the crankshaft for runout. There was no need to worry - the beating of the trunnions did not exceed one hundredth of a millimeter with a tolerance of three hundredths. By and large, it would have been necessary to replace the bushing of the upper head of the connecting rod, but time was running out and the bushing was not very worn. In all other respects, the crankshaft did not disappoint and this purchase can safely be called a success.
We decided to buy everything else: CPG, cylinder head, gaskets, seals, bearings, motor chain, etc. in the store. Although, by and large, the cylinder could have been bored out and that would be enough. But the owner did not want to wait, but in vain.
To be honest, the task of removing the engine from the “Ant” frame is quite a bit of work... As for me, it’s easier to pull a diesel engine off a tractor than from this rattling thing... This is, of course, a joke. But seriously, removing the engine from the Ant is much more difficult and takes longer than from any other Soviet motorcycle.
Specifications
The Soviet moped, which has recently enjoyed great popularity, has the following technical characteristics:
- Length - 2680 millimeters.
- Width - 1250 millimeters.
- Height - 1075 millimeters.
- Dry weight - 240 kilograms.
- Load capacity - 250 kilograms.
- Speed - 25-35 kilometers per hour.
- Engine type is 2-stroke, power is 11 l/s.
- Transmission - 4-speed gearbox.
- The brakes have a diameter of 15.0 centimeters. Drum-type, each wheel has a mechanical drive.
Many fans of Soviet motorcycles are sincerely convinced that the technical characteristics of the Ant are practically in no way inferior to the characteristics of Western models.
Trailer
You can make a trike for the modern Ant yourself. In addition to this model, a homemade trike is also suitable for a sidecar motorcycle.
A standard trike is a connection:
- stroller frames (side trailer);
- a bracket curved from a steel pipe (L-shaped);
- clamps (2 pcs.);
- tubular struts.
When making a trike, it is important to ensure that the body shell does not touch the bracket. In order to give the frame more rigidity, it is necessary to weld a gusset made of steel
A homemade trike requires a welded trailer frame. The trike must also have an easily opening and freely removable tailgate. The sides and bottom of the body are covered with boards (tongue and planed).
The trike must be equipped with up-to-date lighting devices: turn signals, side lights and brake lights.
Advantages and disadvantages
The Ant scooter, whose technical characteristics are not the only feature of the moped, has a number of advantages:
- The moped is equipped with reverse gear, which allows you to better maneuver in difficult situations, such as tight parking. In addition, by moving in reverse, you can choose a convenient loading position.
- The Ant engine can be turned on using a starter, due to the built-in dyna-starter and kick-starter systems. The principle is the same as for motor vehicles.
- The turning radius of the moped is 3.5 meters. This is a fairly small value, ideal for both urban conditions and narrow rural roads surrounded by ditches.
- The lightness of a moped is undoubtedly an advantage compared to motorcycles equipped with a sidecar.
- It is also worth noting how much the Ant scooter costs. At that time, the price of 775 rubles was quite humane, but now it will not hit the budget at all. However, at the moment, purchasing is only possible by hand. Ant's production ended long ago.
In addition to the positive qualities, the scooter also has disadvantages, which were mentioned earlier. Here are the main ones:
- Significant fuel consumption. Today, a consumption of 8-10 liters scares even some car owners, and for motorcyclists this is far from an acceptable option. Therefore, the interest of the moped arises mainly among collectors of rare equipment.
- Frequent breakdowns can prevent the Ant from doing the job it was designed to do. Moreover, some types of breakdowns require solid mechanical knowledge.
- Low cross-country ability on soft ground. Sometimes, if the moped is sufficiently loaded, you can get stuck in loose soil or wet ground.
In terms of price/quality, Ant fully justifies itself. Therefore, if you need a working device for rural use, you can safely resort to the help of this scooter.
https://youtube.com/watch?v=MBVLplW6vqw
Source
Device and technical parameters
The design of the Ant scooter was quite simple and consisted of the following main parts:
- engine;
- frame;
- transmission and suspension;
- electrical equipment;
- brake system;
- body.
Such a simple design of the Ant 2M 01 scooter and its wide unification with the two-wheeled Tulitsa (Tula) model allowed the owners to carry out repairs themselves.
The TMZ Ant motor scooter had the following technical characteristics and operational parameters (data for modification of the Ant 2M motor scooter are given in parentheses):
- Drive – 3x2.
- Load capacity – 0.25 t (0.28 t).
- Engine: type – petrol two-stroke,
- ignition – electronic;
- number of cylinders – 1,
- volume – 0.20 l,
- cooling option – forced air,
- power – 11.0 l. With. (12.5 hp),
- carburetor - K-36G,
- fuel – a mixture of gasoline and oil (1/33).
- base – 1.78 m,
- type – mechanical,
- weight – 0.24 t,
Fuel system
The power system consists of a fuel tank, carburetor and air filter
Fuel supply by gravity, supply control by mechanical fuel tap
The latest scooters were equipped with a more advanced K-65G carburetor. In general, the carburetor is very good, if only because it has two systems that make starting easier in cold weather: a manual enricher on the steering wheel and a float suppressor. All these systems together ensure reliable engine starting in any frost
To increase low-end thrust, a reed valve was added to the engine design. The valve is installed in the cylinder and blocks the reverse emission of fuel from the crank chamber
The cylinder is purged with three channels. Three-channel purge ensures better cylinder filling
The cylinder head has a displacer. The displacer itself is useless, but in combination with a three-channel purge and a reed valve it significantly adds traction at the bottom
Three-wheeled scooter Ant - review
The Ant scooter was produced at the Tula Machine-Building Plant from 1959 to 1995. Its modification, or as they say now, restyling, was carried out in 1983 and the updated version received the designation Ant 2M 01. The longevity of this unusual three-wheeled vehicle was brought, first of all, by positive qualities, among which it is necessary to highlight:
- versatility;
- affordable price;
- simple repair;
- compactness;
- maneuverability.
The TMZ Ant scooter was the first cargo model of motorcycle equipment mass-produced in the USSR. The presence of a cargo platform allowing it to transport 250 kg of cargo at a speed of 60 km/h made the Ant very popular. It is enough to note the areas in which it was used:
- Transportation within the city, including small batches of products for restaurants, cafes and canteens.
- In-plant transportation, when small batches of certain components were moved between production departments.
- Transportation of small volumes of building materials, especially in urban environments.
- Carrying out transportation inside enclosed spaces, primarily for agricultural purposes (greenhouses, poultry farms, livestock farms).
For various modifications of the TMZ Ant scooter, four body options were used:
- open;
- open reduced (installed on the cargo-passenger version);
- awning;
- van.
The most significant drawback is the lack of any comfort for the driver, who was forced to spend almost the entire working day behind the wheel of a scooter. It was especially difficult to work in winter, since, unlike two-wheeled mopeds, scooters and motorcycles, the Ant cargo scooter was used at state-owned enterprises even in winter.
Improving the carrying capacity, or making a dump truck out of Ant
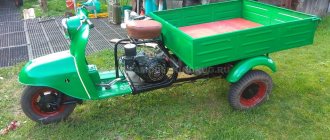
The Ant scooter is a powerful device, but most owners are not averse to increasing the model’s load-carrying capacity. In addition, you can remake the body and make it folding (like a dump truck).
However, there are some nuances and the main thing is not to overdo it. As you know, the load capacity is about 250 kg; in practice, large loads can also be accommodated. But it should be remembered that with such a load the speed will be much slower (up to 35 km/h).
You can increase the load capacity by increasing the sides. However, the scooter frame will need to be strengthened.
Welding can be considered the most optimal option, but you can do it without it (the additional frame is made from wood).
In this situation, the body is moved forward or left in its place, but it is prohibited to move it back.
It is possible to consider the option of installing separate booths on such scooters, which will require separate costs.
The following mechanisms are most often used for a dump truck:
- cable winches;
- hydraulics with automatic drive;
- methods using door hinges, etc. (so-called “manual”).
As for hydraulics, you will also need to use a pump. The total costs with this approach may exceed the cost of the scooter itself.
Let's consider options for implementing the idea:
1. Using automation.
The body is attached to an additional frame, which is connected to the main frame using hinges. Lifting can be carried out using a diamond jack, which operates with a simple electric drive. The electric drive itself can easily be made using the window lifters of a simple car. This is the essence of automation, when the body tips over with the press of one button.
The only disadvantage of such a conversion is the final cost of the work. The price depends on the spare parts used.
2. Manual method.
The body, as in the automatic method, is mounted on an additional frame. The frame is also attached to the main one.
The convenience of this method is that, if necessary, it is possible to simply remove the body (for example, when you need to transport long pipes, etc.). Such long objects can be attached directly to the frame.
Subtleties of production
In practice, it is recommended to additionally install chains that will protect the loops from being pulled out. Ordinary door handles from household appliances or car mechanisms can serve as closures.
When constructing a removable body, you will also need to attach the tank, license plate, and turn signals directly to the frame (not to be confused with the body). It is necessary to ensure that the center of gravity is near the axes of the loops (about 30 cm in relation to the rear edge). This is the only way the body can be tipped over manually without any problems.
So, the Ant scooter today is not only a means of transportation, but also a powerful mini-dump truck at home. Despite the fact that the vehicle has not been sold on the auto market for a long time, it is still worth purchasing it second-hand. Thus, from a simple moped, thanks to little effort, we acquire a powerful dump truck and a sophisticated vehicle.
Build errors
In most cases, the right main bearing of the crankshaft fails due to an assembly error almost in the first season after repair. The engine that we are now repairing is no exception. The bearing has practically crumbled and in any case needs to be replaced with a new one.
The mistake is that when installing the flange on which the dynostarter stator is attached, the oil channel through which lubricant flows to the main bearing and oil seal is sealed.
To ensure that the main bearing lasts at least several seasons, cut the gasket under the flange a little along the contour of the oil channel and when you put the flange in place, do not smear anything with sealant there.
And one more thing: to avoid self-unscrewing of the bolts securing the dynostarter stator flange to the crankcase, and they come loose very often, apply a little thread locker to the threads. If possible, use a medium-strength fixative - “blue”.
Instructions
To make an all-terrain vehicle from a scooter, you will need to find a car that is in good condition.
It should be taken into account that the standard engine develops a power of 11 hp. and has low torque (displacement volume is only 200 cm³), which is not enough for dynamic acceleration of a home-made design and for overcoming off-road conditions.
Before you make an all-terrain vehicle from Ant, you need to decide on the concept of the car. To drive the rear wheels, a ready-made axle can be used, borrowed from VAZ or AZLK passenger cars with rear drive wheels. It is possible to use a separate reduction gear; the torque is transmitted to the wheels using axle shafts equipped with CV joints (for example, from an Oka compact car).
Frame design
Before assembly begins, drawing documentation is developed to allow the assembly of the engine and transmission units of the future all-terrain vehicle. The frame is assembled from sections of box-section steel profiles, which are connected by resistance welding. A platform is provided for installing the engine; the rear axle is bolted to the side members. Welding stockings is prohibited, since the resulting structure is not durable. The front shield from the scooter is integrated into the frame, which protects the driver’s feet from flying dirt.
To install the front wheels, a subframe is assembled, which is attached to the standard steering column. Wheel hubs are mounted on levers that allow the tires to move in a vertical plane. Shock absorbers with springs are introduced into the design to stabilize wheel vibrations. The resulting structure is cleaned of rust and then covered with a layer of special primer. It is recommended to paint the frame with synthetic impact-resistant enamel, which protects the metal from corrosion during operation of the all-terrain vehicle.
Engine Installation
The engine is installed in its original place through rubber gaskets that reduce vibration levels. To increase torque, several reduction chain drives are installed; the location of the gears is thought out at the frame design stage. It is necessary to ensure the tension of the chains, which should not break off the gears during sudden acceleration of the all-terrain vehicle. The motor retains the dynastarter, complemented by a manual start lever. The battery is placed on the top of the frame (to a point that is not filled with water and liquid mud).
Chassis and wheels
Hubs with brake mechanisms are installed on the rear axle, which are connected to the handle on the steering wheel. Discs are mounted on the hubs, which are enlarged by welding an additional rim. Ready-made tires with a developed off-road tread are used; it is possible to manufacture homemade tires from a tube installed in a metal frame. The disadvantage of the homemade design is the low strength of the rubber of the camera, which is pierced by branches or cut by sharp stones when driving along country roads.
The all-terrain vehicle can be equipped with 1 front wheel or 2 tires mounted on a rotating subframe. Front-wheel drive is not provided due to the low engine power and complex kinematic diagram, which is difficult to implement in artisanal conditions. It is possible to use a stationary frame with a steering mechanism and steering knuckles connected to each other by a rod. Instead of a standard scooter steering wheel, a steering wheel borrowed from Russian or imported cars is used.
It is possible to build an all-terrain vehicle from Ant on tracks; in this case, 2 seats for the driver and passenger are placed on a rectangular frame, and a motor with a gearbox is installed behind it.
The chassis consists of support rollers and a rubber track with metal transverse elements. The drive wheel transmits torque to the crossbars; a front roller with a screw mechanism for tensioning the caterpillar track is provided. There is no suspension in the design, the machine is capable of moving through swampy areas and deep snow.
general information
The Soviet cargo scooter has a reliable metal trike, made in the form of a platform with a tailgate. Ant's trike is quite roomy. The platform's carrying capacity is 250 kilograms, which allows the Ant scooter to be actively used for household needs. Thus, a cargo scooter allows you to transport:
- fertilizers;
- seedlings;
- hives;
- Construction Materials.
Motor vehicles are distinguished by maneuverability and unpretentiousness. In the garage, the Ant scooter takes up about the same space as a bulky motorized vehicle with a sidecar. Ant's turning radius is about 3.5 meters.
Characteristics of the Ant scooter
In winter, a cargo moped operates using a mixture of M6/3-10G/1 engine oil and A-76 gasoline, and in summer it requires the M8B grade.
If we compare the Ant scooter with a sidecar motorcycle, then in terms of operational fuel consumption the advantages will be on the side of the former. A cargo moped “eats” 8 liters/100 kilometers. It is also much lighter than a motorcycle with a sidecar - its weight is 240 kilograms.
Spare parts price
Despite the fact that the production of the device stopped long ago, you can still find new spare parts for it that are produced by the industry. Some parts are imported, some come assembled. Supplied in sets:
- Clutch discs.
- Gaskets for power plant and gearbox.
- Nuts.
- Pipes.
- Levers.
The necessary parts can be found on the Internet using store catalogs. Prices for spare parts for the Ant scooter are fair. Here are some examples:
- Clutch disc – 400 rub.
- Kickstarter shaft – 1100 rub.
- Front shock absorber – 1600 rub.
- Gearbox seals – 100 RUR.
- Piston – 2500 rub.
- Gearbox – 14,000 rub.
- Wheel hub – 2000 rub.
Judging by the prices, the device is more than cheap to repair. This is an important operational property for people in rural areas.
In terms of tuning the Soviet Ant vehicle, the owners can’t think of anything. After all, these are often tech-savvy people who like to spend time in the garage. Several directions can be distinguished:
- Weight loss.
To do this, you will need to remove “extra” equipment. This includes body kit in the form of wings, hood and fairings, as well as all electrical equipment. To transport goods around the village in the summer, all this is unlikely to be needed. - Increased output from the power plant
. To do this, cut off the dynostarter shaft. The operation will add power and dynamism. The recoil during starting is leveled by trimming the crankshaft. - Installation of other wheels.
Front 4.5 - 9, and rear 7 - 10. Cross-country ability and speed will increase. - Improvement of the piston group .
You can buy a piston with three rings and make an additional window in the cylinder to supply the fuel mixture. - Magneto and increasing the efficiency of the cooling system
are additional tuning.
The main task when tuning is to increase reliability and less tinkering with details due to breakdowns.
In terms of engine tuning, some owners took radical measures and installed a Lifan engine (Lifan 188f), which has a volume of 400 cubic meters, on the Ant scooter. cm. And its power is 13 hp. A distinctive feature of this assembly is the variator and centrifugal clutch.
A centrifugal clutch is not the best option for trucks, since when driving on rough terrain on a loaded scooter at low speeds, it may slip. And this incapacitates him.
What modifications of the “Ant” scooter are there in the video:
During the Soviet years, this bloodsucker Ant was bought only for its body. Since nothing like this was produced in the USSR in those years. And people needed to either go to the garden or feed the farm, so they took him.
The body in the Ant is really good; you can easily load 10 bags of mixed feed, 500 kilograms of coal or half a cubic meter of firewood and it will safely trample all this junk home. On the two-seater version, the body was significantly smaller and moved far back, causing the overloaded scooter to tip over backwards on bumps. But on the two-seater version it was possible to ride together
The tailgate opens like a regular truck
In stock, the body does not have extensions. On collective farms this feature was ignored and the sides were sewn to some unrealistic size.
The workhorse of the USSR - the Ant scooter
What models of this scooter were produced:
Models (the basic model of a passenger scooter is indicated in brackets):
- TG200 (T-200 “Tula”, not yet called “Ant”)
- TGA200 (T-200M)
- TGA200-01 (“Tourist”)
- TGA200-01P
- "Ant-2 01" ("Tulitsa")
- "Ant-2 02" ("Tulitsa-2")
- "Ant-2 03", the latest model for 1991
- GTS-1
Characteristics of this beast:
- The engine is single-cylinder, carburetor, two-stroke with forced air cooling, displacement - 199 cm³.
- Power - 11 l. With. at 4600 rpm, torque - 16.3 Nm at 4900 rpm, compression ratio - 6.5.
- Carburetor type K-65G.
- Starting the engine with a starter or kickstarter.
- The gearbox is two-shaft, 4-speed. Reverse gear (reverse gear) is located in the cross-axle differential housing. Drive to the rear wheels is by swinging shafts with cardan joints. Torque is transmitted from the power unit to the differential by a roller chain in a sealed casing.
- Tires: 101.6×254 mm.
- The front suspension is long-link, the rear is independent on wishbones.
- Total length - 2880 mm, wheelbase - 1840 mm, ground clearance - 115 mm.
- Dry weight - 258 kg (for models 5.402-03 and 5.402-03K, open cargo platform) or 285 kg (for model 5.403-03F, van).
- Load capacity - 340 kg (for models 5.402-03 and 5.402-03K) or 375 kg (for model 5.403-03F).
- Maximum speed is 60 km/h.
- Fuel consumption - 5.5-7.5 l/100 km.
- Gas tank volume - 10 l.
The scooter is filled with a gasoline-oil mixture in a ratio of 1:30 during run-in and 1:35 during further operation. Ant", 1980s
The TMZ-450D diesel engine was developed for the Ant scooter in the early 1990s.
Source
Engine
The Ant engine is somewhat different from Soviet engines of that time. The most significant difference is in the starting system: here it can be done using an electric starter (this was very cool in the 50s) or using a manual kickstarter. There was no trace of an electric starter on any Soviet motorcycle of those years.
The engine is started with the starter just like a regular car: insert the key into the ignition, turn the key all the way to the right and the engine starts.
The second difference is the forced cooling of the engine
The fan drives air through the casings, cooling the cylinder and cylinder head. The cooling system works tolerably
Mechanical clutch with cable drive from a lever on the steering wheel
The gearbox is manual, the shift lever is located on the left directly under the driver’s foot. The switching algorithm is as follows: first, second, third and fourth gears are switched up. Neutral gear is at the very beginning and to engage it you need to push the gear lever down. Controversial decision, but that's how it's done here
Twin-shaft gearbox with constant gear meshing
The engine is as simple as a broom
Motor scooter Ant – tuning
Every driver dreams of upgrading his own vehicle. And here fantasy knows no bounds, and external tuning becomes a way out of the situation. How can you improve your Ant scooter - tuning will be the best solution. You can paint the wings, hood, body and thus transform the model.
Before carrying out work, the vehicle is carefully prepared: cleaned, sanded, degreased.
As you know, scooter owners love to use various stylish bells and whistles, and external tuning allows you to transform the device. There are a great many options for external transformation of your favorite iron horse, and the owners of the Ant scooter are not alone in their desire, because the Voskhod 3M motorcycle is an equally popular model for tuning. Even an inexperienced motorcyclist can do tuning Voskhod 3M with his own hands.
You just need to pay attention to this and use your imagination so that your old man will sparkle with new colors and get an attractive appearance
Engine assembly
Unlike a dynastarter, repairing an Ant scooter engine with your own hands is difficult to do according to the operating book. Therefore, it is worth seeking the advice of experienced motorcycle owners. Most often, the engine has to be disassembled when there are problems with the clutch mechanisms, the operation of the gearbox, as well as wear on the crankshaft, bearings or oil seals. The most important rule is not to be afraid to disassemble the engine yourself. Using these instructions, disassembling and assembling the engine of the Ant scooter will not be difficult.
So, the procedure for disassembling the engine:
- To begin, prepare your workspace. If you want to achieve proper and trouble-free operation, keep all parts clean and tidy. Remember and complete the disassembly order.[sc:ads3]
- First of all, remove the engine from the frame. To do this, you will need to remove the supporting hood covering the engine. Simply put, you need to unscrew the deflector, the volute and the wires: high-voltage, positive and ground. You can unscrew it in any order.
- Place the moped at any speed, unscrew the nut securing the dynastarter to the crankshaft and, holding the brake, press it out.
- With the scooter running at speed, unscrew the nut located on the drive sprocket.
- Remove the generator stator by unscrewing the 4 screws and remove the casing with the wires coming from it.
Then we move on to removing the clutch cable and kickstarter lever. Now the task is to remove the muffler. To do this you will need a special key. In some cases, the muffler is secured to the cylinder with two regular bolts. Drain the oil from the gearbox by unscrewing the drain bolt. Then unscrew the three points securing the engine. Now you need to unscrew the cylinder secured by 4 nuts located on the head. Remove the head and place the cylinder vertically, with the open part up. The piston can be left in the crankshaft unless replacement is required. Otherwise, you need to pull out the locking rings and then knock out the pin. Now remove the bushing on the output shaft where the drive sprocket previously was. Unscrew the “flower” with the attached right crankshaft oil seal. Then remove the kickstarter cover secured with a stop bolt and 5 screws. Next, the clutch is removed. The central adjustment screw can be left untouched, but the 3 fingers with hooks located around it must be unscrewed. Pull out all the clutch discs located inside and remove the clutch lever attached to one bolt. The lever must be removed along with the spring. Use a chisel to break off the lock washers of the crankshaft and clutch basket and remove the rods and balls. After this, the entire structure is removed. Now the engine can be separated into halves; you just need to unscrew all the connecting screws. When all the parts are disconnected, you can tackle the problem area where the problem has arisen.
You can see how to assemble an Ant scooter engine in more detail in the visual video at the end of the article. The essence of assembly is in the reverse order, but it is important to tighten the parts with a certain force and synchronize the parts with the marks. Under no circumstances should you assemble an engine without detailed instructions written by the manufacturer.
With frequent breakdowns, owners think about what engine can be installed on the Ant scooter. Instead of a native motor, you can use Chinese analog motors . Since the Ant has many copies in Asian countries, replacing the engine can be a great option to save money in case of irreversible damage. True, you will have to make the fastenings yourself and, in some cases, remake the bridge for the left-hand arrangement of the chain. This is not very difficult, considering that the Tula plant provided for the possibility of rearranging the bridge.
Improving the carrying capacity, or making a dump truck out of Ant
The Ant scooter is a powerful device, but most owners are not averse to increasing the model’s load-carrying capacity. In addition, you can remake the body and make it folding (like a dump truck).
However, there are some nuances and the main thing is not to overdo it. As you know, the load capacity is about 250 kg; in practice, large loads can also be accommodated. But it should be remembered that with such a load the speed will be much slower (up to 35 km/h).
You can increase the load capacity by increasing the sides. However, the scooter frame will need to be strengthened.
Welding can be considered the most optimal option, but you can do it without it (the additional frame is made from wood).
In this situation, the body is moved forward or left in its place, but it is prohibited to move it back.
It is possible to consider the option of installing separate booths on such scooters, which will require separate costs.
The following mechanisms are most often used for a dump truck:
- cable winches;
- hydraulics with automatic drive;
- methods using door hinges, etc. (so-called “manual”).
As for hydraulics, you will also need to use a pump. The total costs with this approach may exceed the cost of the scooter itself.
Let's consider options for implementing the idea:
1. Using automation.
The body is attached to an additional frame, which is connected to the main frame using hinges. Lifting can be carried out using a diamond jack, which operates with a simple electric drive. The electric drive itself can easily be made using the window lifters of a simple car. This is the essence of automation, when the body tips over with the press of one button.
The only disadvantage of such a conversion is the final cost of the work. The price depends on the spare parts used.
2. Manual method.
The body, as in the automatic method, is mounted on an additional frame. The frame is also attached to the main one.
The convenience of this method is that, if necessary, it is possible to simply remove the body (for example, when you need to transport long pipes, etc.). Such long objects can be attached directly to the frame.
Subtleties of production
In practice, it is recommended to additionally install chains that will protect the loops from being pulled out. Ordinary door handles from household appliances or car mechanisms can serve as closures.
When constructing a removable body, you will also need to attach the tank, license plate, and turn signals directly to the frame (not to be confused with the body). It is necessary to ensure that the center of gravity is near the axes of the loops (about 30 cm in relation to the rear edge). This is the only way the body can be tipped over manually without any problems.
Removal
Whatever one may say, the winding lever will only get in our way - unscrew it
Unscrew the two nuts on the muffler elbow mounting flange
The muffler, which will prevent us from removing the engine, is attached to the frame with two bolts. We unscrew the bolts and remove it together with the knee or separate it in place and remove it separately - it doesn’t matter
Unscrew the gearbox drive rod and throw it on the ground
Disconnect the breaker contact wire from the coil
Disconnect the ground wire. The ground wire is located at the bottom of the engine just behind the muffler elbow. Attached to the engine with a 10 nut
We remember the location and unscrew the dyno starter wires from the relay regulator. After unscrewing the terminals, remove the wiring harness from the frame
The engine is attached to the frame at three points: one at the very bottom, the other two - in front and behind. We unscrew the bolts that secure the engine to the frame. For greater convenience, the bolts on the engine do not need to be removed and instead, only the brackets can be unscrewed from the frame
Just a couple of months ago, an old client asked to overhaul the engine of his Ant for the season. He is not greedy for money - he promised to buy everything needed for repairs. We agreed, the client brought it for repairs. The piston, crankshaft, motor chain and almost all bearings were worn out.
The customer insisted on purchasing a new crankshaft. They are now in abundance in any store - I don’t want to take them, but their quality is still good... I resisted for a long time and in the end the client found a used engine from which I pulled the crankshaft. Of course, it was slightly worn out, but the bearing of the lower head of the connecting rod was intact and intact, and we didn’t need anything more.
The main disadvantages of a scooter and its modernization
Motor scooter Ant and his carburetor
The Ant scooter, like any technology, in addition to its positive qualities, also had disadvantages. At the same time, the existing shortcomings could be attributed both to structural ones, originally inherent in the device, and to operational ones, arising during the operation of the equipment.
According to reviews from owners, structural defects that required rework or the most frequent repair of a particular unit include:
- an unsuccessful electrical circuit of the scooter, often leading to failure of components (din-starter, relay-regulator, ignition coil), especially in rainy weather;
- an undeveloped gearbox device often with poor-quality factory assembly led to a crash during 2nd or 3rd gear operation. To fix it, the owners had to study the structure of the box itself, as well as how to properly disassemble and then reassemble the gearbox after repair;
- a small difference in fuel levels between the tank and the carburetor chamber led, when there was little fuel in the tank, to running on a lean mixture or stopping the engine.
The most common operational deficiencies are:
- unstable ignition on the Ant requiring frequent adjustments;
- short service life of brake pads;
- loss of hydraulic fluid from shock absorbers, requiring disassembly, refilling and reassembly of shock absorbers for repairs;
- malfunction of the electrical equipment of the starter dyno under the influence of dirt, water, dust. Repairs were carried out by disassembling and reassembling, checking the electrical circuit, searching for and replacing the failed element;
- occurrence of cracks in the frame;
- oil leak in the gearbox.
Very often, the owners, having gained experience in operating the Ant scooter, carried out modernization. But before starting to implement the changes, the following issues were resolved:
- How much is it?
- What will the modified Ant look like?
- How to find and collect the necessary materials for upgrading?
- How much will the scooter weigh after the modification and how will this affect the technical characteristics?
- How long will it take to remodel?
After receiving positive answers to these questions, work on changes was carried out. Tuning the Ant scooter, which made it possible to give it additional properties, boiled down to the following basic alterations:
- Installation of a dump body for transportation of bulk cargo.
- Change of appearance design.
- Installation of a coupling device that allows you to work with various trailed and semi-trailer devices and equipment.
Versatility, cost and maintainability allowed the TMZ Ant scooter to be compared in terms of production volume and popularity with such best Soviet models of motor vehicles as the heavy M 72 Ural motorcycle and the light road motorcycle for the Minsk 125 village.
Previous entry Izh Jupiter 3 - technical characteristics, review Next entry Izh Jupiter 4 - technical characteristics, improvement
Brakes
Ant also has brakes, and you can even try to stop the scooter with them, but only three kilometers before the obstacle. Both brakes are mechanically driven drum brakes: front manual with cable drive, rear foot with rod drive
I would like to warn you right away that this article is a complete instruction for overhauling a Tula engine; it is intended for a narrow circle of people who may really find it useful. But I have an idea to write an analogue of this article in an accessible language and try to display in it the principle of operation of the engine itself, gearbox, clutch and other components so that even a person who does not understand anything about technology begins to have at least some idea about the structure of the motor. If you have any thoughts on this, I'd love to hear them!
I’m probably not the person who should have become the author of this article, but since no one has done this before me, then let it be written by me, over time, on the advice of more experienced comrades, I will make the appropriate changes.
We will talk about a complete engine overhaul, which may be required if there are problems with the gearbox, clutch mechanism, bearings/oil seals/crankshaft are worn out, or something just suddenly falls apart. I'll tell you from the very first step to the last. Many inexperienced owners of Tula equipment are afraid to go there and, as they say, “half” the engine. I myself was in the same situation; any suspicion of a malfunction inside the engine caused a panic attack and a desire to abandon the scooters.
Therefore, I decided to write an incredibly detailed article; there will be nothing special or new in it, just a lot of photographs and explanations, and advice from personal experience. One of the biggest difficulties is to correctly parse and remember what comes from. I photographed the entire disassembly process and the position of some parts (how they are secured, in what order, etc.).
To be honest, I have only assembled one engine in all this time. This happened this summer, and now I immediately confidently rush into writing an article. But I dismantled as many as three engines (one a year), so I still remembered where they came from, but I never assembled the other two engines. For various reasons, they lie disassembled on shelves.
As I already wrote in my topic about, the scooter was given to me by a worker, it started up and drove, but out of the required 4 gears, the fastest one, the fourth, was missing. This was the reason for the engine repair.
If you want to do everything well, so that it works and you don’t have to regret it later and take everything apart again, I advise you to follow a number of simple rules:
.
Avoid
any dirt
, especially during assembly, and keep the work area clean. Personally, I’m such a neat person that I even changed the rags as soon as there was no white space left on them, and for this it was enough to run the rag over any surface a couple of times.
.
Do everything extremely
carefully
, no displays of brute force. Of course, you can stupidly assemble/disassemble the engine with one hammer, but still, despite the fact that this is Soviet technology, it works according to certain laws of physics, which are fulfilled for both the Honda engine and the Tula one. As an example, I will say that if you press the liner out of the cylinder jacket and place it back with a 1 degree offset clockwise/counterclockwise, the engine power can lose up to 2 hp. due to inaccurate alignment of the purge windows. Inaccurate pressing of oil seals and bearings also risks not only damaging their seats, but even blocking the lubrication holes of the bearing, causing it to quickly fail.
.
Do not lose small parts; place all removed parts on a clean surface or in a separate container.
Minimum tools needed:
Retaining ring remover (if not, it’s better to buy, it costs about 200 rubles in any auto parts store) - dyno starter remover (no way without it, 150 rubles) - slotted screwdrivers - knife - mallet - hammer - pliers - set of socket and ring wrenches (sizes from 8 to 22) - a container for small parts - gasoline for washing and some kind of degreaser, solvent 646 can be used, but it cannot be used to wipe rubber seals.
Approximate costs in terms of money (depending on finances and the reason for repair or wear of parts):
minimum (if you order from the online store RosOpt.com, I indicate all prices based on them, even if there is such a small advertisement, but the company is really good):
Set of seals…………………………………. …………………………. 60 rubles – a set of gaskets…………………………………. …………………………. 45 rubles – sealant or bakelite varnish……………………………………. …….. 90 rubles total minimum …………………………………. …….. 195 rubles
maximum (i.e. must be added to the minimum):
New bearings (if you install domestic ones, you can spend 500 rubles. If you use expensive Japanese/Austrian bearings (SKF, KOYO, etc.), you will have to spend about 2-3 thousand.
If desired, you can also replace: - motor chain…………………………………. …………………………… 120 rubles – clutch discs…………………………………. …………………………. 250 rubles – crankshaft…………………………………. ……………………………………. … 950 rubles total maximum …………………………………. ……. from 700 to 3500 rubles
Another small clarification regarding the photographs, I did not record the complete stage of assembly/disassembly of one specific engine. Those. a photograph whose caption talks about disassembling a particular unit may actually depict the assembly stage of a completely different engine, but this is not important, the main thing is to pay attention to the specific part and its location
.
I'll start with the banality.
The very first thing to do is remove the motor from the frame.
Whether on Ants or passenger scooters, this procedure is exactly the same. To do this, first remove the supporting hood that covers the engine. The operations outlined below can go in any order, with the exception of a few nuances that I will draw attention to. We remove the air filter and carburetor ( you can remove it entirely, you can disconnect only the cables and leave it on the cylinder. For example, I removed the reed valve without disconnecting the carburetor from it, but not all engines have this valve
).
It is convenient to immediately remove the cooling deflector ( if equipped
)
(1 in the photo below)
and the cooling scroll
(2)
.
If an ignition coil is connected to the cochlea, then disconnect the high-voltage wire (3)
, i.e.
remove the cap from the spark plug and then disconnect the long thin wire (4)
that comes to the minus of the coil.
If the coil hangs on the frame, then instead of wire (4)
we disconnect another one - going from the breaker to the plus of the coil
(5)
.
1 - deflector 2 - volute 3 - high-voltage wire 4 - positive power wire that goes to the minus coil 5 - ground wire coming from the breaker to the positive coil
The snail itself is attached on the reverse side with 4 pins and nuts. After unscrewing the nuts, you need to carefully knock out the snail through a long piece of wood, because It usually fits pretty tight. Then remove the impeller (1)
and ignition cam (
eccentric
)
(2)
.
Remove the cover that covers the chain (3)
(
you can leave it hanging on the speedometer cable
).
Then we disconnect the wire from the neutral sensor (4)
and remove it - it is secured with 2 screws.
There is a shaped copper washer on the shaft under the neutral sensor:
Then you need to put the scooter on speed and, holding it with the brake, use a puller as in the photo to press out the dyno starter, having first unscrewed the nut holding it on the shaft and don’t forget about the washer under it:
This should definitely be done on an engine that has not yet been removed, otherwise it will cause a lot of problems later, because The rotor sits very tightly and, if the engine is not stopped, will spin when the puller is turned. You must immediately put the key aside so as not to lose it. I advise you to do as I do: put very small parts in some container, and large parts - on a rag along with the screws/bolts/nuts on which they were held, so that later you can always know where which screw comes from. Or bait them into the place from where they were twisted.
Also, without removing the scooter from speed, unscrew the drive sprocket nut (number 5 in the third photo)
, which is usually locked with a special washer.
The edge of the washer must be carefully bent using a thick screwdriver or chisel and hammer. When unscrewing the nut itself, note that the thread on the shaft is left-handed; you need to unscrew it clockwise
. There is also a large grower under the nut. I fastened similar paired parts (star, washer, lock washer, nut) with wire so as not to forget which nut corresponds to which lock washer, etc.
There are 4 wires coming from the stator, the thickest goes to the starter relay (terminal C
on the relay regulator)
. One, the longest wire, goes to terminal Sh
, and two more wires, relatively equal in length, go to terminal
YSh
(one of the wires must have a fuse).
With clean hands, remove the generator stator; it is secured with 4 screws. (1)
and carefully pull out the casing with wires.
Usually, to do this, you need to unscrew another bar (
2 )
, which is secured with two screws, these screws are one of those that connect the halves of the engine.
Usually there is also a cardboard ring under the stator, I don’t know exactly what it’s for, but I’m in no hurry to throw it away. Remove the gear shift rod mount (1)
, kickstarter lever
(2)
and clutch cable
(3)
.
The last thing left is to remove the muffler. Depending on the cylinder, you must either unscrew the large nut with a special wrench as in the photo below:
or two bolts (1)
flange mounting
(2)
:
You also need to drain the oil from the gearbox by unscrewing the lower drain bolt (see photo)
. The oil in the box is about 1 liter, so I advise you to prepare an appropriate container in advance.
Now the 3 engine mounting points are unscrewed: front, rear and bottom (1)
, the bolts are carefully removed, and after this the engine is almost always pulled out without difficulty. For convenience, on Tulitsa/Tourist you can loosen the rear landing mount
(2)
.
on the Ant, you can unscrew the front and rear ears of the mounts and remove the engine along with them.
I can’t give you any advice about an off-road motorcycle; I haven’t dealt with one.
The cylinder can be removed either from an already dismantled motor or from a motor still on the frame. Everything is extremely simple, regardless of the type of cylinder, unscrew the 4 head nuts:
We remove the head and lift up the cylinder itself. If the piston group does not require replacement, then the piston can be left on the crankshaft. If it is replaced, then the retaining rings of the finger are removed using duck-billed pliers. And then, using the design as in the photo, it is convenient to knock out the piston pin. This is done so as not to bend the connecting rod and damage the piston.
We remove the bushing sitting on the secondary shaft, which is located behind the previously removed drive sprocket.
We unscrew the “chamomile” in which the right crankshaft oil seal (hereinafter referred to as CV) is secured.
It is secured with 6 screws, I repeat that for convenience it is worth tightening such screws back, so that you don’t forget or lose anything later, and put the “daisy” aside.
Unscrew the kickstarter bolt (1)
, it is locked with a washer, which must be carefully bent.
At the moment of unscrewing the bolt, the shaft must be bare (without a kickstarter or other levers!), otherwise, after unscrewing the bolt, it will make several revolutions under the action of the spring and may injure you. Now you can remove the left cover that covers the clutch; it is secured with 5 screws (green arrows)
.
I advise you to tilt the engine on its left side and, while removing the cover, hold the starter shaft, because on earlier models, the parts on the shaft were not secured and they could fly into the engine. It is worth warning that even if you have drained the oil, still after disconnecting the left cover when the engine is tilted, the remaining oil will flow out, so spread some kind of rag or just be prepared for this. It is better to put the kickstarter shaft aside as a whole, without disassembling it, if it is in good working order and does not cause any complaints.
Now you need to remove the clutch. Center adjustment screw (green arrow)
You don’t even have to touch it so as not to upset its settings.
But besides it, depending on the model and year of the scooter, the clutch can either have 3 fingers with nuts (red arrows)
, which simply unscrew:
Or on 5 fingers with lock washers. It is convenient to remove the washers using a 10mm wrench, using it to hook your finger upwards by the protrusion and pulling out the freed washer.
After the cover is removed, we take out all the clutch discs in a pack and tilt the engine on the left side, pour out 2 rods and a ball from the gearbox input shaft. To remove the clutch lever you need to unscrew this screw:
and carefully pull out the lever along with the spring.
Now, using a hammer, screwdriver or chisel, bend the lock washers of the crankshaft star nuts (1)
and clutch basket
(2)
.
The rods and ball were previously pulled out of the hole (3)
Afterwards, the entire assembly assembly is removed (all together: sprocket, clutch basket and chain), we also carefully remove the nuts with their corresponding lock washers so as not to forget which goes where, although it is unlikely to be possible to mix them up during assembly. If the crankshaft is an old model, it will have a key, which also cannot be lost and should be immediately put aside, but mine was sitting so dead in the groove that it didn’t even have to be pulled out. On the new crankshaft, the sprocket sits on splines. Under the clutch basket there is another washer and bushing:
The engine is now ready to separate the halves. All that remains is to unscrew all the connecting screws on the right side (red arrows)
, you need to pay attention that all screws are the same length, except one
(green arrow)
:
Using a mallet or even a thin screwdriver carefully inserted between the halves, we begin to separate them. The main thing is not to damage the joint surfaces of both crankcase housings. You can tap the crankshaft on the left side with a mallet. In general, it’s worth figuring out how it would be more convenient to place the motor on the table; two cubes of timber were enough for me for this purpose.
When the halves finally give in, it shouldn't be too difficult to separate them completely. In this case, the gearbox can remain either in the left half or in the right half, depending on which bearing sockets the shafts sit tighter in. In total, from the inside of the box you will have to remove 2 shafts with gears, a gear shift drum and a shift shaft. The last, and sometimes very labor-intensive, task is to knock out the crankshaft. In one engine I pulled it out with one hand, in the other I couldn’t knock it out with a sledgehammer. Only after several dozen blows did he give in and crawl out of the bearings. In no case should we forget about accuracy, but there are times when you can’t do without a sledgehammer (it’s unlikely that you have a hydraulic press in your garage?), so in the case described above, you need to screw the KV nut back and hit the nut flat so as not to damage thread on the shaft itself.
After the HF is removed, we should be left with 2 engine halves with seals and bearings and a clutch cover with 2 seals.
Much depends on the reason for disassembling the engine; if the breakdown is, for example, a broken gearbox shaft bearing, or the crankshaft needs to be replaced, then other intact bearings are not always replaced. They always advise, since the engine has been opened, to at least change the seals, because... it is not known when the next time you will have to halve the motor, and a leaking oil seal can create a huge headache, especially since the kit costs no more than 100 rubles. Bearings can be checked by their fit on the shafts and in the holes. If the bearing falls out of the seat intended for it or does not fit tightly on the shaft, then it is better to replace it, but there are cases when the problem is in the hole or the shaft is already worn out. In this case, you can do as I did - use a cylindrical joint clamp. It costs about 150-200 rubles, and it grabs you tightly. A more complex option is galvanizing to increase the diameter of the shaft or bearing. If all the bearings fit very tightly both on the shafts and in the seats, then this is an ideal option and nothing should be touched.
In our case, we will change all seals and bearings. Let's start with the clutch cover, there are only 2 oil seals, which are convenient to pick out with pliers or duck-nosed pliers. The photo shows the shift shaft seal (1)
already removed, but the kickstarter shaft seal
(2)
is still in place.
We must not forget that the oil seal is not just a piece of rubber - inside it there is a metal ring of the required diameter, and if the edges of the oil seal are torn, the ring will remain in the socket, so you must try to hook it with pliers from different sides and pull it up one by one. By the way, I note that in the above-mentioned cover there is also a small bushing (see photo)
, but you shouldn’t pull it out.
On the left half of the engine there are 2 gearbox bearings, 2 KV bearings and a KV oil seal. Gearbox bearings (1)
they can be knocked inward without any problems, and the retaining rings don’t even need to be removed.
the bushing (2)
, but if you removed it, don’t forget where it came from.
With crankshaft bearings everything is much more difficult. First, all the retaining rings are pulled out. And then I advise, for example, using the head of a huge 20 centimeter nail to knock on the circle of the inner race of the bearing and knock it out, i.e. The inner bearing is knocked out, the outer bearing is knocked out. To remove the oil seal, you need to knock on its edges, where the metal ring is located; with a nail you can scratch the inner surface of the seat. Therefore, here it is better to get by with a wooden block the size of the hole, or use a timing valve from a car of a suitable diameter, or grind the edges of the old bearing on a grindstone so that it fits into the seat without tension, and knock the oil seal out by knocking on it. And the best option is to make a bushing like this, with an outer diameter of 51 - 51.5 mm, an inner diameter of ~ 30 mm, and a depth of at least 70 mm, with a bushing length of about 100 mm. It will also be useful when installing new oil seals and bearings.
In the right half there are 2 more oil seals and 3 bearings. Both oil seals can be easily pulled out with pliers, small (2)
You can even pick it out with a screwdriver (it’s no longer in the photo).
Usually only the outer race remains in place of the crankshaft roller bearing; it can be knocked out with the same nail.
But with gearbox bearings it will be much more difficult. If 204 secondary shaft bearing (1)
taps inside without any problems, then 202 the input shaft bearing
(2)
is completely closed on one side and it will no longer be possible to tap it. In general, if it fits tightly, I would advise not to touch it, because... To remove it you need a special puller.
I didn't have that. In one case, I acted sadistically, I broke the metal brackets that hold the balls, then moved all the balls to one side and pulled out the inner race of the bearing in the opposite direction from them.
Having taken out all the giblets, I carefully used a large screwdriver to pry off the outer race of the bearing remaining in the socket. In another case, this bearing fell out of its socket on its own, or it could simply come out in such a way that the bearing would sit tighter on the shaft than in the hole and would also come out on its own. There is also an old old-fashioned method: stuff bread pulp or plasticine through the central hole, and sooner or later this mixture will squeeze out the bearing around the edges. There is usually an oil deflector washer under the bearing:
I ruined my first washer and then cut it out of an aluminum can:
Now we have the engine crankcase completely free of all internals. All other assembly details will be in the second part, which I will write a little later.
Almost just before leaving for permanent residence on another collective farm, an old acquaintance, whom I had not seen for 15 years, turned to me and asked me to overhaul the engine of his Ant. To be honest, I didn’t have much of a desire to get involved with this Soviet chatterbox, to say the least... But after thinking about it and playing out the situation in my head that I would have to sit in a new place for some time without my favorite job, I agreed and immediately began the repairs.
I will not go into the essence of the disassembly in particular within the framework of this article - I will only outline the main points and, based on my experience, I will try to describe the most common malfunctions and errors during repairs.
The engine had the following symptoms before being repaired:
- Bad start
- Oil leak
- Weak traction
- Increased noise during operation
- The winding lever did not return to its place
Preliminary diagnosis:
- Depressurization of the crank chamber, as well as wear of the seals
- Poor quality assembly
- The piston died
- Bearing wear
- Kickstarter return spring broke
Everything else, including the gearbox and clutch, did not cause any complaints during operation. However, first things first.
The motor chain turned out to be stretched, but not critically.
A few words about the trailer
You can also make a trike yourself. The spaciousness of the body is indicated by the photo of the Ant scooter. A standard trailer consists of:
- stroller frame;
- L-shaped steel bracket;
- two clamps;
- tubular struts.
You will also be interested: New Ural motorcycles: continuation of domestic traditions
When working on the trike, it is very important to ensure that the trailer shell does not come into contact with the bracket. To increase body rigidity, a steel gusset can be welded
In addition, it is important to make a homemade trike with an opening and removable tailgate. The sides and bottom are covered with boards. Additionally, the trailer is equipped with lighting equipment (dimensions, brake lights, turn signals).
Peculiarities
The Ant cargo scooter is quite easy to maintain. If it breaks, you can turn it on its side and make repairs or replace parts. However, it cannot be called economical, since a 2-liter single-cylinder engine consumes as much as 8 liters per 100 kilometers, and after wear of the piston system it is 10 liters. However, at that time the cost of gasoline was low, so there were no problems with operation.
The simplicity of the motorcycle’s structure does not require any special knowledge of a mechanic, because even to remove the tire there is no need to re-mount it. Simply unscrew the bolts located in a circle. These types of features of the moped allow repairs to be made anywhere, without special equipment. Which is very convenient, because it’s no secret how often Soviet equipment breaks down. However, in case of serious engine and chassis breakdowns, which occur quite often, the knowledge of a mechanic is sometimes simply necessary.
If necessary, you could choose a moped with the most suitable configuration. Thus, models with an additional seat for a passenger and models with a closed body were released.
The Ant scooter currently has many analogues in Asian countries. Road congestion in Asia has made the cargo moped one of the most popular models for hard workers. It allows you to easily navigate narrow alleys and significantly reduces travel time. The Chinese analogue and the original Ant scooter, although they do not have significant differences in appearance, are strikingly different in quality.
How to disassemble the gearbox
The Ant gearbox is disassembled according to a certain scheme. This process is necessary if for some reason Ant’s gearbox stops functioning. Some people do it wrong: when the gearbox breaks, they simply throw it away. But with the right approach to this matter, the device can be repaired, after which the Ant scooter will function the same as before. In addition, it is difficult to buy spare parts for the Ant scooter, so you shouldn’t waste them.
The Ant scooter can become a useful type of equipment today. If you have your own farm or garden at your dacha, you won’t find anything better than such a scooter.
Source
Maintenance and repair
Due to its low weight, this moped, if necessary, can be “put on its side” even alone. Also, given that Ant disc wheels consist of 2 halves bolted together, replacing a damaged tire is quite simple. To connect the tube and the spare tire, it is necessary to separate the parts of the removed wheel.
Motor scooter repair Ant
Tools
In order to properly repair a Soviet moped, you will need the following tools:
- double-sided wrenches (set), 4-22 millimeters;
- screwdrivers - 3 pcs. (large, medium, small);
- hammers, 2 pcs. (100 and 300 grams);
- combination forceps;
- wooden stick;
- wire cutters;
- pliers;
- socket wrenches (4 pcs.);
- velvet files - 2 pcs. (flat).
Diagnostics
The Ant scooter must undergo regular maintenance. This is necessary for two reasons:
- This will improve performance characteristics and thereby make the model more reliable and durable.
- Timely diagnostics will allow the owner of such a rare motor vehicle as the Ant scooter to avoid an accident.
Unfortunately, not every owner of such a Soviet rarity as the Ant motor scooter regularly visits the service. Often, completely “dead” equipment is received for repair.
Scooter maintenance
Professional servicing of Ant is a series of operations through which the scooter remains in impeccable condition. Scooter Ant needs:
- daily cleaning;
- washing;
- lubrication;
- oil change;
- adjusting brakes and breaker;
- changing used tires.
If maintenance is not regular, the Ant scooter will require major repairs, which implies a serious financial and time investment.
Repair
If a scooter requires urgent replacement of a damaged or worn part, then repair work cannot be avoided.
It is important to remember that only a highly qualified specialist should repair a scooter, who always has the necessary tools at hand. A Soviet scooter in most cases undergoes one of three types of repairs:
A Soviet scooter in most cases undergoes one of three types of repairs:
- current;
- average;
- capital.
If a scooter needs routine repairs, it does not require much time or removal of a large number of parts. If the Ant scooter requires average repairs, then the owner must take care of disassembling the engine or some elements of the chassis. If the Ant scooter needs a major overhaul, this means that it is time to completely disassemble the chassis or engine and replace all worn parts. To avoid risks, without sufficient qualifications, major repairs should be entrusted to an experienced specialist.
FAQ
What is its maximum load capacity? You can put 340-375 kg on the platform depending on the year of manufacture (there are minor differences), but you should do this carefully so as not to tip over on your side somewhere in a turn.
What about the maximum speed with and without a load? Without it - 60 km/h, according to the manufacturer. With a load, it is better to drive slowly and carefully, since a loaded tricycle is controlled in a very non-trivial way and is not stable.
They haven't been produced for a hundred years now, I'm afraid I can't find spare parts
Are there any Chinese analogues? No, there are no direct analogues, but in most cases you can choose something suitable and then modify the part with a file. And in general there are enough non-original Russian-made spare parts.
Assembly
I bought this main bearing. It seems to be our production. There are Chinese analogues in stores - they are more expensive, but I don’t know what their quality is... I try to buy something that may not be of such super-duper quality, but at least one that has been proven over the years.
The quality of production is such that there is essentially nothing to complain about. The price is quite reasonable - 350 rubles.
We press the inner race of the main bearing onto the right crankshaft journal. External - screw the stator flange of the dynostarter and press it into the crankcase until it rests against the flange.
We install the oil seal, retaining ring and main bearing into the left half of the crankcase. I'm installing a new main bearing. It is closed, but it doesn’t matter: we open it, wash out the factory grease and install it in the crankcase.
Lubricate all bearings and working edges of oil seals with clean engine oil. And very carefully, so as not to accidentally wrap the edge of the oil seal - insert the crankshaft into the left half of the crankcase, assemble the gearbox and knock out the crankcase guides by 5-6mm.
We degrease the crankcase connector, install a new gasket and install the second half of the crankcase.
We tighten the bolts and immediately, so that nothing gets into the crankcase, install the piston. I'm installing a new piston, cylinder head and reed valve body. The piston one, like everything else, is of no particular origin - most likely Rostov, but clearly not Chinese. I didn’t want to get involved with this counterfeit, but the owner didn’t want to wait until they bore the cylinder and put a liner in the cylinder head and insisted on buying it. You see the prices for spare parts - it’s up to you to decide whether to contact this new product or not.
We install the second main bearing into the crankcase and secure it with a retaining ring.
We adjust and assemble the clutch mechanism.
We install the manual start mechanism and close the whole thing with a standard lid.
A short summary
So, the Ant moped is a real Soviet classic. At the time of release, this vehicle was one of the best options in terms of price/quality. And now such a bike demonstrates good technical parameters. But, since the motorcycle has not been modernized for a long time, its fuel consumption is very high.
Thus, maintaining such a workhorse will cost a lot of money, so the bike is more suitable for lovers of rare models than for people who are looking for transport for daily use.
Video review of the Ant scooter:
Electrics
The most problematic part of the Ant has always been considered its electrics, in particular the voltage regulator relay and dyno starter (generator and starter rolled into one). Due to their design features, the dyno starter and relay regulator require constant attention and qualified maintenance. If the dyno starter is not serviced on time, then it begins to undercharge the battery literally in the first season
On older models, the relay-regulator was of a mechanical type
On the latter, more advanced - electronic type
Contact ignition. The contacts are located in the cooling casing
The ignition coil and capacitor are located on the frame. In terms of repair and maintenance it is very convenient