For readers of our blog there is a 10% discount using the promo code blog-BB30 on all products presented in our store
Vibrations do not lose popularity. Easy maintenance, cheap consumables and unpretentious operation are an excellent option for those who use a bicycle primarily for transportation, without extreme or excessive loads.
The principle of operation is elementary - when pressed, the brake lever pulls a cable (G) , which moves the brake levers (I) , pressing the pads (J) to the wheel rim. When the handle is released, the levers return to their original position with springs installed on them. In this article we will look at how to set up and adjust rim brakes:
When to adjust the drum brake on a scooter
Adjusting the scooter drum brake is necessary in the following cases:
- Braking performance is reduced.
- The wheel constantly brakes on its own without pressing the brake lever.
- The force applied to the handle is good, the handle does not press, but the scooter does not brake well.
- The handle does not return to its original position on its own, which is why it slows down even after you release it.
- You can hear a squeaking noise from the scooter's drum brake.
Let's consider all the points in more detail:
Bleeding scooter brakes
This article will touch upon a very important topic about maintaining the brake system of a scooter. Many drivers of scooters or motorcycles generally neglect and do not pay due attention to the braking system - which is not acceptable. Since your life, or at best, your health, directly depends on the condition and performance of the brake system. When carrying out any repair or maintenance work on the brake system, be very careful and maintain sterile cleanliness. Any speck of dust that gets into the brake system channel at the most inopportune moment can lead to brake failure, which you understand will not lead to any good...
Most manufacturers recommend replacing brake fluid and bleeding brakes once every two seasons. Remember! Bleeding the brakes must also be done after repairing the brake system or other work related to depressurization of brake hoses, calipers, and brake machines.
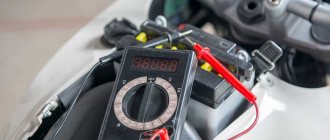
Before we start pumping the brakes, let's read the warning on the brake reservoir.
The inscription on the tank means something like this:
WARNING: Use only DOT3 or DOT4 brake fluid from a sealed container. Clean the filler cap before removing it.
Following the manufacturer's recommendations (which we advise you to do), today we will use this kind of brake fluid.
So, unscrew the tank lid (before unscrewing the lid, remove dust and dirt from it).
Removing the diaphragm
Add brake fluid until the level in the reservoir is at its maximum.
Now we need a glass or other suitable container and a piece of rubber tube. We unscrew the drain fitting a little (the fitting must be unscrewed so that during bleeding the brake lever does not feel much force, it is not necessary to unscrew the fitting much) on the brake caliper.
We put a tube on the fitting and lower it into a glass into which a little brake fluid should first be poured, this is necessary so that during pumping through the tube no air gets into the system.
Carefully monitor the level of brake fluid in the reservoir during bleeding, do not miss it, otherwise air will get into the system, which is not permissible! Also, when bleeding the brakes, all decorative parts of the scooter should be covered from splashes, otherwise brake fluid that gets on the paintwork surface will ruin it.
After a few minutes of bleeding, about a third of the bottle of brake fluid was gone.
As you can see in the photo, the old liquid (cloudy) remained at the bottom of the glass, and the new lighter one floated up; during pumping, not a large amount of air came out in the form of bubbles, which indicates that there was air in the brake system, and this is not acceptable! The brake system should be pumped until air bubbles stop coming out of the tube and the old fluid is replaced with new fluid.
After you bleed the system, immediately tighten the drain fitting and adjust the brake fluid level in the reservoir so that it is approximately halfway through the inspection window.
Don’t forget to check the brakes for proper operation immediately after bleeding (before the trip!)
Poor braking performance
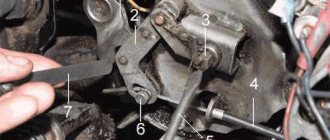
During the operation of the scooter, the linings on the brake pads wear out. Wear of the linings requires more travel of the brake lever, up to its complete depression. The problem is solved by tightening the adjusting nut located near the wheel.
In the case when the nut is tightened all the way, but there is no desired effect, you can move the lever itself, which is located on the cam axis, by 1-2 slots. In this case, you will need to remove the rear wheel.
Replacing a brake cable on a scooter
No matter how many years a motorcycle has been in existence, for the same number of years it has been equipped with cables in a flexible sheath that serve to control certain mechanisms. The throttle valve and carburetor enricher, clutch release mechanism, front drum brake, and decompressor are cable driven.
Years ago, heavy motorcycles were equipped with a light switch built into the headlight housing. It was controlled from a lever on the steering wheel, again via a cable. And on the Vyatka V-150M scooter, cables were even used to control the air damper and carburetor float slide.
The main advantages of cables in comparison with other types of drive - hydraulic, pneumatic, electric - are simplicity, light weight and low cost, and over rigid traction the cable has the advantage that it can pass along a complex path without intermediate links - rocker arms, rockers, etc. But the other side of the coin is relatively low reliability, low durability and the need for constant monitoring. The service life of the cable depends on two factors: operating conditions and timely lubrication.
It is clear that the rear brake cable works under more difficult conditions than the gas cable and, of course, can fail earlier. If you do not take care of the cables, then sooner or later a moment will come when one of them will deteriorate at the most inopportune moment. And it’s also good if any auxiliary drive breaks - for example, a decompressor or enrichment cable. The motorcycle will somehow survive their absence. It’s worse if it’s the throttle cable or, God forbid, the brakes. The old saying goes that it's better to have a bad engine than a bad brake.
So, the cables need constant attention and timely lubrication!
They need to be lubricated at least twice a year - in the fall at the end of the season and in the spring at the beginning. The oil in the braid not only facilitates the movement of the cable, but also blocks the path of water and dirt. Imagine what will happen if water gets into the shell and freezes! And, of course, the cable will not last long if its sheath is deformed - individual wires will rub against the dents and the cable will, at best, break, and at worst, jam. Before lubricating, the cable should be thoroughly washed to remove any remaining old lubricant and dirt, and it is not at all necessary remove from the motorcycle - just release the tips. If one of them is removable, then the work is much simpler - you need to remove the tip and remove the cable from the sheath.
For flushing, you can use kerosene, gasoline, liquid oil (transformer or spindle). At the end of washing, it is advisable to blow the cable with compressed air to remove any remaining washing liquid.
For summer operation, the cable is lubricated with thick oils. If you operate the motorcycle in winter, you need to use thinner oil. In any case, it will be a very good idea to add graphite powder - it will not only help the oil, but also protect it from leaking. It is most convenient to wash or lubricate the cable under pressure: firstly, the process goes faster, and secondly, the lubricant penetrates, as they say, into all the cracks. There are a lot of methods and options. Let's recall some. Gravity lubrication. One end of the cable is inserted into a split plug, the plug is inserted into a funnel, the funnel is fixed at such a height that the second end of the cable hangs freely. Now you need to pour oil into the funnel and then the process will proceed independently (Fig. 1).
Lubrication under pressure from a closed reservoir is an improvement to the method described above. In this case, a split plug is inserted, for example, into a plastic bottle of shampoo or car oil (Fig. 2).
Another option is a durable metal tank with a tightly screwed lid and a tire valve embedded in it. Air is pumped through the valve by a pump, under the pressure of which the oil enters the cable sheath (Fig. 3).
You can lubricate the cable without using complex devices. It is enough to pull a vinyl chloride tube onto the end of the shell, tighten it tightly with a binding wire / fill the tube with oil. Its end must be clamped with pliers and the tube must be “wound” around them. The main thing in this case is to select a sufficiently strong tube and secure it properly to the shell (Fig. 4).
Now about the malfunctions . The most common is tip breakage. The reason most often is the inattention of the motorcyclist himself. After all, the tip does not come off suddenly - first one wire, then another, a third... The remaining ones bear an increased load, which they ultimately cannot withstand. The cable can also rub against the edge of the sheath or against the stop. The cause of the breakdown may also be the “limited turning” of the cable in the socket (Fig. 5).
Usually the cable breaks at the entrance to the tip, which makes it possible to repair it using a reserve length. Of course, to maintain the necessary difference between the length of the cable and the sheath, you will have to shorten the latter slightly. To do this, you need to carefully remove the cap from the shell with pliers, unwind a predetermined number of turns and cut the wire with sharp wire cutters. Under no circumstances should the outermost coil protrude into the shell. Of course, even a shortened cable must have the necessary length so that under no circumstances (maximum steering wheel turn, maximum suspension travel) it is not stretched. So, let's start repairing the cable. For this you will need: a soldering iron with a power of 60 ... 100 W, tin-lead solder, flux (zinc chloride, also called pickling acid) and gasoline. New tips may also be required (if the old ones have become unusable). If they are not there, then they can be completely replaced by brass spoke nipples from bicycles, the square parts of which need to be rounded. Thoroughly wash the end of the torn cable with gasoline to remove any remaining lubricant and coat it with flux. Then heat the old tip, use pliers to pull out the pieces from it and put the boss on the cable first, and then the tip. Insert a nail into the middle of the bundle of wires, place a piece of solder and heat with a soldering iron until the solder passes evenly through the entire tip (Fig. 6).
After cooling, excess solder is removed with a file. If the cable has a removable clamping end, then its end must be carefully tinned to prevent fraying (Fig. 7).
At the end of work, the soldering or tinning area should be thoroughly washed with water to completely remove flux residues. If a small area of the shell is damaged, it is repaired by applying a tin “patch” followed by soldering (Fig. 8).
But what to do if the cable breaks on the road? You can prepare an “emergency supply” of quick-release tips in advance and always carry them with you. The most acceptable option is shown in Fig. 9.
This tip is similar in design to the one installed on the clutch cable of a Java motorcycle. Its sleeve has a through hole, which allows you to tighten the screw from any side. However, over time, the screw deforms the cable and cuts its veins. Therefore, it makes sense to screw two screws into the sleeve on both sides. It is also possible that one screw is firmly fixed in the bushing. In the case where there is no tip, you can do it simply: take a nut, insert a cable into it and use a hammer to flatten the nut. You will get a kind of “boss”.
And when the throttle cable breaks, you can turn on the enrichment cable instead. Of course, operating the shifter is not very convenient, but in order to get home, this option will do.
Instead of a throttle cable, you can pull a 1.5...2 mm nylon fishing line, a tennis or guitar (nylon) string of the same diameter, or a piece of electrical wire in vinyl chloride insulation into the sheath. You must tie knots at the ends of the wire or fishing line, both on the fishing line and on the string It is advisable to burn them in the flame of a match.
We consider all these options only as a temporary way out of the situation. New or repaired cables should be installed on the motorcycle as soon as possible. Take care of yourself and your motorcycle......
Video: DO IT: Replacing the front brake cable on a scooter
If the thickness of the linings is within acceptable values, but you notice poor brake performance or feel the handle “recessing” when pressed, the system can be adjusted using a special nut on the cable (this nut is located near the rear, front wheel). It is tightened more tightly, but taking into account the free movement of the handle within 10-20 millimeters. Too tight will cause the rear wheel to brake constantly. If you have fully tightened the nut, but have not achieved the result, then the pads or cable need to be replaced.
The scooter does not brake well, even if a lot of force is applied to the brake lever.
When you press the brake lever with maximum force, but the braking is not particularly noticeable, although the resistance on the lever is good, you should think about the quality of the linings, their wear and possible contamination. The fact is that oil from the same gearbox seal could get between the brake drum and the brake linings. Naturally, there is no need to talk about any effectiveness after this. In addition, cheap, low-quality pads a priori do not want to perform the task assigned to them, they constantly creak and wear out very quickly. Therefore, it is very important not to save money when buying pads and to give preference to famous brands such as Ferodo and Brembo.
Checking the condition of the brakes
First of all, “unfasten” the brake, as shown in the photo.
We check how the cable (G) in the jacket (A) by pressing and releasing the brake lever and pulling the cable back with your finger - the movement should be free, without delay. If the cable is difficult to pull out, the cable, jacket, or guide (C) may be damaged, or dirt may have accumulated inside the jacket or guide. They need to be removed and cleaned or replaced.
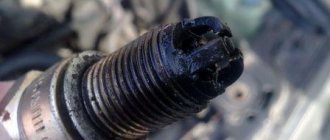
Check the condition of the pads (J) . They should have visible grooves for dirt drainage (the block should not be smooth). Worn pads without grooves must be replaced. Check that the pads are complete with washers and that they are installed correctly.
When installing new pads, follow the order of the washers.
The brake levers (I) should rotate freely in their seats and be moved apart by springs after compression. If movement is difficult, the brake may get stuck in the closed position during operation and rub the pad against the rim. In this case, you can remove the levers from their seats, clean and lubricate the contact points and install them back.
When installing, make sure that the protruding pin on the lever fits into the hole on the frame, and that the hole on the left and right lever is the same.
How to tension a chain on an Alpha moped - step-by-step instructions
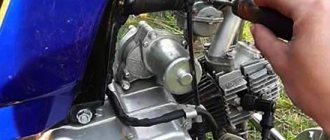
To simplify access to the necessary components, first remove the rear left passenger footrest. The moped must be placed on the center stand. It is also advisable to unscrew the bolt and remove the exhaust pipe. If this is not done, the ratchet heads cannot be used.
Next, take two keys - 17 and 14 mm. You need to unscrew the nut to loosen the wheel axle. The nut is unscrewed, but not completely. With the second key you need to hold the axle on the reverse side so that there is a stop. If you don't hold it on the reverse side, the axis will spin.
Now you need to loosen the nut located on the other side using a wrench with a diameter of 24 mm.
Using a wrench with a diameter of 10 mm, tighten the chain tension bolt. But the tension should not be too strong.
The rear axle is weakened. You need to make sure that the teeth of the driven sprocket do not fall on the edge of the chain. To do this you need to spin the wheel. When the teeth come in from the right, you need to tighten the bolt a little using a 10 mm wrench. If they enter from the left, it is necessary to loosen it, and if from the right, then, on the contrary, tighten it.
Now you need to tighten the wheel axle with 24 and 17 mm wrenches. The second bolt is tightened with a wrench with a diameter of 14 millimeters. The chain is tight, all that remains is to install the left step and protection.
To properly tension the chain, you will have to align the marks on the sprockets. There are risks and sticks on the suspender. These marks are applied on both sides.
You need to try to ensure that the risks on the right and left coincide. If these marks are not aligned, the wheel will not stay level. Naturally, it will also spin incorrectly. As a result, the rubber will begin to wear out intensively on one side. Therefore, it is important to tighten the nuts on both sides.
For more accurate tightening, it is important to remove the cover covering the chain. Otherwise, there is a chance that it will be pulled too tight. After tensioning, the brakes may also need to be adjusted.
Useful visual video on how to tighten the chain on an Alpha moped: