It is not uncommon to experience problems when riding an Izh Planet 5 motorcycle due to the low reliability of the gearbox. This is due to low-quality components, primitive production of the 20th century and low requirements for the precision of manufacturing the crankcase, bearings, gears and shafts. There are, of course, some advantages to the simplicity of the design of such an Izh Planet gearbox; it is low-cost production, which is rather better for the manufacturer. But the main advantage is the ability to repair it yourself. Here we will look at what the Izh Planet gearbox is, we will learn not only how to assemble it, but also how to identify faults and fix them.
To begin with, I would like to announce the list of numbers of bearings and seals used in the IZh gearbox:
- One input shaft bearing - number 204
- One secondary shaft bearing - number 192906КМ
- Two intermediate shaft bearings - number 203
- One secondary shaft oil seal - size 34.5x52
Assembling the Izh-Planet 5 box: detailed instructions, diagram and recommendations
The assembly of the Izh-Planet 5 box is often carried out during its repair or replacement of parts. This unit is not highly reliable. This is due to the low quality of components, poor assembly, and poor requirements for the manufacturing accuracy of bearings, crankcases and other mechanisms. You can find your advantages too. Firstly, it is cheap to produce. Secondly, it can be repaired with your own hands. Let's look at what the part is and how to assemble the Izh-Planet 5 box, and also learn useful recommendations.
FAQ Gearbox repair and adjustment
FAQ Gearbox repair and adjustment
Post by mey » Aug 14, 2008, 10:54 pm
In the future, the topics created about gearbox repairs, settings, flying gears, jamming, and the like will be closed... IT’S CLEAR TO EVERYONE...
Post by mey » Aug 15, 2008, 05:22 pm
Post by Timoha » 17 Aug 2008, 08:45
you just have to look, I’m sure there’s something else out there
It’s possible to cram in something that can’t be shoved in. It’s possible to push out the non-pushing.
I WILL BUY A LIVE CPG U5 AIR OR A DROPS kit.
Post by mey » 08 Sep 2008, 23:40
The guys, out of stupidity, when assembling the motorcycle, did not put the washers from the box, three thin and one thick (I found them when I assembled((()). How serious problems can there be, and is it possible to install them somehow without disassembling the engine? PS No kick the fool, I have my first Izhak.
Post by -mixanik31- » 09 Sep 2008, 00:20
Post by mey » Sep 10, 2008, 10:16 am
I bought a corefan Planet 5 and drove it, everything was fine, but soon a crackling noise began to be heard from the engine or from the gearbox when engaging second gear. When you don't squeeze the clutch too much, the cracking noise subsides. We disassembled the box and saw that one of the gears on which the shift fork is put on was missing one tooth; they replaced everything and stuck it in place, but the cracking sound remained the same. What can you tell me?
Post by Diman5768 » Sep 10, 2008, 7:11 pm
Source
Most common problems
Most often, the motorcycle in question loses or shifts poorly in second gear. This may be due to careless turning on of speeds. For example, when picking up high speeds in first gear without neutral, when engaging the second speed gear, an impact occurs, which contributes to intensive wear of the unit. Therefore, it is not recommended to “spin” the first speed too much. If, nevertheless, problems with the second position continue, there are several options for resolving them.
In some cases, the simplest method will help, without completely disassembling and then reassembling the Izh-Planet 5 box. It is necessary to place the motorcycle on the right side, and then remove the kick starter and gear shift foot along with the shaft. Next, the crankcase cover and clutch basket along with the discs are dismantled.
When the gears of the box wear out, the meshing of the teeth deteriorates. In turn, this leads to slipping, jerking and failure of the second gear. Another reason could be wear on the input shaft bearings. Since it moves slightly to the left due to vibration, it is necessary to move it into place with light blows using a mallet. The installation of washers of suitable diameter will allow you to fix the element in the desired position. Then the bearing stopper and other dismantled parts are reassembled in the reverse order.
"Sores"
There are three problems in the planetary checkpoint:
I solve the problem with oil leakage very easily and simply: I take out the retaining ring; I remove the intermediate shaft bearing, degrease the plug, retaining ring, mounting hole, then apply sealant to the outer edge of the plug, put it in place and immediately press it with the bearing and voila - the leak is eliminated!
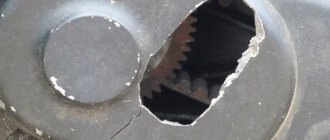
Due to a factory defect, the gear-carriage for engaging the first-third gear does not fully engage the first-gear gear with its cams, but only in a small part, barely catching the gear with its cams, which is why the edges quickly wear out and the first gear begins to knock out.
This moment is clearly visible in the photo. For this particular gear, the hook was no more than a couple of millimeters. It is difficult to cure this “sore”: from the side of the first gear gear, you need to grind the end of the intermediate shaft by 3-4 mm and, using adjusting washers, move the first gear gear to the carriage. I don't see any other way.
During operation, the bolts securing the stop are constantly unscrewed, either due to vibration or something else - they are unscrewed and that’s it, no matter how you tighten them... Even special lock washers do not help. I struggled with this disgrace for a long time using all the traditional methods known to me and came to the conclusion that the best solution to this problem is red thread locker. Feel free to put bolts on it and get rid of this problem once and for all.
Other faults
It happens that disassembling/assembling the Izh-Planet 5 box may be necessary if the fourth speed disappears. This is often due to broken bearings on the output shaft. Such a nuisance occurs due to the presence of axial play, displacement of the bearing assembly, or its failure. You can try to fix the problem in the same way as repairing the second gear. If this does not help, you will need to completely disassemble the unit.
When the speed switch jams from a high range to a low mode, the spring system of the switching mechanism has failed. It needs to be replaced. Strained operation of the unit after assembling the Izh-Planet 5 gearbox indicates incorrect installation of the adjusting washers. To avoid this, it is necessary to mark and record the previous placement of these elements during the process.
Detection of faulty parts
To learn how to determine the damage and degree of wear of gearbox gears, consider the classification by which you can make the right decision about repairs. The gear needs to be replaced if:
- there is at least one broken tooth, or the presence of cracks in any part of the tooth caused by plastic deformation of the gear material.
- when the working surface of the gear is chipped by 20 percent or more, when the depth of chipping is 5 percent or more of the tooth thickness.
- if there is corrosion on the working surface of the gears;
- if the contact patch is less than 80 percent of the width of the teeth, and less than 60 percent of the height.
Disassembling and assembling the Izh-Planet 5 box
First, you will need to completely dismantle the clutch, starting device and motor transmission, and also drain the oil. After these manipulations have been carried out, you can begin to remove the gearbox. In the area of the right side of the motor, unscrew the eight mounting screws. The driver's footrests, foot brake lever, and crankcase cover on the right side are removed. The clutch cable is disconnected and the ball and pusher of the input shaft are removed. After this, the circuit is disconnected. Designations in the photo below: clutch discs (1,3), lower disc (2), inner drum (4), nuts (5, 6).
The crankcase cover is placed on the prepared rags or paper. You can pull it out by grabbing the star with your hands and pulling it towards you. If the element does not budge, look at the worm shaft support washer, which may have become warped. Place tweezers or a knife into the hole between the crankcase and the cover, and then straighten the part. When dismantling the housing, a couple of washers may fall out. The second element is slightly thicker and is mounted on the copy shaft. They must be signed and put away with the rest of the spare parts.
Engine of the Planet[#2] Elimination of axial play of the input shaft.
Hi all!
In today’s article I will share my personal experience on how to overcome one of the reasons for the eternal departure of the 2nd gear on Izh Planet 5. Let’s begin.
In order to solve the problem of input shaft play, we will need to remove the clutch basket cover, after draining all the oil from the gearbox. After this, we unscrew all the bolts around the perimeter of the clutch cover, take a mallet and, with soft blows of the rubber tip, try to move the cover along with the gasket; if everything goes smoothly, the cover will be removed without problems, and with it the gasket. Next, you need to remove the clutch basket, it is removed together with the motor transmission gear and the motor chain. To do this, we open the hex washer on the motor transmission and unscrew the bolt, honestly, I don’t remember whether it’s a left or right thread, look in the book, it’s definitely all there. Next, unscrew the 5 bolts with the clutch springs, remove the bolts and the clutch pressure plate. Next, take out all the clutch discs and unscrew the clutch basket nut (LEFT THREAD!). Then we remove the entire motor transmission assembly, that is, together with the MP gear, MP chain and basket. Behind the clutch basket we see a certain “bar” that sits on 5 bolts for, of course, your “favorite” screwdriver. unscrew the bolts and remove the “bar” CAUTION, under it there are adjusting washers, each motorcycle has them differently, I personally had so many of them: 2 for the input shaft and 2 for the intermediate shaft. But again, you may have more/less, it all depends on the adjustment. Next, when we have removed all the washers and the “bar” holding these same washers in place, we inspect it for bents, bends, etc. and so on. IT SHOULD BE PERFECTLY Smooth, WITHOUT BENDS, ETC. If everything is in order, we move on. We see the bearing, inside of which the very input shaft of the gearbox is installed, we take a screwdriver and our favorite tool, which all Soviet motorcycles are so afraid of, and we begin the ritual. We place a screwdriver in the outer race of the bearing, and with light blows of a hammer we knock it into place until the play of the input shaft in it stops. By the way, yes, before that we pull the shaft with our hand and see if there is any play. There should be a slight play, according to the book it is 0.2 mm. not 1 mm, and especially not 1.5 or 2 mm, as it was for me. So, we put the screwdriver as shown in the photo and with soft blows we hammer it behind the OUTER race, into place this same bearing. As soon as the backlash is gone, we put all our miracle tools aside.
Now we look at the gap, as shown in the photo below, I repeat, it is on the basis of this gap that they determine at the factory how many washers to put there, but over time the gap grows, and the thickness of the washers is no longer enough to hold the input shaft bearing in place, the shaft begins to “run” and “dancing” begins from the 2nd.
We take a caliper and measure this gap with a depth gauge.
As you can see from the photo, for me it was exactly 2.5 mm.
Now we do the following. We take the washers that we had in the box (in my case it’s 2 washers) and measure their thickness.
As you can see from the photo, each is 0.75 mm, that’s 1.5 mm, but we need 2.5. That is, now we do the following, we run to the store or to Uncle Vasya, and take from him a set of adjusting washers for the Planet gearbox, standardly there are two washers we need, about the same thickness of 0.75, but the thickness may differ! We take one washer from the kit, then we take all 3 of our washers and measure their total thickness, I got 2.25, and that’s what we need.
Main stage
As noted in the assembly diagram of the Izh-Planet 5 box, further disassembly operations are carried out above the insides of the roof of the unit, since the secondary shaft and sector could remain in it. If it is necessary to remove them, you need to straighten the petals of the lock washer, unscrew the nut, remove the star and washer. Holding the gear very carefully to prevent the shaft from jumping out, the cover is moved to a clean and flat surface with the gear facing up.
It is worth noting that the bearing of this part of the assembly does not have a retaining ring. Therefore, when removing the shaft with bearing, the rollers may fall out, so be careful. If the specified element has exhausted a decent service life, there is a risk that when dismantling the secondary shaft, the outer ring may jump out of the seat and remain on the rollers. Next you need to start pressing out the oil seal. To do this, the installation rings are removed from the hole in the cover, after which the outer ring of the bearing is removed.
Final stage
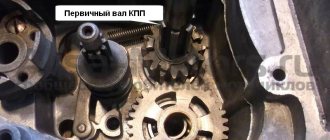
Next, the second and third speed gears are removed from the input shaft, after which the input shaft is dismantled. To do this, you will need to carefully knock it out using a stopper and a light hammer. The upper and lower forks are removed.
Next comes the intermediate shaft assembly. Using a screwdriver or other suitable tool, bend the clamp with the neutral indicator and carefully pull out the worm wheel. On its far side there are shims that could stick to the crankcase. They need to be collected and stored with the rest of the removed parts. Next is the turn of the copy shaft. Check the edges of the shaped sockets in which the guide forks move. They should not have chips or dents. We unscrew a couple of screws securing the switching mechanism, which is also removed. Now you can replace unusable parts and assemble the Izh-Planet 5 gearbox according to the scheme. The figure below shows: retaining cap (1), bolt (2), crankshaft sprocket (3), double-row chain (4), clutch drum (5), input shaft (6).
Repair
Once the unit has been gutted, you can begin to determine the parts that need to be replaced. As a rule, you have to buy a set of shims, a set of gaskets and sealant. This is the case if there are no more serious damage. Once you have decided on the elements to be replaced, you will need to adjust the worm shaft axis, and after final assembly - the clearance along the axis of the primary, intermediate and secondary shafts.
Adjusting washers are placed on the far ledge of the copy roller; they should be lubricated with a special compound. A support washer is mounted on the near edge, and the shaft is put in place. It should be turned so that the neutral sensor with its protrusion fits into the deepest groove. Then, using a ruler (without the gearbox cover yet) on the plane of the crankcase, measure the gap between the washer and the dipstick. It should be no more than 0.2 mm. Depending on the indicator, regulators are added or removed. If it is impossible to accurately set the gap, it is better to make it smaller.
Assembling the box on the Izh-Planet 5 motorcycle
For proper assembly, you first need to install the input shaft, then the first gear gear with the groove down. Then the return spring is mounted with the range shift shaft; first, put on the spring mechanism and place the block in the seat. After this, a worm shaft with adjusting washers is installed. To make installation easier, lubricate the moving mechanisms with Lithol.
When installing the unit, care must be taken not to damage the neutral speed sensor. To get the shaft into place, use a screwdriver to bend this indicator slightly. When installing, remember the small washer, which eliminates play. A similar part is installed on the copy shaft. After this, the gear shift compartment is installed.
Assembly
In a carefully washed and prepared for assembly crankcase we place the input shaft, the first gear gear and the follower shaft with pre-selected shims.
We put a fork on the gear-carriage for engaging the second-fourth gear (it is smaller than the gear-carriage for engaging the third-first gear, you can’t go wrong) as shown in the picture. We put the gear on the input shaft and insert the fork pin into the upper groove of the follower shaft.
We put a fork on the gear-carriage for engaging the first-third gear, as shown in the picture, place it on the first gear gear and insert the fork pin into the lower groove of the copy shaft.
We install the fork guides in their places (with grooves towards the clutch basket). By the way, if necessary, the “Planetovskaya” gearbox can be assembled and disassembled without disassembling the clutch basket and without removing the guides. But to do this, during installation you will have to pull the tracing shaft towards you a little, insert the pins of the forks into the grooves and after that, remove the locking bar and push the tracing shaft all the way.
Install the intermediate shaft.
On older engines, the end gear is installed separately. On later ones, it is made integral with the intermediate shaft.
We fill the return spring of the gear shift shaft as shown in the picture.
We check the functionality of the gearshift shaft pawls: compress and unclench them several times
We pay special attention to their working edges: they should be sharp and not licked. And don’t forget to check the spring that compresses the pawls: it must be of the correct shape and ensure the elasticity of the pawls’ movement
We squeeze the pawls and install the gear shift shaft in its place.
We rotate the tracking shaft with the mark on the body towards the gear shift shaft and so as not to miss the mark during installation, we cover the gap between the teeth opposite the mark of the tracking shaft with lithol or paint it. It will be more noticeable this way.
We look for a mark on the sector and when putting the sector on the gear shift shaft, we combine the mark on the sector with the mark on the tracking shaft body: the tooth opposite the sector marks should strictly fit between the teeth opposite the mark of the tracking shaft.
To ensure that our marks do not get lost during installation, we tie together the sector and the copy shaft with ordinary sewing thread.
We put standard thrust washers on the input and follower shafts and insert the guide bushings of the gearbox cover into place.
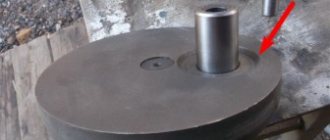
We degrease the surfaces, apply sealant, lay the gasket, install the cover and tighten the mounting bolts with the maximum possible force. We adjust special washers under the bolts marked with yellow arrows.
After tightening the gearbox cover, we check the axial play of the primary and secondary shafts. Normal: 0.2-0.4mm.
If the play is greater than normal, remove the plate, seat the bearing and adjust the required number of shims under it.
Important
When performing these operations, follow the mark in the middle part of the sector. It should coincide with a similar mark on the shaft. The last step is to install the crankcase cover. If the work is carried out correctly, it will sit in its place without problems.
It is necessary to ensure that all rods and shafts coincide with their original mounting sockets. They should rotate freely without creaking or jamming. Use moderate force when tightening the screws as the threads in a soft metal crankcase can easily be stripped. All fasteners are tightened evenly to avoid distortion.