Assembly
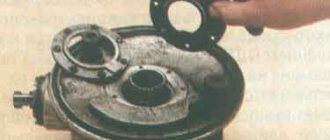
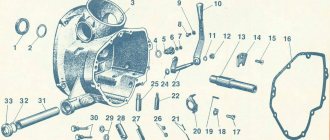
In a carefully washed and prepared for assembly crankcase we place the input shaft, the first gear gear and the follower shaft with pre-selected shims.
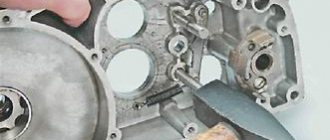
We put a fork on the gear-carriage for engaging the second-fourth gear (it is smaller than the gear-carriage for engaging the third-first gear, you can’t go wrong) as shown in the picture. We put the gear on the input shaft and insert the fork pin into the upper groove of the follower shaft.
We put a fork on the gear-carriage for engaging the first-third gear, as shown in the picture, place it on the first gear gear and insert the fork pin into the lower groove of the copy shaft.
We install the fork guides in their places (with grooves towards the clutch basket). By the way, if necessary, the “Planetovskaya” gearbox can be assembled and disassembled without disassembling the clutch basket and without removing the guides. But to do this, during installation you will have to pull the tracing shaft towards you a little, insert the pins of the forks into the grooves and after that, remove the locking bar and push the tracing shaft all the way.
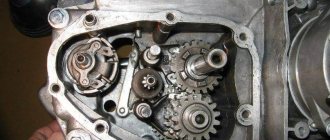
Install the intermediate shaft.
On older engines, the end gear is installed separately. On later ones, it is made integral with the intermediate shaft.
We fill the return spring of the gear shift shaft as shown in the picture.
We check the functionality of the gearshift shaft pawls: compress and unclench them several times
We pay special attention to their working edges: they should be sharp and not licked. And don’t forget to check the spring that compresses the pawls: it must be of the correct shape and ensure the elasticity of the pawls’ movement
We squeeze the pawls and install the gear shift shaft in its place.
We rotate the tracking shaft with the mark on the body towards the gear shift shaft and so as not to miss the mark during installation, we cover the gap between the teeth opposite the mark of the tracking shaft with lithol or paint it. It will be more noticeable this way.
We look for a mark on the sector and when putting the sector on the gear shift shaft, we combine the mark on the sector with the mark on the tracking shaft body: the tooth opposite the sector marks should strictly fit between the teeth opposite the mark of the tracking shaft.
To ensure that our marks do not get lost during installation, we tie together the sector and the copy shaft with ordinary sewing thread.
We put standard thrust washers on the input and follower shafts and insert the guide bushings of the gearbox cover into place.
We degrease the surfaces, apply sealant, lay the gasket, install the cover and tighten the mounting bolts with the maximum possible force. We adjust special washers under the bolts marked with yellow arrows.
After tightening the gearbox cover, we check the axial play of the primary and secondary shafts. Normal: 0.2-0.4mm.
If the play is greater than normal, remove the plate, seat the bearing and adjust the required number of shims under it.
Planet Pendant [#1] Orion Feathers. Analysis and troubleshooting.
Hi all!
In today’s article I will try to describe every process, even the smallest one, in the smallest detail, because the topic of today’s writing is quite serious, and finding something really worthwhile on the Internet is really difficult, it’s possible, but difficult. And, of course, I have a much greater desire to join a topic that is worth something than just writing a few words about how difficult and painful it is to disassemble ORION feathers. In general, that's enough to talk about, let's go figure it out.
So, let's start with the fact that the seats are already removed from the motorcycle, and in order to disassemble them, you need to have some tools, and make some yourself.
Tools we will need:
1. Impact screwdriver. NOWHERE without her. Believe it or not.
2. A good, and most importantly WIDE bit for a regular screwdriver slot.
3. Favorite tool of IZhevod, what is it IZhevod, scoop maker rather, yes, yes, we are talking about a hammer.
4. A self-made screwdriver, and here I want to make a small digression. Guys, I'm a bit of an asshole and didn't take a photo of the screwdriver I made... I apologize for that, but there's nothing complicated there, more on that below.
5. Comrade, girlfriend, wife, in general, any person, or 2 more hands that we will definitely need. This is certainly not a tool, but believe me, you can’t do it alone.
6. Yews. Such good, powerful yews.
7. Key for 14.
8. Construction hair dryer. WITHOUT IT, DON’T EVEN TRESSURE TO DISASSEMBLE THE FEATHERS, you screw the slot on the bolt and that’s it. Don’t be lazy to take it from a friend, or buy it in a store, it’s a very necessary thing in our business.
9. POSSIBLY, you will need a wrench with a 8-mm head, into which a WIDE bit will be inserted under a regular slot of a screwdriver; it will be more convenient to unscrew the damn bolt from the bottom of the pen cup, which sits on the varnish.
10. Key to 22.
12. Narrow-nose pliers.
That's all from the tools, let's move on.
Making a special screwdriver.
Everything here is actually simple, I’m sure you’re not stupid and will understand me even without a photo, in general, why is it needed at all, the design features of the pen are such that the bolt that is screwed into the bottom of the glass secures the main, sliding pipe, inside this pipe there is a bolt with slots, it can be different, I had the one like in this photo.
As you can see from the photo, this is a PPC and not a bolt, and it’s not a bolt at all, it’s, I don’t know, a fitting or something, that doesn’t matter, for me it will be a bolt.
It is into this “super groove” that our screwdriver will be inserted.
We make a screwdriver from a 14 hex blank, I can’t say exactly the length, I know for sure that 50 cm will be enough.
We take a grinder and begin to make a certain slot at the end of our workpiece so that it fits into this very “super groove” on the bolt inside the feather. The length of the slot should be at least 15 mm, it’s better to make it 16, and then if you cut anything with a grinder. The thickness of the slot is somewhere around 1.5-2.5 mm. Why did we choose a hexagonal blank? Because it will be convenient to hold it with a key number 14, that’s the whole secret, in fact. Here's a photo, it's not mine, the guy there used a square blank instead of a hexagonal one, but the hexagonal one is more convenient.
Repair
Once the unit has been gutted, you can begin to determine the parts that need to be replaced. As a rule, you have to buy a set of shims, a set of gaskets and sealant. This is the case if there are no more serious damage. Once you have decided on the elements to be replaced, you will need to adjust the worm shaft axis, and after final assembly, the clearance along the axis of the primary, intermediate and secondary shafts.
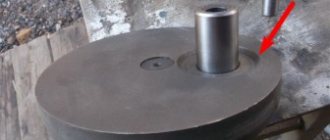
Adjusting washers are placed on the far ledge of the copy roller; they should be lubricated with a special compound. A support washer is mounted on the near edge, and the shaft is put in place. It should be turned so that the neutral sensor with its protrusion fits into the deepest groove. Then, using a ruler (without the gearbox cover yet) on the plane of the crankcase, measure the gap between the washer and the dipstick. It should be no more than 0.2 mm. Depending on the indicator, regulators are added or removed. If it is impossible to accurately set the gap, it is better to make it smaller.
Tuning the IZH Jupiter engine
Before you start, you need to decide how much power you would like to give to your engine. If you are quite satisfied with the average power, then you will need a ZiD-200 resonator. But if you want to make the IZH Jupiter 5 motorcycle fast and powerful, start tuning the engine by installing a resistor from the SMB-5 “motoblock”.
Replacing the air filter plays a big role in engine modification. The better the air is cleaned, the more horses the engine will be able to produce. After all, the degree of engine overheating depends on the amount of incoming air. It is best to use imported air filters. They provide improved cleaning and longer service life.
Next you should work hard on the injection system. An excellent option is to install a “Planet” carburetor with a diffuser diameter of 0.32 cm. Two carburetors will provide much greater acceleration and good dynamics. We take the flanges securing the cylinder from the standard tube, grind out the aluminum studs, and cut off the flange from the carburetor from the inlet tube from the Planet.
We grind the ends of the cylinder heads on a machine, and press the cylinders themselves. The maximum permissible volume of PIC is 18 cubic meters. see Install factory copper layers under the cylinder heads. And we adjust the ignition advance angle to increase compression.
We use the second flange from the old carburetor. Then we weld the parts using “cold” welding. And finally, we modify the assembly to be compatible with the inlet channels. all the cracks with epoxy liquid . Voskhod carburetors will provide uniform traction. In this simple way, you can add not only a couple of additional horses to your pet, but also provide more lively dynamics that give a good riding experience. The motorcycle is very reliable for everyday use, and if you take good care of it, breakdowns will occur very rarely.
[sc:ads5]
Common faults
The most common problem with IZ Planet 5 is the spontaneous switching off of second gear. This problem is common on many other motorcycles, but this breakdown is often associated with careless gear shifting. When the first gear “spins” to high speeds, bypassing the “neutral” gear, the engagement with the second speed gear causes an impact, which causes wear. To prevent such a malfunction, it is not recommended to spin the first gear too much. But if the second one still dies, then some ways to eliminate the problem are possible:
The simplest method that will help in some cases. Place the motorcycle on its right side, then remove the kick starter and gear shift lever along with the shaft. Then remove the left crankcase cover, and then remove the clutch basket along with the discs. During operation, the gearbox gears wear out, which causes the meshing of the teeth to deteriorate. This leads to slipping and jerking of the transmission until the second gear fails. Sometimes, when replacing a gear, the problem is not always solved, and lies in the wear of the bearings of the input shaft, which moves to the left over time due to vibrations. To fix the problem, you need to remove the stopper of the input shaft bearing, then move this bearing with light blows of a mallet or with a hammer through the “spacer”, so as to move the shaft to the right. To fix it in this position, you should place washers of appropriate diameter under the bearing. Using the number and thickness of washers, ensure that there is no play in the input shaft, then return the bearing stopper to its place, reassemble the clutch basket and other parts in the reverse order.
- If fourth gear disappears. This is often due to failure of the secondary shaft bearings. This is due to the appearance of axial play in the secondary shaft when the bearings are displaced or fail. This malfunction can be repaired in the same way as repairing the second gear by removing the left crankcase cover.
- If the gear shift jams from upshift to downshift, the spring of the shift mechanism pawls has broken and must be replaced.
- If the gearbox switches tightly after assembly, it indicates incorrect installation of the adjusting washers.
Tuning IZ Jupiter 5 – using the bike’s potential to its full potential
[sc:ads1] Bright and unique things have always been a sign of good taste, ingenuity of the owner and his material wealth. The desire to travel on a one-of-a-kind vehicle is even more relevant, since the production of both cars and motorcycles occurs on a mass basis. Hundreds of thousands of identical wheeled units roll off the assembly line every year, making road traffic monotonous and dull. It was especially hard for citizens of socialist countries, where stereotypes were the norm of life.
But resilient drivers, as motorcyclists are by definition, have always very quickly found a way to highlight their vehicle in the gray traffic and make it the envy of others. Everything that was at hand was used - from all kinds of light bulbs, shiny stickers, right down to changes in the frame structure and replacement of the engine . Now, when the domestic motorcycle enthusiast has access to almost unlimited quantities of materials to upgrade his motorcycle, tuning bikes has become a real art.
However, motorcyclists were divided into two groups: some adopted all the features of their Western sister cities without exception, while the other remained faithful to the creations of the Soviet and domestic motorcycle industry. Almost all motorcycles that come to hand are tuned, but some are more popular among those who like to upgrade Soviet two-wheelers. One of these is Izh Jupiter 5.
Detection of faulty parts
To learn how to determine the damage and degree of wear of gearbox gears, consider the classification by which you can make the right decision about repairs. The gear needs to be replaced if:
- there is at least one broken tooth, or the presence of cracks in any part of the tooth caused by plastic deformation of the gear material.
- when the working surface of the gear is chipped by 20 percent or more, when the depth of chipping is 5 percent or more of the tooth thickness.
- if there is corrosion on the working surface of the gears;
- if the contact patch is less than 80 percent of the width of the teeth, and less than 60 percent of the height.