content .. 11 12 15 ..
CRANKSHAFT OF MOTORCYCLE ENGINES “URAL”, “DNEPR”
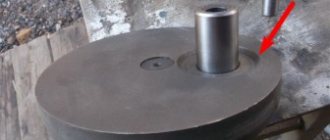
The crankshaft of the MT 10-32 engine is cast from high-strength cast iron. The shaft rests on two bearings (Fig. 2.4). The shaft elbows are located in the same plane at an angle of 180°. The nominal diameter of the main journals is 45±0.008 mm, the connecting rod 48±0.025 mm.
The connecting rod journals are hollow. Their cavities are closed with threaded plugs and cored. The crankshaft cheeks adjacent to the main journals have a balancing system.
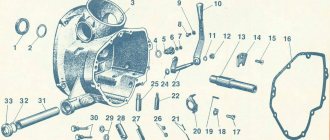
At the front end of the crankshaft, drive gear 4 of the camshaft and a centrifuge are installed on segment keys. The rear end of the shaft is conical. A flywheel 22 is installed on it, secured with a central bolt 29. After tightening, the bolt is secured with a washer 27. To ensure that the engine runs without vibration, the crankshaft and flywheel are balanced. The crankshafts of the K-750M and M67-36 engines are assembled from individual parts using special technology and are non-separable. Such shafts can only be disassembled and assembled using special tools. The crankshaft (Fig. 2.25) consists of two axles (front 6 and rear 4) with main journals and counterweights, a middle cheek 2 and crank pins 3. All parts are connected to each other using a press fit. Oil traps are screwed to the outer sides of the front and rear axle. There are blind holes in the fingers and
radial channels for supplying oil to roller bearing 5 of the lower head of connecting rod 1. A gas distributor drive gear is installed on the journal of the front axle, and a flywheel is mounted on a key on the conical part of the rear axle.
The front and rear crankshaft journals and the middle cheek of the K-750M engine are made of 45 steel, and the M67-36 engine is made of alloy steel.
To ensure assembly accuracy and load uniformity, the rollers are divided into groups depending on the size of the outer diameter (Table 2.6).
The inner ring of the roller connecting rod bearing is the surface of the crankshaft pin. Before assembling the crankshaft, the connecting rod bearings are assembled.
Connecting rods, crank pins and rollers are manufactured with high precision and then sorted and labeled. The fingers are marked by the inner diameter, the rollers by the outer diameter, and then assembled (Table 2.6).
For assembled connecting rod bearings, the clearance in the assembled bearing should be in the range of 0.010 - 0.024 mm for the K-750M engine and 0.010 - 0.012 mm for the M67-36 engine.
Rice. 2.25. K-750 engine crankshaft assembly: 1 — connecting rod; 2 - middle cheek; 3 — crank pin; 4 — rear axle, 5 — roller bearing of the lower head of the connecting rod; 6 - front axle
content .. 11 12 15 ..
Repair and adjustment of main gear | OPPOZIT.RU | motorcycles Ural, Dnepr, BMW
(moto 01/2K page 68)
However, breakages of the teeth of the main gears do occur. The “risk group” is headed by motorcycles with sidecars, whose owners ignore factory recommendations for load capacity. Especially models with a sidecar wheel drive, whose transmission often experiences increased loads when the sidecar wheel again touches the road after lifting off from it. And many owners of “Urals” and “Dneprs” have to repair broken “bridges”. Our subsequent recommendations may also be of interest to those users who would like to replace the “sidecar” gears of the main gear with a “nine” - a gear for “singles” (the name comes from the number of teeth of the drive gear).
Make no mistake, this is not easy to do. Cramming the gears and bearings into the crankcase isn't even half the job. The most difficult thing is to adjust the meshing of the gears and the gap between them. This procedure requires skill, time and patience. In any case, the Irbit Motor Plant ran out of patience, and, citing (this was a long time ago) advances in the manufacture of “bridge” parts with increased precision, all adjusting washers were removed from the design. This “innovation” made production easier and cheaper, but, to put it mildly, did not increase reliability; rather, on the contrary. We can't help you here.
But we'll give you some advice. When buying a new “pair” in a store as spare parts, pay attention to the fact that the gears are numbered with the same number (before heat treatment, the gears are rolled together in pairs and only then subjected to carburization). Avoid purchasing goods of dubious origin! Along with the “pair”, buy a new collar seal. And prepare paint, preferably “nitra” (it dries faster), and a brush - you will paint the gear, the color is to your taste.
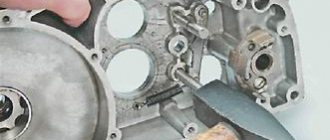
1. Before disassembling the “bridge”, drain the oil from it. Unscrew the screws securing the collar seal cover and remove it together with the seal. |
2. Unscrew the nuts and separate the cover from the crankcase along with the hub and driven gear. When you separate the cover, the hub bearing needles will begin to fall off the hub. Collect them and count them - there should be 45 pieces. |
3. Take the rear wheel axle and insert it until it stops, as shown in the photo, apply a few blows to the end of the axle with a hammer. The inertial forces of such a heavy part as a hub with a driven gear will force it to unpress from the bearing (pressed, in turn, onto the “bridge” cover) or together with the bearing from the cover. |
| 4. If there are signs of wear on the hub ball bearing, press it off the crankcase cover with a universal puller. Or, if it “stayed” in the hub, push through the holes in the hub. And throw it away, and instead press a new bearing into the hub. |
5. Take the wrench used to adjust the suspension spring preload and unscrew the drive gear ball bearing nut (attention: left-hand thread!). Then remove the rubber ring-seal, the shaped washer and the pack of spacer washers (if you did not remove them earlier when removing the cardan fork from the splined part of the drive gear shank). |
6. Now remove the drive gear with double row ball bearing from the final drive housing. During this operation, the needle bearing needles of the shank may fall out of the outer race. Don't lose them. |
7. The needle bearing of the shank practically does not wear out, and its inner race serves as a kind of “carrying pennant” for new drive gears. Try to remove (uncompress) this cage with two powerful screwdrivers. If that doesn’t work, either grind off some of the teeth on sandpaper to grab onto the cage with a puller, or even use a grinder to cut off part of the shank flush with the cage, and then knock out the unnecessary remainder of the drive gear from the cage. |
8. Take the driveshaft yoke (or entire shaft assembly), new drive gear, double row bearing, spacers, and wedge bolt. Place the bearing on the gear, then the rings, the cardan fork and hammer in the wedge-shaped bolt. In this case, the inner race of the double-row ball bearing, consisting of two rings, will be “clamped” on one side by the shank shoulder, and on the other by the cardan fork. This happens due to the fact that one edge of the wedge is beveled (it should “look” forward as the motorcycle moves). When you hammer it in, the fork rides on the bearing, firmly fixing it on the drive gear. The thickness of the package of spacer washers is selected so that the wedge head protrudes a few millimeters above the surface of the fork, and the drive gear rotates easily in the bearing without jamming (but also without noticeable axial play). |
|
10. And the last step is to install the collar seal. For this operation, use some old screwdriver without sharp edges - use it to tuck the edge of the oil seal onto the working surface of the hub. Make sure the spring doesn't come off! Install your beloved “bridge” on the motorcycle, fill in where and how much transmission oil is required - and enjoy the soft, silent operation of the unit you have rebuilt yourself. |
Adjustment begins after replacing the gears. Apply a thin coat of paint to the driven gear teeth and completely assemble the final drive. Be sure to install the final drive housing cover gasket! Its thickness directly affects the location of the driven gear relative to the drive gear (the thicker the gasket, the further away the gear). If you use sealant instead of a gasket, then consider the thickness of its layer to be approximately 0.1-0.2 mm, subtracting it from the thickness of the spacer washer.
Turn the driven gear of the main gear several turns and disassemble the “bridge”. Carefully inspect the shape and location of the contact spots on the driven gear teeth.
Further, in your actions, be guided by the table with pictures. From the diagram of the main gear, it is clear that the spacer washer is “responsible” for the movements of the driven gear (namely, its thickness, change it). A little more difficult with the drive gear. You can move the spacer washers to the other side of the bearing and change the thickness of their package. If this movement is not enough, all that remains is to either place washers under the outer race of the ball bearing, or grind the race itself.
If you decide that all this is too complicated, select the thickness of the spacer washer in such a way that the gap in the gear mesh is minimal. This approximately corresponds to the gap recommended by manufacturers of 0.1-0.3 mm.
The location and shape of the paint imprint on the teeth for optimal engagement. Rotation: A - no load; B - under load.
Adjusting the engagement of the drive and driven gears
Alexander Gorev
opposit.ru
Ural Hercules - factory Ural tricycle
The Irbit Motorcycle Plant has released a three-wheeled modification in its model range for transporting cargo up to 500 kg. The model is called “Hercules” and moves well both on city roads and off-road. The sides of the tricycle are also removable and this allows it not to be limited in the size of the cargo it transports. Hercules is a truck that does not require a category “C” license.
Technical characteristics of the Hercules tricycle:
- Dimensions: 335x150x115 cm
- Ground clearance: 185 mm
- Weight: 500 kg
- Fuel tank capacity: 19 l
- Maximum speed: 70 km/h
- Engine capacity: 750 cc
- Power: 45 hp
- Engine type: opposed 4-stroke with two cylinders
- Generator: 500 W
- Electrical: 12 V
- Transmission: 4-speed, with reverse gear
- Tires: 6.45 and 13 inches
Sonstiges – MOTOLYULKA.RU
TERIBERKA - RYBACHY Peninsula, July 2011.
I’m writing on my own behalf, so there’s no need for dirt. Let’s do this, this will be a woman’s vision of history.
Tyoma left on Wednesday. As I remember now. Left for Murmansk. And I stayed in this stuffy Moscow, in full heat + 35 in the office and without air conditioning. I had a really hell of a job
The plane ticket to Murmansk was warming me, no, it was cooling me. Departure on Saturday. When already?! And there is still so much to do! However, I began to catch myself thinking that this is cool - a man has been scratching on a motorcycle since Wednesday... and I have to catch up with him in just 2 hours, on Saturday! It’s somehow unusual, I used to fly often and for me “fast”, even at 9 o’clock, long-distance flights were familiar, now I have a different feeling of the World. It should be - Pass!
We were pleased with SMS messages from Tema - for example: “Petro
How they made me happy and upset me at the same time. After all, I've never been there. Karelia for me has remained the “Land of Lakes” from books.
motolulka.ru
Concept
In principle, a tricycle can be equated to an ATV; In terms of driving performance, these two vehicles differ slightly. The Ural region, which has already been discussed in this article, acted as a donor. Yes, the motorcycle was quite good, but I needed a more cross-country and stable vehicle.
Tricycle from the Urals stuck in a rut
The fact is that the terrain through which you need to move is gradually becoming swampy. Forest roads, which used to be so pleasant to ride a motorcycle on, disappear, overgrown with tall grass, or even completely going under water. Even if you manage to find them, driving along them on a motorcycle is noticeably more difficult than on a tricycle or quad. In addition, a significant part of the journey has to be covered in conditions of complete absence of roads, where the motorcycle does not fit well. Taking all this into account, it was decided to make a tricycle from the Urals with our own hands.
Assembly algorithm
If you have a frame ready, then the following sequence of actions will help you:
- Find a suitable rear axle from Moskvich or Zaporozhets.
- Mount the engine, exhaust system, filters, and oil cooler on this axis.
- The frame must perfectly connect the rear axle, engine and front fork. This is a very important stage. It is easier to install everything on a lift or jacks for better access to parts during the assembly process. All ferrous metal structures must be carefully primed and painted before installing parts.
- In order for the trike to be fixed on the ground, a front fork with a shock absorber is installed.
- When fixing each element, eliminate any play or clatter; if the part may come loose over time due to vibration, use locknuts.
- It is better to use fastening of metal elements by welding, where possible, for example, with cross members, rear axle and frame.
- Once the trike is on its three wheels, it's time to install the fuel tank, rack, seat, and additional accessories.
Even by investing a small amount of money and working with passion, you can get a trike no worse than its foreign counterparts. At the same time, the driving characteristics will be at their best, and will allow you not only to show off beautiful equipment in the garage, but also to show off at high speed on the highways. Stylish accessories such as leather fringe, chrome details, a specific helmet shape and the characteristic roar of the engine will allow you to recognize an ardent biker on a tricycle, which was made with his own hands in the garage.
Hi all! In this article, we looked at what is better for off-road travel: a motorcycle or an ATV. In some situations a moto is better, in others a quad is better. But we did not consider a vehicle such as a tricycle or trike, which will be discussed.
Design Features
If you don’t know how to assemble a tricycle from the Urals, strictly follow the drawings. Typically, the upper beam is used to secure the rear shock absorbers. Glasses welded to it will allow you to achieve a good level of comfort. Car-like shock absorbers will respond reliably to changing road surfaces. Simply welding a square or round pipe into the end will not be enough. It is necessary to use reinforcing kerchiefs made of ferrous metal, scalding them well. A do-it-yourself trike from the Urals can be used not only to satisfy your love for a hobby, but also as a workhorse on the farm. If you set a goal, such a trike can have a carrying capacity of several hundred kilograms . It will be necessary to install not only the engine, but also prepare the site for installing the gearbox. Looking ahead, there will be the most problems with it, since there is nowhere to remove the finished structure, and making the box itself, the body, is very difficult.
A classic tricycle with a rear axle. | Topic started by: Aethylswyth
Andrey (Cinderella) well, what nuances should a beginner need to take into account
Andrey (Cinderella) thanks for your response, I really bled all over the keyboard with the discussion
Vladimir (Floris) The Ural-Dnepr gearbox reduces the reduction by half, and the classic gearbox reduces it by 4. That is, the speed will drop by half, and the thrust will also increase by two
Andrey (Cinderella) Vasya, valuable information, this is what I need, speed no more than 50 is what I need
Andrey (Cinderella) Andrey, thank you very much, but the question is how is the cross-country ability in winter?
Andrey (Cinderella) Andrey, of course you can’t drive through snowdrifts, but it’s quite good cross-country ability
Andrey (Cinderella) Andrey, in winter I will market
Grisha (Sumangali) the whole thing is attached to the pendulum
Andrey (Cinderella) Grisha, yes. There are other designs, but I'll try this
Alexander (Karole) Andrey, I put together this one. If you are interested, write and I will share.
Ivan (Kronid) Andrey. Can you send me more detailed photos in a personal message? I want one like that too.
Oleg (Lorko) Good. day please send me a photo in PM for more details and if possible a description
Alexey (Yudita) And if we take the Ural mg350 as a basis. And make a body like this, only with a lower landing. And instead of springs, put springs.
Oleg (Lorko) For those interested. write. I’ll share the information on how I did it.
Vasily (Zekaria) Oleg, tell us how you connected the cardans to each other? , preferably with a photo
Oleg (Lorko) Vasily, something like this. where the original rubber band is placed from the cardan. I asked for 2 pins on which it is put on and drilled holes the same as on the Zhiguli Cordan (I took the Cordan from the Zhiguli)
Oleg (Lorko) Cut off 2 pins