Domestic motorcycles of the IZH brand, despite their age, are still popular in various parts of our country. This simple and unpretentious transport is especially popular among residents of rural areas. Not every imported motorcycle can start at +40 or -30, run on any gasoline, and when modified with a sidecar, it turns into a universal transport for a hunter or fisherman. Unfortunately, these motorcycles also have a significant drawback - low engine life. It’s rare that an IZh can work for several seasons and not fail. That is why below you will find step-by-step instructions on how to disassemble and reassemble the IZH Planet 5 engine.
Engine - disassembly and assembly
Complete disassembly of the engine is necessary if serious damage to the connecting rod, crankshaft and its bearings is noticeable.
This happens, for example, when the engine jams, or general severe wear of parts (rumble, hum during operation). The engine has to be completely disassembled (“halved”) also in case of wear of the left crankshaft oil seal (loss of power, difficult starting, increased smoking due to oil leaking into the crank chamber from the gearbox). 1. Remove the cylinder and piston from the engine.
2. Drain the oil and remove the power unit from the motorcycle.
3. Having removed the left crankcase cover, remove the motor transmission, clutch and trigger mechanism.
4. Remove the right crankcase cover. Here you should remove the generator along with the right crankshaft oil seal.
5. Remove the drive sprocket of the main gear.
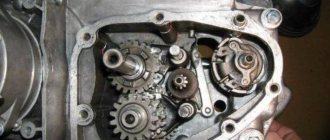
6. We disassemble, as far as possible, the gearbox.
7. On the right side, use a screwdriver to unscrew the screws connecting the crankcase halves and unscrew the nuts of the two bolts.
8. Using a punch, we knock out two installation sleeves to half their length.
9. Apply light blows with a mallet to the plane of the connector of the crankcase halves and, using a mounting spatula, (putting it into the grooves of the front and rear of the engine), separate the halves.
Do not push the crankcase halves apart with a screwdriver inserted into the connector. This will lead to damage to the joint planes and leakage of the crankcase.
10. Using a screwdriver, unscrew the screws securing the locking plate of the gearbox bearings.
11. Remove the plate.
12. Remove the adjusting rings-washers, writing down their number and location.
13. Remove the left half of the crankcase from the crankshaft, tapping it with a mallet if necessary.
Be careful, the aluminum alloy of the crankcase is quite fragile.
14. Using light blows on the outer ring, knock out both ball bearings of the gearbox shafts.
15. We knock out the rolling pins that guide the gearshift forks from the crankcase.
16. Using pliers or pliers, remove the outer retaining ring of the crankshaft ball bearing.
17. Remove the adjusting washer(s).
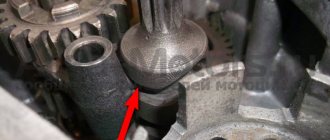
18. Use a soft metal drift from the side of the crank chamber (through the oil seal hole) to knock out the ball bearing.
19. Use pliers to remove the inner retaining ring.
20. Take out the split spacer ring.
21. Select suitable mandrels for pressing out the left crankshaft oil seal.
22. Through them, with light blows, knock out the oil seal along with the figured washer and the main bearing ring towards the crank chamber. We remember which side of the oil seal was facing the crank chamber.
Similarly, we press out the outer race of the right main bearing.
23. If the crankshaft main bearings need to be replaced, remove them with careful blows of a chisel or a suitable puller.
1. We wash all parts in kerosene or white spirit and inspect them.
There should be no cracks on the housing parts, no signs of scuffing in the bearing seats or broken threads.
The right and left halves of the crankcase can only be replaced as a set.
2. Clean the mating surfaces of the crankcase from any remaining sealant and gaskets.
3. Polish the gearshift forks to a mirror finish.
4. Using a scraper and sandpaper, remove burrs and other production roughness from the crankcase halves. After this, we additionally wash the body parts with water and detergent.
Repair of the crankshaft is possible only in a specialized workshop.
5. Fill the left oil seal with grease and install it together with the bearing ring, split spacer ring and shaped washer in the left half of the crankcase.
6. Install the internal retaining ring.
7. Liberally coat the main bearing rollers with grease so that they do not protrude from the cage.
8. Having cut it out of a plastic bottle, roll it up and install the mandrel for the left oil seal.
9. Place the crankshaft with the left end up on the supports.
Rocking slightly, carefully place the left half of the crankcase onto the crankshaft. The crankcase connector should be in the plane of symmetry of the connecting rod.
10. Take out the mandrel.
11. Install the lubricated ball bearing on the shaft.
19 mm tool head
press it in until it stops.
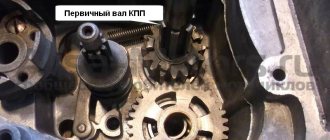
12. Install spacers and retaining ring.
13. Lubricate the connecting rod bearing with 4-6 drops of engine oil.
14. Check the ease of rotation of the crankshaft.
15. Further assembly of the engine is carried out in the reverse order of disassembly. At the same time, we apply a heat-resistant (not lower than 200°C) sealant to the grease-free planes of the crankcase connector and the threads of the bolts. However, first we assemble the engine without sealant to make sure that the crankshaft and other parts rotate freely. All bearings, their seats and gears must be lubricated.
The sealant should be applied in a thin bead without breaks.
16. When connecting the crankcase halves, carefully tap the parts with a mallet.
It is enough to cover the paronite gaskets with a layer of grease.
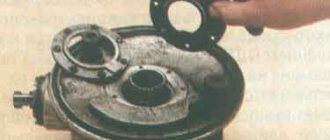
Assembling the crankcase halves
We degrease the connector of the halves, knock out the guide bushings a little so that they extend 5-6 mm above the plane. Depending on your desire, we assemble the checkpoint. Personally, I assemble the gearbox only after assembling the engine, it’s more convenient for me.
We apply any automotive sealant to the connector, install the second half of the crankcase, tap it with a mallet, install the gearbox cover and tighten the crankcase with bolts.
We do not pull the bolts anyhow, but strictly according to Feng Shui: we pull about a third of the force, first the middle crosswise, then the periphery, and gradually increasing the force over several circles, we tighten the bolts as much as is sufficient.
Engine repair IZH Planet 5
The IZH Planet 5 motorcycle, created in 1987 by the Izhevsk plant, is still popular among motorcyclists. This is a very high-quality and reliable bike, characterized by durability, simplicity and affordability. Disassembling the IZH Planet 5 engine is quite simple even for amateurs. The design of the motorcycle itself does not contain complex elements.
Planet 5 is unpretentious to weather conditions. If you want to start the engine in a cold winter, it will surprise you, even if it is -30 degrees outside the window. Moreover, the motorcycle was designed to ride on various types of roads, which makes it very passable and an excellent assistant in agricultural work.
Like its counterpart, Jupiter 5, IZH Planet 5, whose engine performance is not much inferior to its “brother,” has a strict classic style. However, it has a number of advantages over Jupiter, the main of which are:
- single cylinder engine;
- disassembly and repair of the gearbox without removing the engine;
- presence of one muffler.
However, there is also a big disadvantage . The Planet's crankshaft is much more massive, so it operates at lower speeds, which makes it less powerful. Although the design of the IZH Planet 5 engine is practically no different from the Jupiter one. True, breakdowns occur no less frequently, so if you switched from one motorcycle to another, there should not be any special problems with operation and maintenance.
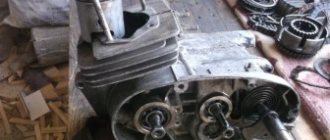
Warm greetings to everyone! I haven’t posted anything for a long time, and now the opportunity has come to please me with another project. On our agenda is Planet 5. An ordinary ordinary five, without any additional equipment. At first it all started with the engine, there was no intention of making the motorcycle itself, but fate turned out differently. Here we go! Well, how did it all begin? The start of this story was back in the fall, when a stranger to me wrote about repairing the engine from Planet 5. The problem was a cracked sleeve, the second gear was falling out and there was noise in the engine, plus the seat under the guide shaft of the shift fork was worn out and the shaft was hanging out. I say, we’ll do everything, bring it. A month and a half passed. I write to him and remind him that I haven’t forgotten about the repairs. The man asked again if we would do it. In general, he decided to bring the engine for repairs. And he lived 300 km from me. Then he writes that he saw how we make entire motorcycles and asked if we could make his Planet 5. That time was the first time I saw that same planet from a photo.
I told him everything, that restoration is not a problem, just bring the engine and we’ll do everything. He explained everything in detail and he says that in 3 days he will bring everything in its entirety. I think that's great! The next day he writes that to begin with he will only bring the engine. Like we’ll do it first, and then we’ll see. He carried the engine on the train in a huge trunk, which also had a suitcase with spare parts))) This is how the engine arrived.
It looks clean - well-groomed) Well, at first glance!
The ignition cover is “eaten” by rust.
New cylinder. Unfortunately, it’s not a factory one... Well, they sold it) But they sold one that doesn’t fit on the crankcase. Here's the first problem!
We are starting to take it apart little by little. I took off the engine cover and saw new clutch discs. The motor chain is, of course, stretched... The inside is relatively clean.
So we got to the gearbox. And there were complaints about her! Yes, an interesting fact - someone before me tried to assemble the engine, but forgot to put a bearing on the intermediate shaft (which is the lowest). If someone tried to start it, then it would just be “meat”... As for the complaints) 2nd gear flew out, and the seat under the guide shaft of the shift fork also became loose. It was also immediately revealed that the 1-12 fork was extremely worn and the gaps on the shafts were outside the permissible standards, so the box was not working correctly.
Eh... Crankshaft. It had no play at all in the NGSh, but a chip on the axle shaft. It was such a pity for the crankshaft! Quite cheerful and somewhat chipped. I didn't want to put it on! What if something happens and the key breaks and the engine has to be disassembled again... No way! We decided to repress the old crankshaft using a new connecting rod.
While we were slowly purchasing consumables for capital. But the crankshaft... drank my blood!
Crankshaft, how they blew my mind! We found a donor for repressing. I bought a connecting rod and took the crankshaft to the master. Since I was without a car, I carried this whole, excuse me, BAYDA in my backpack. Oh yes, I also took the crankcase with it to the argon engineer to weld the hole where it was weak. The crankshaft was the one with a jamb, which I didn’t pay much attention to. The left axle shaft came out towards the connecting rod, but the master moved it into place and replaced the connecting rod. Everything is ready) I pick up the crankshaft and go home happy with the thoughts that I will half assemble the engine today. Yeah... collected it.
How can I put it more politely... We're in trouble! I install the crankshaft, pull it with the engine sprocket - it is clamped to the left wall. I put the washers in - to no avail. Then they pressed the crankshaft out of the crankcase, since the tension in bearing 304 was brutal! I look at the shaft: the axle shaft has come out to the connecting rod, but it itself is not pressed in, which is why it was a little wider. Yours...arrr! This whole thing made me hesitate! I had to take the old crankshaft from my supplies and take both to repress. Baaalin, now bring 2 crankshafts at once! The backpack begged for mercy, but had to be carried on its hump again.
That's it, thank God for crankshafts! Got up as needed! Just perfect! Well, finally you can assemble the checkpoint.
The bearings were replaced and the motor was halved. We put on the rollers and speed lock. Well, little box, come to us.
Creative chaos))))
Like, what could go wrong. But again it’s not like that... I’m assembling the box. Everything is according to the marks, the gaps on the shafts are what you need! I put the gearbox cover on, but 4 does not turn on. At least kill it! No, that’s all, and a faint rustling sound is heard. I remove the cover, the shafts rotate without jamming. I think what's going on... I assembled a gearbox without an intermediate shaft - there is a fourth one. I put it in between - no. I think what I did wrong in this life. I tried to install other boxes - the same story. What a problem engine! And then it dawned on me!
I think we need to assemble the gearbox in the cover itself. Everything is visible there, you can change gears and everything will be visible. Yeah! Here it is!
This was the problem) The new fork 1-12 was a little out of size. With its surface it caught on another gear on the intermediate shaft and did not allow 4th gear to be engaged. Chinese iron! That is OK! We finalized it and everything went as it should))
The gearbox is assembled, the clutch too, hurray! There's just a little bit left - to put on the cylinder. But... heh, again the evil spirit decided to bring me down. Installed the piston. I put the rings on and look - yep. The ring locks are recessed into the piston and the rings are not fixed. Yep... I spat and went home! Just yesterday I went to town with the cylinder and matched the piston to the cylinder. Although the funny thing is that the pistons of different groups entered differently and I had to try 5 pistons. Ahhhh... go to town again and change the pistons. I didn’t want to bring the cylinder again, so I picked up 2 pistons of the same group from the store and drove home at random.
By the way, about the cylinder! As I mentioned, the cylinder is new. New, but crappy. Compare it with the old one, and you will see the difference yourself. Different pins and more burrs. But that's not so bad. There are giant steps on the canals! In the meantime, the cylinder was re-sleeved, but crookedly... They left such steps that you could still feel it with your finger. But the drill helped us out. In general, she’s great! And the crankcase was filed down so that the cylinder would sit and the excess deposited aluminum was ground off so that the gear would not touch.
Yeah, the engine is assembled. Really! He killed so many of my nerves while he was writing this, as if he was experiencing it all over again.
And he went to his brothers to wait in the wings. In the meantime, it’s winter - we’re preserving it) Then I cleaned the cylinder head and made it look good, it’s a pity there’s no final photo.
I made the owner happy that the engine was assembled) He was happy, of course. And suddenly he decided to bring me the entire Planet. And the journey to me was 300 km, and they wanted to carry him in seven. Ahhh, fall in love with the queen, steal a million - take it! We'll do everything!
The next day the hero of this whole celebration arrived. Izh-Planet 5 in person.
I was very glad that the seat was alive and well. And there will be no need to retighten it and the like.
Vidocq is tired... What to do, but without the “collective farm”. The owner said that the motorcycle had been standing almost in the open air for about 6 years. And this phrase immediately made it clear that rust had begun to seriously overtake him.
The mileage is only 17,000. And the crankshaft was still in the most vigorous condition... it was)) So we drove carefully and didn’t give it a full blast.
I was also surprised by the presence of a throttle limiter, which is removed after the first 2,000 km, but here it was still there. First time I saw this)
A complete muffler, which is already rare, and wheels. True, one of them has already been eaten away by rust and the chrome has fallen off.
The cable clips and bushings with rubber bands are still intact. I was surprised by the integrity of the little things. Usually most people don’t even have a trace of this, but here’s the original - I love it)
Left glove compartment. You fought as hard as you could, but the electrolyte was stronger. This is how everything has been eaten through and the frame is all covered in rust. Oh, the poor scruffy fellow.
After pampering yourself with tea and buns, you can begin the disassembly procedure.
Wow, how clean everything is... I'm already looking forward to the process of cleaning and washing.
Having removed the tank, I am glad that the central wiring is safe and sound. Already a plus)) Clamps ala what was at hand. We will replace it with the original))
Another original wiring clamp))) Made from lace xD
Powerful flange) The owner says that the standard ones always burst and so they turned theirs out of a piece of iron! Impressive thing)
We begin to dismantle the wiring) In order not to get confused later, we label each wire on masking tape, very convenient by the way!
Thank you, Lord, for the absence of home-made twists, blue electrical tape, for this integrity, so as not to conjure with a soldering iron later - AMEN!
The corrugations are already all cracked. And under the dashboard there are still parts of field dandelions. I'm silent about dust)))
So the wiring was almost dismantled. Business. Breaking is not building.
Having removed the right glove compartment, I thought how bad it was. How everything started. The rear shock absorbers are probably not repairable at all, since the cups are completely rusty. And how much dirt is mixed with oil. Least favorite moment))
Wiring and electrical equipment goes into its own separate box)
And finally, we remove everything remaining on the frame) It was not easy, everything was covered in dirt and rust, which is why some bolts had to be cut with a grinder.
This is what's left of the motorcycle. Of course, there will be plenty of work. Look for shock absorbers, turn signals, rear casing... In general, a lot of things)
And how much does it take to clean and sand, to remove this rust? Honestly, I didn't want to do this. It will take some time to clean it all out. He suggested to the owner that everything be sandblasted and everything black be powder-painted there. It will be more expensive, but it will be of high quality. Everything will be cleaned, processed and painted. Since the budget was already outlined, I still persuaded him that I would even put it all together and deliver it myself, just let’s take care so that everything is clear and beautiful. In the end I agreed. We could clean everything ourselves and paint it from a spray bottle, but it would be too... messy. I was lucky with Planet 4, that there was no rust at all on the frame and everything else, and there was a primer under the dirt, it even came out of a spray can. But it wouldn’t work that way here.
This can sum up part 1. The engine is ready, the motorcycle is disassembled and is waiting for a trip to sandblasting. At this time, we will look for donor spare parts and purchase new ones that are necessary. This is how another IL begins to transform after many years of inactivity. I already liked this planet because most of the spare parts there are still original, the owners didn’t particularly farm it or kill it, which will save us time. And I haven’t seen a color like this often. Most often they were red. And here is a little blue one, special) In general, wait for the second part, it will be out very soon. Also, the next part about the restoration of Planet 4 is already at the preparation stage.
Thank you for your attention, see you soon, have a happy winter everyone)
IZH Planet 5 engine diagram
| 1 - spark plug; | 2 - cylinder head; |
| 3 - cylinder: | 4 - piston; |
| 5 - piston ring; | 6 - piston pin: |
| 7 - crankcase; | 8 — channel for lubrication of the main bearing; |
| 9 — roller bearing; | 10 — left oil seal; P - left cover; |
| 12 — motor chain; | 13 - ball bearing; |
| 14 — crankshaft sprocket: | 15 — outer drum of the clutch; 16 — clutch disc; |
| 17 - inner drum: | 18 — pressure disk; |
| 19 — spring; | 20 - shaped nut; |
| 21 - pusher; | |
| 22 — ball bearing; | 23 — trigger gear; |
| 24 — gear shift lever; | 25 — trigger lever: |
| 26 — trigger shaft; | 27 — gear shift shaft; |
| 28 — trigger sector; | 29 - spring: |
| 30, 31, 32. 39, 40, 42 — gearbox gears; | 33 — gear shift fork; |
| 34 — emphasis; | 35 — gear shift shaft; |
| 36 — gearbox cover; | 37 — installation sleeve; |
| 38 — right cover; | |
| 41 - intermediate shaft; | 43 - ball bearing; |
| 44 - roller bearing: | 45 - secondary shaft; |
| 46 - input shaft: | 47 — clutch adjusting screw: |
| 48 - worm ball; | 49 — clutch worm; |
| 50 — cap of the secondary shaft nut; | 51 - oil seal; |
| 52 — asterisk; | 53 - generator; |
| 54 — right oil seal; | 55 — roller bearing; |
| 56 - gasket; | 57 - crankshaft; |
| 58 - bypass channel; | 59 — exhaust window; |
| 60 - decompressor |
Assembly and disassembly
Before you think about power, you need to understand motorcycle maintenance. Often, chasing speed and appearance, owners forget about the basic rules for operating their pet. Due to negligence, and not only, various types of breakdowns occur. You can troubleshoot problems yourself. Considering that disassembling and assembling the IZH Planet 5 engine is very simple, they can be done at home. However, it is recommended that you consult the factory-produced motorcycle operation and maintenance book.
There are cases when the maintenance book was lost long ago, or was not received at all upon purchase. In this case, here is a simple procedure for disassembling the engine:
It should be noted that the cleaner your workplace is, the better the repair will be done, since dirt that gets inside the engine can make it difficult to operate and even cause another breakdown. Don't be too lazy to wash the engine well before work .
Write down or mark the progress of your actions. This will help with assembly. Group the parts in the order they are disassembled and assemble them by location. The more organized the disassembly process is, the faster you will assemble the IZH Planet 5 engine, the technical characteristics of which will once again delight you.
- So, the first thing you need to do is remove the exhaust tube. It will be most convenient not to unscrew it completely, but only from the engine side and tie it to a stable part.
- Now proceed to remove the cylinder cover, which is secured to four bolts and the cylinders themselves, being careful not to damage the gaskets. Damage to the gaskets will lead to loss of engine pressure and compression.
- Remove the tube from the chain boot.
- Knock out the front pin strengthening the engine. Knock it out carefully; the bent part will not fit back in.
- Now proceed to the engine mounts. Remove all nuts and bolts from the rear of the engine.
- When the engine is not secured, move it to the side on a stable surface. There are seven bolts on the pallet that need to be unscrewed. Then carefully remove the tray. Remove the outboard flywheel plate and gasket and secure the engine. It is better to fix the engine on a workbench; if you don’t have one, then a massive table will do.
- Let's move on to the take-out flywheel. To loosen the bolt holding the flywheel in place, you will need a socket wrench and a long, sturdy pry bar. The carving on the cap is quite soft; if you overdo it, you can tear it off.
- Then we separate the halves of the pallet. They will still be needed, so we don’t put them away in the “far corner”.
- Now we move on to the take-out flywheel and veneer. They are easy to remove and do not require any special skills.
- Having remembered the locations of the adjusting washers, remove the front, rear and follower shafts in sequence.
- Let's move on to the crank chamber covers. After unscrewing the pins, carefully remove the covers and rings.
- Then you need to return to the pallet again. Remove the crankshafts from its halves.
- Next, remove the bearings of the crankcase halves. Unscrew the race and screws with the crankshaft oil seal.
- And the last step. Remove the installation rings and knock out the seals. Assembly is carried out in the reverse order, but it is necessary to tighten the bolts and studs with certain efforts. Otherwise, there should be no questions about how to assemble the IZH Planet 5 engine.
Installation of bearings and seals
We install a retaining ring in the left half of the crankcase.
Depending on the model of the main oil seal, we install a spacer sleeve in the mounting hole of the main bearing, or, if the oil seal was initially wide (there are some), we heat the crankcase and, on the inside of the crankcase, place the oil seal until it stops against the retaining ring.
My engine had a regular narrow oil seal, so I put in a bushing.
Using a mandrel, install the main oil seal into the preheated crankcase.
Quickly, before the crankcase cools down, place the oil guide washer on the oil seal. The oil guide washer has a saucer-shaped profile. We place it on the oil seal so that the concave side faces us, and the curved side faces the clutch basket.
While the crankcase has not cooled down, we press the outer race of the main bearing into it using a mandrel.
If you are going to replace the main bearings with new ones, don’t be lazy: find a sheet of iron 7-8 mm thick, cut a wedge in it for the connecting rod, pass the sheet of iron between the cheeks of the crankshaft and use a mandrel to drive the main bearing onto the axle.
This way you will protect yourself from damage to the crankshaft. The main bearing has a very high interference and fits into the axle with a very large force. It is not uncommon for people to simply knock out the axle (the axle on the planetary crankshaft is pressed into the cheek) inside the crankshaft, but they were never able to put the bearing on.
Engine repair Izh Planet 5
Engine repair Izh Planet 5
Engine - disassembly and assembly
Complete disassembly of the engine is necessary if serious damage to the connecting rod, crankshaft and its bearings is noticeable. This happens, for example, when the engine jams, or general severe wear of parts (rumble, hum during operation). The engine has to be completely disassembled ("halved") also in case of wear of the left crankshaft oil seal (drop in power, difficult starting, increased smoking due to oil leaking into the crank chamber from the gearbox). Disassembly 1. Remove the cylinder and piston from the engine. 2. Drain the oil and remove the power unit from the motorcycle. 3. Having removed the left crankcase cover, remove the motor transmission, clutch and trigger mechanism. 4. Remove the right crankcase cover. Here you should remove the generator along with the right crankshaft oil seal. 5. Remove the drive sprocket of the main gear. 6. We disassemble, as far as possible, the gearbox. 7. On the right side, use a screwdriver to unscrew the screws connecting the crankcase halves and unscrew the nuts of the two bolts. 8. Using a punch, we knock out two installation sleeves to half their length. 9. Apply light blows with a mallet to the plane of the connector of the crankcase halves and, using a mounting spatula, (putting it into the grooves of the front and rear of the engine), separate the halves. Attention! Do not push the crankcase halves apart with a screwdriver inserted into the connector. This will lead to damage to the joint planes and leakage of the crankcase. 10. Using a screwdriver, unscrew the screws securing the locking plate of the gearbox bearings.
11. Remove the plate.
12. Remove the adjusting rings-washers, writing down their number and location.
13. Remove the left half of the crankcase from the crankshaft, tapping it with a mallet if necessary. Attention! Be careful, the aluminum alloy of the crankcase is quite fragile. 14. Using light blows on the outer ring, knock out both ball bearings of the gearbox shafts.
15. We knock out the rolling pins that guide the gearshift forks from the crankcase.
16. Using pliers or pliers, remove the outer retaining ring of the crankshaft ball bearing.
17. Remove the adjusting washer(s).
18. Use a soft metal drift from the side of the crank chamber (through the oil seal hole) to knock out the ball bearing. 19. Use pliers to remove the inner retaining ring.
20. Take out the split spacer ring.
21. Select suitable mandrels for pressing out the left crankshaft oil seal.
To watch online, click on the video ⤵
How to replace a crankshaft bearing without disassembling the engine! SIMPLE METHOD | IZH planet/JupiterMore details
IZH-Jupiter engine. We change the oil seal without disassembling the engine. Read more
Replacing the crankshaft oil seal without disassembling the engine.Read more
Replacing the left crankshaft oil seal Izh Planet without removing the engine, the fastest wayRead more
Updating the oil seal of the left half of the Izh PLANET crankcaseMore details
Replacing the crankshaft oil seal Izhevsk planet 5 without disassemblydizhkaMore details
Engine assembly Planet 5 Ch1Read more
replacing the right oil seal IZhRead more
Replacing the oil seal of the IZH Planet drive starRead more
Replacing the gasket and oil sealRead more
#233. I installed the oil seal on the right side of the Planet 5 calenshaftMore details
DO NOT BUY THESE SEALS. More details
#229. Left half of the engine and bearing Planet 5More details
How to remove the right crankshaft bearing of a Minsk Voskhod motorcycleRead more
Pain. The motorcycle engine is assembled, but you need to get the bearing. Read more
Engine. Izh planet 5. REPAIRMore details
Pressing out the crankshaft bearing to replace the oil seal without disassembling the engine!Read more
replacement of the left crankshaft oil seal Izh Jupiter-5More details
Source
Weaknesses and shortcomings of the IZH-P5 engine of the IZH Planet 5 motorcycle
Why did they stop producing the IZH Planet motorcycle in Russia? Oddly enough, the Kovrov Machine-Building Plant named after Dektyarev (ZID), as well as the former Soviet, now Belarusian Minsk Motorcycle Plant, still supply their motorcycles to the market. As for the Izhevsk Machine-Building Plant, which produces IZH motorcycles (Planet, Planet-Sport, Jupiter), the last production batch of motorcycles was produced in 2008, then, due to difficulties arising from the economic crisis, the production of IZH motorcycles was curtailed. It’s a pity, because the state could have provided assistance to the plant. At that time, Izhmash had a lot of experimental design work on promising motorcycles, both with two-stroke and four-stroke engines. I have a lot of positive memories associated with the IZh “Planet-3” and “Planet-5” motorcycles.
Any motorcycle model starting from Planet-2 gave a head start to Jupiters in terms of cross-country ability, old or new, it doesn’t matter. He didn’t sail on it, even in the taiga or in the forest, fishing or hunting. A very reliable “workhorse” with traction like a tractor, and my father and I never transported anything on it. We bought it in 1989 and to this day my father drives it, but it looks like new and makes my heart happy with its proper operation. Planet motorcycles, even its oldest models, continue to serve their owners regularly and reliably, despite the stoppage of production, there are no problems with spare parts for repairs on the market, and there is no limit to the maintainability stock. In this article, we will look at the IZH-P5 power unit of the IZH Planet 5 motorcycle, or more precisely, its technical characteristics, weaknesses and disadvantages. The IZH-P5 power unit differs from the IZH-P4 20 hp. the previous model of the motorcycle “IZH Planety-4” increased by 2 hp. power, a higher compression ratio and an engine head, the 4th model has two exhaust pipes, the 5th has one. Gearboxes differ in the number of teeth on the gears and, accordingly, in the gear ratios. Gearboxes are interchangeable.
Photo report: Repair (repressing) of the crankshaft of the Izh-Planet motorcycle
Due to a gross design miscalculation, the crankshaft of the engine of the Izh-Planet (SZD) motorcycle, having traveled some measly 5,000 km, successfully “grunted” (knocked). Even Chinese plasticine goes through many times more, but here is “Planet”. How so?
Of course, to make the picture clearer, it’s worth making a little reservation: The crankshaft, the repair of which will be discussed in this article, is slightly different in design from the original “Planet” one, since it is from a SZD (motorized sidecar) engine. But in essence, there is practically no difference between these shafts and the engines.
The reason for the rapid failure of the crankshaft was that the bearing of the lower head of the connecting rod, due to a gross design flaw, was not at all lubricated with oil during operation.
In the cheeks of the crankshaft, recesses were made for the lower head of the connecting rod (it is not clear why), so when the lower head of the connecting rod fell into place, the standard oil channels of the lower head of the connecting rod were blocked by the walls of the recess, which led to “oil starvation” of the bearing.
Here, that same depression in the cheek, of unknown purpose.
But the oil channel (ordinary chamfer) on the “native” connecting rod, the channel must be said: it’s made to “fuck off”, and it’s not a channel in essence, but just another Soviet bullshit (even the Chinese don’t allow themselves to do this). Through such a channel, lubricant cannot even theoretically flow to the bearing.
Now look, if you put in a new connecting rod with developed channels for lubrication, then all the same, the channels are blocked by the walls of the recess.
Our task for today: Install a new connecting rod, instead of the old one, into the crankshaft, first taking care of its normal lubrication. And then, the whole thing must be carefully aligned using special measuring tools.
First, the crankshaft must be disassembled.
We are looking for a sheet of metal of suitable thickness (7-8 mm) and using a grinder we cut out a wedge approximately in the middle.
Place the crankshaft on the sheet.
We lay the sheet on some powerful beams so that the crankshaft journal hangs freely in the air, take a suitable mandrel, place it on the finger and use a heavy sledgehammer to knock the finger out of the cheek. After removing the finger from one cheek, take the second cheek, place it on a sheet and knock out the finger in the same way.
Before removing your finger, remember the main rule: Never try to knock out a worn finger all the way through the other cheek! During engine operation, the working surface of the bearing pin of the lower connecting rod head takes on an elliptical shape, so if you decide to knock out the pin with a worn surface through the cheek, the result will be the same - you will violate the geometry of the hole for the pin in the cheek. Because of this, the new finger will no longer stay in such a hole!
Previously, a new connecting rod was purchased from the online store (factory-made, not 100% Chinese).
We are looking for a cutting disc for the grinder that is as thin and worn in diameter as possible, prepare a container with water in advance, install the disk on the grinder and begin to refine our connecting rod.
We cut a small groove at the bottom of the connecting rod, through which the bearing will be lubricated; you need to saw slowly, a little at a time, while constantly lowering the part into the water; under no circumstances should the bearing be overheated, otherwise all the work will go down the drain.
Such a groove is quite enough to lubricate the bearing; as you can see, due to the timely cooling of the part with water, there are completely no traces of blue. After cutting the groove, we take needle files and thoroughly sand all burrs, sharp corners, and “other jambs” both inside and outside.
The connecting rod has been modified, now you can start assembling.
We place any cheek on some flat surface (preferably wooden) and, using a mandrel, a heavy hammer or a small sledgehammer, drive the bearing pin into the cheek. Be careful not to let your finger stick out of your cheek.
We put the support washer on the finger, then we put the connecting rod with the pre-washed bearing there and put the second washer on top.
We adjust the mandrel under the finger, take the second cheek, turn it around so that it is as equal as possible to the first and, through a spacer, place the second cheek on the shaft.
You shouldn’t push the cheeks together too much; bring them together so that there is a small gap between the connecting rod and the cheek (0.15-0.2 mm).
The final step in all this work will be the final alignment of the crankshaft.
The crankshaft cheeks do not always occupy a level position during assembly, which is why the crankshaft journals are in different axes. With such an imbalance along the axes, the engine simply cannot work. Therefore, to begin with, we take a caliper in our hands and measure the thickness of the crankshaft in certain places (marked with arrows).
In case of any discrepancies in the thickness of the crankshaft, we either move the cheeks in the desired direction or compress them. Until the thickness of the crankshaft in all measurement locations is absolutely the same.
After we have equalized the thickness, we place the crankshaft on the prisms, install the indicator on the stand and proceed to the final one.
We turn the crankshaft so that the indicator arrow shows maximum runout. Take a piece of chalk and place a mark along the axis of the indicator.
We take a metal plate, cover it with a sheet of some non-ferrous metal; in our case, the role of the non-ferrous metal is played by a piece of lead. And lightly hit (where the mark is) with the marked cheek on the slab. Afterwards, we install the crankshaft on the prisms and check the runout, and repeat this until we can reduce the runout of the axles to the minimum possible value (no more than 0.03 mm).
This work may seem difficult only at first glance, but in fact everything is very easy and simple, the main thing is not to rush! And of course, measuring instruments play a major role here; without them, there is no point in taking on such work.
Characteristics of the IZH-P5 motor
| engine's type | Single-cylinder, carburetor, two-stroke, air cooled. |
| Working volume, cm 3 | 346 |
| Maximum power, l. With. | 22 (20.9…23.1 at 4850±10% rpm |
| Cylinder diameter, mm | 72 |
| Piston stroke, mm | 85 |
| Compression ratio | 8,2-8,7 |
| Cylinder-piston group lubrication system | mixture of fuel and oil. On later motorcycle models, oil supply is used by an oil pump, which proportions the oil supply depending on the crankshaft speed and engine load in ratios of 1/25-1/100 to the gasoline supply. The filling capacity of the Izh P-5-01 motorcycle engine crankcase is 0.7 l, oil M-8V, M-10V2, MS-14, MS-20, MGD-14M or their foreign analogues. |
| Carburetor | K-65I (in earlier ones - K-62I) |
| Fuel used | motor gasoline with an octane number of at least 76. With a joint lubrication system, gasoline is used in a mixture with motor oils M-8V, M-10V, aviation oil MS-20 in a ratio of 25: 1, or a mixture of gasoline and oil for two-stroke engines MGD-14M (or its foreign analogues) in a ratio of 50:1. |
| Gas tank capacity | 18 l. |
| Air filter | contact-oil |
| Oil filling capacity in the air filter | 0.15 l engine oil |
| Generator | Generator - a three-phase electric machine with electric machine excitation and an electronic rectifier-voltage stabilizer BPV-14-10 (BPV-21-15), with a power of initially 100, then 140 W, or a single-phase generator with excitation from permanent magnets and an electronic regulator RNM-1, power 90 W. |
| Ignition | battery contact capacitor, on later models electronic non-contact, with automatic control of ignition timing based on crankshaft speed and independent of the battery. |
| Spark plug | A23B (or foreign analogues) |
| Accumulator battery | lead acid, type 6MTS-9, 12 volt 9 Ah |
| Transmission | |
| Transfer from engine to clutch | double-row bushing drive chain (reinforced) in an oil bath |
| Clutch | multi-disc in oil bath |
| Gearbox housing filling capacity | 1.0 l, oil M-8V, M-10V2, MS-14, MS-20 or their foreign analogues. |
| Transmission | three-shaft four-speed in one unit with engine and foot gear shift. |
Weaknesses of the IZH-P5 engine
- Air filter;
- Cylinder-piston group;
- Transmission.
More details about the weak points of the IZH-P5 power unit...
Air filter. To prevent dust from entering the engine, frequent washing and oiling of the filter element is required. Installing a paper filter would reduce the time spent on engine maintenance during maintenance and would improve the quality of cleaning the air supplying the carburetor.
The CPG wears out after 20,000-25,000 km due to the lack of water cooling.
Transmission . Over the years, due to wear and tear, the gears switch off on their own and adjustment does not eliminate the problem. In this case, it is necessary to overhaul the gearbox and replace worn out parts.
Disadvantages of the IZH-P5 engine
- Loud in operation;
- Increased vibration;
- Oil sprays from the muffler;
- Long acceleration;
- High fuel consumption;
- Small resource;
- Strong return from kickstarter.
Loud operation has a negative impact on people around (interferes with rest), which causes corresponding reactions towards the motorcyclist.
Increased engine vibration is felt throughout the motorcycle, especially with your hands on the handlebars.
Oil splashes from the muffler, which, when driving, falls on the back of the driver or passenger. This disadvantage is eliminated by installing a stainless steel ladle of the appropriate diameter at the end of the exhaust pipe. The ladle should have a sector cut out in advance, which should be in the lower part when mounted with screws. This modification will prevent oil from getting onto the back, and the exhaust will be directed downward.
Long acceleration. Planet 5 with a sidecar takes longer to accelerate. The increased duration during acceleration is especially noticeable on a motorcycle with a sidecar.
High fuel consumption. The engine is not fuel efficient and the reason is primarily in the design of the two-stroke engine.
The resource is limited to an interval of 20-25 thousand km
Strong return from kickstarter. To prevent the kickstarter from hitting your leg, do not accompany the kickstarter with your foot when it returns to its original position. The impact on the kickstarter when starting the engine should be sharp and strong.
PS. Dear “Planetovod” motorcyclists! You can ask a question or add reviews and information on the weak points and shortcomings of the IZH-P5 motor in the comments.