It is not clear why Voskhods have gained fame as unreliable and capricious motorcycles. You might think that Jupiter or Ant is much better than Sunrise. However, this opinion still exists in the motorcycle community. Well, okay, if there is such an opinion, then so be it.
Someone had already “overhauled” the engine before us, then we drove it a little, removed the cylinder for boring and rolled it into the garage for the winter. While the motorcycle was standing in the barn, water began to flow into the engine... And when spring came to the yard, the owner wanted some drive... Well, let's give him some drive.
Motorcycle engine repair Voskhod
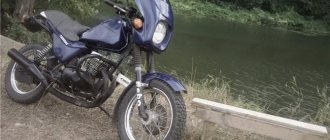
The Sunrise is a road bike.
It was very popular in Soviet times, but is no longer produced. The most popular model is considered the Voskhod 3M, an engine whose repair is completely simple and completely easy to maintain. The reliable design and stability of the bike make Voskhod an excellent friend for any motorcycle enthusiast. Since nowadays you can only buy such a motorcycle second-hand, you have to tinker with the technical part of the motorcycle. You will be very lucky if the previous owner kept the bike clean and used it according to recommendations. If not, then frequent repairs of the Voskhod engine will take up your free time.
Voskhod 3M is considered a direct competitor to the YAVA 350 motorcycle. However, Voskhod breakdowns happen an order of magnitude more often. This happens mainly due to the negligence of the owner. Failure to follow operating instructions leads to minor problems that create significant problems. A special feature of 3M is the chassis. The brake pads were equipped with a wear sensor, the shock absorbers were fitted with corrugated rubber covers , and a protective shield was installed on the front wheel. The design of the Voskhod 3M engine also changed slightly after the modification was released. Motor 3M-01 with five-channel cylinder purging and one exhaust window.
Engine
The “heart” of a motorcycle, even with the most careful use, gradually wears out - this is facilitated by the abundance of heterogeneous mechanical loads in the cylinder-piston group and other moving parts, temperature effects on the metal, the chemical composition of the working mixture and exhaust gases. DIY motorcycle repair Voskhod most often includes the following engine work:
Engine repair, like the repair of other units, must be preceded by a comprehensive diagnosis of its technical condition, which includes an analysis of operational parameters (approximate indicators of developed power and speed, fuel consumption, sound of operation, color and character of the exhaust). If necessary, diagnostics are performed on the bench, and specialized instrumentation is used.
It is important to navigate the structure of a two-stroke internal combustion engine of a motorcycle and understand how each specific type of repair is performed. So, when replacing piston rings, you can do without removing the engine. It is enough to unscrew the stud nuts, remove the cylinder cover and, opening access to the piston, bring the piston to top dead center. Then the worn rings are removed and new ones are installed. The engine is assembled, not forgetting to replace the gasket. This completes the repair.
Engine diagram
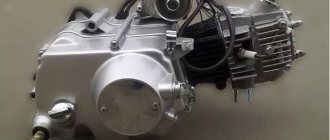
For Voskhod motorcycles, the engine size was the same. It was 173 cm3. In general, all bikes from this manufacturer had the same single-cylinder engine with two power strokes and an air cooling system. The very small volume of the engine produced 10 horsepower and over time, modifications to the engine began to produce power of 14 hp.
If you discover a malfunction and it is related to the operation of the engine, do not put off repairs for a long time. Exacerbating the problem will result in unexpected costs. There is no need to be afraid to overhaul the engine. Not only disassembly, but also assembly of the Voskhod engine is very simple.
Before repairing, carefully inspect the motorcycle for wear or broken parts. After inspection, clean the engine from dirt. It is better to wash it thoroughly with a cleaning agent. Since the main engine problem is the crankshaft bearings, seals and gaskets, let’s consider the process of repairing them:
At the same time, be careful not to overtighten the crankshaft, otherwise it will move or bend. In this easy way you can replace bearings and gaskets in the engine. As you can see, the work does not require hard-to-find or rare tools.
Replacing clutch discs
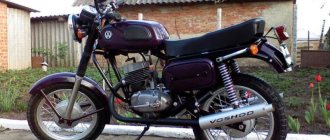
Motorcycles Voskhod, Voshod-2(M) and Voshod-3(M) were produced from 1965 to 1993 and were distinguished by excellent technical and operational qualities for their time. All of them were equipped with 173 cc two-stroke engines, which had one air-cooled cylinder and carburetor power. This allowed the motorcycle, depending on the modification, to reach a maximum speed of 90-105 km/h with a fuel consumption of no more than 4.5-5.5 liters per 100 km. In general, Voskhod has established itself as a reliable and durable vehicle, capable of operating for many years with proper maintenance. However, time takes its toll, and the need to repair Soviet equipment arises more and more often. Let's try to figure out what features are characteristic of restoring the main components and assemblies in the process of repairing a Voskhod motorcycle.
Force
To increase power on Voskhod 3M, you can do engine tuning yourself. Even simple manipulations like an air filter can increase performance.
For a stronger increase in power, you can replace the intake system. For example, install a new carburetor. Perhaps even from another motorcycle with a similar system. There is an option in which you can install two carburetors, but you will have to connect pipes to it and weld the channels, filling the cracks with epoxy liquid.
Ignition and carburetor
It is these two components that, as a rule, determine the stability of the engine. Often, interruptions in the crankshaft rotation speed, loss of traction, and difficulties starting the engine are associated precisely with their malfunctions. Repairing the ignition and carburetor usually comes down to adjusting them. Setting the ignition includes setting the gap between the coil core and the sensor magnet within 0.295...0.305 mm. The piston ignition timing should be 3.5-5 mm to top dead center. Adjusting the carburetor is somewhat more difficult. If you are repairing a Voskhod-3M motorcycle, then you will have to deal with the K65V carburetor, and the main tools will be the quality and quantity screws included in its design. Using the first, you can lean or enrich the mixture - change the proportion of fuel and air entering the cylinder. The second determines its volume per working cycle. With the standard setting, the quality screw is screwed in completely and then unscrewed half a turn. Then the rotation of the quantity screw achieves the minimum stable speed and the quality of the mixture is re-adjusted. Finding the optimal adjustment balance is a search for maximum traction and stability with minimum fuel consumption.
Photo report: Disassembling the engine of the Voskhod-3M motorcycle
The engine that we will be disassembling today had some problem with gear shifting. The owner seemed to start disassembling it, removed the generator, clutch basket, cylinder, and then something went wrong with him. In general, he took it, threw it into a bag and brought it to me with all the “gibles” for repairs.
Remove the kickstarter shaft.
Using round-nose pliers, remove the retaining ring from the piston pin boss, push it out and remove the piston from the connecting rod.
We take out the separator from the upper head of the connecting rod and hide it somewhere further.
We unscrew all the bolts holding the crankcase halves together and knock out the guide bushings (if any). Typically, guide bushings are pressed into holes through which the engine is attached to the frame.
We take a mallet and strike the crankcase halves evenly from all sides (“pricking the engine”).
Before disassembling the engine, do not forget to put the drive sprocket on the output (secondary) shaft of the gearbox. If this is not done, then during disassembly, the secondary shaft jumps out of the cage and all the bearing rollers scatter in different directions. The videos are then very difficult to find. It is better to remove the secondary shaft over some kind of pallet or container, so that if something happens, the rollers will not disappear from you.
Disassembling the clutch
Removing the clutch cover
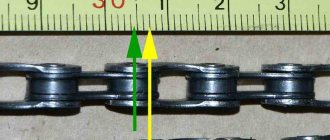
Checking the motor circuit
We put pressure on the motor chain and see how much it has sagged: if the chain sag by more than 15 mm, we immediately throw it in the trash.
In our case, the motor chain is ideal: there is practically no sagging
Removing the clutch basket springs
Remove all discs from the basket. After removal, check the discs for wear and warping.
We take out the clutch rod
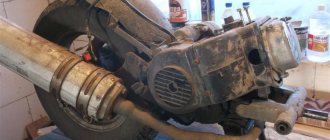
We weld a rod or piece of tire to the old unnecessary clutch disc, unbend the lock washer under the nut of the inner drum of the clutch basket, fix the inner drum with a puller and unscrew the nut (left-hand thread)
First joint
Someone put a washer under the inner drum
Place a tin block or stick under the chain and unscrew the nut (right-hand thread)
The sprocket sits on a cone and can only be removed with a puller
Removing the basket
Remove the adjusting washers from the shaft and pick out the second key
Photo report: How to disassemble the Voskhod engine?
It is not clear why Voskhods have gained fame as unreliable and capricious motorcycles. You might think that Jupiter or Ant is much better than Sunrise. However, this opinion still exists in the motorcycle community. Well, okay, if there is such an opinion, then so be it.
Someone had already “overhauled” the engine before us, then we drove it a little, removed the cylinder for boring and rolled it into the garage for the winter. While the motorcycle was standing in the barn, water began to flow into the engine... And when spring came to the yard, the owner wanted some drive... Well, let's give him some drive.
Photo report: Installing a piston on a motorcycle “Izh”, “Ant”, “Voskhod”
In matters of choosing one or another engine repair strategy. When it comes to repairing Soviet two-stroke motorcycles, it is advisable to adhere to a strategy that involves the complete restoration of original parts. And if this is not possible, with a creaky heart, you are forced to buy counterfeit goods or look for a used option.
There is little point in dwelling on the boring process in detail. Boring involves restoring the geometry of the cylinder by increasing its diameter. You don't need to know more about boring. There are turners, let them bother with these subtleties
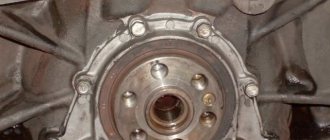
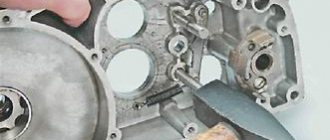
Removing the generator
We slightly unscrew the generator rotor mounting bolt, attach the rotor with a puller, rest the puller bolt against the rotor mounting bolt and pull the rotor off the crankshaft axle
We pick out the key and put it somewhere away. Help: painted oil seals are a sure sign of collective farm repairs (experience)! If you decide to buy a Voskhod and see that the seals are painted, check the engine a hundred times and only then agree to purchase.
Tuning options
Refinement of the design involves internal or external tuning. During internal modifications, the engine is rebuilt, driving parameters, suspension, and brakes are optimized. When external modifications are made, the motor vehicle is given a sporty style or it is converted into a chopper.
Features of internal tuning
Owners often rework the Voskhod-3M engine. To increase engine thrust, the factory paper air filter is replaced with foam filter elements. This helps reduce air exhaust friction. Then the jets and diffusers are polished using an abrasive material, the diameter of which affects the volume of fuel entering the engine.
To improve the fuel exhaust system, a new modernized carburetor is installed. From the existing pipe, take flanges for mounting on the cylinders, grind out aluminum bushings, and cut off the flange from the exhaust pipe. In an old carburetor, take a second flange. Using cold welding, the parts are connected.
The design is adjusted until it fits perfectly into the exhaust channels. Internal gaps are filled using epoxy glue.
Often rear adjustable shock absorbers are installed and sports tires are installed. When performing such tuning, the motorcycle becomes more aggressive and sporty.
Performing external tuning
In a sporty style
With a low seating position and a high front fork, there is a desire to modify the motorcycle in accordance with the sporty style. To do this, raise the rear shock absorbers and replace the exhaust pipe elbow. This way the exhaust pipe is level with the rear axle. Exhaust pipes with a larger diameter will improve the design and increase the traction of the bike.
External modifications can include painting, chrome plating, installation of nickel-plated arches instead of the old factory protection, installation of large rear-view mirrors, stepped seats and wheel tuning.
At the end of the tuning, a sports fairing is installed.
Chopper
When performing tuning for a chopper, shortened rear shock absorbers are cut off or purchased. Thanks to this replacement, the rear of the motorcycle will be lowered by several centimeters. The rear fork and wheel are replaced with wider ones. The angle of inclination of the front fork axis is replaced, and the cylinder covers are equipped with chrome plated cups. The same style is followed when tuning the headlights, rear lights, and dashboard.
Tuning for Cafe-bike
With such a modification, to reduce costs, they weld the rear part of the frame with their own hands, shorten the fork, trim and adjust other parts. For the steering wheel and seat, your own strength may also be sufficient. A headlight with a brake light is installed from trucks.
Most owners can carry out tuning on their own using only purchased parts due to the simplicity of the designs and the low cost of spare parts.
Removing the piston
We unscrew the four nuts on the head, remove the head from the studs, remove the cylinder, remove the retaining ring from the piston boss, push out the piston pin, remove the piston and remove the separator
Removing the kickstarter
We put the claw on the kickstarter shaft, pull the shaft towards us, unwind the return spring and remove the kickstarter from the shaft
Second jamb
Cracks often appear where the kickstarter shaft enters the crankcase. It is advisable to weld crankcase cracks
Engine disassembly
We unscrew the bolts holding the crankcase together. There should be 14 bolts
We heat the crankcase connector with a hairdryer, apply gentle blows to the protruding shafts through a wooden spacer until the engine is halved
The third jamb
The crankcase gasket was installed crookedly, so much so that it did not even cover the crank chamber connector
Jamb four
The main bearing was closed. He died quickly
Fifth jamb
The gearbox secondary shaft bearing was not assembled correctly: the rollers should be separated by a ring, but on this engine a ring was not installed between the rollers
So much for a major “repair”, the painted oil seals are proof of this. Now think: is it worth buying a motorcycle after a major overhaul or is it better to buy one that has been worn out, but has never been chipped.
Source
increase in power at sunrise
how to increase power on a Voskhodov engine and what is required for this and what spare parts
Previously in the same section:
- Registration of self-propelled gun // 1st December 2012 // 3
- winter season // 17th November 2012 // 6
- I need a bike for a photo shoot))) // 15th November 2012 // 6
- Carbs // 14th November 2012 // 3
- Maybe someone else is not so lucky? // 31st October 2012 // 6
42 comments were left on this post.
You can bore the head, put a 3rd ring on the piston, bore the windows in the cylinder, it will eat more, but it’s a bad ride!
you can redo the ignition system…..) and also cut screw holes in the cylinder head….. calculate a new exhaust)
why cut? what will it give? Is it possible to redo the ignition system. (How?)
and what do you propose to do with the chain drive?
cutting will give the mixture a swirl and, as a result, better combustion! The hall sensor can be installed on the ignition system! with a chain drive: you can think about the sprockets...... you can also center the crankshaft and lighten it!
The 3rd ring is crap (it gets hotter), I installed the K-36 carb and it’s better
Bore the cylinder to max, Gas spark plug, K-36 carburetor, reduce the combustion chamber, have a normal driver behind the wheel and the bullet is a fool!!
How long did you accelerate your sunrises? thanks for the comments!
I'm my 3m to 100 (with a very crappy piston)
By the way, I don’t recommend changing the sprockets, there’s no big difference, it just ruins the engine
Isn’t it easier to buy Jupiter or Java? yy
engine tuning is not necessary... you can just install a rear sprocket from a java... I will be on my hind legs, but the maximum speed will decrease much...
I drove the Kovrov guy up to 130.
It was scary at that speed, but I kept going.
Damir Sayetgalin Well, for your information, the asterisk from Java, on the contrary, is smaller! As a result, he will go faster, but the acceleration will be slower, which means he won’t rear up.