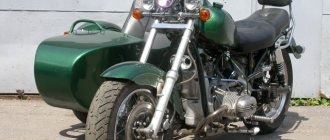
Motorcycle "Ural M-67-36": installation of one carburetor
The motorcycle plant in Irbit produced heavy motorcycles with a unique design - a powerful frame, a boxer engine, a cardan drive of the drive wheel and an indispensable side trailer. Over the years of production, some elements and components have changed, but the general concept of the machines has remained unchanged. In 1976, production of the Ural M-67-36 motorcycle began, which continued until the beginning of 1984.
MY MOTORCYCLE
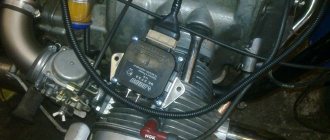
All modern motorcycle manufacturers are transferring their equipment from carburetor power systems to injection ones. “Why is my Ural worse?” - Vladimir Polyakov from Sochi thought and created an injection system on his Voyage. Yes, such that any plant will be jealous: fuel consumption by the engine has been reduced to three liters per 100 km.
1. The microprocessor and fuel pump are located in the seat tank
2.Instead of the usual carburetors - Italian plumbing.
He was tired of carburetors - they constantly required adjustments, synchronization, the engine started poorly, kept an uncertain idle speed... And in a secret Sochi laboratory (at Vladimir’s house), a certain device was formed from a bunch of wires, hoses and plumbing parts and was implanted into the Irbit Ural motorcycle.
The operation of the engine is controlled by an electronic “brain” based on a PIC16F84 microprocessor. The injection and ignition algorithm is “hardwired” into it (our lab manager wrote the programs for it himself). But not simple ones, but with the ability to adjust the mixture composition and ignition timing. To select the desired program, there are three buttons under the gas tank, and on the steering wheel there is a liquid crystal display, which displays all the information about everything happening in the engine.
1.The flow meter is installed between the air filter and the throttle valve
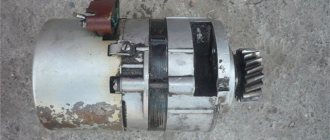
2. The generator now has a “dry” drive.
But in order for the control system to issue commands accurately, it needs reliable information from the sensors. This is a crankshaft position sensor, a variable resistor that monitors the position of the throttle valve (borrowed from some ancient Opel), and a mass flow meter for the air sucked into the engine power system.
The ignition system of the Ural motorcycle consists of a two-spark coil from the Oka and a VAZ switch. But the switch does not have the function of changing the ignition timing depending on the speed and load on the engine, therefore it is entrusted with the function of a power switch that controls the “bobbin”. The signal comes to the input of the switch from the microprocessor, and it, according to the selected program, determines the moment at which the spark should “strike”.
The coil took the place of the generator. For what? And then, so that you can install an energy source in front of the engine and get rid of oil leaks from under the oil seal and the ever-howling drive gears. Now the on-board power station is rotated by a toothed belt from an electric planer. The pulley is installed on the camshaft shank, which was empty due to the lack of a standard ignition system.
What needs to be done to install a monocarburetor
If you install one carburetor on a Ural motorcycle, this will largely solve this problem. This is a possible, although not ideal, solution. In bringing the plan to life, certain difficulties will have to be overcome. Necessary:
- Clear space above the engine crankcase. This is where it is most convenient to secure the intake tract and connecting flange.
- Make an intake manifold.
- Select a suitable carburetor according to the parameters.
All this will require a significant investment of time and money.
Creating the Intake Manifold
Having chosen which carburetor to install, we proceed to the next step - creating an intake. First, we remove everything unnecessary - old carbs, filter, freeing up the area. Now you need to make three mounting plates. To do this you need to use metal, no thinner than 5 mm. The plate will act as a tip that is fixed to the cylinder (similar to the plates on the exhaust elbows). On the cylinder side, it must retain the mounting points and have an internal diameter corresponding to the diameter of the inlet port. You can use the old plate on the carburetor side by cutting off part of the seat from the original part (if the design allows). Parts can be ordered from a turner or made from CNC equipment. The last resort is to do everything yourself, using a drill, a file and a lot of patience. Now we need to put everything out. The plates are screwed into their seats, and the carburetor is rigidly fixed in its future location.
Important! When aligning the carburetor, please note that it must be raised relative to the gearbox by at least a few centimeters.
The next stage is the selection of pipes and welding machine. It is best to use stainless steel pipes, perform rough “on-site” fasteners using manual electrode or semi-automatic welding, and finally weld the parts using argon or gas welding.
Such a high-quality finishing weld is needed to ensure that the inside of the manifold is in a perfectly smooth condition, otherwise swirls or irregularities may appear that prevent normal intake. If there is only rough welding, then it is worth welding the manifold in stages, polishing the welded joint each time. Note! Due to the peculiarities of the arrangement of the cylinders in a boxer engine, the manifold created in this way cannot be of equal length, so try to make the intake pipes as equal as possible. On the other hand, if you install the carburetor not symmetrically, relative to other parts, the problem can be avoided. Solving the problem with the air filter. As you already understood, the old air filter is no longer suitable for installation. Some people get sophisticated by installing one carburetor behind the filter, making an incredibly long intake. This option has a lot of disadvantages, but the most obvious is the inability of the system to adequately respond to gas and they do not work at low temperatures. The way out of this situation is a new filter. You can make it yourself; many people approach the issue creatively, placing the filter inside a flask, leather bag, first aid kit, etc. Such a new element looks quite original and can fit well into the overall style of the motorcycle. On the other hand, the market is simply overflowing with short filters of zero resistance, which will ideally fit in a new place.
Settings
The last stage is starting the Ural engine and setting it up. Some imported carburetor models do not have an enricher, which must be taken into account when purchasing. Otherwise, the idea is simple: when the engine starts, we do a test drive, with maximum spin in low gears and try to reach speeds of more than 100 km/h. If the engine does not pull, perhaps a more efficient jet will solve the problem; you also need to work some magic with the idle speed setting.
Note! This entire system has one significant drawback - problems with operation at low temperatures. In cold weather, condensation forms in a long manifold, which inevitably leads to deterioration in engine performance.
You can try to isolate the inlet with rubber pads or other insulating materials. Plus, you shouldn’t do test runs and adjustments in the cold season.
Conclusion
Now you know how to install one carburetor on a Dnepr or Ural motorcycle. Before you start work, weigh the pros and cons, correctly assess your abilities, because if you don’t have a lot of money to entrust this work to workshops, you will have to use the skills of a welder, designer, mechanic and others. On the other hand, by correctly completing all the described points, you will lighten the burden of owning Soviet equipment and will be able to ride a motorcycle without any problems, even in everyday use.
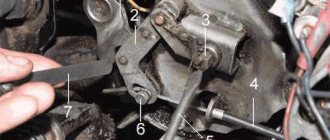
Adjusting the main carburetor systems in the Urals
Adjustment of carburetors on a Ural motorcycle is carried out after checking and adjusting the gaps between the spark plug electrodes, breaker contacts, valve stems, and the ends of the rocker arms. Each of the two carburetors is separately adjustable. It is necessary to begin adjusting the carburetor in the Urals after measuring the gap between the tip of the cable sheath and the fitting, which should be 2-3 mm.
Rice. 3a. The main elements of the carburetor: 1 - main air path: 2 - throttle valve; 3 - subsidizing haze; 4 — air nozzle; 5 - sprayer; 6 — air channel; 7 - well; 8 — main fuel jet; 9 — float chamber (central location).
Rice. 3b. Fuel corrector: 1 — air inlet channel: 2 — spool; 3 — spool needle; 4 — fuel jet: 5 — sprayer; 6 — output emulsion channel; 7 — spool return spring; 8 — corrector control cable.
If the gap does not correspond to the specified size, the union locknut is loosened. Turn to the right or left to set the required gap. After this, the fitting is re-locked with a lock nut and the carburetor of the Ural motorcycle is adjusted. By turning off the warm engine at a minimum engine speed without load, the basic settings are made. The idle system is adjusted for each of the two mechanisms separately. The Ural carburetor is adjusted with the second cylinder turned off.
Idle adjustment
By rotating screw 28, the crankshaft speed is set to the minimum stable engine speed. Screw 29 is slowly unscrewed gradually until the motor begins to malfunction. It also gradually, slowly twists until a calm, stable speed is achieved. Once again, use screw 28 to reduce the opening angle of the throttle valve until the minimum speed is reached.
Carburetors and ignition
Tuning a Ural motorcycle engine affects all engine systems, including ignition and carburetors. It is recommended to read the information: how to properly configure Ural carburetors. The standard ignition is so outdated that it is not even suitable for everyday driving, let alone anything else. It is desirable to install a microprocessor ignition with the possibility of an automatic advance angle. This article will help you set up the electronic ignition system. Ideally, such an ignition would be installed with a programmable controller with the ability to adjust the firmware. Such ignition systems have another useful feature - speed cut-off. This will prevent over-torque of a heavily boosted engine. Well, for maximum spark strength, in combination with a new ignition, you can use a coil from the Oka or Gazelle. Branded high-voltage wires with silicone insulation and internal resistance are required, for example from Tesla from VAZ 2108. They will ensure an uninterrupted spark in any weather and eliminate the possibility of spark breakdown to ground. As for carburetors, you will need to install Japanese vacuum carburetors with a diffuser diameter of 32 to 36 mm, followed by selection of jets, synchronization and adjustment with a gas analyzer. Tuning on a dynamometer is highly advisable, where you can test different settings and ignition timing and get the most out of your motorcycle tuning!
Inappropriate installation option
What carburetors are suitable and what is better to install? We will have to disappoint those who plan to use available models from Oka or Zhiguli during the conversion. All car modifications are out of play in this case. There are several reasons:
- The vacuum in the intake tract of a motorcycle differs from the parameters typical for car engines. Because of this, correct adjustment of the carburetor on a motorcycle becomes almost impossible.
- The selection is carried out not simply by working volume, but by the number of aspirations per unit of time. Aspiration can be roughly calculated by multiplying the engine displacement by the maximum speed.
- Car models pose a danger if the motorcycle falls because fuel can splash out and ignite.
Automobile carburetors are not suitable for conversion!
So the idea of using parts from Oka or other automotive equipment will have to be abandoned.
Oka engine tuning and swap
There is a group of car enthusiasts for whom the Oka model, due to a number of features, is of particular interest in terms of tuning. Since this car is small and light, and has a weak engine, it is not surprising that increasing the power of such a motor becomes the number one issue.
It is not difficult to guess that a much more effective solution in this case would be a swap, that is, a complete replacement of the internal combustion engine, rather than an attempt to increase the power of the existing factory version. To understand which engine can be installed on the Oka, you need to analyze information about those units that were installed on this model, but for one reason or another were never included in the series.
When auto production in Russia was going through a crisis and AvtoVAZ refused to produce engines for the Oka, in order to maintain production and comply with environmental requirements, attempts were made to install units from other manufacturers on this model. In 2004, a trial batch of 15 cars with an engine from Hyundai Atos was produced; the Ukrainian MeMZ 245 and MeMZ 247.1 engines were also installed on the model.
As a summary, we note that, as in the case of the diesel Niva, the Oka car can also be equipped with a different engine if desired. The easiest way would be to install a motor that the manufacturer himself has already installed on this model as a trial version.
If we talk about a real swap and the installation of an internal combustion engine that has never been installed on this model, in practice compact 3-cylinder Volkswagen diesel engines are well suited to Oka. Even in single copies, tuners installed MeMZ 245 or MeMZ 247.1, after which this engine received additional turbocharging.
Installing a diesel engine on a Niva SUV instead of a gasoline one. What you need to know when replacing the original Niva engine, suitable diesel engines and gearboxes.
Advantages of installing a diesel power unit instead of gasoline or LPG. Choosing a suitable diesel engine for GAZelle and UAZ (UAZ) to replace a gasoline engine.
The range of engines for the Lada X-Ray, available power units. Features and performance indicators of engines on Lada Xray, innovation, reliability.
Restyled Volkswagen Polo sedan with a new engine. The main features of the new Russian-assembled engine CFN E211 on the Polo Sedan from Kaluga.
Lada Vesta: what oil is best to fill in the engine of this car and how to choose the right lubricant. Recommendations, useful tips.
Tuning the Lada Vesta engine, affordable ways to increase power and improve the characteristics of the Vesta power unit. Chip tuning Lada Vesta, what you need to know.
Need an intake manifold
A separate problem is the manufacture of the intake manifold. Since casting the part at home is not possible, you will have to use thick-walled stainless steel pipes. It is important to meet the following conditions:
- The internal diameter of the pipe must correspond to the diameter of the inlet holes on the cylinders.
- The diameter, flow area and bending of both branches of the collector must be the same.
- The connecting platforms should be made of thick, at least 5 mm, and even sheet. It would be good if all operations could be performed on a milling machine. In the absence of one, you will have to arm yourself with a good plumbing tool, be patient and do everything yourself.
- Internal welds, if any, are carefully ground. Irregularities and protrusions on the inner surface of the intake tract are unacceptable.
Conversion of the Dnepr motorcycle to one K65D carburetor
Hello Dear Like-minded People! So, I thought about installing one carburetor, instead of the old K301. Because it was very difficult to set up synchronization, the consumption was high, and in general they were outdated. I thought for a long time about which one to choose, there were many options - Solex, DAZ, K133, from a tractor launcher, etc. I read a post on this resource that you can install one K65D carburetor from Jupiter. Here was my topic about one K65D, logically it would have been better to install the K65I from the Planet, but it turned out the way it turned out. K65D (Pekar, Russia). Diameter of the mixing chamber, mm – 32; Diffuser diameter, mm – 30; Throughput, mlmin - GTZh - 260 - idle metering tubes - 50 - fuel corrector nozzle - 255 Ambient temperature range at which the engine starts and stable operation is ensured in all operating modes - from -20C to +50C.
A stainless steel pipe with a diameter of 28mm was found, and 4 pipe angles with a diameter of 25-28mm were purchased, the diameter of the angles varied. The flanges were made of metal 5mm thick, there were two more metal options - 3-3.5mm, 10mm. 3mm - in my opinion, too thin, most likely they would begin to bend when tightened, and 10mm - this is too much, and it is more difficult to work with such material.
Here is the finished flange.
The most difficult thing was to make a structure with a flange that was attached to the carburetor, or rather to make a hole in the pipe, it took a long time. Since the drills did not have such a diameter, it turned out that it was decided to use a trick, namely, take a piston pin with a diameter of 30 mm, cut longitudinal lines on it with a grinder, it turned out something like a milling cutter. We didn’t drill the hole, but squeezed it out, the finger was red-hot.
It was difficult to secure the manifold to the flanges in place. Fortunately, four pipeline bends were purchased; without them, it’s unlikely that anything would have worked; we would probably have had to bend the pipe. And so we put one knee, on the other it turned out, something like the English letter “S”. Thus, we made a less abrupt transition.
Of course, there was a lot of welding stuck on, the welder offered me to remove everything with a grinder, I refused. All the same, the collector needs to be covered with something and insulated. There is an idea to cover it with outdoor insulation for the wires. The whole rework took quite a long time; they started at 13:00 and were finished at 21:30. Because it was dark, the collector was poorly welded, leaving many small holes. I noticed this already at home, so I went to the welder again. The second time they boiled it well, checked it, put it in water and blew into the collector, everything was clear.
The first launch went surprisingly well. There is nothing, without changing the position of the needle in the carburetor in the middle. I installed it, replaced the air filter with a sock, pumped it up, grabbed the first kick, but stalled, and started on the second. I adjusted the idle and that's it. The precise operation of both boilers was a pleasant surprise. After unscrewing the throttle, a shot followed, it was the first and the last. This didn't happen anymore. The traction at the bottom is crazy, at first you can even climb the wall. The top was most likely cut off, acceleration was normal up to 70 km/h, then I don’t know. The collector cools down strongly, even in the heat of 30C, it is covered with dew. The consumption, it seems to me, is still high, the candles indicate this, they are too black. I lowered the needle to the very last mark, it didn’t seem to be as black as before. Maybe this is because I drive mostly at idle... This is the experience of converting it to one carburetor, I’m happy, I definitely won’t go back to two. I apologize for the photos because I took them on my phone!
Thank you for your attention!
Preparing for adjustment
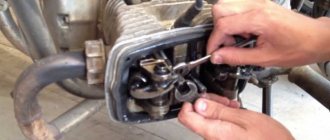
Adjusting the K-37A carburetor of the Ural motorcycle has three stages of adjustment: 1. idle; 2. at medium speeds; 3. uniform operation of both carburetors.
Before starting the setup, it is advisable to remove the carburetors and disassemble them to check for serviceability. To do this, check the fuel level, if necessary, change it and bring it to normal. Clean all jets and fuel and air passages. Check the control drive of each device. When installing, pay attention to the tightness of all connections.
Before starting, pay attention to the condition of the piston and measure the compression ratio in the cylinder. The cylinder-cylinder head connection is assembled without air leaks. If you need to replace the gasket.
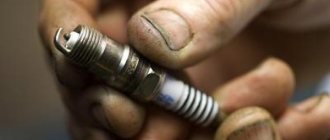
Pay attention to the ignition. Inspect the spark plugs and spark quality. In case of malfunction, install new spark plugs.
Carburetor adjustment should be carried out on a warm engine, and the carburetors should first be adjusted individually.
The float chamber of the K-301 carburetor of the IMZ Ural motorcycle works as follows. When there is no fuel in the float chamber, the float moves down under its own weight and the needle allows fuel to enter the float chamber. As the float chamber is filled with fuel, the float floats up and at a certain level (22±1.5 mm from the plane of the lid) the needle blocks access to the fuel. If the engine is not running, the fuel level remains unchanged.
After starting the engine, fuel begins to be consumed and its level decreases. The float lowers again and allows fuel to flow. Thus, the fuel level in the float chamber fluctuates depending on the operating mode of the engine. However, this fluctuation is very small (within 1.5 mm) and the fuel level is practically considered to be constant.
The mixing chamber has a variable cross-section. The narrowest point is called the diffuser. Its diameter is one of the main determining dimensions and characteristics of the carburetor. For the K-301 carburetor of the IMZ Ural motorcycle, it is 28 mm. The diffuser contains a flat throttle valve (or throttle), consisting of a body and a cheek. The cheek is shorter in height than the body. Therefore, the narrowest gap is formed between the body and the diffuser, while between the cheek and the diffuser the flow area is somewhat larger.
Oka with a VAZ 2108 engine
The hopelessness that accompanied the Soviet automobile industry throughout the entire period of its existence was permanent. Still, it was not completely eradicated, and it timidly stepped into the 21st century along with new domestic developments. Although there remain some examples of cars from the country of the Soviets dear to the heart of the nostalgic automotive esthete.
Content:
Oka 1111, as it is
Oka 1111 is one of these examples. A nice, progressive in its time, but little promoted project. Half-eight engine, 33 horsepower, moderately stiff chassis, excellent, almost BMW-like handling and maneuverability. This is how we can briefly describe Oka as it is. The car has its fans, and there are many of them. This can be explained very simply - this is the cheapest minicar on the market. Cheaper than a Korean scooter. Seven years ago, in 2007, they asked for less than $4,000 for a new Oka.
For the money, the car worked perfectly, and with an average consumption of 5 l/100 km, it satisfied the needs of not too capricious motorists. This is the quintessence of minimalism, the most simplified design of the suspension and chassis, and there’s no need to talk about the interior. He looks frankly poor even if measured by the standards of the 1980s.