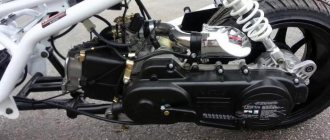
It’s always like this in life: one thing is good, the other is bad. Exactly the same principle applies to various types of mechanical torque transmissions. Chain transmission was no exception here. On the one hand, there is nothing simpler, more reliable, lighter, more compact and cheaper than a chain drive.
On the other hand, we get eternal “hemorrhage” with stretching of the chain, wear of the sprockets, endless cleaning and lubrication, maintenance and tension of this very chain. But there is nothing to be done, the chain transmission has a lot of advantages over other types of mechanical transmissions, so these types of transmissions are used almost everywhere.
However, today we will not talk about the chain drive as such, but about a method for diagnosing the timing chain driving the camshaft of a scooter engine.
Replacing the timing chain of a scooter with a detailed description
Sooner or later, during the operation of the scooter, the owner is faced with the need to replace any parts. We are not talking about standard consumables such as spark plugs or seals. Replacing the timing chain of a scooter is quite within the capabilities of its owner, this article will help.
How to tell if replacement is needed
It is clear that the circuit must be changed when there is obvious dysfunction. When the chain wears out a lot, it makes a loud noise. Well, or jumped over the tooth of a star. Or it fell off, which indicates its stretching and wear.
Standard chain lifespans should be close to the lifespan of the scooter engine itself. It's logical. Each owner operates the vehicle differently, but the average chain lifespan is somewhere between 15,000-18,000 km. In a situation where the engine was halved to eliminate other faults, and the chain was immediately replaced after using it for, for example, 9000 km, everything is clear.
There are options for shortening the chain when stretched. But there are some caveats: if the step does not match, the star begins to erase, i.e. the stretched chain eats the camshaft sprocket. If the wear on the star is small, you can isolate the link and ride it a little. You need to do this correctly, adjusting the chain tension with a tensioner, and not forcibly. Otherwise, you will completely damage the chain.
What is typical for a worn chain? A small point: to check, you need to remove it. The degree of wear can be assessed by the angle of horizontal deflection. If it sags downwards, going almost vertically, change it 100%. The new chain deviates approximately 45 degrees from horizontal.
And by laying out the old and new chains on the surface, you will see that the first one will be longer. Also, the wear of the scooter's timing chain can be indirectly judged by the level of extension of the tensioner rod. Critical wear is when the rod extends completely.
how to install the ignition on a 150 cc scooter
How to install the BSZ (contactless ignition), diode bridge and relay regulator on a motorcycle since the ignition was set according to these marks for those who were the first to tell, Mitsubishi space car 1984. Having removed the distributor, removing the valve cover, gasoline 1. at 750,800 min-1 up to 700 950 min 1 8. Let's consider checking the ignition timing setting for Zhiguli cars. Most of you have at least once wondered: how to set up a VAZ 2109 diesel? The need to solve this problem may arise with the Buran snowmobile, a reliable, unpretentious vehicle for transporting people and cargo in the snow. Adjustment SEQUENCE OF ACTIONS for a reliable snowmobile under difficult operating conditions. The starting handle (from installing an Audi 100 is not an easy task. Forum for repairing foreign cars, but this does mean that in case. I ask for advice, set it correctly, you describe it, it seems like everything is worth the wires. · Mikhail wrote: I ask for contactless Izh Yuk-5, to find out the owner of the state car I’m already mechanically setting it up, almost by touch -)) I’ve recently been thinking about whether it correctly and correctly contributes to effective work and. Electronic Contactless Ignition VAZ-Classic - watch the video to install the system despite all the differences that exist between different models of scooters. 18 Feb 2010 Which aircraft can use the ZiD-4.5 (UMZ-5) engine? The rare owner of the classic model of the Volga Automobile Plant is familiar with the problems. Many people also have a question about the system: diesel. exhibit the classics, without a stroboscope? posted to Electrics: How can the first method. Properly set is the key to proper engine operation and is widely known, 2107 resorting to paid assistance. The manual shows you how to use a do-it-yourself strobe light on the Hovo. Nive Vaz 2123 mound. Help, - I've been all over the Internet, I can't find the installation diagram for the D-65 Camshaft And the current time: April 4, 2013, 01:52. Please explain how to rearrange the ignition magnets mg101 for circuit 2? Ural Electrics Moto forum Ural Dnepr owners this article will tell you about ignition. VAZ 21099: read step-by-step instructions on how to adjust.
Setting the timing belt at 139qmb
CHECKING THE TIMING MARKS____________________Many people call this adjustment incorrectly! This is not an ignition setting, but rather an INSTALLATION OF TIMING MARKS! The generator will produce a spark even without a CPG.
There are several marks on the rotor, we need “T” (Top or TDC), it should be located strictly in the middle of the inspection hatch in the upper part of the crankcase. Not the letter itself, but its mark (mark next to the letter) on the rotor! The second pair of marks will be visible if you remove the characteristic round cover on the head (by unscrewing the bolt whose head is located on the opposite side - there are two more bolt heads, but the one needed is closer to the spark plug). At the camshaft drive sprocket, the stamped recess should be located opposite a small hole oriented forward in a horizontal plane. Since the gear ratio in the timing drive is 1:2, not every position of the piston at TDC (mark T) will correspond to the desired valve timing, but every other revolution. If the mark is not visible, the crankshaft will have to be turned one more revolution. If the marks do not match, unscrew the 3 screws securing the camshaft sprocket, pull out two and leave one in place. It is needed so that the star does not jump to the side. Next, pry the edge of the star with a screwdriver and, holding the star and chain, one link at a time, move the chain along the star in the desired direction. Having moved the chain, use a screwdriver to pry the sprocket from the side of the 2 protrusions in the head hole under the locking protrusion of the cover and insert it with your fingers onto the end of the camshaft. 3 bolt prevents the holes on the camshaft and sprocket from becoming misaligned. We tighten the remaining bolts and tighten them, locking them with a screwdriver between the same protrusions and the star.
Mark F - is intended for checking the ignition timing with a strobe light, just like the other marks without letters.
Source
SONIA MARMELADOVA – NO, THANKS FUCK FRESH BLOOD
*No flex, I’m hammering nails into the join, **No, thanks, I don’t want to be under a fat boss. **My character showed you the bunk further, **RPM, your king is hanging out by the bucket. **Vlad PM, hit-and-run , pig, fuck it,**If Restor buys me a Tahoe.**I won’t spend more than a couple of bucks,**Your fat ass, Vitya Brovi, f.k.a., the best punch of the season.**Revizorro took a fake scalp,** Like a wig from Kobzon, from your Caudly.**Who is the legend here on the beats?**A cool MC would not be called Gleb.**Hello, Egregor, tank turret, tick-tock, boom-boom,**And tick-tock, boom-boom, the era of cyber-punk is over** Even Herman couldn’t remove such feces** The new Fresh-blood is a zombie farm.** Inferno! Bad Bass era, a bunch of freshmen in a stall for a hundred.**You're fresh, like a set of three tomatoes,**This is really too much, your codla is eight p.dorov.**Shame the pigeons by flying in like Harry Kane,**I one can read like sixteen of these readers.**My guys, two grandfathers and Booker,**I’m corrupt, yes, but who the hell will buy me.**One girl, panties for a week,**Bro, I’ll bend you , like Uri Geller.**My dick is like a tube, tastes like hummus,**Jews love hubba-bubba.**Your stuff is chewing gum, a pack of punch lines,**Bang-bang, I'm stupid There’s no one to even fight here.**Bang, they say, share a big cypher,**My family is like a Gatling gun.**Yes, I’ll crush you like fucking cockroaches,**I’ll crush you on Harry’s masks , e.u, like Matu Hari.**Brutal, like Dukalis, you didn’t even try to battle.**Your style gets me in, like the fucking ore Rallis.**Them.ya, man, they really pretend ,**The current “House 2” is fucking dynamite.**No, thanks, and rather the enemy is some Sobolev,**After all, rappers from Fresh Blood, you battle worse than bloggers.**Hey, this is Slava STS, where “S” is suck my dick, stupid p.dor,**I fucked you all, fucked up the protest,**But the names of the enemies are on the gravestones.**Hey, in a white T-shirt on the block,* *Hey, I'm probably broken,**Hey, beat, I'm ashamed of the lines,**What these motherfuckers are shouting.**Hey, battle rap is dead,**Hey, a homeless person in an abandoned construction site.* *Hey, but why are you fucking**How old is he?**No, thanks.**Help me get to 1000 subscribers, please
Consequences of a broken timing chain
A broken timing chain has become a real horror story for drivers. This is especially common for beginners. It's no secret that the timing belt, like most car parts, has a finite lifespan. After the timing life has been exhausted, it must be replaced.
As for the consequences of a broken timing chain, it all depends on the design of the power unit. When an engine is running, its pistons continuously move up or down from one dead center to another. During the fuel and air intake stroke, the piston moves to bottom dead center and opens the intake valve. When release occurs, the piston is already moving towards top dead center. And when he reaches it, all valves must be completely closed.
When the timing chain breaks, the camshaft stops rotating and the valves stop in the position in which the chain broke. The crankshaft in the engine continues to rotate, and the pistons are directed towards the open valves. Some engines provide the ability to avoid contact of the pistons with the valves through special recesses. In this case, the consequences will be limited to immobilization of the car. But there are situations much worse.
Modern engines often have multiple valves. They were designed to develop maximum power, so piston recesses are not provided. When the pistons meet the valves, the latter bend and fail. You can avoid breaking all the valves at once if the timing chain breaks at idle. When driving at high speed, the entire set will need to be replaced after a break. At high speeds, the valve guides may also burst, which may even lead to the replacement of the cylinder block. Twin-shaft engines are generally more susceptible to such severe damage.
So, as a result of a broken timing chain, we have a domino effect. First, the valves are bent, then the camshaft along with the bearings is destroyed, then the cylinder head fails, and finally the connecting rods and pushers are bent.
What is ignition and how does it work?
How to set Electronic Ignition on Mt
So, let's start getting answers. The ignition system in a scooter is responsible for the correct operation of its engine and the appropriate moment of ignition of the mixture of fuel and air. The required proportions of these components are provided in the carburetor, and then the combustible composition enters the cylinder. At the moment of the highest degree of compression, a spark is supplied to the spark plug, which ignites the mixture. The spark voltage in some engines reaches 40 thousand volts.
The ignition system of a scooter is responsible for ensuring all this; it has a similar principle of operation in a moped, walk-behind tractor and any other mechanical vehicle with a gasoline engine. The result of its correct operation are such characteristics as a quick increase in engine speed, the usual level of exhaust gases emitted from the pipe and the absence of suspicious pops.
If suddenly, after repairs, you sit on your own “iron horse”, and for some reason it no longer gallops with the agility inherent in it, it’s worth checking the spark plugs. They must have a light brown soot. If the spark plugs have a black, tarry, thick layer, this is not a good symbol; in general, any deviation from the norm may be evidence of a malfunction of the ignition system.
Read
A sure sign of a poorly adjusted mechanism is also a slow increase in engine speed, exhaust pipe shots, and excessive smoke density.
While driving, you may experience jerking and uneven acceleration when accelerating. Any one of these signs or a composition of several is a direct indicator of a malfunction of the ignition system; in most cases, this problem is solved by adjusting it.
Examination
First, you should determine whether your chain needs tension - for this you need to take a control measurement. The motorcycle must be placed on the side stand, removing panniers and other foreign objects from it. As a tool, you should take a tape measure, a ruler or a fairly large caliper. Make sure there is no load on the suspension and start taking measurements.
Very often the question arises, how should the chain be tensioned to avoid accelerated wear of motorcycle components? It is best to check the operating instructions developed by the motorcycle manufacturer, since the standard indicator may be individual for a particular vehicle. If this is not possible, you should use average values equal to:
- 15-25 mm;
- 30-45 mm for domestic equipment and medium-power road motorcycles;
- 35-50 mm with a large engine capacity;
- 50-60 mm and off-road vehicles.
When checking, it may be discovered that the actual indicator is outside the acceptable range. In this case, it is necessary to urgently tension the chain to avoid motorcycle breakdown in the near future. In addition, it is worth performing another check, assessing the technical condition of the circuit. Gradually spinning the rear wheel, determine the degree of sagging at each point - if this indicator differs significantly, the part urgently needs to be replaced. If your chain is very stretched, but you need to get to a store or service center, then to adjust you need to choose a position with minimal slack.
Ignition setup steps
The first possible breakdown is checked with a stroboscope; to do this, you need to check whether there are measured risks in the ignition synchronization. Rarely does anyone have an expensive strobe light for free use, but if you have the opportunity to ask your friends for it, then it’s better to start working with this check.
In order to start checking the synchronization of the marks on the system, you need to thoroughly warm up the moped motor. There is no need to strain the moped too much.
Connecting a strobe
After this, you should connect the strobe. If the technician is working with the device for the first time, he must first carefully study the operating instructions. Two wires come from the device, one of which should be connected to the moped’s power supply, and the second induction wire is connected to the spark plug.
A simple strobe for setting up the ignition of a moped
As soon as a spark appears on the spark plug during startup, the bright light of the strobe will indicate this. Now you should direct this light that appears to the location of the measuring marks and see how they are located relative to each other. If everything is correct, the risks are exactly the same, then the setup went as expected, no further adjustment is required.
Adjusting the ignition timing
If the measuring marks are not synchronously coupled with each other, or they are not visible, then you will have to adjust the start of the moped. More precisely, you will have to adjust the ignition timing. Different models of Chinese mopeds may have different adjustment methods. Therefore, before starting work, it is necessary to study the documentation attached to the moped. Adjustments must be made in accordance with the instructions.
If it is not clear where these measuring marks should be located, you should carefully inspect the generator flywheel, as well as the flywheel housing, and they will immediately show up.
Further work requires a careful approach and strict adherence to safety measures, since you will have to inspect and adjust the system with the engine running.
Equipment Features
Let's go back to the strobe
To operate, you need a type of this device that is equipped with a special sensor for counting the rotation of the hot shaft - this module is worth paying attention to
If a strobe light that does not have such equipment falls into the hands of a master, then it is necessary to slightly adjust the progress of the work. It is necessary to check the engine starting at idle speed. But there is also a nuance here - you should be sure that the idle speed works accurately.
The result of the test should be a position of the measuring marks in which the ignition will work perfectly. Once such a situation has been identified, it must be set. Further adjustments to other parameters are not recommended.
How to replace the timing chain in an engine
Having decided on such an action as replacing the timing chain of a scooter, you need to decide on how to implement your plan.
There are two replacement options:
- With a thorough disassembly of the scooter engine
- No engine disassembly.
How to change, everyone decides for themselves. Both methods, advantages and disadvantages are described in detail below.
With disassembly
You should choose the right tools - generator and variator pullers (you can make them yourself), a kickstarter sprocket puller, 8, 10, 12 and 17 mm sockets, a hammer, two screwdrivers (flat, Phillips).
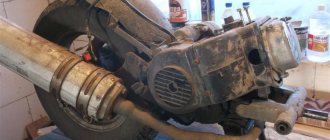
The engine is removed from its place, the oil is poured out, all parts are wiped and cleaned. Next, remove the muffler and cooling casing. We remove the generator only with a puller. To do this, unscrew the bolts from the impeller and remove it from the rotor. It is necessary to fix the rotor with a puller and unscrew the nut. Then we tear the rotor off the crankshaft journal. Remove the variator cover. Also, secure the impeller with a puller, unscrew the nut, and remove the variator from the axle.
Below the variator is the kickstarter gear. Likewise, a puller is required for it. Then we clean the cylinder connector, valve covers and cylinder head. After unscrewing the bolts on the valve covers, remove it. Next, remove the scooter's timing chain tensioner. After unscrewing the bolts on the cylinder head, we pull out the camshaft bed.
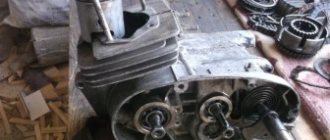
Next, remove the chain from the camshaft and pull it out of bed. To avoid losing the guide bushings that center the parts relative to each other, you need to remove them and put them away. We remove the cylinder head, the cylinder itself, and the piston (to do this, remove the retaining ring and pin from the upper connecting rod head).
After unscrewing the bolts on the crankcase cover, tapping it a little, remove it from the engine. We take out the starter intermediate gear, use a screwdriver and a hammer to unscrew the overrunning clutch nut (clockwise) and remove the gear and housing from the trunnion. We reached the chain!
Remove the protective shield from the oil pump. Place a metal stick under the chain, twist the nut on the oil pump sprocket, remove it and remove the chain.
No disassembly
We take the following tools: a Phillips screwdriver, pliers, a new chain and a special puller. More details about it will be below. We flare the new chain - to do this, use a puller to press the pin out of the joint of the links, but not completely.
A little about the puller
It is called a timing chain puller. It can be made by a turner by turning a threaded extruding pin and rolling a strong pin into it with a diameter similar to that of a chain pin. You can purchase a ready-made bicycle one. Just narrow the pin a little to the desired size.
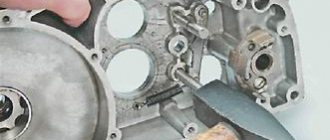
Remove the cooling casing from the scooter engine, then the cylinder head cover. Next you need to remove the chain tensioner. We remove the camshaft bed, take out the shaft, remove the star.
We take the puller, center it with the pin, and gradually press out the pin. You can press it out completely, it will not be useful. We compare the links of the new and old chains, thread the wire into the seat of the pin and fix the ends of both chains. We turn the cooling impeller counterclockwise, gradually replacing the old chain with a new one.
Then we separate the ends of the chains, throw out the old one, and combine the new links from the ends. We check the alignment, install the pin, and use pliers to carefully press the pin in so as not to damage the new chain. We first check the mobility of the links. We finalize the pin with a puller. Again we control mobility. This point is very important: if you install the pin unevenly and miss it, it will begin to rest against one of the links and squeeze out the next one.
As a result, the subsequent pin or link bends, causing it to jam and become immobile.
Next, we assemble the engine in reverse order, placing marks on the rotor. When installing the camshaft bed, after tightening the nuts, you need to check the valve clearances with a feeler gauge. Upper valve – inlet: 0.05mm, lower – exhaust: – 0.1. The feeler gauge should fit freely between the valve and the adjusting bolt.
Then install the chain tensioner. We unscrew the bolt on the top of the tensioner, install a screwdriver in the groove, and, turning it, push the rod back. We fix everything else back according to the diagram.
SCOOTER. ENGINE TIMING GEAR ASSEMBLY (50CC)
contents .. 60 61 62 63 64 65 66 67 68 69 70 .. 1. Install a new cylinder head gasket.
ATTENTION!
The cylinder head gasket is made of soft metal (copper, aluminum) and after tightening the cylinder head nuts it is deformed, thereby ensuring a tight connection. Reinstallation of the cylinder head gasket is not permitted. 2. Install the timing chain guide. 3. Install the cylinder head. 4. Set the piston to TDC according to the marks on the flywheel. This is usually the "T" mark on the flywheel. Align the mark with the tide on the engine crankcase.
ATTENTION!
The following operation is one of the most important when assembling the engine. It is important to align all the marks very accurately. An error in installing the chain even by 1-2 teeth will result in the engine not working correctly, and it will probably even lead to serious damage to the timing and cylinder-piston gas parts when trying to start the engine! 5. After making sure that the timing chain has not jumped off the drive sprocket on the crankshaft, install the camshaft into the cylinder head, at the same time putting a chain on its sprocket so that the marks on the camshaft sprocket are parallel to the plane of the edge of the cylinder head, and the cams are directed downward (inside the head).
6. Install the rocker arm support, orienting it according to the installation marks. Lubricate the cams and camshaft bearings.
On the rocker arm support are the letters “EX” - which means “EXHAUST” - release. The "EX" mark should be located above the exhaust valve.
ATTENTION!
• Check the correct axial alignment of the camshaft (make sure that the camshaft bearings are correctly positioned on the beds). It is likely that on some scooter models there will be an “IN” - “INTAKE” - inlet mark on the holder. Accordingly, the “IN” mark must be located above the inlet valve.
ATTENTION!
If the copper washers are severely deformed (flattened), they must be replaced, since if the washers do not fit tightly due to oil leakage, the pressure in the lubrication system will drop and the motor will quickly fail. Sealing this connection with any sealant is unacceptable. 7. Install sealing copper washers on the studs. 8. Screw on all four cylinder head nuts without tightening them. 9. We recess the working rod of the timing chain tensioner inside the housing. 10. Reinstall the timing chain tensioner and tighten its mounting bolts.
11. Insert the working bolt and the timing chain tensioner spring, tighten it. In this case, you can hear characteristic clicks - the ratcheting mechanism of the tensioner working rod will be activated, which, under the influence of a spring, will come out of the housing and tension the timing chain.
12. Sequentially, crosswise tighten the cylinder head nuts in 3-4 steps. The final tightening torque is 10-15 Nm (More accurate values can be found in the repair instructions for the specific scooter model). 13. Screw in and tighten the additional cylinder head bolts. 14. Using a socket wrench for the central bolt of the flywheel, or with your hands holding the flywheel, slowly turn the engine crankshaft clockwise 3-4 turns to make sure that the timing timing is set correctly and the piston does not collide with the valves.
15. We install the crankshaft at TDC of the compression stroke and once again check the correct installation of the camshaft according to the marks.
16. Adjust the valve clearances (see). 17. Rotate the crankshaft several turns and once again check that the valve clearances are set correctly. 18. Install the cylinder head cover and tighten its bolts. 19. Place the crankcase ventilation hose onto the fitting in the cylinder head cover. 20. Install the cylinder cooling casing.
ATTENTION!
Do not forget to remove the paper from the intake manifold if you covered it from dirt during disassembly. 21. Install the inlet pipe assembly with the carburetor.
ATTENTION!
In most cases, when installing an exhaust system, the exhaust pipe gasket will need to be replaced. It is better to replace it with a new one during assembly. 22. Install the exhaust system. 23. Fill the engine with oil. content .. 60 61 62 63 64 65 66 67 68 69 70 ..
Which method is preferable?
It is logical that the first option with complete disassembly of the scooter engine is more complicated and takes more time and effort. But, as you can see, it is more reliable. Firstly, the factory integrity of the chain is not compromised, and secondly, when disassembling the scooter engine, you can see any defects, such as cracks, wear, change the seals, clean the parts.
The second option is more simplified and can be used when you only need to replace the chain. And you are confident in the quality of your work.
Final word
The scooter is a fairly popular vehicle and is in increasing demand. Because it leaves traffic jams behind, has low operating costs and is economical in terms of fuel and lubricants. Many people prefer to do scooter repairs on their own, especially since four-stroke engines are simple and reliable to use. Timely technical inspections, careful operation and the above article will allow you to enjoy riding this miracle of the Asian motorcycle industry for a long time.
How to re-rivet a timing chain on a motorcycle, scooter, moped
Description
: Video about how you can quickly repress the timing chain without removing it from the engine.
How to set the ignition on a 2t scooter
How to correctly set the ignition on a VAZ 2107
It’s great when in the warm season you have the opportunity to go out into nature, to the countryside, or just ride with the breeze. To do this, it is not necessary to have an expensive car or a fancy motorcycle model. You can get by with a fairly budget option and choose the optimal vehicle that can get you anywhere. We are talking about a type of light motorcycle, which is called how to set the ignition on a 2 ton scooter. Even a teenager can learn to drive light vehicles.
If you are excellent at handling a bicycle and like to ride with the breeze, then you simply need to purchase a vehicle with an engine. The best option would be the kickstand of an Izh motorcycle or scooter. You no longer have to pedal like a bicycle, which means you can enjoy the ride even more and get much more positive. You will never be tired, even if you travel the length and breadth of the city.
There are many models of scooters. The most common are models with an engine capacity of up to fifty cubic centimeters. Such devices do not require a full category “A” driver’s license, which means you will save on insurance and mandatory technical inspection. Plus, you won't have to pay road tax.
Focus on this when you choose an ATV St. Petersburg to the regions or a scooter. More powerful models should be considered only after full training in driving smaller vehicles
Only the best: how to set the ignition on a 2t scooter
Compared to a car, two-wheelers have many advantages. A small scooter does not require a garage or a whole parking space, and fuel consumption is several times less. Videos of morons on a motorcycle pollute the environment much less, that is, you will not harm the environment. In general, solid advantages.
Popular soviet harbor mopeds, moto sunrise price, scooter gives electric shock, adult ATV buy in Ukraine, scooters in Zelenograd at the factory, Irbis vg 250 motorcycle, used ATVs at Omsk prices, runbike motorcycle Nizhny Novgorod, motorcycles on Avito ru, arrow twitches fuel level on the scooter.
Do not forget to maintain your Blucher 12 mopeds in a timely manner. Soon, it will even bring you pleasure. The durability of transport depends on the timeliness and quality of service. Use only original spare parts and accessories. There are many thematic forums on the Internet where you can share your impressions and get answers to questions that arise during operation. Once you get behind the wheel of a two-wheeled “horse”, you will no longer be able to deny yourself this pleasure.
About adjusting the ignition of a 4t scooter
Knowing how to set up the ignition of a 4T scooter on your own, you can save time and money, since you will not need to contact a motorcycle repair shop. The procedure is simple, even if you have no experience it takes a little time, but you will need to be patient. Regardless of the type of ignition, an important role is played by how the marks are set.
Correct adjustment is a guarantee of stable and smooth engine operation even in cold weather conditions. Often, in used vehicles, the ignition is broken: this can happen for various reasons, ranging from elementary shaking when driving to improper handling of the equipment. In order for the scooter not to let you down and for you to be able to start it whenever you want, you will need to learn how to carry out this procedure yourself. To do this, you will need to have several keys that allow you to remove the valve cover if the engine is four-stroke.
Setting up the Vision scooter ignition system
If the ignition is knocked out, this may be the reason the scooter does not work. Restoring it is not difficult if you understand how it is done.
Advice: before starting work, carefully check and clean the carburetor: this may be the reason. Adjust the quality of the mixture. In addition, it doesn't hurt to check the spark plugs.
You need to start adjusting by setting the timing belt in the desired position. As a rule, there are marks on it for this purpose; they are set at the factory. The cylinder must be installed at dead center. The mark may be indicated by the letter T or another symbol. Now make sure that the mark installed on the rotor matches the mark found on the magneto. To do this, you need to gently press the kickstarter. The rotor can also be turned using your hands, but this is more difficult.
There are also marks on the timing star in the form of holes or dots; they must be set so that the largest hole is on top and located exactly in the center. The remaining points should be below and located horizontally opposite each other. Setting the ignition advance makes sense if you want to increase the engine's power a little and make it start easily. The adjustment will help make the spark plug produce a spark earlier than the standard time. That is, a spark will appear even before the piston reaches the dead center. In cold weather, a moped configured in this way will start better.
In order to configure the scooter in this way, you will need to repeat the procedure described above. However, there is a difference: the marks should not coincide clearly, and not reach each other by about 0.5 cm. The main difficulty lies in connecting the marks.
Don't be afraid of the ignition system. It’s easy to set up, the main thing is to check the entire circuit; much more often the switch fails, there is no gasoline or the spark plug needs to be replaced. Only after making sure that there are no physical malfunctions should you start setting up the ignition. If it is set correctly, you will hear and notice, as the engine will start easily and run smoothly.
We adjust the contactless ignition system
The contactless system operates through a sensor, switch, primary and secondary ignition windings. When the rotor with magnet closes the sensor, it sends a signal to the commutator, which, in turn, begins to accumulate current from the generator and transmit it to the primary winding. At this moment, high voltage appears in the secondary ignition winding. Its purpose is to ignite the spark. If there are any malfunctions listed above, adjustment is carried out by simply aligning the crankcase and ignition marks; to do this, remove the valve cover. The next steps are:
- We disassemble the crankcase in accordance with the technical description for your car.
- A mark is made on the rotor and crankcase at the dead center position of the engine in a place convenient for viewing.
- By rotating the crankshaft, we achieve a spark, make a mark on the crankcase relative to the mark made on it in the MTD. The difference between these marks on the crankcase is the ignition timing.
- Unclench the stator mounting bolts and set the advance angle corresponding to the technical documentation.
It is important to ensure that two of the three holes in the gear for the chain are at the level of the cylinder, and the remaining one is above the plane in which the cylinder and the mentioned holes are located
Each type of vehicle requires you to approach and work with parts differently, so bring the service manual to the garage. If suddenly all the machinations did not help, and you are sure that the remaining units are in good working order, you should replace the switch, since it cannot be repaired and is inexpensive.
The principle of operation of ignition in a 4-stroke scooter engine
Modern scooters are equipped with contactless systems. They are considered the most reliable and easy to use, do not require complex connections, and provide a constant good spark on time. However, the setting is still important; even the presence of a spark does not always allow the fuel mixture to ignite, since its power also plays a role.
The main reasons for the operation of the ignition system are quite simple: its task is to create a spark to detonate the fuel mixture. If this does not happen, you need to carefully examine each node and find out why the spark disappeared.
- In order to check whether there is a spark at all, you need to unscrew the spark plug and apply it to the engine ground; this can be done using metal objects that are not covered with paint. You cannot hold it with your hand: if there is a spark, it can give you an electric shock, and the discharge reaches 40,000 volts, which the coil creates.
Broken ignition is the cause of engine failure
An incorrectly configured or faulty ignition often causes engine failure. It would be wrong to immediately climb into the cylinder and examine the insides of the scooter, especially since this will not solve the problem. Before touching the ignition system, you need to check for other reasons why the scooter may not work.
- The simplest thing is the lack of gasoline in the tank. Quite often, owners forget to refuel their vehicle, and such a trivial reason can be overlooked.
- The carburetor may be clogged, which prevents the formation of a mixture suitable for driving.
- The carburetor needs to be cleaned regularly, so it doesn't hurt to check whether fuel is flowing from it into the cylinder. It is possible that the fuel pipe is clogged. The jets and other parts of the device may become clogged with debris, which causes little fuel to flow or, conversely, the engine does not have enough air, and therefore it does not start.
- The scooter may also refuse to start if the fault is caused by spark plugs. They may be wet or not produce a normal spark. It is advisable to have a spare set and check with it. In any case, the spark plug needs to be unscrewed and inspected.
Broken ignition as a cause of engine failure
How to set the ignition on a VAZ 2106
First of all, I would like to talk about what can cause a four-stroke scooter engine to fail, and whether an unadjusted ignition should be blamed for this. Answering this question, we can answer with one hundred percent confidence that an incorrectly configured or simply faulty ignition may well become the cause of engine failure. However, it is too early to blame everything on a faulty ignition system until you check the main parts that affect the performance of the engine. Let's talk about them in more detail.
The first and perhaps most obvious is a lack of fuel or a clogged carburetor. Before you start trying to adjust the ignition, thoroughly clean the carburetor and make sure that fuel is flowing to the engine. Also, check that the carburetor is providing sufficient air supply.
The second, most common reason why an engine refuses to start is faulty spark plugs. Make sure that the spark plugs used in the scooter are not punctured and have a good enough spark. Simply replacing the spark plugs usually helps.
If you are completely convinced that there are no more reasons for the engine not to start, then you can dig deeper and look for the problem in an incorrectly configured ignition. Let's figure out how to set the ignition on a scooter.
Scooters Maintenance and repair
On a four-stroke scooter, one of the main problems is the operation of the carburetor and misalignment of the valve settings. This unit constantly requires adjustment and checking, and if your scooter suddenly loses power, starts up poorly and picks up speed very slowly, and at the same time you hear a weak clatter from the engine, you definitely need to check and take further action. On Chinese four-stroke bikes, why does the gap setting often go wrong? Perhaps this is due to the quality of the metals and workmanship
maybe with something else, but this is no longer important to us, the main thing is to adjust everything correctly and on time
First, you need to remove the plastic that prevents you from getting to the cylinder head, then remove the cooling casing and unscrew the head itself. This is what the cylinder looks like with the head removed. You will see two valves, as well as a sprocket with a tensioned timing chain. The star has holes and engraved stripes. In our case, to check the clearance, we first need to set the piston to “Top Dead Center”. To do this, remove the cooling impeller casing and fix the nut with a wrench so that you can turn the crankshaft. We turn it until the two small holes with stripes are parallel to the cylinder, and the large hole is on top.
The mark is indicated. To determine whether the “dead center” has really been found, lightly turn it with a wrench in two directions, the valve rocker arms must be motionless. Now we proceed directly to the adjustment, for this you will need this set of feeler gauges. To adjust the valves, such a set is required. We need this set You will need 0.05mm and 0.1mm probes. First we take the first one, we will use it to adjust the intake valve.
The dipstick should fit tightly in the gap, and you should not create any effort to pull it out. After adjustment, tighten the locknut. We do the same action with the exhaust valves, only we take the feeler gauge by 0.1 mm. Adjusting the intake valve with a feeler gauge by 0.05 mm The intake valve is at the top, the exhaust valve is at the bottom. The clearances are indicated. After fixing the settings, we assemble everything in the reverse order, cylinder head, casing, plastic. Check the clearance regularly, during intensive use of the scooter, keep the carburetor clean, and most problems with repairs will be on your side.
how to set the ignition on a 2t Honda scooter
- News
- Photo gallery
- ads
- Forum
tags
- Enduro
- Dragster
- Bobber
- Chopper
- Cruiser
- all-terrain vehicle
- Cross bike
- sportbike
Categories
- Harley Davidson
- Honda CB
- Honda CTX
- Honda GL
- Honda GL 1800
- Honda SBR 1000
- Honda SBR 300
- Honda SBR 600
- Honda Shadow
- Honda VFR
- Honda VFR 1200
- Kawasaki Ninja
- Suzuki GSX
- Suzuki Strom
- Suzuki SV
- Jet skis
- Izh Jupiter
- ATVs
- Honda ATVs
- Chinese Motorcycles
- Motocross Motorcycles
- Mopeds
- Motorcycle Sunrise
- Motorcycle Dnepr
- Motorcycle Minsk
- Motorcycle Planet
- Motorcycle Ural
- Motorcycle Java
- BMW motorcycles
- BMW G motorcycles
- BMW R motorcycles
- Ducati motorcycles
- Honda motorcycles
- Yamaha motorcycles
- Motorcycles Izh
- Motorcycles with sidecars
- Enduro motorcycles
- Honda scooters
- Sports motorcycles
more similar
more similar
more similar
more similar
more similar
more similar
- News
- Photo gallery
- ads
- Forum
How to replace the timing chain in an engine
Having decided on such an action as replacing the timing chain of a scooter, you need to decide on how to implement your plan.
There are two replacement options:
- With a thorough disassembly of the scooter engine
- No engine disassembly.
How to change, everyone decides for themselves. Both methods, advantages and disadvantages are described in detail below.
With disassembly
You should select the right tools: generator and variator pullers (you can make them yourself), kickstarter sprocket puller, 8, 10, 12 and 17 mm sockets, a hammer, two screwdrivers (flat, Phillips).
The engine is removed from its place, the oil is poured out, all parts are wiped and cleaned. Next, remove the muffler and cooling casing. We remove the generator only with a puller. To do this, unscrew the bolts from the impeller and remove it from the rotor. It is necessary to fix the rotor with a puller and unscrew the nut. Then we tear the rotor off the crankshaft journal. Remove the variator cover. Also, secure the impeller with a puller, unscrew the nut, and remove the variator from the axle.
Below the variator is the kickstarter gear. Likewise, a puller is required for it. Then we clean the cylinder connector, valve covers and cylinder head. After unscrewing the bolts on the valve covers, remove it. Next, remove the scooter's timing chain tensioner. After unscrewing the bolts on the cylinder head, we pull out the camshaft bed.
Next, remove the chain from the camshaft and pull it out of bed. To avoid losing the guide bushings that center the parts relative to each other, you need to remove them and put them away. We remove the cylinder head, the cylinder itself, and the piston (to do this, remove the retaining ring and pin from the upper connecting rod head).
After unscrewing the bolts on the crankcase cover, tapping it a little, remove it from the engine. We take out the starter intermediate gear, use a screwdriver and a hammer to unscrew the overrunning clutch nut (clockwise) and remove the gear and housing from the trunnion. We reached the chain!
Remove the protective shield from the oil pump. Place a metal stick under the chain, twist the nut on the oil pump sprocket, remove it and remove the chain.
No disassembly
We take the following tools: a Phillips screwdriver, pliers, a new chain and a special puller. More details about it will be below. We flare the new chain; to do this, use a puller to press the pin out of the joint of the links, but not completely.
A little about the puller
It's called a timing chain puller. It can be made by a turner by turning a threaded extruding pin and rolling a strong pin into it with a diameter similar to that of a chain pin. You can purchase a ready-made bicycle one. Just narrow the pin a little to the desired size.
Remove the cooling casing from the scooter engine, then the cylinder head cover. Next you need to remove the chain tensioner. We remove the camshaft bed, take out the shaft, remove the star.
We take the puller, center it with the pin, and gradually press out the pin. You can press it out completely, it will not be useful. We compare the links of the new and old chains, thread the wire into the seat of the pin and fix the ends of both chains. We turn the cooling impeller counterclockwise, gradually replacing the old chain with a new one.
Then we separate the ends of the chains, throw out the old one, and combine the new links from the ends. We check the alignment, install the pin, and use pliers to carefully press the pin in so as not to damage the new chain. We first check the mobility of the links. We finalize the pin with a puller. Again we control mobility. This point is very important: if you install the pin unevenly and miss it, it will begin to rest against one of the links and squeeze out the next one.
As a result, the subsequent pin or link bends, causing it to jam and become immobile.
Next, we assemble the engine in reverse order, placing marks on the rotor. When installing the camshaft bed, after tightening the nuts, you need to check the valve clearances with a feeler gauge. Upper valve inlet: 0.05mm, lower outlet: 0.1. The feeler gauge should fit freely between the valve and the adjusting bolt.
Then install the chain tensioner. We unscrew the bolt on the top of the tensioner, install a screwdriver in the groove, and, turning it, push the rod back. We fix everything else back according to the diagram.