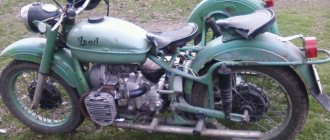
Homemade tricycle from IZH Jupiter
A tricycle built on the basis of the Izh Jupiter motorcycle: photo and description of the homemade product, as well as a video review of the trike’s design.
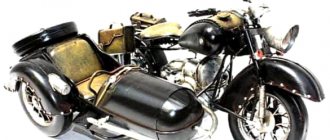
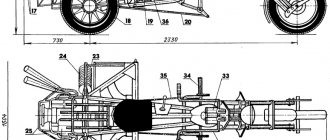
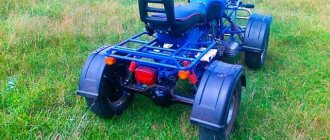
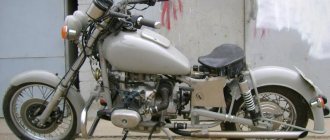
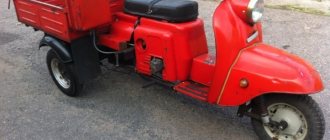
The craftsman assembled a homemade tricycle with his own hands, using Izh Jupiter as a donor. Below are photos and drawings of the trike.
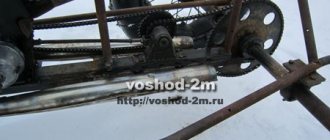
The design of the tricycle is quite simple: a rear axle is installed, torque is transmitted via a chain drive to the driven axle sprocket.
Rear wheels from VAZ.
The figure shows the dimensions of the rear axle of the tricycle.
The rear axle is made of a thick-walled pipe with an outer diameter of 42 mm, machined axle shafts from a VAZ are installed.
A sprocket from an Izh motorcycle is installed on the axle.
We recommend watching the author’s video, where he talks in detail about the construction of his homemade tricycle.
Video: winter drift on a tricycle.
Beginning of work
You should prepare in advance for assembling the trike. You will need to find a ZAZ-968 and a Ural motorcycle at a disassembly site in decent condition. From ZAZ you will need an engine, from Ural - most of the components. You will have to make the frame yourself and this is the most difficult stage of the whole undertaking. As a result of manipulations, converting a Ural motorcycle into a tricycle can turn into a presentable, powerful vehicle, no worse than its factory counterparts.
The frame plays the role of a connecting link on which all the parts will be installed. It must be reliable and comply with the drawings. There are only a few nuggets that can produce a similar product with precision up to 5 mm; if you doubt your abilities, it is better to entrust the work to professionals. Before installing the parts, spend an hour and measure the frame with a tape measure, check the locations of the holes and clamps.
Design Features
If you don’t know how to assemble a tricycle from the Urals, strictly follow the drawings. Typically, the upper beam is used to secure the rear shock absorbers. Glasses welded to it will allow you to achieve a good level of comfort. Car-like shock absorbers will respond reliably to changing road surfaces. Simply welding a square or round pipe into the end will not be enough. It is necessary to use reinforcing kerchiefs made of ferrous metal, scalding them well. A do-it-yourself trike from the Urals can be used not only to satisfy your love for a hobby, but also as a workhorse on the farm. If you set a goal, such a trike can have a carrying capacity of several hundred kilograms . It will be necessary to install not only the engine, but also prepare the site for installing the gearbox. Looking ahead, there will be the most problems with it, since there is nowhere to remove the finished structure, and making the box itself, the body, is very difficult.
It is also important to remember that the tricycle from the Urals with your own hands has a shifted center of gravity back. This occurs due to the installation of the power unit. A common problem is that at high speeds and abrupt release of the clutch, the motorcycle can rear up. Therefore, if there is an opportunity to shift the balance to the front wheel, it is better to take advantage of it.
The engine mounted on the frame requires virtually no modification. The main thing is to prepare the engine from the ZAZ-968 so that it works flawlessly. The exhaust system will also have to be made to order. Firstly, all bikers are simply delighted with the large and bright chrome parts, and secondly, you may not like the sound of the engine. A tricycle from the Urals can have an oil cooler or water cooling.
Advantages and disadvantages
Let's start with the advantages that a homemade trike from a Ural motorcycle has: - excellent cross-country ability, especially in mud; - comfort and less fatigue; — simplicity, low cost and reliability of the design; — minimal risk of engine overheating.
The trunk allows you to secure everything you need
And now about the disadvantages: - difficult control (due to a blocked bridge); — lack of reverse gear, which would be very useful (to be solved); — the intake manifold is strongly cooled until condensation appears (possibly having a negative effect on the combustible mixture); — a large load on the front axle (the front wheel sinks in mud, which significantly worsens cross-country ability); — high speed in 1st gear.
If there was a reverse gear, there would be no need for a shovel
In general, these shortcomings can be considered insignificant, especially considering the significant improvement in cross-country ability. In addition, many of them can be eliminated.
Trike from the Urals
Assembly algorithm
If you have a frame ready, then the following sequence of actions will help you:
- Find a suitable rear axle from Moskvich or Zaporozhets.
- Mount the engine, exhaust system, filters, and oil cooler on this axis.
- The frame must perfectly connect the rear axle, engine and front fork. This is a very important stage. It is easier to install everything on a lift or jacks for better access to parts during the assembly process. All ferrous metal structures must be carefully primed and painted before installing parts.
- In order for the trike to be fixed on the ground, a front fork with a shock absorber is installed.
- When fixing each element, eliminate any play or clatter; if the part may come loose over time due to vibration, use locknuts.
- It is better to use fastening of metal elements by welding, where possible, for example, with cross members, rear axle and frame.
- Once the trike is on its three wheels, it's time to install the fuel tank, rack, seat, and additional accessories.
Even by investing a small amount of money and working with passion, you can get a trike no worse than its foreign counterparts. At the same time, the driving characteristics will be at their best, and will allow you not only to show off beautiful equipment in the garage, but also to show off at high speed on the highways. Stylish accessories such as leather fringe, chrome details, a specific helmet shape and the characteristic roar of the engine will allow you to recognize an ardent biker on a tricycle, which was made with his own hands in the garage.
All-terrain vehicle based on the Urals
At the preparatory stage, drawings and a diagram of the future tricycle are being worked out. In the variant under consideration, chain transmission is not provided.
The unit is suitable for 15-inch alloy wheels, which are heavier than homemade analogues, but more reliable and have a beautiful appearance.
After choosing the final concept, they move on to turning the parts of the all-terrain vehicle.
Tools and Supplies
The frame from the Ural motorcycle, converted to accommodate the installation of a car rear axle, was chosen as the base. You will also need the following items:
The instrument is traditional. You will need a lathe, yews, a set of keys, screwdrivers, a gas welding machine, and measuring devices.
Main stages of rework
The process of creating a three-wheeled all-terrain vehicle can be divided into several stages:
Making odorishi
On a light three-wheeled carakat they put “strippings” from the tires of a GAZ-66 or Ural (Lapot) car, as well as medium-sized tractors. The tires become lighter, while a new tread is cut onto the old rubber, which is responsible for reliable grip when driving on snow and mud.
It’s not difficult to make wheels for an all-terrain vehicle with your own hands. Process steps:
Engine and transmission
The wheeled all-terrain vehicle in question was equipped with a Lifan engine, modified for installation on a tricycle. A moped generator and a larger cross-section muffler were also installed. The standard carburetor did not perform well, which is why a tractor starter was installed.
This approach made it possible to increase the power of the karakat by almost 2 times.
The variator works great, in the 2nd range it makes it possible to slip and drift. In mode 4, the unit starts off smoothly, accelerates to 50 km/h, and at high speeds loses stable control. A unit from Honda City, Oka, Zhiguli is suitable as a transmission box. The gearbox is mounted on the vehicle frame and is coupled to the rear axle using a cardan drive.
Final improvements
At the final stage, the reliability of the assembly and the operation of all components are checked. The seat and body are painted, oil and fuel are added. If desired, fenders, mudguards, light and signal elements are mounted.
Do-it-yourself tricycle assembly from the Urals
Before starting work, it is necessary to think through the design of the future tricycle and the location of all elements. Ideally, make a drawing of the future vehicle.
Important design points:
- All joints must be reinforced.
- Car cups are welded to the top beam. It also serves as a support for shock absorbers.
- Frames are welded to the central beam, which serve as footrests for passengers and also support the suspension bump stops.
- The base for the pedal weights is the lower transverse tube, which is attached to the frame.
- A support for the gearbox is also made on the transverse frame.
The main difference between a tricycle and a motorcycle is that the engine is located at the rear and therefore the center of gravity of the vehicle is shifted back. When accelerating, such a tricycle rears up a little. Below you can see a diagram of how to convert a Ural motorcycle into a tricycle.
Location of tricycle parts
As we have already said, the engine of a Ural tricycle is not located on the main axis, like in motorcycles. It is placed between the rear wheels, because of this, when accelerating quickly, the tricycle easily rears up. But this is a much safer event than on a motorcycle and adds adrenaline and entertainment to the trip.
As a motor, you can use a native motor from the Urals or take a car engine. The main parameter of choice is its capacity between the rear wheels. Be sure to securely fasten it in at least three places. Most often, if the power unit is in good condition, then you don’t even need to do anything to it. And if the engine is old, then you can replace the radiator or some other elements.
Depending on the engine you choose, you will also have to change the exhaust system by installing one muffler for each cylinder.
When converting a motorcycle from the Urals into a tricycle with your own hands, the gearbox is usually installed on the left side, because you usually need to hold the steering wheel firmly with your right hand. You'll have to think a little about how to connect it to the engine, because now the gearbox will be located at a much greater distance from it.
Gear box
When you make a tricycle from the Ural with your own hands, you definitely need to take into account where exactly the gearbox will be located. You already understand that the engine itself will be off the axle, behind the seat, between the two rear wheels. At the same time, make sure that it is attached as securely as possible in at least three places - especially if you plan to perform various tricks, as described above. As for the gearbox, it is better to install it on the left side of the steering wheel, since your right hand will be occupied most of the time. It is unlikely that if you take the engine and gearbox from a car, you will be able to make a design that is convenient enough to change gears without stopping driving. Also don't forget that you need to take care of connecting the box to the motor, which is a bit more difficult considering that it is now located a little further from the box than it should have been in the original. But if you're trying to figure out how to make a tricycle with your own hands, you always need to be prepared for these kinds of surprises and difficulties.
Tricycle from the Urals and VAZ-2101
When creating a cargo tricycle with your own hands from the Urals and parts of a VAZ-2101 car, the easiest thing will be to install a regular bridge and make a car suspension with shock absorbers from the Urals.
The bridge from the VAZ-2101 is turned over, after welding the differential. This is reflected in the handling - the steering wheel is quite difficult to turn, however, the trike's cross-country ability increases.
The driveshaft is shortened and welded to the fork on the final drive and connected to the axle through a rubber coupling. It is better to take the original Uralov clutch, in this case the transmission will be softer.
To avoid bending the cardan drive, you can move the engine to the left by 7-9 cm, or move the axle to the right or increase the wheelbase.
It is better to leave the engine as a whole unchanged, but instead of two carburetors, make one Chinese one. And for forced cooling, use an air filter from Izh.
Additionally, to cool the engine when operating in difficult conditions, you can install two fans and run them separately if necessary.
Pros and cons of the design
+ Simple and cheap transport;
+ The engine does not overheat.
- Can only go forward;
— Too much load on the axle with the front wheel;
— Goes too fast in first gear.
Suspension
It doesn’t matter whether you make a tricycle with your own hands from an Izh or any other motorcycle. You will have to remodel the front wheel suspension anyway. After all, the distribution of forces in a tricycle is very different from that observed in a regular motorcycle. To do this, you will need two pairs of consoles, as well as two powerful springs - if possible, try to get helicopter or airplane springs, but springs from passenger cars can also be used if necessary. The consoles need to be connected to each other by levers, through which the axle of your front wheel will pass. Naturally, this is not the only way - there are a large number of ways to make a tricycle with your own hands. Drawings are available on the Internet (one of them is in our article), but this method is one of the most effective.
How to make a tricycle from a Ural and ZAZ-968 motorcycle
The front fork works like in the Urals, a lever system is used and the front axle is located between the transverse arms.
When creating a trike from the Urals and a ZAZ-968 car, the rear part remains practically unchanged, like a car. Only a muffler, oil cooler and air filter are added there. The gearbox and engine are also original to ZAZ. The engine is mounted as before, and the gearbox is placed on the left.
In general, there is not much to change.
DIY assembly steps
- At the very beginning, the rear axle is removed from the car.
- A beam is attached to the cut.
- Mufflers, an air filter, an oil cooler and pipes are installed on the rear wheel axle. If you use engines from the 90s, then all these elements will already be installed.
- A frame is being made that will be the basis of the tricycle, so it is necessary to make it strong and reliable.
- An extended front fork is manufactured by welding with shock absorbers attached to it. Lengthening occurs by replacing the fork rods with longer ones or by welding more tubes to the Ural fork.
- Welds the frame and rear axle of the car, forming a solid structure.
- The fork is connected to the frame by welding, just like with the rear axle of the ZAZ.
- After this, the seats, gas tank and other elements are attached.
- Finally, the new tricycle is painted and chromed.
How to properly design a mini-tractor?
The conversion of a walk-behind tractor into a mini-tractor is carried out in several stages. First you need to take care of the frame. It is made of durable metal, which is cut into pieces of the required length and then welded together. When the frame is ready, you can start assembling the chassis.
If the motor is placed in the front part, then the width for the wheels can be left the same as in the walk-behind tractor. In order to attach the wheels to the rear, you will need an additional axle. It is made to the required length; an ordinary piece of pipe is suitable for this, the main thing is that the width is suitable. Bushings and bearings must be installed at the ends of the pipe. You can then install wheels on them.
Ural Hercules - factory Ural tricycle
The Irbit Motorcycle Plant has released a three-wheeled modification in its model range for transporting cargo up to 500 kg. The model is called “Hercules” and moves well both on city roads and off-road. The sides of the tricycle are also removable and this allows it not to be limited in the size of the cargo it transports. Hercules is a truck that does not require a category “C” license.
Technical characteristics of the Hercules tricycle:
- Dimensions: 335x150x115 cm
- Ground clearance: 185 mm
- Weight: 500 kg
- Fuel tank capacity: 19 l
- Maximum speed: 70 km/h
- Engine capacity: 750 cc
- Power: 45 hp
- Engine type: opposed 4-stroke with two cylinders
- Generator: 500 W
- Electrical: 12 V
- Transmission: 4-speed, with reverse gear
- Tires: 6.45 and 13 inches
Homemade tricycle assembled from Soviet motorcycles
Dear visitors to the “ Samodelkin Friend ” website, from the material presented by the author you will learn how to independently assemble a tricycle from spare parts from old Soviet motorcycles with your own hands. This trike was assembled by Viktor Bryukhanov and was based on the Voskhod motorcycle frame, front fork with wheel, tank and seat, single-cylinder internal combustion engine borrowed from the Minsk motorcycle. The rear part (gearbox, axle shafts, wheels) is from the Ant cargo scooter. IZh “Planet” shock absorbers; by the way, the tricycle has a reverse speed and an additional towbar for a trailer. Rear brakes, no front brakes)
Thanks to its wheel arrangement, the tricycle is more stable on a dirty dirt road, perfect for fishermen and hunters for traveling long distances off-road (within reasonable limits))
So let's take a closer look at the design features of the tricycle.
Materials
- motorcycle frame "Voskhod"
- ICE "Minsk"
- gearbox, axle shafts and rear wheels “Ant”
- Shock absorbers IZH "Planet"
Tools
- welding inverter
- set of wrenches
- Angle grinder (grinder)
- skillful hands and a bright head)
Step-by-step photo of assembling a homemade tricycle from Soviet motorcycles with your own hands. Rear part from ant, shock absorbers IZH "Planet"
Engine motorcycle "Minsk"
Torque is transmitted using a chain transmission.
Shock absorber "Planet"
There is also a reverse speed.
Rear wheels "Ant"
Tools and materials
A good option would be to make a vehicle from an Alpha moped. Instead of standard propellers, it is recommended to use wheels from an Izh motorcycle. But you can get a good device from Dnepr. Even models from very old series are suitable, including those in extremely worn condition.
For the rear part, use car wheels. The ideal donor for wheels and axles will be VAZ cars of any model.
Sometimes a tricycle is also obtained from the Voskhod motorcycle. The basic mechanism has excellent speed characteristics, which increases the significance of this option. The gearbox is taken from any cargo scooter. The body is made by hand. It is advisable to install forced cooling and change the gear ratio.
When they say that a three-wheeled vehicle is made from a chainsaw, they mean that the engine was taken from there. Of course, you can use motors only from the most powerful saws as a basis. The remaining components are:
- frame made of ordinary VGP;
- wheels and axles removed from garden carts;
- a driven sprocket and chain taken from a bicycle;
- small leading star with D-6;
- handcrafted wings.
If you decide to make a three-wheeler from an “ant,” then additional components are usually taken from Izh motorcycles. The engine and variator can be anything, even made somewhere in Asia in semi-underground conditions. The frame, gearbox, hubs and shock-absorbing unit are removed from the “ant”. The axle shafts are borrowed from VAZ.
Hydraulic components and brakes can be collected from the Minsk motorcycle. But experienced experimenters sometimes even make them themselves.
One original and quite convenient variation is a three-wheeled vehicle made from a pit bike. Despite the “childish” purpose of the original vehicle, it can turn out to be a real all-terrain vehicle that can overcome off-road conditions perfectly. On the ATV, part of the stationary axle is cut out, leaving the factory brake and main sprocket. You can add a differential, but then you will have to deal with scrupulous alignment. FYI: An excellent trimmer tricycle can be created based on the Champion.
It is appropriate to complete the analysis of possible options using the example of three-wheeled transport from OKI. It is rarely used in its pure form; it is much more correct to create “hybrids” with motorcycles such as “Ural”.
For the work itself you will need:
welding machine (an inverter is possible, although not necessary);
- electrodes of a suitable type;
- grinder (for cutting and grinding metal, removing burrs);
- spanners;
- screwdrivers;
- electric drill;
- other tools and components - at personal discretion.
