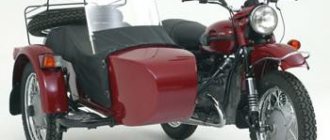
“There are two ways to get the legendary boxer with a sidecar: buy a new one from a dealer of the Irbit motorcycle plant or restore some old device that has been preserved in good shape in that same grandfather’s garage.
This summer, the newly-minted owner of the Ural approached us, choosing the painstaking but noble path of restoration. The task was set: to make the seats of the passenger and driver more comfortable, to restore (and in fact, to make again) the chair in the stroller and to sew a new cover for it.
And so that quickly and without unnecessary expenses - after all, this is a restoration, not a custom build. Therefore, we save the budget and act as quickly as possible.
To begin with, we decided to deal with the driver and passenger seats.
Obviously, they are not very comfortable, so it was decided to install several layers of foam rubber in them and make the same soft covers.
Let's try on the volume and type of foam that will soften the seat to a fairly comfortable level:
We immediately decided not to limit ourselves to the outer layer and additionally install several sheets of denser foam rubber directly into the rubber structure. This will make the seat even softer and more comfortable. Shock-absorbing properties should also improve.
Having dealt with the foam rubber, we cut out a rough version of the cover.
A draft is needed in order to understand how the material will behave. In addition, you need to understand the case fastening system. A live model will give you a better look at all the pitfalls and take into account the design features when sewing the final, finishing version.
We cut, sew, try on the seat:
For a sample it turns out quite well. The question arose about fastening. Unfortunately, the design engineers did not provide a system for attaching the cover to the seat frame. It would have been possible to install it with metal rivets, but this solution was abandoned in order not to make major changes to the appearance.
We chose a simpler and more aesthetic way - to secure the cover using a lacing system.
We install the eyelets and figure out the weaving pattern:
The thread allows you to understand the length of the lace that will be needed in order to firmly secure the case.
Having been satisfied with the test sample, we confidently proceed to the final product.
The appearance of the cover was previously agreed upon with the customer.
There was also an option with buttons, but after some consideration, we realized that this could affect comfort. Therefore, it was abandoned in favor of stitching.
The option chosen was one with decorative square stitching and highlighting the contour of the contact patch.
We prepare the patterns and cut the cover:
We cut, sew, stretch on the seat and in the end we get the following result:
The seat has become moderately plump and soft - the driver and passenger will definitely appreciate this.
On one side, the seat began to look like an airfield cap, which was once popular among Georgians.
And on the other - on a rugby ball.
Satisfied with the result, we take the finished seats (and we have two of them - driver and passenger) and head to the workshop where the motorcycle is being prepared.
Let's see how they will look installed.
Making a new seat from scratch
Let's say you want to make a seat for your motorcycle project, which is about to hit the road with a new tuned engine, cool forward flow, sparkling chrome wheels. You can find a commonplace seat for a motorcycle in stores, at dealers, or at a disassembly site and remove it from a donor.
In our case, we did not want to install a stock seat, but planned to make a seat for an “egoist” for one person. During the work, there were a lot of options for the development of events under different conditions, skills and desired results.
Stages of work:
Rigidity frame
Initially, you take masking and stationery tape as tools. The painting shop is needed as a primary base. You use it to cover the workspace on the frame. Paste regular stationery tape on top, which is needed to protect the painter's tape from soaking.
Note that the thinner layers you use, the easier it is to give them the desired rounded shapes. The seat must exactly follow the contours of the frame, since after drying it will be more problematic to change its shape. Your workpiece should not have any cracks or wavy outlines relative to the frame; it must fit snugly and evenly.
And yes, if your seat is held on by bolts, you can reasonably take care of this right away. It is convenient to make bolts or other parts of fastenings part of the frame and glue the bolt heads into resin so that they do not get lost anywhere and already know their rightful place.
Experienced craftsmen or those who know how to work with metal make frames from sheet iron, sometimes even making complex frames using welding.
After the main workpiece has dried, we move on to the next stage of work.
Customizing
Continuation of the story about the restoration of the IMZ "Ural" motorcycle.
This part is devoted to working with the stroller, or more precisely, restoring the passenger seat in the cradle. As mentioned earlier, the main task set by the owner as part of the restoration of the Ural was to make a new seat for the stroller. To do this, it was necessary first of all to disassemble the old seat, take the original dimensions and try to take into account all the design and fastening features...
In this form, we saw the factory cradle passenger seat, consisting of two cushions with a plywood base. Inside each there is a spring, no different from those that were installed in almost all Soviet upholstered furniture, including mattresses and household sofas.
For softness, the pillows were stuffed with technical wool, stitched to a piece of burlap. The insides have accumulated a huge amount of dirt and dust, and have already begun to rot.
We disassemble the pillows and study the design of the plywood base. The spring is secured with the help of chains, which in appearance resemble toilet chains (the flush handle was usually hung on these).
We are getting rid of the aforementioned springs and retaining chains, since in the new version of the stroller seat we will use foam rubber. It will provide sufficient softness and save several centimeters of volume in the stroller.
Using the measurements taken, we draw mock-ups of the bases and make new ones from 6 mm thick plywood.
We provide holes that are needed in order to fasten the layers of foam rubber and subsequently mount the seat in the cradle.
We prepare a “sandwich” from foam rubber. The main, bottom layer is dense and elastic foam rubber made from recycled materials (the so-called recycled foam rubber), the top layer is softer, “thirty-fifth”, for passenger comfort.
We assemble the resulting foam rubber “sandwich”, attach it to the base and wrap it with film...
... to go from the resulting structures to the workshop, where work on the restoration of the Urals is in full swing.
Meanwhile, the cradle has already been painted and is ready to accept the seat. Let's try it on.
Due to the fact that the new seat was created according to the original dimensions, it fits perfectly into the cradle. This means you can start working on the case.
In the process of thinking about the appearance of the new seat, photographs of various design solutions were studied. As the main reference, we chose one of the options that we liked the most. We look at the buttons that the owner liked:
We draw sketches, estimate the sizes and placement of buttons and send them to the customer for approval of the working version:
The buttons will help tighten the surface of the cover evenly and give the seat an original appearance.
Next, we cut and sew the covers, and also prepare the buttons.
Having selected plastic buttons of the required size, we cover each one with leatherette - they will “work” on the front side of the seat.
We try on the covers with the buttons installed.
Before pulling the cover on, we think over the system for attaching the buttons to the base. We mark the attachment points, after which we pass a nylon cable through the layers of foam rubber and fasten it on the reverse side using pins.
We also mark four bolts for installation - they will go through the plywood base. With their help, the seat will be fixed in the stroller.
We attach plywood bases, stretch and shoot the cover.
Test sessions on the new chair were successful. The chair turned out to be quite soft and moderately elastic.
Once again we go to the workshop and try on the finished seat to mark the holes for mounting the chair to the stroller.
At this point, the work with the seat can be considered complete! We give everything to the masters who work on the motorcycle, and a few days later we go to look at the result:
General view with the new chair and seats.
The stroller is covered with a new cover.
The chair is larger.
New seats, which were discussed in the previous post
Lacing used to attach seat covers
Photo with near-zero mileage for memory
In total, all the work - from developing sketches to the final photography - took about 1.5 months.
Special thanks to the master mechanics who put the motorcycle on wheels, and of course to the owner for his dedication, patience and creative cooperation!
Filling the base
When your frame blank is ready, the next step is filling it. A good option is polyurethane foam, on which softer fabrics, felt, foam rubber and other porous materials are attached on top.
To create the desired shape, you can take thinner materials and use them in more layers. When creating a “frog” saddle, sometimes it is enough to find old Soviet seats from the “Ural” or “Dnepr” as a blank. And then work wonders only with the case.
2Sult › Blog › Rebuilding the Ural motorcycle. Part 1
Greetings to all those who came across my boring blog.
Now let's get back to talking about my particular copy. In the previous entry, I wrote that I removed part of the attachment, for example the seats and steering wheel. Now the frame is almost completely freed, except for the rear brake foot and I haven’t disassembled the pendulum yet. It also remains to disassemble the fork, but that’s a little later.
Well, did you listen to my advice under the photo and take a closer look at these fasteners on the frame? Now let's look further.
I worked with a grinder and removed everything unnecessary. As I already wrote under the photographs, these are mounts under the wing on the tail of the frame and seat mounts. This was done in order to make one large, flat seat. It will look something like this:
Something like this, with the exception of the wing, I think it will be implemented a little differently. The frame is now undergoing welding and sandblasting/painting.
If I'm not mistaken, then I said that I have one engine completely assembled, and there are two more in a semi-disassembled state. Unfortunately there is only one gearbox. I decided that I needed to disassemble the engine. The fact is that the previous owner had all this stuff lying in the barn, under a leaking roof. Everything was covered in a layer of dirt, sawdust, rust and so on, in short, completely covered in shit. Accordingly, you need to disassemble the engine and clean it. Well, at the same time, study the insides in order to understand which parts will be replaced.
I found instructions for disassembly on the Internet. To begin with, I took the fully assembled engine and off we went. Four people were involved in the case. my close friend, with whom we made my “anti-hero” Suzuki, and who also has itchy hands, my brother and my father. And the most pleasant thing is, of course, the presence of my father nearby, doing something together, listening to his advice from the height of enormous life experience, getting bullied for crooked hands and lack of any knowledge) In short, believe me, this is very cool and it means a lot to me.
Initially, I planned to take everything apart, see what could be replaced, and wash and clean the rest. Next, take all this stuff and take it to the city to a new workshop, since I myself won’t be able to assemble this engine; this requires more knowledge and experience, and I have a person who will help me. But since I want to take full part in all processes, I don’t want to take parts to him, but I want to do everything in my workshop and invite specialists there as needed.
But the main problem is different - after disassembling the two engines, we discovered that they are slightly different. In general, the differences are minimal, in small details. But they exist. So now we urgently need to look for a place for a workshop in the city and call a comrade to give his verdict on this matter.
Thank you all for your attention, for your likes and comments. do not be ill.)
Source
Drawings of a stroller seat/car seat.
Actually, subject.
While I was in the army, a little water leaked into the stroller from a hole in the roof of the garage. The result is a rotted corner of the wooden frame of the passenger seat. In this regard, I became concerned about the issue of making a new one, or replacing both pillows with car pillows. So far I have considered the seat option from the ZAZ 968M, but I don’t know if it will fit in width and height. Looks like it fits. In general, please share if anyone has drawings of this seat, or tell me what car equivalent can be installed so that it does not interfere with the awning closing. Thank you. ZAZ-968 is definitely higher than a standard stroller cushion. Wouldn't it be easier to just remake the wooden frame of the pillow?
I have a berth for both pillows, so I’ll join you.
take a regular car with three doors (i.e., folding), and when you need to cover it with an awning, fold it and don’t bother.
That's it, but! I have not come across seats that fold at an angle of 90 (fully). All I saw was 45-55 degrees (the back sticks out!).
from multi-seat minibuses, they usually have this function, those that turn into a table.
At one time I installed it from a Muscovite 2140, but the frame (the ass one) had to be cut down a little.
I have the same problem. By chance I got a seat supposedly from an old gazelle: the back is high and narrow, but the 5-point pillow is just right. Now I’m wondering what to use for the padding on the back frame (plywood).
I “sculpted” four layers of foam on my plywood back - 30mm approx. Then I carefully tightened it with leatherette, similar to what was used to tighten chairs in the 30s/40s. Crap! Hard!
30 mm is not enough. This suggests 6-8 cm of “softener”. And leatherette on top, of course. The exotic skin of young dermantine is our everything. It’s not natural leather to cover it with. Although I saw Eco Leather in a fabric store, something in between leather and dermantine, I’m thinking of covering it with it.
On UAZ 469, 3151 there are narrow seats. I had the whole thing in my stroller.
Tatar, Max, thank you, I’ll try it.
1. from Oka 2. It’s easier to look somewhere 3. make it using an old seat.
The UAZ Hunter has folding seats in the trunk. There is no more space in the trunk than in a cradle - I think you can squeeze it in.
from a penny, those without headrests seem to fit in width. Or from a Kruzak 200 from the trunk, they fold at 90 degrees.
The seats on the kopeck and the lock are wide, they definitely won’t fit into the stroller.
and in short, in 2 days I remade the lower seat. it rotted. Carefully removed the leatherette. stripped the springs. cotton wool in the stove. I measured the base. I made one the same size. primed it. This is all work for a couple of hours. I cleaned the springs with self-tapping screws and screwed them to the base. with a piece of linoleum on top. tied to springs. I threw regular foam rubber from the top. and washed and dried the old leatherette. tied with staples. Everything is ready.
Seats
Initially, this motorcycle had the original separate Ural seats, which were not particularly comfortable. And sometimes you have to drive for several hours along overgrown or washed-out forest roads, or even completely off-road. Therefore, it was decided to install a more comfortable seat on the Ural motorcycle. The choice fell on seats from the Gazelle (minibus), which cost only 400 rubles for 2 pieces at a car dismantling station. The passenger seat was four bolted onto the rear fender without modification. I had to tinker a little with the driver's license.
Seats from Gazelle to the Urals
At first there was an idea to put a backrest for both the driver and the passenger. But in this case, boarding the passenger was much more complicated, and sitting was not very comfortable: the driver’s backrest was in the way, so we had to abandon it. In the end, only the seat cushion was installed, the front of which was pre-narrowed for a more comfortable fit.
Driver's seat in the Urals
Of course, it would be possible to do without a passenger backrest, but with it it is much more comfortable for the passenger, especially on long trips. In addition, fishing rods, a shovel and a bag with a metal detector are attached to the back using straps. It turns out that this DIY motorcycle backrest not only adds comfort, but is also very useful from a practical point of view.
Attaching luggage to the backrest
Restoring the Ural: reupholstering the seats: One comment
Thank you, very interesting and useful information, I will follow your advice.
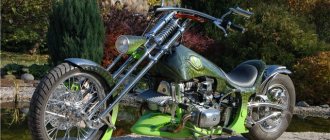
A good saddle is the basis for a comfortable motorcycle ride. And on a custom, the saddle (as well as other design elements) emphasizes the style of the motorcycle. Therefore, the manufacture of the saddle must be treated with care. First of all, you need to have a clear idea of what to make.
It is necessary to install the saddle when the tank and rear fender are finally placed on the homemade product. It is also necessary to install the pedal assemblies. It is the placement of these components (i.e. footpegs + controls), the shape and position of the saddle that determine the comfort of riding a motorcycle.
Saddle designs vary greatly. And almost everything can be repeated in “garage” conditions. For devices designed in the “old school” style, a good solution would be to use standard rubber separate saddles “Uralov” and “Dneprov”.
Let's look at the most common saddle design. This is a saddle with a metal frame and a soft element made of foam rubber or latex.
Such designs are used on almost all production motorcycles in the “Custom” style. However, it is worth noting that often the base of the saddle is made of plastic, and exclusively molded foam rubber is used as an elastic element. Whereas latex has much better quality. A saddle with such an element, with good softness, is never pressed down to the base. Sheet latex is very expensive and is practically not available for sale, including in specialized furniture stores. Since even for expensive sofas they now use cheaper foam rubber. The question arises: where to get this material?
Latex was used in the saddles of Dnepr and Ural motorcycles, as well as in car seats until approximately 1995. That is, if you do not have an old motorcycle saddle in good condition, you will have to go to the dismantling of “Muscovites”, “Zhiguli” or “Zaporozhtsev”. For one large new two-seater motorcycle saddle you need about one and a half old motorcycle saddles or one car saddle.
Also a good material for saddles is the material used in gymnastics mats. They can be purchased at sports stores and are very expensive. This material consists of particles of foam rubber, latex and microporous rubber pressed into one sheet.
So, you have the material and now you can start making the metal frame of the future saddle. For this, sheet steel with a thickness of at least 1.5 mm is used. Thinner metal may sag or even bend when tightened.
The saddle frame must have a flange for gluing the covering material and must have a number of holes for air outlet.
Protection
We won’t dwell on plastic hand protection; You can buy it in any place where Ural spare parts are sold. Let’s take a closer look at the peculiar safety arc. In general, roll bars on a Ural motorcycle are not particularly needed when driving off-road, but it’s still better with them.
Safety bars in the Urals
This arch was made from a metal bed frame, to which 4 bolts were welded for fastening to the frame. The arc performs the following functions: - makes the fall softer (although it may bend); - protects against tall grass and bushes that it crushes under itself; - can be used to install additional headlights (although they should be installed higher); - serves as an excellent support for mounting the motorcycle near a tree or on a homemade side stand. By the way, the homemade side stand is a durable bent Z-shaped tube.
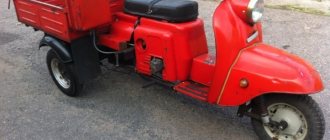
Trunk
For forays into nature, a trunk on a Ural motorcycle is vital. The luggage compartment is a plastic toolbox attached to the back of the rear seat and to the bottom of the handle (which is near the taillight). Plus, using the straps, you can attach a bag with a metal detector or other luggage to the backrest. In the future I plan to install additional panniers on the Ural under the rear seat.
Trunk from a box
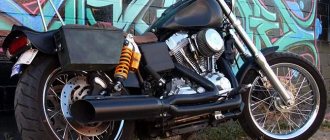
Muffler
The original muffler, in my opinion, strongly “chokes” the engine, so it was decided to replace it with a homemade one. Of course, it was possible to install a direct flow or do without a muffler altogether, but why tire yourself with a loud exhaust and attract unnecessary attention to yourself. Making a homemade muffler for a Ural motorcycle is quite easy if you have a welding machine and pipes of different diameters. It is better to take thick-walled pipes, otherwise, due to resonance, the effect may be exactly the opposite.
Homemade muffler for Ural motorcycle
This muffler for the Ural motorcycle consists of two pipes, one of which is located inside the other. The exhaust gases first enter the inner pipe, which is welded on the reverse side and has many holes along its entire length. Through these holes, the smoke passes into the outer, and then into the last, downward-curved pipe. The sound is quite quiet and pleasant, and when crossing a ford, when the muffler is under water, gurgling is heard.
Improved technical characteristics
The surface of domestically produced engines has many roughnesses. To make the surface smooth, you need to stock up on a file, felt, sandpaper and patience. You can speed up the polishing process by using drill attachments with felt wheels.
Despite the fact that the Ural has impressive power, the owners still strive to improve the performance of their “iron horse”. In order to tune the engine of a Ural motorcycle, you should:
- clean the cylinder head channels;
- replace the original carburetor with the K-301B model;
- install two air filters, parts from Moskvich-412 or GAZ-24 are suitable;
- adjust the synchronization of the carburetor;
- diagnose the correct ignition setting for each cylinder, the advance should be from 40° to 42°.
If everything is done correctly at all stages, engine power will increase to 42 horsepower. Engine power can only be increased in new models or motorcycles that have undergone major overhauls. When tuning an old engine, there is a danger of damaging it.
Installing a homemade muffler will result in failure to pass the scheduled technical inspection .
Tuning a Ural motorcycle requires a lot of time and effort, but the result is definitely worth it. A stylish retro-style motorcycle, customized to suit you personally, is a great option for urban conditions.
Painting
In order to make the motorcycle less noticeable in the forest, khaki paint was chosen, which was used in 2 cans. As you can see in the photo, there wasn't enough paint. Painting a Ural motorcycle from a spray can is a simple and interesting process. First you need to clean the surface from dirt, treat it with sandpaper (so that the fresh paint sticks better) and degrease it with gasoline. After this you can paint. The paint, which costs about 170 rubles per can, dries within a couple of hours.
Conclusion
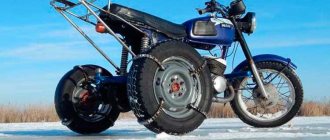
Well, that's all, I tried to tell you about all the improvements. The story stretched over 3 articles, although there seemed to be few improvements themselves. Overall, in my opinion, the motorcycle turned out to be quite good, although it is very difficult to move off-road without toothy tires, so installing it is a top priority. If you have any questions, ask in the comments.
Fuel filter is an important addition
Source
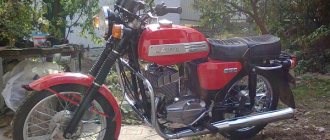
Ural IMZ-8.103 1988 → Manufacturing of Soviet boxer cradle seats
About 2 months ago I was already planning to make a seat for the cradle of my boxer, because... the back was safely lost by the previous owner of the moto, and the pillow had already rotted on one side. For these purposes, I found a VAZ seat as a donor for seat padding, but it was laziness, the sun was at the wrong angle, I got up on the wrong foot, I slept on the wrong side, etc. and so on. But today I finally overcame my laziness and took up the seat. For those who are too lazy to read the whole article, here’s what came out of it...
Well, for those who are not too lazy to read and look at the photos, read the full article)
So, to begin with, I found leather patterns in my grandfather’s bins, presumably for a jacket, but later abandoned the option of a black seat without a pattern, because... The Zhiguli seat cover was in very good condition. And in the process of fitting, I discovered that the patterns would be small.
Initially everything looked like this:
To make it you needed:
I decided to start with the back, and then adjust the pillow under it. and as it turned out, making the back is a little easier, because... there are no springs in it. To begin with, I applied markings to the plywood.
I cut it out and tried it on in place... and trimmed the bottom edge another 1 cm, and also marked the points of the holes for the bolts
Next, I drilled 4 holes and selected and screwed in 4 bolts. The upper ones are for attaching the seat to the cradle, the lower ones will hold the pocket, but a little later, when I find a long, stiff spring. I also cut the VAZ backrest padding to the size of the plywood.
After that I tried it on again...
and began to cover the backrest with a cover from a VAZ seat (when I nailed everything to the plywood, I noticed that it had moved the cover to the side rather nicely, but I didn’t bother picking out the staples anymore
Then I cut off all the excess...
... and put the backrest in place.
Then I set about making the seat cushion, looked at the old base, it turned out there was no need to adjust it and the same dimensions would fit. I omitted the marking process, because... It differs in nothing but shape and size. The workpiece was cut out, marked and drilled holes for the bolts by the fastening bar from the bottom side, inserted the original bolts into these holes, and additionally drilled several holes for ventilation in case of a fart bomb from the passenger
I screwed a block with a hook that holds the pillow to the bottom of the longboat
Next, I secured the springs from the original pillow. In the original, small bars are placed around the perimeter and springs are screwed to them with self-tapping screws. I was too lazy to look for the bars, so I made it a little easier...
While I was fixing the springs, it started to rain and I had to move to the garage. Then I took the stuffing from the VAZosideniya cushion and cut it to the size of the Uralosideniya base
The pillow cover was torn along the seam on one side, so it had to be hemmed. And after that I began to tighten the pillow
I cut off all the unnecessary...
I looked at the result. A little crooked, but oh well, for the first time it’s pretty good, and I don’t need it for an exhibition)))
There are of course some flaws, but it looks pretty good. I climbed into the cradle, sat on the new seat, my buns approved) The pillow turned out to be much more comfortable and softer than the original one. It turned out a little higher and softer due to the foam rubber. In the original, there is burlap on the springs and a small layer of cotton wool and the springs sometimes cut into the buns, here this problem is eliminated in principle
Source
MY MOTORCYCLE
Continuation of the story about the restoration of the IMZ "Ural" motorcycle. This part is devoted to working with the stroller, or more precisely, restoring the passenger seat in the cradle.
As mentioned earlier, the main task set by the owner as part of the restoration of the Ural was to make a new seat for the stroller. To do this, it was necessary first of all to disassemble the old seat, take the original dimensions and try to take into account all the design and fastening features...
In this form, we saw the factory cradle passenger seat, consisting of two cushions with a plywood base. Inside each there is a spring, no different from those that were installed in almost all Soviet upholstered furniture, including mattresses and household sofas.
For softness, the pillows were stuffed with technical wool, stitched to a piece of burlap. The insides have accumulated a huge amount of dirt and dust, and have already begun to rot.
We disassemble the pillows and study the design of the plywood base. The spring is secured with the help of chains, which in appearance resemble toilet chains (the flush handle was usually hung on these).
We are getting rid of the aforementioned springs and retaining chains, since in the new version of the stroller seat we will use foam rubber. It will provide sufficient softness and save several centimeters of volume in the stroller.
Using the measurements taken, we draw mock-ups of the bases and make new ones from 6 mm thick plywood.
We provide holes that are needed in order to fasten the layers of foam rubber and subsequently mount the seat in the cradle.
We prepare a “sandwich” from foam rubber. The main, bottom layer is dense and elastic foam rubber made from recycled materials (the so-called recycled foam rubber), the top layer is softer, “thirty-fifth”, for passenger comfort.
We assemble the resulting foam rubber “sandwich”, attach it to the base and wrap it with film...
... to go from the resulting structures to the workshop, where work on the restoration of the Urals is in full swing.
Meanwhile, the cradle has already been painted and is ready to accept the seat. Let's try it on.
Due to the fact that the new seat was created according to the original dimensions, it fits perfectly into the cradle. This means you can start working on the case.
In the process of thinking about the appearance of the new seat, photographs of various design solutions were studied. As the main reference, we chose one of the options that we liked the most. We look at the buttons that the owner liked:
We draw sketches, estimate the sizes and placement of buttons and send them to the customer for approval of the working version:
The buttons will help tighten the surface of the cover evenly and give the seat an original appearance.
Next, we cut and sew the covers, and also prepare the buttons.
Having selected plastic buttons of the required size, we cover each one with leatherette - they will “work” on the front side of the seat.
We try on the covers with the buttons installed.
Before pulling the cover on, we think over the system for attaching the buttons to the base. We mark the attachment points, after which we pass a nylon cable through the layers of foam rubber and fasten it on the reverse side using pins.
We also mark four bolts for installation - they will go through the plywood base. With their help, the seat will be fixed in the stroller.
We attach plywood bases, stretch and shoot the cover.
Test sessions on the new chair were successful. The chair turned out to be quite soft and moderately elastic.
Once again we go to the workshop and try on the finished seat to mark the holes for mounting the chair to the stroller.
At this point, the work with the seat can be considered complete! We give everything to the masters who work on the motorcycle, and a few days later we go to look at the result: General view with a new chair and seats. The stroller is covered with a new cover. The chair is larger. New seats, which were discussed in the previous post. Lacing used to attach the seat covers. Photo from near-zero mileage as a memory
In total, all the work - from developing sketches to the final photography - took about 1.5 months.
Special thanks to the master mechanics who put the motorcycle on wheels, and of course to the owner for his dedication, patience and creative cooperation!
Source allday.in.ua (moto news)