Anyone who has purchased their first moped rarely thinks about the rules of its operation, maintenance and possible repairs. As a result, parts wear out faster, the moped constantly breaks down and works intermittently.
While the moped is relatively new, problems with the power unit and chassis system are almost invisible. But every day of driving a vehicle, with such an attitude towards it, adds to the likelihood that the moped will break down.
Unfortunately, it happens that young people, either due to lack of experience or because of their frivolity, do nothing if the vehicle is “jamming” and ride it until the moped stops starting.
Do you want to know why a Minsk motorcycle won’t start? All possible breakdowns.
Is there anything that can be done if the moped does not start from the starter? There are many reasons that lead to this. If the reason is serious, then it’s better to turn to experienced mechanics. Well, minor breakdowns are easy to fix yourself. Fortunately, mopeds produced in the USSR are distinguished by their simplicity of design, which also helps with tuning. For example, you can tune a moped yourself without any problems with a minimum of tools in the garage. Of course, you could use the help of an experienced mechanic, but for a novice motorbike enthusiast it is enough to be attentive and ingenious.
How to start a moped in cold weather
There is no snow at all on some highways in the winter, so you can drive on them without any problems. But the “iron horse” is not always ready to start easily at subzero temperatures. Now we will tell you how to properly operate a moped in winter.
The first step in winter is to refuel with fresh gasoline, and also be sure to replace mineral oil with synthetic oil. If you leave it, the mineral oil will always be thick in the engine, and this will have a detrimental effect on its performance. To start, it is better to use a kickstarter rather than an electric starter, since the battery voltage sags greatly when exposed to cold. When starting, add a little more gas than usual, so the engine will not stall. Sometimes, when the oil thickens, some smart people heat it up using a gas burner. In modern vehicles this usually does not happen if the oil is synthetic.
If you follow all starting recommendations, the moped will start at a temperature not lower than -20 degrees Celsius. When you are able to start it, we recommend letting the engine warm up for at least 5-10 minutes.
The wires may vary in color, so you perform all actions at your own peril and risk. Remember, if done incorrectly, all electronics may fail.
to “The scooter does not start from the starter - reasons and methods for solving the problem”
Why do the turn signals and signal on the scooter work but the rest of the electrical equipment does not work?
I installed a new battery, fully charged, but when starting from the electric starter, nothing happens, the starter doesn’t make a sound, there’s not even a click. This is a relay, as far as I understand?
Nver replied: April 29, 2022 at 12:33 pm
Plus the turn signals don't work, and when switching left or right you hear a loud buzzing sound.
I turn on the ignition key, nothing shows on the dashboard, it doesn’t start with the button, but it starts with the crank. Please tell me what could be the reason?
Alexey replied: July 10, 2022 at 10:20 am
Current leakage can be anywhere. It is impossible to find it without special equipment………………………………
Matveich replied: August 6, 2022 at 08:04 pm
I installed the minus-mass switch and now the battery won't go down..
Sequence of starting the Vento Riva II Classic moped from the starter. There are no diagrams or instructions, can anyone tell me.
Hello! Please tell me, today the electric start button on the scooter broke off (it fell out with shards of plastic and the spring flew out). What should I do? Should I buy a new button or the entire device, where is it located?
Hello!. The scooter stalled after replacing the fuel hose from the carburetor to the engine. The reason was found, but the answer to the question is, why did gasoline stop flowing from the carburetor?
Vasya Pupkin replied: May 17, 2022 at 05:26
Replace the scooter's vacuum valve, it costs pennies
The electric starter did not work, when you pressed the starter button there were clicks, it did not try to turn. While driving, when turning on turns, there were also clicks, and the battery quickly discharged. I checked a lot of things, went through the contacts, the problem did not go away, it got to the point where the circuits were ringing with a cartoon, I removed the battery, threw the + terminal from the starter away and started ringing the wiring for continuity and with each other, when the + terminals and - the terminals for the battery are shorted!! Bingo!! Insulation breakdown + terminals on the starter. I removed the soot and the characteristic smell, cleaned everything, removed the insulation between the terminal and the starter, restored the insulation, and everything was ok, the starter turns and starts. (I used self-vulcanizing insulating tape Vulcan brand Zubr, I recommend it, an excellent topic for everyday use). All the best.
What could be the problem, the starter turns but does not start at times, it started when I took the scooter back from repair, they changed the rings. Tell me what's the matter.
The scooter doesn’t start from the starter, but it does with a half-poke from a kick. The piston is new, so it’s not a matter of compression but of sparking. I realized this when I found a problem with non-starting (there was no kickstarter mechanism). I suffered for almost 2 weeks, installed it and removed the Akum from the car completely , connected the booster, it didn’t even grab once during all this time. I fiddled around every day, and couldn’t understand why it didn’t even grab even once with a spark, compression and gasoline in the cylinder present. Finally, I remembered how in the winter we started a dog when the manual one broke starter and began to think what I could come up with. I am a carpenter by profession and it was decided to build something out of wood, fortunately I was in the village and there were no problems with it there) I removed the blower from the magnet and instead screwed on one made of plywood and a piece of wood with a diameter of about 50 -60mm device on which I wound a rope. I wound it and voila, he sneezed like a bitch. In the end it started, there was no limit to the joy. Later I restored the Kia mechanism. But I still never grabbed it from the starter. My conclusions or the starter does not turn the crankshaft or magnet powerfully enough It’s not magnetic enough to form a blue spark (when you turn the starter the spark is white) I hope you finished reading my poem)) Good luck to everyone in your launches)))
The electric starter is powered by a battery and passes through a special relay. Therefore, the first reason why the starter on a scooter does not work is the battery. It may have malfunctioned or simply run out of power. If you hear a spinning sound when starting the scooter through the electric starter, then the problem is with the battery. In this case, check the contact at the terminals. If it's not the contacts, it's the battery. If it is simply discharged, then it is enough to start the scooter with a manual starter and drive several tens of kilometers. This is enough to slightly charge the battery. If it still does not charge, then most likely it is faulty and needs to be replaced.
The large black wire connects: 2 yellow, green and red, where direct current flows. Red goes into the ignition switch, from which by turning the key you can close the system and make it work. On the reverse side, the harness goes to the console, where it is connected to the switches. If voltage has been lost, then you should look at the operation of this harness - does the voltage go out from the ignition switch into this black harness.
How to restore a scooter battery
We will also briefly talk about how to restore the battery on a scooter if it does not charge and is damaged. By the way, restoration can really be carried out precisely when you have a liquid-acid battery. Gel batteries can also be revived in some cases, but most often this does not lead to long-term success.
First, you need to thoroughly rinse the damaged battery with distilled water several times and pour the prepared electrolyte into it. We check the density of the electrolyte - normally it should be 1.27 g/cm³. Now you need to charge the battery for 10-12 hours.
After charging, connect any high-power power source to it and discharge it completely. We repeat the process at least ten, maximum fifteen times. This is exactly how it is recommended to “bring to life” an old acid battery
It is important to remember that you cannot leave it completely discharged for a long time in between charge-discharge cycles
Owners of mopeds, who thus save on buying new batteries, claim that after the battery has been restored, it can work for about a month and holds a stable charge. In some cases this can be quite useful.
As we have already said, restoring a gel battery is often a thankless task. Most likely, you will not achieve a positive result.
In order for your scooter or moped to last as long as possible, you should not constantly ride it without a battery. It is better to purchase a suitable power source and provide it with proper care from time to time, thereby saving both the vehicle and its battery. It never hurts to know how to start a moped in emergency situations, but in order to avoid unpleasant consequences, this should not be abused.
And of course, for those who are limited in financial resources, we can recommend purchasing an inexpensive liquid-acid battery: it will require care, but it is not as complicated as it might seem at first. In addition, it is much more realistic and easier to restore such a battery on occasion than an expensive gel battery, which places higher demands on its owner.
Running in the Alpha moped
Hi all!
In this article I want to touch on the following topic - the running-in of the new Alfa moped. After purchasing a new moped, the owner is faced with the question of how to properly break in the engine. This procedure must be carried out on absolutely any equipment, since it significantly extends the life of both the engine itself and the moped as a whole. Four-stroke engines have a number of features that should be taken into account during break-in.
Most manufacturers indicate a minimum value of 500 km, but to achieve the maximum effect from break-in, you should drive at least 1000 km in a gentle mode. Only after the odometer shows the coveted number can you safely turn the throttle to full.
During break-in, not only the piston group is ground in, but also the bearings and gears. As a result of controlled wear, the necessary technical clearances appear, which at the moment of maximum load and overheating allow the motor to function normally.
How to start a scooter with a drill
This is a fast, reliable and safe way. It seems to an amateur that the scooter engine is complicated and it is better not to mess with it. This is true, but if you overcome the fear of breakdown and follow the recommendations, everything will work out. For an experienced owner, there is no problem even starting the Izh Jupiter 5 without a battery, even with a drill or a screwdriver. They write that this method is only suitable at home or in a garage where there is access to an electrical outlet. No one will carry a full set of tools with them, especially on a scooter. But, in fact, cordless drills that do not require connection are now widespread. So, even at the dacha, if the battery runs out, there is a chance to start the iron horse.
- First of all, we free access to the engine fan. If the drill only rotates clockwise, then we do it from the generator side. If we have a screwdriver, then it is not forbidden to use the variator, if necessary.
- You should find the fan axis. Most likely, from the outside it will resemble a nut.
- We select a suitable head.
- After making sure that the bit holds the “nut” firmly, we fix the head to the drill. If you have an extension cord available, use it. If not, we use the traditional method. To do this, insert a bolt of suitable size into the bit so that its leg can be clamped with a drill. If you have time, press the bolt to the head with a nut, and grind the end of the leg on three sides so that the drill does not slip through. But the minimum is enough - a head and a bolt clamped with a drill.
5. Turn on the ignition.
- We attach the head to the nut. If the operation occurs from the generator side, then the drill should rotate clockwise. If it’s from the variator side, then it’s against it.
- We are trying to start the scooter with a drill. We crank the engine. The two-wheeled friend should start.
Method for Alpha mopeds, Japanese mopeds and scooters
The method is to disable the switch, but it only works on scooters and mopeds from Japanese and, sometimes, Chinese manufacturers.
To disable it, you will need to remove the ignition switch protective shield. Under it there are 4 wires according to the standard, white, black, red and green - these wires supply power. The remaining wiring is the switch; after disconnecting it, the moped can be started using the kickstarter.
Attention!
Be careful as removing this wiring may turn off all other wiring on the moped (turn signals, headlights, etc.)
You can see more about this method in the video:
Nuances concerning both schemes
If you connect the security system as discussed above, you can get a workable option, perhaps without remote start. In general, an alarm system on a scooter can be installed in different ways. For example, if you don't need engine lock, just don't cut the wire and connect the "gray" and "pink" cords. You don’t have to connect the siren or the scooter’s turn signals (at the owner’s choice). Further, all the schemes that have been considered will only become more complicated.
We will equip the motor with remote start
The “blue” wire coming from the signaling connector can supply voltage to the relay that turns on the starter. Let's figure out what to connect it to.
There may be several wires coming from the “2” button module, if it is present at all. One of them is connected to a standard relay, and when pressed, the following may appear:
- + 12 Volt. Then, connect the cord itself to the “blue” signal wire (T-shaped connection);
- "Mass" potential. If you need autostart, you will have to buy a relay, the normally open contacts of which are connected between ground and the found cord.
When installing an additional relay, turn on the winding between the “blue” wire and ground. In this case, the signaling electronics must be protected with a diode.
“Chapter 1” looked at how to install an alarm on a scooter with a 4-pin and 2-pin ignition. In the second case, for example, remote start is easier to implement:
The numbers here indicate the relay connection points:
- Contact 30;
- Contact 87;
- Pin 85 (diode cathode);
- Pin 86 (diode anode).
As you can see, no new connection points will be added. The only thing is that you have to stretch the cord from ground to pin 86.
The last paragraph does not apply to any equipment produced in China. Simply, Nexus, Racer, Tachilla and many other scooters use a 4-pin ignition.
Subtleties of connecting to the switch
Let us immediately note: this chapter only talks about the first circuit, that is, the 4-pin ignition. As you remember, to connect the signaling you need to break one wire going to the switch:
The cord in question is marked with an arrow. Finding it in most cases is not difficult:
Here there are 6 cords connected to the switch, and their markings are clear.
Sometimes, at the same time, the switch module is a miniature unit, and it can be difficult to even find its location. Which is true for most Racer models and many others.
It’s hard to guess, but the switch module here is the part numbered “5”. And sometimes, in difficult cases, a digital switch is used, to which a connector with dozens of cords is connected. We have seen such an example in the video. Good luck.
Scooter starter malfunctions: identifying and fixing the problem
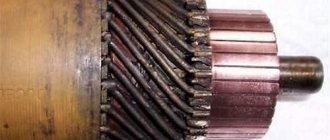
The presence of a starter in a scooter, unlike a car, is not mandatory. However, it makes life much easier for the driver, adding a little comfort while working. Everyone knows that the starter works thanks to the battery, and it consists of:
- brushes;
- covers;
- anchors;
- support washer;
- two springs;
- o-ring;
- metal stator housing.
The principle of its operation is no different from any other starter, although some breakdowns may differ from the usual ones.
Initially, you need to exclude battery discharge from the list of possible breakdowns. If this were the case and the battery suddenly became low, you would hear a peculiar sound when you press the “start” button. This sound indicates that the starter is not engaged with the bendix and is running without load, idle. If you still hear this sound when starting up, do certain things:
- you need to check the terminals and clean them if necessary;
- inspect the wiring for damage;
- Check the condition of the battery (voltage level), recharge or replace it if necessary.
In most cases, these points will help you solve the problem with your scooter.
However, there may be other breakdowns, which in themselves are considered more serious when compared to a dead battery. We are talking about audible clicks when the starter operates. This is a deeper problem and it is necessary to look for its causes.
Causes and solutions
Step 1: With the ignition on, try honking the horn. If everything worked out and you could hear a loud and ringing sound, everything is fine, you can start the engine. If the sound was very quiet or could not be heard at all, there were problems with the battery or power supply (recharge the battery, clean the terminals).
Step 2. When you press the engine start button, you hear the sound of the relay turning on. If yes, then try bridging the power terminals of the relay. If there is no sound, disconnect the relay from the power supply, and then use the wires to connect the battery and starter.
Step 3. Once you have connected the starter, it works fine. If yes, then you just need to replace the relay. If not, check the contacts of the start button, the wires from the starter, and replace all worn parts.
Step 4. If, after you bridge the power terminals of the relay, the starter begins to operate normally, replace the relay. If not, then you are faced with a more serious task: you need to disassemble the starter and check the condition of its parts (brushes, windings and springs).
Problems
Other possible reasons: - the mass does not contact well; — the switch is faulty; — the spark plug is poorly cleaned or the air filter is not working properly.
In any case, in such a situation, it is recommended to take the unit to a service station to show it to the technician. Or you can try to fix it yourself. For example, cleaning a carburetor is not that difficult if you have mechanical and electrical knowledge.
There can be worse breakdowns, for example, the pistons with rings may be faulty. Or the valves may need to be adjusted, and this is not a very simple matter for a novice motorcycle owner. The problem may also be that you start it cold and the oil has thickened. You may also need to set the ignition parameters correctly.
But you can speed up this process by drying the candle on a gas stove or burner. If you don't have them on hand, you can use a hairdryer. The dried spark plug needs to be put back into the cap and checked to see if there is a spark by placing the spark plug on the unpainted part of the engine and turning the kickstarter. If there is a spark, it is strong and powerful, blue in color, then everything is in order with the candle.
If the spark is weak, yellow or there is no spark, then you need to replace the spark plug with a new one. After installing the new spark plug, we try to start the engine. If it doesn't start, then the problem is not with the spark plug.
If there is no spark, it is worth checking the serviceability of the spark plug cap. In this case, you need to unscrew the cap from the wire and bring the wire to the metal part of the engine. Turn the crankshaft with the ignition on. If there is a spark, we eliminate the problem with connecting the cap and wire. And we try to start it again.
But if there is no spark on the wire, then a so-called “current leakage” is possible - a situation when somewhere a wire is exposed and touches a metal part of the engine. In this case, you need to find and fix this problem.
If everything is in order with the wire, but there is no spark, then more complex breakdowns may occur: - a problem with the ignition coil; — switch malfunction; - problem with the Hall sensor.
But what to do if everything is fine with the spark, but the engine still won’t start? There may be a problem with the fuel system. In this case, there may be two options? either at the moment the engine starts, too little fuel is supplied, or, conversely, too much. Then you need to take it apart and look? where and how gasoline flows. Do not forget that the tank may be running low on fuel and the engine will not start because of this.
Carburetor clogged
The symptoms of the problem are the same as in the previous case - you can start the moped, but then it stalls. That is, there is a spark, there is gasoline, but the moped does not start. In order to check whether the carburetor has broken down, you need to check how gasoline flows from it into the cylinder.
Take the spark plugs and wet their contacts with gasoline. Then screw the spark plug being tested into the cylinder and try to start the moped. If the bike starts this way, it means the carburetor will have to be repaired.
If you are on the road and need to quickly get to your destination, you can clean the supply hoses by blowing them with a pump. If this does not work, then you need to completely clean the carburetor.
Tuesday, February 2, 2016
Electrical diagram of a Chinese 4t scooter 139qmb
Chinese scooter wiring diagram
Ignition wiring diagram for 4t scooter 139qmb.
In scooters with alarms, problems with ignition occur when the relay responsible for turning off the ignition fails. I had such a case. The scooter stopped starting. Using a brute force method, I replaced everything from the generator to the spark plug and the switch and ignition coil, but the spark never appeared. It turned out that the contacts of the same relay in the signaling system had burned out. To exclude this option, you need to remove one connector (the one with two wires) from the switch. On one wire relative to ground, the high-voltage winding of the generator should ring 350-450 Ohms. On the second one, ground-to-ground should ring when the ignition is off and not ring relative to ground when the ignition is on. This way you will prevent the alarm from breaking when you look for the reason for the lack of spark.
Connection diagram for a generator and a standard voltage regulator for a Chinese scooter
Source
Ignition coil
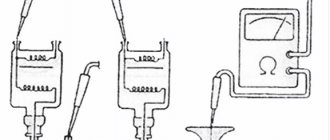
If everything looks intact, check the ignition coil. To do this, disconnect it (remembering how the wires are connected) and use a multimeter to check the resistance of the windings.
The primary winding is made of thicker copper wire. Its terminals are connected to two terminal connectors at the end of the coil. It has a small number of turns and therefore its resistance is low, approximately 0.5-5 Ohms. One wire of the coil is connected to ground - you need to check it, attach one multimeter probe to the nearest metal part of the moped, and the second to the coil connector. The resistance should be close to zero.
The high-voltage coil consists of several thousand turns of very thin copper wire, so its resistance should be on the order of 2-5 kOhms. The resistance must be measured between the coil contact connected to ground and the core of the high-voltage wire.
In this way, we will check the coil for a break, but without special equipment we cannot check for other coil faults, for example, an interturn short circuit, so we will leave the coil alone for now, also because a coil without visible mechanical damage is most likely working.
How to start a moped from a pusher
While there are two main ways to start an engine, there are many other options as well.
With a rope
The first step is to get to the generator, which is located on the back side, in any way that is harmless to the equipment. We find the impeller there - you need to wrap a rope around it 5 times clockwise, to do this you can tie a knot at the end of the rope and insert it from the very beginning between a pair of blades. And then you will need to pull it hard, you may not succeed the first time, so most likely you will have to make several attempts.
You can learn more about this method from the video:
From the pusher
People have the opinion that if a moped has a CVT, then it cannot be started in this way. In fact, this is just a myth; experts have carried out tests many times - nothing bad will happen.
For this method to work, you need to get to the clutch bell; to do this, carefully remove the protective cover of the variator. Next, we will need to lock the bell and clutch together. This is done as follows: take the nut from the variator protective cover, and then insert it with force so that it is fixed there. To implement this method you will definitely need an assistant. He will push the moped, and you must press the variator strap at the right time during acceleration, so you will be able to turn the wheel. When the engine starts, the nut will fall to the ground by itself, so you won't lose it - no need to worry about that.
A little about driving a moped
Driving a moped is not that difficult; anyone can do it. On the right side there is a lever to control the front brake, and on the left side there is a rear brake. The instrument panel contains auxiliary controls for the moped.
There is a handle on the right side, you can use it to add gas. This is done by rotating the knob; turning it towards you adds gas. There are also additional switches, for example, to turn on the lights and turn signals. There are also buttons for the horn and starter.
Start setting up the ignition on a moped
Using a strobe light, you will need to check for the presence of measuring marks on the ignition timing. Thanks to this, you can find problems with the moped in advance, so as not to disassemble it too much. There will be two wires coming out of the strobe: the first is connected to the vehicle's power source, the other must be connected to the spark plug (this is the induction wire).
Strobe with wires
To complete the task, you need to warm up the engine, and then:
- start the engine to get a spark (the strobe light will light up);
- the light received from the device must be directed to where the measuring marks are located;
- if the risks are level, then there is no need to adjust them. Otherwise, you will need to perform other operations that require more time.
The result of this operation is a reduction in costs in terms of spare parts that may not be needed. If you don’t have a strobe light, borrow one for a short time from those vehicle owners who have one, so as not to spend money on a tool just for one use. To find the measuring marks, you will need to inspect the generator flywheel along with the flywheel housing - they can be easily found. The main difficulty lies in the non-standard arrangement of marks on Alfa brand mopeds. Otherwise the process won't be too complicated.
Video on how to correctly set the marks and ignition in general:
The second reason if there is no spark on the Alpha moped is the ignition coil, or switch
Checking the switch
The switch is in an accessible location. You just need to remove the right side decorative cover on the moped. Disconnect the switch from the wires and check with a multimeter. If such a device is not available, then we go to the store and buy a new switch. Fortunately, it costs a couple of hundred rubles.
Similar actions with the ignition coil.
Ignition coil (Bobbin)
How to start a scooter on the road
So, we already skillfully start the engine using a drill. But on the road the drill is useless. With a minimum of tools and a small rope, you can fix this problem.
- First, you should get to the same fan.
- Next, wind the rope clockwise. As a result, it should look like this: the end of the rope goes towards the exhaust pipe from below the fan.
- Turn the ignition key to the on position.
- Pull the rope to turn the engine over. Provided there is good compression, a working fuel system and ignition system, the scooter will.
There is another way, which will certainly seem crazy to most - you can always start the scooter from a pusher!
Is it possible to start a scooter from a pusher?
Those who know even a little about the theory of the structure of a scooter's gearbox will confidently say that it is impossible to start a scooter from a pusher. After all, there the clutch is not controlled by the driver of the scooter using a handle and a cable, but it is controlled by centrifugal force. Centrifugal force, in turn, occurs only when the engine is running - this is a fact. That's exactly how it is!
If you think a little more broadly than the usual theory, you can come to an unusual conclusion: the engine can be turned by the wheel if the clutch is stuck. But how to do that? Let's find out.
If you have a 8 or 10 socket and a wrench, you can remove almost any clutch cover. Under the same cover is hidden the crescent of the winding mechanism. By removing this cover, we gain open access to the clutch. It is on the right - the right one is made of parts connected by a belt.
In this centrifugal clutch we see two parts we need - the bell and the clutch itself. The clutch has holes in the housing that are smaller in diameter than the holes in the bell. So, in order to jam the clutch, the bell and the “clutch” must be closed together. This problem is solved by inserting the bolt from the kick starter cover into these two holes. The holes must first be aligned with each other.
An important condition is the presence of a second person. The process of “starting a scooter from a pusher” feels like pushing a heavy motorcycle in first gear. The scooter wheel will only turn under heavy load from above - this is why a second person is needed.
Turn on the ignition, push the scooter and at the right moment you will need to jump on the seat to get the wheel to turn. Eventually you will start the scooter.
Checking the ignition timing
If there is a spark, fuel is supplied, compression is fine, but the moped still does not start - the ignition timing may be off.
On 139fmb engines, which are installed on alpha, the ignition timing is not adjustable. It is rigidly determined by the position of the flywheel on the crankshaft. The engine crankshaft on the generator side has a conical surface on which the flywheel (also known as the generator rotor) is tightly seated. The correct position of the flywheel is set using a key that is inserted into the crankshaft keyway.
You can check this visually (remove the generator cover, unscrew the nut securing the flywheel and see if the grooves match). But the groove on the crankshaft cannot always be seen (depending on the specific instance), so there is a more reliable way: buy or borrow a strobe light from someone (many car repair shops have one), unscrew the plug on the generator cover and check that flashes occur at the same time the label || appears in the window.
How to start a scooter without a key and outside help?
You will need:
#1
Scooters have become very popular due to the fact that they do not require registration and can be used without a driver's license. The scooter is also a very maneuverable form of transport, which provides very good mobility at its relatively low cost.
#2
The moped starts like most types of transport - with a key. But due to loss or breakdown, it is not always possible to use it. Therefore, drivers need skills on how to start a scooter without a key. Naturally, the first thing you need to do is make a new set of keys.
#3
To do this, take the moped to a workshop where they will take measurements for a new set of keys. If you cannot transport the moped, then do a complete disassembly of the lock and collect all its parts down to the smallest. From such a set the master will also be able to make a new key. If you cannot restore the key, you can always purchase a new ignition switch. In general, it is not as difficult as adjusting the valves on a scooter.
#4
Drivers have difficult circumstances: sometimes with a broken or lost key it is not possible to contact a mechanic, and sometimes the electric starter can fail, so you need to be able to set the moped in motion without a key
Such problems can occur even in a deserted place, and their solution becomes a vital problem. Scooters are known for their simple designs and the ignition mechanism is no exception.
Therefore, you can use the screwdriver method, which is simple and you will not need to know how to paint a scooter, because the lock should remain intact.
#5
In order to use a screwdriver, you must first get access to our lock. Depending on the design of your moped, remove the apron, basket or body trim. Therefore, you need to unscrew the screws that hold the casing, in most cases these are two screws on the top and bottom, less often there may be latches that press the same screws. Learn the process of removing the trim, because this will help you on how to make music on a scooter
After unscrewing the cover, carefully lift the panels that are located above the central part of the lock.
#6
Having reached the scooter lock, use a screwdriver, flat and the right size for your moped, and carefully insert it into the slot of the ignition switch. In this situation, the screwdriver should serve as a key. To start the engine, turn it, but you need to be careful in this, because you can reach the limit position in which the moped can start on its own
To do this, you don’t need to be particularly clean in the problem of how to change a belt on a scooter, but you just need caution and endurance
#7
In general, the screwdriver method is quite easy, but it does not always work, especially on anti-theft scooters. It is also possible that the ignition key may break. Therefore, to avoid such troubles, make a spare key in advance.
What to do if the scooter does not start when cold
Every scooter owner may encounter this problem: a pre-heated engine will work normally, but the scooter will not start in cold weather. Making a launch becomes extremely labor-intensive, or even impossible.
If the scooter doesn’t start well when cold, and you can’t do it with either the kickstarter or the electric starter, then it’s a consequence of problems with the power supply or ignition system. Each malfunction requires special attention, so we advise you to follow the instructions in this article.
Based on the identified problem, troubleshooting a scooter in cold weather takes from a few minutes to a couple of hours.
The moped does not start well when cold due to the lack of a spark in the spark plug. To resolve the problem, you must do the following:
- you need to unscrew the spark plug and visually inspect it for damage, check the electrodes, if they are damaged, the spark plug needs to be replaced. If the spark plug gets wet, remove it from the cap and dry it, then close it back into the cap and watch for a spark. There are 5 possible states of the spark plug: good, wet, contaminated with soot, overheated, contaminated with oil;
- connect it to the ignition coil using a wire and place it on the cylinder;
- When rotating the crankshaft using an electric starter or kick starter, test the spark on the spark plug. Remember that you need to start the ignition on the moped and be careful when testing the spark, it is not recommended to do this with bare hands, protect yourself with rubber gloves;
- during rapid cranking of the crankshaft, a continuous and strong blue spark should appear in the candle; if its color is yellow, or it appears very weakly and every once in a while, then replace the spark plug and test a new one;
Other possible reasons for the lack of spark after inspecting the spark plug
If your Alpha Moped does not start, find out the possible reasons and further steps to action.
Oxidation of contacts
The appearance of the spark plug may correspond to the norm, but the spark still does not appear, which means that a discharge test needs to be done. If there is no spark again, then test the scooter’s electronics for contact oxidation.
No spark on the wire
This may be a consequence of current leakage phenomenon. It is when a metal part of the moped comes into contact with an exposed high voltage wire. The conductor may have been water, which could have accumulated in the area of exposure during active trips through puddles.
You need to carefully inspect the wires running from the spark plug to the ignition coil, and if you do not find any disconnection or damage, then you can assume a critical breakdown in the ignition system:
- damage to the ignition coil;
- ignition sensor malfunction;
- switch failure;
Each of these parts causes a lack of spark and intermittent operation of the engine, so before you buy anything, find out what exactly is wrong and try to borrow a working part to check from your friend.
For many motorcycles, a malfunction - the scooter does not start well - is detected and corrected immediately in the first stages and the engine starts properly, otherwise you should look for problems further.
Important! It is better to stay as far as possible from the spark plug hole at the top of the cylinder, because fuel may splash out and ignite from that place.
Effect of cold weather
The reason why the scooter does not start in cold weather may be a problem with the spark plug cap or its connector. In such a case, the cap is disconnected and the wire is brought a couple of millimeters closer to the metal element of the engine to rotate the crankshaft.
Vehicles in sub-zero temperatures are capable of passing current due to the contact of metal parts with exposed wires, as a result of which the scooter has difficulty starting in cold weather.
Failure in the power system
If you have already tested the occurrence of a spark and the performance of the ignition system, then the reason why the scooter does not start when cold may be hidden in a malfunction in the power system. This may mean either an excessive amount of gasoline supplied or a lack of it. The first thing you need to pay attention to is the following elements: fuel valve, gas tank, starting enrichment and gasoline pump.
Older models have a fuel tap directly under the gas tank. You need to disconnect the carburetor hose and open the tap, and then if the tank is completely full and gasoline flows out of the hose, then immediately begin inspecting the carburetor. If gasoline does not flow out, then the fault may be in the lines, or in the tap itself; you need to inspect them.
You might be interested in how to make an ATV with your own hands. A detailed description of creating off-road equipment from a motorcycle or car!
In new models, the fuel tap is automatic, operating due to vacuum. The fuel tank here is mounted above the carburetor, and the valve is a device consisting of a membrane, which often fails due to contamination and other things. This type of tap cannot be repaired and requires replacement.
To test the starter enricher, remove it and connect it to a 12v battery. Observe the needle; if it is working, it should smoothly exit the body; if this does not happen, it is faulty.
If all of the above elements are fully operational, proceed to disassembling the carburetor and cleaning it.
If you are experiencing difficulties with repairs, do not refuse the help of friends or contact technical service. It is better to entrust the matter to specialists than to buy unnecessary parts and spoil the existing ones.
Rate this article
www.real-biker.ru
How to start a Japanese scooter without a key
If necessary, you can start a Japanese scooter without a key by performing some simple manipulations that are accessible to everyone. On Honda Dio scooters and other similar models. One option is to disconnect the ignition wire from the scooter's switch. In most Japanese scooter models, the switch is located next to the battery. The wire that needs to be disconnected is usually black and white. After switching off, the scooter can be started using the kick starter. In Honda Dio scooters, the ignition can be set to 3 contacts; when disconnecting the wires from the lock, you will need to connect the red and red-black ones. In order not to break the wires, you can use a jumper in the form of a copper wire to connect them. On Honda Dio 34-35 scooters, in addition to the jumper described above, you will need to install another one between the pink and red-black wires. This is due to the fact that voltage must be supplied to the pink wire through a stabilizer installed in the ignition switch.
Various models of scooters can usually be started using a flat-head screwdriver, which will need to be driven into the lock and turned. But in this case, you will have to change the ignition switch.
Ideally, a fully functional engine should start within a few seconds. After starting, leave the engine idling for about 4-5 minutes (to warm up). On scooters with a manual enrichment, keep the lever pressed while warming up, and release it after warming up.
It happens that a fully functional scooter does not start the first time - no big deal, after the first attempt we wait two or three minutes and try again. If you start the scooter in cold weather or early in the morning, then during the start, try to cover the air intake hole in the air cleaner housing with your hand or a rag; this action usually allows you to start the scooter confidently even in sub-zero temperatures.
We have decided on starting the scooter from the starter, now let's move on to the tricks of starting the scooter using the crank (kickstarter).
We put the scooter on the center stand, insert the key into the lock, and don’t turn on the ignition yet! We turn the engine three or four times with the crank (pump), not forgetting to press the enrichment lever (if your scooter has one), then turn on the ignition and start the engine.
On some scooter models, to start them with the crank, you must press the brake lever, otherwise the kickstarter mechanism will be blocked. On the vast majority of scooters, you do not need to press the brakes to start using the crank.
Checking the presence of a spark and the condition of the spark plug
This is the simplest check that every moped owner can carry out, having only a spark plug wrench or a spare spark plug on hand. Moreover, if you unscrew the spark plug from the engine, you can at the same time assess its condition and understand by the color of the carbon deposits how correct the working mixture is being prepared by the carburetor.
So, if you unscrew the spark plug from the engine, pay attention to the carbon deposits that cover the central electrode. The carbon deposits should be brown or light brown in color. If the carbon deposits are black, this indicates that the mixture is too rich, or the spark plug is faulty, or the engine is “eating” oil. Perhaps this is the reason for poor engine performance.
Also pay attention to the presence of liquid on the candle. If the spark plug is “wet”, that is, there is gasoline on the spark plug, then gasoline still enters the combustion chamber, but does not ignite. There are at least three reasons why a spark plug may be wet:
- trying to start the engine with the ignition turned off - if you turn the engine with the kick starter for a long time, the spark plug will simply flood with fuel and it will not be able to work normally. To solve the problem, the candle needs to be dried, for example, heated with a lighter.
- The spark plug is faulty - if the spark plug insulation is broken or the gap is broken, the spark plug will not work normally. Only replacing the spark plug with a known good one will help here.
- ignition system faulty
Now we put the tip on the spark plug and press it to a metal surface, for example, to the engine head, turn on the ignition and turn the engine with the kickstarter. It is more convenient to check the spark together, so that one person holds the spark plug and the other turns the engine. But in principle, one person can handle it. Be careful - there is high voltage at the center electrode of the spark plug.
If there is no spark, then the ignition system is at fault. Check all wires for breaks or shorts to ground. All electrical wiring connectors must be connected. If possible, replace the ignition coil with a known good one. Check if the generator coils are damaged. You can read more in the article “The moped has lost its spark, what should I do?”
If you can’t figure out the wiring, contact someone who knows how to do it.
If there is a spark, then most likely the problem is in the power system. Screw the candle into place and continue.
We use kickstarter
The process of starting through a kickstarter (winding claw) looks somewhat different, even if the start is done cold. Firstly, you definitely need to set the side step. We insert the ignition key, but do not turn it, but put it in the “off” position. Now you need to turn the kickstarter foot several times to bleed the engine. Then we turn the ignition key. We press the brakes and give a little gas. And once again we turn the engine through the foot? Only now the scooter should start. That's all. Don’t worry if the starter spins for a long time when you start it cold. This is the usual scheme for starting an engine via a kickstarter. Before such a start, do not forget to set the footrest for your safety.
Other possible reasons: - the mass does not contact well; — the switch is faulty; — the spark plug is poorly cleaned or the air filter is not working properly.
In any case, in such a situation, it is recommended to take the unit to a service station to show it to the technician. Or you can try to fix it yourself. For example, cleaning a carburetor is not that difficult if you have mechanical and electrical knowledge.
There can be worse breakdowns, for example, the pistons with rings may be faulty. Or the valves may need to be adjusted, and this is not a very simple matter for a novice motorcycle owner. The problem may also be that you start it cold and the oil has thickened. You may also need to set the ignition parameters correctly.
But you can speed up this process by drying the candle on a gas stove or burner. If you don't have them on hand, you can use a hairdryer. The dried spark plug needs to be put back into the cap and checked to see if there is a spark by placing the spark plug on the unpainted part of the engine and turning the kickstarter. If there is a spark, it is strong and powerful, blue in color, then everything is in order with the candle.
If the spark is weak, yellow or there is no spark, then you need to replace the spark plug with a new one. After installing the new spark plug, we try to start the engine. If it doesn't start, then the problem is not with the spark plug.
If there is no spark, it is worth checking the serviceability of the spark plug cap. In this case, you need to unscrew the cap from the wire and bring the wire to the metal part of the engine. Turn the crankshaft with the ignition on. If there is a spark, we eliminate the problem with connecting the cap and wire. And we try to start it again.
But if there is no spark on the wire, then a so-called “current leakage” is possible - a situation when somewhere a wire is exposed and touches a metal part of the engine. In this case, you need to find and fix this problem.
If everything is in order with the wire, but there is no spark, then more complex breakdowns may occur: - a problem with the ignition coil; — switch malfunction; - problem with the Hall sensor.
But what to do if everything is fine with the spark, but the engine still won’t start? There may be a problem with the fuel system. In this case, there may be two options? either at the moment the engine starts, too little fuel is supplied, or, conversely, too much. Then you need to take it apart and look? where and how gasoline flows. Do not forget that the tank may be running low on fuel and the engine will not start because of this.
What could cause
The reasons why mopeds no longer start may be the following:
- fuel system
- ignition system
- compression
- engine oil.
Each of these categories includes many details, which we will learn about below.
Fuel system
Nothing to burn, or lack of fuel in the combustion chamber, is the main reason why the moped will not start. Below are a number of common breakdowns and ways to fix them.
- Low quality fuel. Diluted gasoline or old fuel will not allow the engine to start. A particularly pressing problem is when the delta or alpha does not start after winter. The fuel in the tank has lost its combustible properties and may not even ignite.
- Faulty fuel valve. If fuel from the tank does not flow into the carburetor, the fault lies in the fuel tap. If you have a scooter, then immediately change the tap, first checking the presence of the supplied vacuum. You can try to clean the faucet on a moped.
- A dirty fuel filter can prevent gasoline from entering the carburetor. The filter must be clean.
- Carburetor. If the moped starts and stalls, there is an 80% chance that the cause is in the carburetor. To clean it, you can use a carburetor cleaner, but the safest thing to do is disassemble it and wash it yourself. The shut-off needle must be free of defects and the fuel jets must not be clogged!
- A clogged air filter is another reason why the moped has difficulty starting. After all, for an engine to operate, it requires not only gasoline, but also air. Remove the air filter and try to see if the moped starts. If it starts, then the problem was in the air filter - clean it.
Advice! Only the serviceability of all components of the fuel system will ensure normal engine operation.
Ignition system
There is nothing to set fire to, or the lack of an ignition spark is the second most important reason when a moped has trouble starting
Pay special attention to the following details:
- Candle. First of all, make sure there is a spark. Unscrew the spark plug, put the tip on, and then rotate the engine with the starter, pressing the electrodes of the spark plug against the metal of the engine. If there is a spark, it means that the entire ignition system is working properly. Otherwise, clean the spark plug, warm it up and try again. In case of failure, we look for a deeper reason.
- High voltage wire. If the wire is exposed, at least in one place, it will pierce the body, and the spark plug will not work. Insulate the wire or replace it with a new one.
- Ignition coil. If the coil does not work, there will be no spark. The ignition coil is checked using a multimeter. It is necessary to measure the resistance on the primary and secondary windings of the coil. The optimal resistance value can be found for each moped individually.
For example, the primary winding of the ignition coil (between the two coil contacts) of a Delta or Alpha moped should have a resistance in the range of 0.1 to 1.0 Ohms. The secondary winding (from the spark plug contact to the end of the wire) with a spark plug cap should resist with a force of 7-9 kOhms, without a cap - 3-4 kOhms.
If there is no resistance in the secondary winding, measure the resistance of the wire to ground. It should be within 2.5 kOhm.
Battery. The reason that a moped does not start when cold is often a discharged battery. To get a good push-button start, be sure to install a new battery in the scooter.
Compression
Motorcycles, scooters and mopeds start successfully from the stand only if there is sufficient compression. Compression above 7 kg per cm3 is considered sufficient. The optimal value is 10 atm.
You can measure the degree of compression with a compression meter. This device is inserted into the spark plug hole and then the motor rotates. The compressometer scale will show the exact value of the compression ratio.
Advice! To ensure that your Alpha starts like a clock, change the piston group parts on time, ensuring the necessary compression.
Engine oil
This reason can only be considered in the winter season. The engine oil may thicken and prevent the crankshaft from turning. In this case, you should warm up the engine crankcase with a heater so that the oil becomes less viscous and the shaft can rotate.
Comments • 70
Such a question of connection or pinout of a voltage relay with 5 wires
BURNED 3 CDI SWITCHES STILL THERE ARE OPTIONS I HAVE LEASING FOR 1000 PIECES
Oh Sony Ericsson was great!
Let me know where you can buy a constant point commutator for a 165Fmm motor.
Is there some kind of magneto for 139QMB? Show me please
And I have a Chinese viper. I have a spare engine. I put it on a stand next to the moped and spin it with a hammer drill. Convenient especially for tuning
Guys.. Please help. The situation is very strange, I’m ready to call an exorcist.. Engine 139fmb. Yamasaki leader 2. New coil with spark plug. Switch. Generator stator.. Ignition turned on. I connect the switch according to the diagram
Attention, the switch is powered by a high-voltage generator coil. What is the point. There is no spark when connected correctly
A spark appears only if you lean the muffler wire against the frame. Just lean it against it, don’t screw it in; if you screw it in, there won’t be a spark. When the engine stop wire is wrapped around the frame, a spark appears due to shaking. But at the same time, the spark is naturally not constant and is not enough for full engine operation. Tell me.. What to do. Why does the engine stop work like that?
Hello, please help! My switches are burning one after another, without even driving a kilometer, I did everything 100% correctly on the wiring according to the video, how to start the engine without a moped, BUT I don’t have a terminal for the switch, as in the video itself (the wires are stupidly stuck in ). Could this be the reason for the fire?! I have a Honda dio 27, and a switch (with AC) Thanks
Source
Let's start
The scooter engine start circuit is quite simple, understandable and universal, even in cases where the scooter starts when cold.
First you need to insert the ignition key and immediately turn it. Then hold down the brake lever. Give a little gas and press the start button. It is important not to forget to remove the scooter from the side stand, since on some branded and Japanese models, due to the unremoved side stand, a special sensor may be triggered when the engine starts, which will prevent it from starting from the starter. If the scooter is technically in full working order and it’s not very cold outside, then literally after a couple of seconds the engine should already be rattling peacefully, even if you start it when it’s cold - and you’ll be able to go about your business after just a few minutes of warming up the engine. Why is it important to wait? Because when driving when cold there is too much load, which is bad for the engine. [ads-pc-1]
Preparation for purchase
It is advisable to drive as many hours as possible before purchasing your iron horse - and not only on smooth asphalt. It is worth organizing rides along forest roads in order to learn how to stay in the saddle in extreme conditions. You will need to pass a category M license. Obtaining this category is allowed from the age of 16 on the territory of the Russian Federation. And you can go on your first trip on your own motorized vehicle.
Moped license - category M
The undeniable advantage when choosing a moped is its efficiency - consumption is about two liters per hundred kilometers, with a gasoline tank capacity of 4 liters this is quite acceptable. A definite plus when deciding to own an Alpha. And even if you have to ride throughout the warm season, the efficiency of a moped will allow you to partially save your budget. "Alpha" has five horsepower at a maximum speed of 7500 per minute.
How to check, replace
Checking is carried out using a multimeter. This device is used in electromechanics and is sold in hardware stores. There are models without a sound signal - they do not differ in appearance, and therefore you have to ask the sellers. Without a sound signal or “ringing” it is inconvenient to constantly look at the panel, but it is possible to carry out the check. Sequentially, starting from the battery to the ignition circuit and generator, all the wiring of the Alpha moped is checked. The multimeter has two probes: red and black. Red ones need to touch the plus, and black ones need to touch the mass or ground.
READ How to connect contacts on your phone
Thus, the wiring of the Alpha moped is a complex and vulnerable place for this vehicle. However, this is exactly what will help toughen the motorcycle owner in the face of eternal breakdowns and make him a real ace in the electricity of his motorcycle.
Any scooter, be it Japanese or Chinese, has the ability to start from an electric starter or a kick starter. If the first one doesn’t work for you, which is a very common problem, kickstarter comes to the rescue. Let's look at the reasons for its breakdowns.
Starting a scooter “from the pusher”: how is this possible?
People often ask whether this is even possible, especially if a person is aware of how the gearbox is tripled. After all, the moped’s clutch is adjusted using centrifugal force, and not with a cable and handle. The centrifugal force itself appears only if the engine is already running. However, if you show ingenuity and logic, you can simply turn the engine using the wheel if the clutch is “jammed”.
If the reserve has an “eighth” or “tenth” head, as well as a knob, then the clutch cover is very easy to pry off and remove. Below it is the winding mechanism. It has a characteristic crescent shape. We find the clutch itself on the right, it is connected by a belt. It is necessary to find a “bell” and a clutch, the hole of which is much smaller than in the “bell”. Now all that remains is to “jam” the clutch using a simple mechanical method: insert the bolt that secures the starter cover into both holes, having previously aligned them with each other.
Of course, when using this method you will need an assistant, because you will only be able to turn the moped wheel when someone is sitting on top. Now we turn the ignition, push the moped, and the assistant must jump on the scooter in time so that the wheel turns and it starts.
By the way, do not worry that the bolt that needs to be inserted into the clutch and bell holes will damage the engine. As soon as the motor starts running, the bolt will fall out of the holes.
It’s just important not to forget about it and not lose it along the way.
Reasons for lack of spark
Often, owners may encounter cases of starting failure in the cold season, although the moped drove well in the autumn. Initially, you need to unscrew the spark plug and carefully inspect for spark, oiliness and color.
Carbon deposits on the electrode
There may be no spark, if the electrode is covered with carbon deposits, then they are cleaned with a metal brush. If there is even the slightest doubt about the serviceability of the spark plug, you should replace it immediately, thereby making your life easier in the future.
Acidification of contacts
If the external signs of the spark plug correspond to suitability, and there is also no spark, then you need to check whether there is a discharge. It is worth noting that you need to be extremely careful, as it can give you an electric shock. If there is no spark and the external signs of the spark plug are normal, then the scooter is checked electronically for acidification of the contacts.
Insufficient fuel
If there is a spark, but the moped still has difficulty starting from the starter in cold weather, you should pay attention to the fuel tank. If it is empty then it is filled
It is worth noting why old gasoline pours out of the carburetor float chamber. How to do it? There is a bolt at the bottom of the carburetor; it is unscrewed, and after all the fuel has flowed out, it is screwed back in. Before putting the moped in the garage in cold weather, fill the tank full of fuel.
Unscrew the bolt and pour out the old gasoline from the carburetor float chamber
If the above has been checked and done, and the scooter does not start well from the starter, then you can make the following repairs:
- The carburetor is removed and the air filter is cleaned;
- The carburetor is cleaned, the jets and channels are purged;
- Everything is coming back together.
Where is the battery located on a moped and how to connect it
Once you find yourself in an unpleasant situation with a battery in the middle of the road, you begin to think about how to avoid this again. You can get home without a battery, but if you ride for a long time, the scooter’s electronics will begin to fail. The battery requires care, so knowing where it is located and how to change it is absolutely necessary.
Connecting the battery is easier than doing any of the operations described above. Its location depends on the model. On Chinese scooters it is usually located under your feet. We remove the floor and look for a rectangular hatch. There is a place for the battery right in it. If the model is made in Japan, then you will have to check other places. The battery may be located in front of the driver's seat or under the seat.
If you don't know what kind of battery your two-wheeled friend needs, then measure the space for it before you go shopping. Or, using one of the methods, get to the seller directly on a moped.
You need to connect the battery like any other electrical device: minus to minus, and plus to plus. The terminals should be as close to the wires as possible. A red wire usually means positive, and a green or black wire usually means negative.
The moped has lost spark, what should I do?
Very often the reason that the engine does not start is the lack of a spark at the spark plug. This is diagnosed very simply:
- you need to unscrew the spark plug from the engine (or take a spare one),
- put a candle cap on it,
- turn on the ignition,
- press the spark plug to ground
- crank the engine with the starter, or better yet, with the kickstarter.
If a spark does not jump between the electrodes of the spark plug, the engine will not start.
But fortunately, the ignition system on Alpha mopeds is quite simple and you can find the fault on your own.
I always try to follow the principle “from simple to complex” when troubleshooting. That is, before disassembling half of the moped, you need to try to check everything that is easy and cheap to check.
First, remember what preceded the malfunction: some work may have been carried out or there may have been mechanical damage (for example, the moped fell). If something like this happened, start troubleshooting from there. There is a high probability that upon inspection you will find a broken wire, damaged insulation, a damaged connector, or something else.
Be sure to try cranking the engine with a kickstarter; it happens that the starter turns too slowly and there is no spark.
Starting a scooter “from the pusher”: how is it possible
The third, most amazing way. A knowledgeable person understands that, unlike a car, the clutch is not controlled by a handle and a cable. Therefore, if you just push the moped, nothing will happen. Let's imagine: let's try to start an alpha moped. It just drives forward, the engine won't start. The scooter's clutch is regulated by centrifugal force, which obviously does not exist without engine speed. Nevertheless, there is a way to start a scooter with a push. Creative hobbyists have come up with an elegant solution to the problem. The clutch is easily jammed with one bolt.
We are looking for an eight or ten head in the tools. Using a wrench, unscrew the clutch cover bolts. The lid itself will have to be pryed off. We don't lose bolts. We see a mechanism similar to a crescent. We are looking for a belt - it connects the clutch, there are small holes in it. We are looking for a bell, it has larger holes. Turn them so that the holes match. We secure them with the bolt from the kick starter
It is important not to tighten the nut, but simply insert the bolt. The hardest part remains. In order to start a scooter, you need no less effort than to move a Ural motorcycle
The wheel will not turn unless there is a lot of weight pressing on it. To make everything work, you need an assistant. His task will be to saddle the iron horse in time, creating a load. If you don't succeed on the first try, try again. You can also try strapping your scooter to your motorcycle. Izh Planet 3, for example, will perfectly fulfill the role of a pusher. But you still have to create a load on the wheel.
As for the bolt, it will fall out when the two-wheeled friend moves on its own. Do not forget, without it the lid will not hold well.
"Delta" (V-50M) does not pull. / Help / MotoScoot - motorcycles and scooters
Such a thing, I took a Soviet Delta (used). I didn't go from the very beginning. The former owner said that he had just changed the rings and were getting used to them. I drove it around a bit, but it didn't get any better. When replacing the crankcase (the old one was cracked), I replaced the piston and rings with new ones (there was a small groove on the piston, apparently from a grain of sand; one ring was broken), it still doesn’t work. The clutch doesn’t slip, it just stalls on a flat road in first gear from lack of traction, it only goes uphill and then you have to push it with your feet.)) The carb (K60) has been adjusted. The only thing I don’t like is the jet, the hole in it is too large and somehow crooked.)) Does anyone have any ideas on how to make it go at least 40-50 km/h? PS I did not set the ignition (perhaps too early). Can anyone tell me how to do this correctly? It starts with just a click, the engine runs smoothly without load, and picks up speed well. When starting, when I slowly lower the kick starter, I hear some hissing, as if air is being sucked in. Is this how it should be or is there still a leak in the cylinder?
motoscoot.ru
How to check the starter button of a scooter?
A common cause of starter failure is the starter button. You yourself know what the quality of Chinese goods is, and if the starter of your scooter one day fails, it makes sense to check the button and, depending on the test results, move on, for example, to the starter relay, the starter itself, or go to the store for a new button.
To check we need:
- Tester with audio dialing mode
- Small flathead screwdriver
- Wish
In order to check the button, you must first remove it from the plastic steering wheel trim. The button sits in the casing on two side latches. Press the latches one by one with a screwdriver and remove the button.
The button is connected to the scooter's on-board network via a three-pin connector. There are only two contact wires in the connector: yellow and green, brown is not used. The yellow wire is positive and the green wire is negative. In scooters, the wiring is made according to a two-wire circuit, so there are two contact wires.
We disconnect the plug from the button, switch the tester to audio dialing mode, connect the tester probes to the side contacts of the button (the middle contact is not involved), press the button key and look at the tester:
- If the tester beeps and the display shows zeros, the button is 100% working
- If the tester is silent, the button is 100% faulty
As you can see, everything is very simple. By the way, in this way you can check the starter button not only of a scooter, but also of any other similar equipment, including an ATV, motorcycle, moped, or even a KAMAZ - it doesn’t matter.
Video: Why doesn’t the alpha moped start from the starter? There is a solution)))
It is no secret that the insulation of the wires is made of cheap plastic and it is better to replace the insulation with rubber before it crumbles after a few rains. The two networks in Chinese motorcycles do not intersect, therefore, when disassembling the power supply of the on-board network of the electric starter, headlights, turn signals and stop, you should remember several points:
- The green wire is always ground or, as it is also called, ground.
- Pink and yellow (two yellows) come from the generator, where there is still alternating current.
- Blue comes from an impulse from a magnetic sensor.
- Black and red – battery power.
They all go into a big black rope. The colors are fixed and it’s easier to remember what they belong to than to have to decide for a long time where they come from and where they go. There are two main coils: under the steering wheel and next to the battery, under the shield. If next to the battery you can still determine what is coming from where, then under the steering wheel the wiring of the Alpha moped begins to resemble Narnia: everything is lost there and the colors change. Wiring from this point spreads throughout the motorcycle, providing power.
Remember that the scooter starts from the starter when it has an integral part with proper operation of the variator, clutch, camshaft group and valve. To put it simply, if all power systems are in normal condition, then there is a problem in the transmission, thanks to the crankshaft torque, which works closely with the variator. Garage repair of the starter on a Delta moped.