How to install a kit (t-disc) for lighting motorcycle wheels
The articles posted on our website are copyrighted and are PROHIBITED for copying, publication on other sites and sources of information is PROHIBITED, and the use of photographic materials is also prohibited.
If you found this article useful, please post a link to our site on other resources on the Internet for greater distribution. To illuminate the wheels of a motorcycle, it is necessary to install a system for transmitting electricity from a standard battery from the frame to the moving wheels. This is done using the T-disk kit, developed by the GreenRound.ru workshop.
Additionally, each set for lighting motorcycle wheels can be equipped with a radio controller with a remote control, which allows you to remotely control the motorcycle lighting and turn on a number of programs (smooth blinking, strobe, brightness, alternate turning on of wheels and engine lighting, “heartbeat”, etc.)
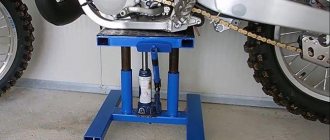
For ease of installation of the LED strip, it is recommended to dismantle the wheel. Remove dirt and wash.
We use a degreaser to treat the surface for mounting the LED strip and current collector disk. Next, add a little magic and glue the LED strip onto the wheel.
LED strip for motorcycles is an exclusive product that differs in its properties from the usual decorative LED strip. We install the T-disk on a special removable fastener. We connect the cable from the T-disk with the cable from the LED strip and cover the connection points with a heat-shrinkable tube.
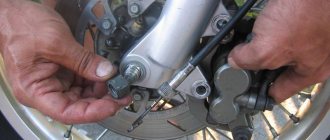
Having previously measured the installation distance from the T-disk, we add the height of the brush and compare it with the mounting location on the wheel axle. We bend the bracket in a vice, you can use a hammer. The T-bracket fits onto the wheel axle like a washer and, when installing the wheel into the fork, is clamped with the standard wheel mount.
The distance between the brush body and the T-disc tracks should be 2-3 mm. Fixing the cable on the wheel and installing the LED strip are described in more detail in the instructions supplied with the T-disk. Using our installation technology, the LED strip does not come off over time and is not afraid of water.
LED lighting for a motorcycle is an element of motorcycle tuning for a lightweight vehicle. In this article we will tell you what rules you should follow when choosing equipment, describe the installation process and teach you how to do it yourself.
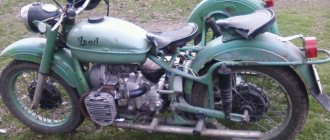
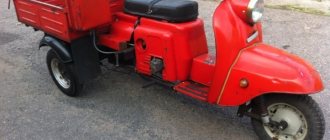
Homemade wheel lighting on Jupiter
Good day everyone, and in this article the author decided to highlight the wheels on Jupiter. Anyone can do this. No special expenses will be required.
Materials for making this homemade product:
1) Plexiglas 2) LED strip 3) Glue 4) Metal disc from the clutch 5) Brush from the generator (used to transfer positive contact to the wheel) 6) Several wires 7) Sandpaper
Step 1.
We cut out rectangles from plexiglass, the author took approximately 5 mm thick. We try on the dimensions according to the wheel
Step 2.
Next, we clean our part with sandpaper to a matte state, so that the light is distributed evenly. We make 3 blanks for each wheel.
Step 3.
Now, our task is to place the LED strip on the plexiglass. To do this, we glue the tape to the plexiglass using super glue; for better fixation, the author also glued the cuts with another glue. We carry out all these manipulations with the remaining blanks. Connect the power and check.
Step 4.
Well, now we need to attach our clutch disc. The author attached it to an aluminum wheel cap and insulated it; he used a motorcycle inner tube as an insulator, cut everything to size and fastened it all with plastic clamps.
Now we bring out the wires.
We connect them plus to plus, minus to minus.
Step 5.
We put everything in place, place all the parts so that they slide along the metal circle, power it from the battery, you can make a separate switch.
Source
INSTALLATION RULES
To illuminate your motorcycle efficiently, pay attention to the following recommendations:
- Choose a tape that is moisture-resistant, protected from dirt, vibration and shock, or individual LEDs.
- Determine where to install the LED lighting on your motorcycle. To create a uniform glow, and not a “garland on the Christmas tree” effect. Try the tape on the inside of the body, pointing the lights towards the engine.
- Prepare and degrease the mounting area; the reliability of adhesion of the adhesive base of the diodes to the surface depends on cleanliness.
- Do not connect the motorcycle's LED lighting directly to the on-board network; automatic switching on simultaneously with the use of the head light can create additional voltage on the network and damage the electrics. The optimal installation option is connecting to the battery via a switch or connecting to an audio system. The switch is placed under the seat or on the steering wheel.
- If, after installing the LED lighting of the motorcycle, there are wires left, secure them securely with clamps, the fastening points should be insulated, make ring terminals at the ends or heat-shrink them.
LIGHTING THE BIKE WITH YOUR HANDS
The procedure for installing LED motorcycle lighting itself takes no more than 2 hours; preparation takes much longer.
- Buy individual LEDs or a ready-made LED strip kit. Installing and connecting each LED individually is more difficult than using a ready-made strip.
- Select installation locations, try on the tape and prepare the surface. Try to place the lights symmetrically on both sides of the bike to ensure an even glow.
- Gather the wires on each side at one point into a bundle and make a knot; place the connection point closer to the driver’s seat if the battery is located under it. Strip and twist the exposed positive ends together, repeat with the negative ends. Do the same procedure on the other side.
- Remove the seat and connect the nodes to the battery. From the central bundle, twist another wire and insulate the attachment point. Attach the wire between the positive terminal and the bolt head, tighten the bolt, and do the same procedure for the negative terminal.
- Replace the seat and check that the motorcycle's LED lights are working.
LED accent lighting will improve the visibility of your motorcycle on the road and make it stand out among the traffic even on a dark highway, but in order to feel confident, it is worth equipping the bike with powerful standard and additional LED lights. Look at the options in the Wesem-Light online store catalog.
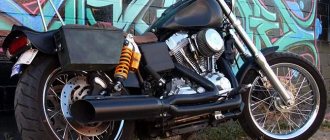
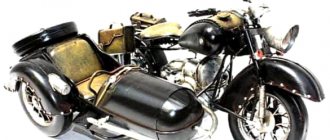
BMW Speziel Tr500 “Schneekrad” tracked motorcycle-snowmobile
more detailed version of THIS POST
In the second half of the 30s, the rapidly developing Wehrmacht was already seriously thinking about conquering the eastern lands. But the pragmatic Germans understood perfectly well that in order to conquer these lands, where the concept of “road” is absent in principle, and winter snow can become an insurmountable obstacle for any equipment other than tracked ones, new types of all-terrain vehicles will be required.
One of these machines was the unique tracked motorcycle BMW Speziel Tr500 “Schneekrad” (“Schnee” - “snow”, “krad” - short for “Kraftrad” - motorcycle) from the BMW company. This device was created on the basis of the BMW R12 motorcycle and was built in a single copy.
Unfortunately, he did not live to this day. Not even any precise technical description or technical characteristics have been preserved, and the information that sometimes slips through is quite contradictory.
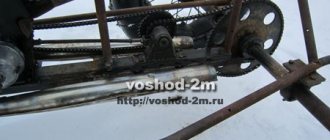
The motorcycle's chassis consisted of a single rubber track stretched between the front and rear drive wheels; there were two road wheels in the center. The upper part of the caterpillar slid along four supporting rollers and was covered on top with a removable casing.
The track tension was adjusted by a pressure roller located under the driver's seat. The car turned out to be quite clumsy; it could only be controlled by tilting it in one direction or another.
When driving in the snow at low speed, the driver could turn by putting his foot in the direction of the turn. As you understand, after the first fracture it became clear that this was not a solution!
Subsequently, they decided to equip the car with a sidecar with a steerable ski wheel, but this did not so much solve the handling problem as aggravate it even more. In the end, the military realized that nothing good would come of this idea and abandoned such an extravagant device.
SdKfz 2 (Kettenkrad HK 101)
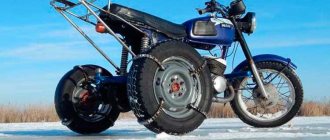
Customizing → LED lighting in wheels. Part one.
And I decided to look a little for options for implementing this idea. I suggest you take a look at my version of the backlight design. I found the following options online: 1. Various LED caps. The easiest and cheapest way. There are many sold on Ali and in our stores. But the brightness is very low, and it doesn’t look serious. For lisapeds in general. 2. You can use batteries - they are heavy and need to be recharged. It's hard to imagine. In short, also for lisapeds, where there is no speed. 3. Two discs are mounted on the wheel and there are two brushes attached to them. I don’t argue, it’s a serious option, but it’s quite difficult to sculpt, and you know, the brushes aren’t very good in bad weather. And it’s unpleasant to think that somewhere you have something rubbing against the wheel.
Then I decided to try to implement the circuit without wires. By electromagnetic induction method. In fact, everything is simple - you need a high-frequency generator, an amplifier, and two windings. And there will be happiness on wheels. I’ll say right away that I’m not very good at electrical engineering. Well, okay, let's get started. We are looking on the Internet for a circuit of any high-frequency generator - I chose the UC3845 chip. I collected it and looked at it with an oscilloscope: a rectangular signal, 30 kHz, amplitude 12V. Exactly what is needed. We are looking for a MOSFET operating in key mode; the control signal was less than 12V. We connect it and hang it on the radiator. The simplest thing left is to wind two coils. I wound a coil around the transmitter about 5 cm in diameter, 20 turns. Receiver - 30 turns of the same diameter. You can generally experiment with the coil.
I collected it, and this is what came out of it.
Consumption 2.8 W. Output power 1 W. Power can be increased by decreasing the coil resistance.
All that remains is to attach one coil to the wheel (I suspect it will fit best on the brake disc mount), the other to the fork, glue the tape and you will be ready. This is in the next part.
@Kolsha You’re a bad person) I’ve been waiting for this post for a month. At least I would call..)
Handmade belt buckle / Kraken
So. Let's start with the Table of Contents. This is my first serious work in this field.
The work turned out to be voluminous in terms of convexities, and in terms of convexities too. There are a lot of details. There are even more photos. Therefore, I will torment you with these very details, so to speak, immerse you in the atmosphere completely and completely. Be patient.