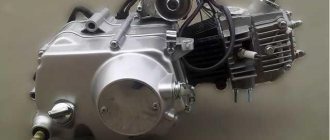
2.4. ENGINE REPAIR
Engine malfunctions can be divided into three groups:
caused by improper adjustment;
arising as a result of natural wear of parts during long-term operation;
accidental, caused by the breakdown of parts as a result of hidden defects, accidents, or improper operation.
If malfunctions of the last group occur, the parts, as a rule, have significant damage and cannot be repaired. Engine repair in this case will consist of replacing damaged parts with new ones.
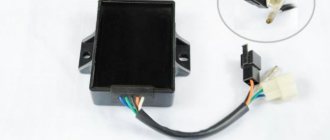
Malfunctions can be caused by a violation of the adjustment: ignition, carburetors, gas distribution mechanism.
The procedure for adjusting the ignition and carburetors will be given in the relevant sections of the book, but here we will take a closer look at adjusting the gas distribution mechanism.
In the gas distribution mechanism, the clearance in the valve drive is adjusted. In order for the valve to fit tightly on the seat, it is necessary that there is a gap between the valve and the drive parts when the cam is not acting on the pusher. If there is no clearance, the valve will rest against the actuator and will not sit on the seat.
The clearance is adjusted on a cold engine, since when the engine is warm, you can get burned on hot parts. In addition, the gap changes when heated. Moreover, for the lower-valve M-72 engine, the gap decreases when the engine warms up (therefore, the gap is often called “thermal”), and for overhead-valve engines, the gap increases. Therefore, when adjusting, for lower-valve engines, a larger gap is assigned, and for overhead-valve engines, a smaller one. By the way, the term “thermal gap” for overhead valve engines of Ural motorcycles is not entirely correct, although it is often used out of habit. If the clearance is adjusted on a hot engine for overhead valve engines, then when the engine cools down the clearance may disappear, which will lead to burnout of the valves.
Checking and adjusting the gaps is carried out in accordance with the instructions or more often if signs of adjustment have appeared.
An external sign of increasing clearances in the valve drive is a loud metallic knock in the cylinder heads on a warm engine. Signs of a lack of clearance are a drop in engine power and “popping” noises in the carburetor.
To check and adjust the clearances between the valve and the rocker arm, it is necessary to remove the cylinder head cover (do not forget that the head contains oil) and install the crankshaft in such a position that the valve is closed. The instructions indicate at what position of the crankshaft each valve is adjusted. This adjustment provides the most accurate clearance values, taking into account the runout of the cams.
Due to improvements in manufacturing technology, the beating of the cams is now negligible, so a simpler adjustment method can be proposed. To adjust two valves in one of the cylinders at once, you need to set the piston to top dead center on the compression stroke. The top dead center can be determined by the mark on the flywheel, and the compression stroke by the position of the valves: both valves must be closed (one of the valves on the opposite cylinder will be open). After this, you need to check the gap between the valve stem and the rocker arm with a feeler gauge. If there is no feeler gauge, the clearance can be checked by pressing the rocker arm against the valve stem and rotating the rod. The rod should rotate easily, but should not have noticeable axial movement.
If the gap does not correspond to those specified in the instructions, then it is necessary to loosen the lock nut and adjust it with the adjusting bolt. After adjustment, tighten the locknut and check the clearance again, since the clearance often changes when the locknut is tightened. After adjusting the clearances in one cylinder, turn the crankshaft 1 revolution and repeat the operations on the second cylinder.
Let's consider the procedure for engine repair in the event of malfunctions that appear during operation.
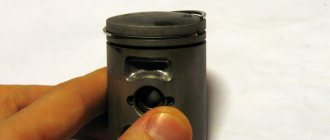
In the first 8-10 thousand kilometers, the most common defect is “sticking” of the piston, which usually occurs at the point where the piston skirt passes into the “refrigerators”. If the “sticking” is insignificant (the width of the strips with scoring is 5x7 mm), it is necessary to file the piston with a small file or needle file (it is not advisable to use sandpaper for this purpose, since abrasive particles from the paper will be pressed into the soft metal of the piston and will subsequently cause increased wear cylinder). Envelopment of aluminum on the cylinder mirror can also be removed with sandpaper, since the cylinder mirror is quite hard, abrasive particles are not pressed into it and are easily removed when washing the cylinder.
Operating principle of valves
Before we talk about how valve clearances are adjusted, let’s understand the principle of their operation. Any car enthusiast knows that the main task of these units is intake and exhaust. This is how gas exchange occurs in engines.
First, a mixture of fuel and air enters through the intake valves, then the combustion products exit through the exhaust valve. The opening and closing of the valves occurs under the influence of the camshaft cams. So that the valve can return to its rightful place, it is helped by a spring. This spring also plays another very important role. When the valve is closed, it contributes to the tightest and tightest fit of the disc to the hole in the cylinder head or seat. This ensures the tightness of the system.
Adjustment of valves
The adjustment of KAMAZ valves itself does not cause much difficulty; it is necessary to establish the permissible gap between the valve stem and the rocker arm; this is done using an adjusting screw locked with a nut. Unscrew the lock nut, loosening the adjusting screw, and install the feeler gauge between the rocker arm and the valve. On the intake valves it has a size of 0.35, on the exhaust valves 0.45 mm. We tighten the adjusting screw so that the feeler gauge is not tightened and moves between the rocker arm and the valve stem, and at the same time this movement should not be free. Then tighten the lock nut while holding the adjusting screw with a screwdriver. After adjustment, install the valve covers.
When you start the engine, you will immediately feel that it has become more responsive, as the cylinders begin to work more evenly in relation to each other.
Source
Setting the valve timing ch2 (in collective farm style - ignition)
Without knocking the piston off from TDC, we orient the camshaft so that the large hole and marks on its sprocket become as shown in the photo and, while putting on the chain, install the camshaft in bed.
Ideally, the marks on the sprocket should be strictly parallel to the plane of the valve cover connector. In practice, unfortunately, such accuracy is difficult to achieve. And this is mainly due to the stretching of the timing chain. And there’s nothing you can do about it - either change the timing chain to a new one or catch the phase by switching the teeth, but this method of setting the valve timing is not acceptable to me personally.
How to properly install a piston on a scooter?
During the operation of the scooter, various breakdowns occur
It doesn’t matter at all who the manufacturer is (Japan or China). The difference is that one vehicle breaks down earlier, while the other breaks down over time.
Problems can occur with the wiring, engine, or chassis. But, as a rule, almost everyone is faced with replacing the CPG. This abbreviation implies the term “cylinder-piston group” or, as people say, “piston group”. Looking ahead, it must be said that replacing the piston, piston and rings separately is not as difficult a task as it might seem at first glance. It is also worth knowing that the process of removing and replacing the CPG is almost the same on all scooters. Therefore, the article will discuss the main points. Looking ahead, let us remind you that the power of the CPG can vary. It is recommended to install a piston engine with the same power as a standard CPG.
Preparatory work
So, the engine is cooled down, and the car itself is placed on a flat surface and immobilized. You can start working:
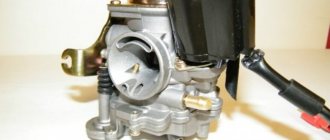
- Remove the carburetor air filter cover and remove the filter;
- We unscrew the filter mounting bolts and remove it, having first disconnected the pipes going to it;
- We remove the cable for manual control of the air damper (choke) and disconnect the throttle linkage;
- Unscrew the bolts securing the valve cover and dismantle it;
- Check the chain tension (it must be normal, otherwise you will have to adjust the tension first);
- Remove the distributor cap.
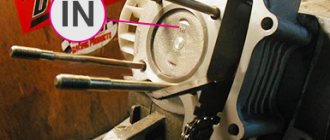
Now you need to set the TDC of the piston in the 4th cylinder and the marks on the knees will help with this. camshaft drive shaft and cover. shaft, as well as on the camshaft gear and its cover.
To do this, you can use a key of appropriate size, which you need to rotate the knees. shaft for the drive pulley bolt. Or use one of the drive wheels. To do this, you need to hang it with a jack, engage 4th gear and slowly turn the raised wheel. In this case, the transmission will ensure rotation of the crankshaft. But with the second method, you will need an assistant, since it will be difficult to check the coincidence of the marks.
Replacing a piston (CPG) on a 4t scooter
Need help finding spare parts?
We will help and advise!
+7-927-653-31-57
Gradually the time comes and your two-wheeled four-stroke friend needs to change the piston. There may be 2 reasons for this: wear or installation of a more powerful piston. In this article we will tell you how to replace the piston (CPG) on a 4-stroke scooter with a 139QMB engine.
If you have a different engine model, for example 152QMI or 157QMJ (150 cc scooter), then this article will also suit you to replace the CPG, since there are no fundamental differences. For 2-stroke scooters, we recommend reading the article “Replacing the piston on a 2-stroke scooter”
Why adjustment is needed
- With a small gap, especially if the pusher fits closely, low compression is observed. Even on a hot engine there is a gap. In this case, the engine operates unstably at any temperature; on a hot engine, characteristic knocking noises will be heard, and popping noises may occur in the carburetor;
- If there is a large gap on the valves, they do not open completely. At the same time, the combustion chamber is poorly ventilated and is also not sufficiently filled with the fuel-air mixture. This leads to unstable operation of the motor.
If there are strong deviations in the clearances, the engine operates very unstable, to the point of being unable to start. Adjustments are made to avoid these problems.