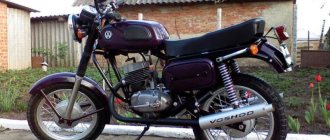
The Sunrise is a road bike. It was very popular in Soviet times, but is no longer produced. The most popular model is considered the Voskhod 3M, an engine whose repair is completely simple and completely easy to maintain. The reliable design and stability of the bike make Voskhod an excellent friend for any motorcycle enthusiast.
Since nowadays you can only buy such a motorcycle second-hand, you have to tinker with the technical part of the motorcycle. You will be very lucky if the previous owner kept the bike clean and used it according to recommendations. If not, then frequent repairs of the Voskhod engine will take up your free time.
Voskhod 3M is considered a direct competitor to the YAVA 350 motorcycle. However, Voskhod breakdowns happen an order of magnitude more often. This happens mainly due to the negligence of the owner. Failure to follow operating instructions leads to minor problems that create significant problems. A special feature of 3M is the chassis. The brake pads were equipped with a wear sensor, the shock absorbers were fitted with corrugated rubber covers , and a protective shield was installed on the front wheel. The design of the Voskhod 3M engine also changed slightly after the modification was released. Motor 3M-01 with five-channel cylinder purging and one exhaust window.
Replacing clutch discs
You can replace motorcycle clutch discs very quickly. The first thing you need to do is drain the oil from the engine, but we won’t drain it. You just need to place the motorcycle on its right side on the ground.
Motorcycles Voskhod, Voshod-2(M) and Voshod-3(M) were produced from 1965 to 1993 and were distinguished by excellent technical and operational qualities for their time. All of them were equipped with 173 cc two-stroke engines, which had one air-cooled cylinder and carburetor power. This allowed the motorcycle, depending on the modification, to reach a maximum speed of 90-105 km/h with a fuel consumption of no more than 4.5-5.5 liters per 100 km. In general, Voskhod has established itself as a reliable and durable vehicle, capable of operating for many years with proper maintenance. However, time takes its toll, and the need to repair Soviet equipment arises more and more often. Let's try to figure out what features are characteristic of restoring the main components and assemblies in the process of repairing a Voskhod motorcycle.
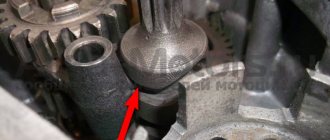
Removing the kickstarter
We put the claw on the kickstarter shaft, pull the shaft towards us, unwind the return spring and remove the kickstarter from the shaft
Second jamb
Cracks often appear where the kickstarter shaft enters the crankcase. It is advisable to weld crankcase cracks
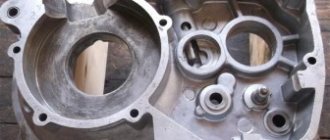
Engine
The “heart” of a motorcycle, even with the most careful use, gradually wears out - this is facilitated by the abundance of heterogeneous mechanical loads in the cylinder-piston group and other moving parts, temperature effects on the metal, the chemical composition of the working mixture and exhaust gases. DIY motorcycle repair Voskhod most often includes the following engine work:
- removing the power unit from the motorcycle frame;
- partial or complete disassembly of the internal combustion engine;
- replacing piston rings;
- restoration of the cylinder mirror;
- repair or replacement of the piston, connecting rod, crankshaft;
- replacement of support bearings, liners, seals;
- lubrication, fastening, adjustment work.
Engine repair, like the repair of other units, must be preceded by a comprehensive diagnosis of its technical condition, which includes an analysis of operational parameters (approximate indicators of developed power and speed, fuel consumption, sound of operation, color and character of the exhaust). If necessary, diagnostics are performed on the bench, and specialized instrumentation is used.
It is important to navigate the structure of a two-stroke internal combustion engine of a motorcycle and understand how each specific type of repair is performed. So, when replacing piston rings, you can do without removing the engine. It is enough to unscrew the stud nuts, remove the cylinder cover and, opening access to the piston, bring the piston to top dead center. Then the worn rings are removed and new ones are installed. The engine is assembled, not forgetting to replace the gasket. This completes the repair.
Tools
- Large flathead screwdriver
- Puller for removing the drive sprocket of a motor transmission
- Puller for removing the generator rotor
- Puller for loosening the clutch basket nut
- Head for 11, 14, 19
- Hook for removing clutch springs
- Small hammer
- Wish
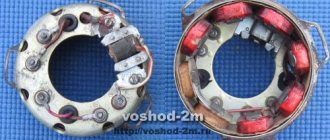
Ignition and carburetor
It is these two components that, as a rule, determine the stability of the engine. Often, interruptions in the crankshaft rotation speed, loss of traction, and difficulties starting the engine are associated precisely with their malfunctions. Repairing the ignition and carburetor usually comes down to adjusting them. Setting the ignition includes setting the gap between the coil core and the sensor magnet within 0.295...0.305 mm. The piston ignition timing should be 3.5-5 mm to top dead center. Adjusting the carburetor is somewhat more difficult. If you are repairing a Voskhod-3M motorcycle, then you will have to deal with the K65V carburetor, and the main tools will be the quality and quantity screws included in its design. Using the first, you can lean or enrich the mixture - change the proportion of fuel and air entering the cylinder. The second determines its volume per working cycle. With the standard setting, the quality screw is screwed in completely and then unscrewed half a turn. Then the rotation of the quantity screw achieves the minimum stable speed and the quality of the mixture is re-adjusted. Finding the optimal adjustment balance is a search for maximum traction and stability with minimum fuel consumption.
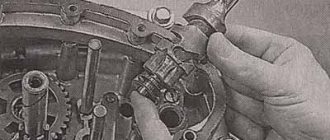
Removing the piston
We unscrew the four nuts on the head, remove the head from the studs, remove the cylinder, remove the retaining ring from the piston boss, push out the piston pin, remove the piston and remove the separator
Description
Motorcycle engine Voskhod 3M single-cylinder, two-stroke with a volume of 173.7 cubic centimeters. The cylinder diameter is 61.7 millimeters. The piston stroke is 58 millimeters. The maximum power in kilowatts is 9.9, and in horsepower it is 13.5. The cylinder, piston, crankshaft and main bearings are lubricated with gasoline and oil. Engine oil is poured into the box and clutch and checked with a dipstick.
how to adjust fuel consumption in a K62V carburetor. Sunrise 3m
The quality adjusting screw is fully tightened, and then unscrewed half a turn or a little more. After starting the engine, warm it up to normal temperature.
The correct idle speed adjustment is checked by sharply opening and closing the throttle. If the engine stalls when the throttle is opened suddenly, you should enrich the mixture by turning the quality screw a quarter or half a turn. If the engine stalls when the throttle is closed abruptly, the mixture is leaned out by turning out the same quality screw by the same amount.
Rice. Carburetor K-62:
1 — idle fuel jet, 2 — main fuel jet; 3 — float chamber, 4 — sprayer; 5 — float axis, 6 — float lever bushing; 7 — air channel, 8 — nozzle, 9 — dosing needle, 10 — body; 11 — throttle, 12 — needle lock; 13 — throttle spring; 14 — throttle lift limiter (removed after engine break-in); 15 — throttle control cable, 16 — rod with idle speed adjustment screw (lowering the throttle); 17 - cover; 18 — idle speed adjusting screw, 19 — fuel inlet fitting, 20 — adapter hole, 21 — idle speed emulsion channel; 22 — drainage hole, 23 — idle air channel, 24 — locking needle with washer, 25 — float, 26 — corrector emulsion channel; 27 — dosing needle; 28 — float stopper, 29 — plunger, 30 — plunger spring, 31 — corrector control cable. To achieve optimal fuel consumption, you also need to set the gasoline level in the float chamber. The distance from the housing parting plane to the farthest upper part of the float should be 26 (+0.5/-0.5) mm. It is adjusted by bending the float tongue.
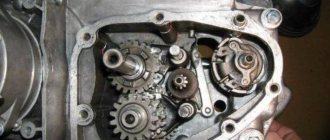
Disassembly
To disassemble the clutch, it is not at all necessary to drain the oil, much less remove the engine from the frame. It will be enough to turn the motorcycle on its side, unscrew the parts that interfere with removing the clutch cover and then remove the cover itself and that’s it. In my case, it just so happened that the engine was one way or another, but it was necessary to remove it from the frame in any case.
This is what the clutch parts look like under the cover. As you can see: there is nothing complicated, much less fundamentally new, here.
First of all, we check the motor chain: press it with a screwdriver or finger and see how much it sags. If the sag is more than 20mm, then we change the chain; if the sag is less, then it can be safely used.
Using a homemade hook from an old bicycle spoke, remove the spring tendrils from the clutch pressure plate.
Remove and set aside the pressure plate and remove the clutch rod from the gearbox input shaft.
We take the discs out of the basket and carefully inspect them. We inspect plastic discs first of all for wear, cracks and the integrity of the protrusions with which they enter the basket.
We check metal disks, including the pressure and support disks, for warping of the working surfaces. To do this, place them one by one on a mirror or piece of glass and look. If the disk does not lie on the glass with its entire surface and when pressing on it it wobbles, then such a disk must be replaced with another one.
If this moment is neglected, the clutch will lead and slip, and no amount of adjustment will correct the situation.
Use an old, unnecessary screwdriver to unbend the lock washer under the inner drum nut. We put a puller on the inner clutch drum, which is an unnecessary clutch disc to which the tires are welded. And with a 17mm head we unscrew the nut on the drum and remove it from the shaft (left-hand thread).
Motorcycles, motorcycle news, motorcycle diaries, motorcycle books and motorcycle selection
Operating instructions for motorcycle Voskhod 3
Operating instructions for motorcycle Voskhod 3.
The quality is very average, but readable if desired.
Contents of the operating instructions for the Voskhod 3 motorcycle
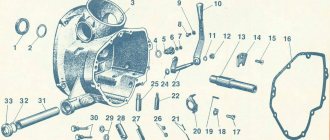
—Recommendations and warnings. —Introduction. -Technical data. —Basic rules and tips for operating the Voskhod-3 motorcycle. - Starting a cold engine. —Start a warm engine. —Putting the motorcycle in motion. — Motorcycle braking. —Control mechanisms and instruments. —Basic instructions on the design, disassembly and assembly of a motorcycle and recommendations for its care. —Removal and installation of the cylinder head, cylinder, piston rings, piston pin and piston. —Removal and installation of the clutch, motor transmission and kickstarter mechanism. —Removing the generator cover, speedometer gearbox and clutch release. —Removal and installation of the generator. —Removing and installing the gearbox oil seal and the right crankshaft oil seal. —Removing, installing and adjusting the carburetor. —Adjusting idle speed. — Complete disassembly of the engine. —Removal and installation of the crankshaft, bearings and crankshaft seals. —Disassembly, assembly and adjustment of the gearbox and shift mechanism. — Engine power system. —Exhaust noise muffler. -Chassis. — Shock absorber maintenance. —Removing and installing the front wheel. —Removing and installing the reverse gear chain and chain guard. —Adjustment of chain tension. —Adjusting the brakes. —Electrical equipment. —Ignition adjustment. —High-voltage transformer B300B. — Electronic switch KET-IA. -Spark plug. —Headlight FG 133. —Central switch. — Motorcycle maintenance. — Recommendations for maintenance. —Lubricant table. —Possible malfunctions and ways to eliminate them. — Factory warranty and procedure for filing a complaint.
Main characteristics of Voskhod 3 M
The technical characteristics of the “Voskhod Z M” are pleasantly pleasing, allowing you to take walks both on the highway and on country roads.
Length of base from wheel to wheel, 1.3 meters
| External dimensions (length/width/height), meters | 2,0/0,76/1,09 | ||||||||||||||||||||||||||||||
| Dry weight, kilograms | 122 | Engine | One cylinder for two strokes, capacity 173 cm3 | Cooling system | Air | Power on offer at 5600 rpm | 15 horsepower | Torque at 5200 rpm | Reaches 16 Nm | Speed maximum | 110 kilometers per hour | Fuel consumption, liters | 4.2 per hundred kilometers | Generator | 12 volts | Front suspension | Telescope fork, stroke—1.6 cm | Rear suspension | The pendulum at an angle of 20 degrees gave a stroke of 8.5 cm | Brake mechanism | The drums, with a diameter of 16 centimeters, had an indicator of block production | Clearance | 12.5 centimeters | Load limit | 160 kilograms | Fuel tank volume | 14 liters | checkpoint | Four-speed | Wheels | Spoked, tube tires, 16 inches |
Force
To increase power on Voskhod 3M, you can do engine tuning yourself. Even simple manipulations like an air filter can increase performance.
For a stronger increase in power, you can replace the intake system. For example, install a new carburetor. Perhaps even from another motorcycle with a similar system. There is an option in which you can install two carburetors, but you will have to connect pipes to it and weld the channels, filling the cracks with epoxy liquid.
Tuning options
Refinement of the design involves internal or external tuning. During internal modifications, the engine is rebuilt, driving parameters, suspension, and brakes are optimized. When external modifications are made, the motor vehicle is given a sporty style or it is converted into a chopper.
Features of internal tuning
Owners often rework the Voskhod-3M engine. To increase engine thrust, the factory paper air filter is replaced with foam filter elements. This helps reduce air exhaust friction. Then the jets and diffusers are polished using an abrasive material, the diameter of which affects the volume of fuel entering the engine.
To improve the fuel exhaust system, a new modernized carburetor is installed. From the existing pipe, take flanges for mounting on the cylinders, grind out aluminum bushings, and cut off the flange from the exhaust pipe. In an old carburetor, take a second flange. Using cold welding, the parts are connected.
The design is adjusted until it fits perfectly into the exhaust channels. Internal gaps are filled using epoxy glue.
Often rear adjustable shock absorbers are installed and sports tires are installed. When performing such tuning, the motorcycle becomes more aggressive and sporty.
Performing external tuning
In a sporty style
With a low seating position and a high front fork, there is a desire to modify the motorcycle in accordance with the sporty style. To do this, raise the rear shock absorbers and replace the exhaust pipe elbow. This way the exhaust pipe is level with the rear axle. Exhaust pipes with a larger diameter will improve the design and increase the traction of the bike.
External modifications can include painting, chrome plating, installation of nickel-plated arches instead of the old factory protection, installation of large rear-view mirrors, stepped seats and wheel tuning.
At the end of the tuning, a sports fairing is installed.
Chopper
When performing tuning for a chopper, shortened rear shock absorbers are cut off or purchased. Thanks to this replacement, the rear of the motorcycle will be lowered by several centimeters. The rear fork and wheel are replaced with wider ones. The angle of inclination of the front fork axis is replaced, and the cylinder covers are equipped with chrome plated cups. The same style is followed when tuning the headlights, rear lights, and dashboard.
Tuning for Cafe-bike
With such a modification, to reduce costs, they weld the rear part of the frame with their own hands, shorten the fork, trim and adjust other parts. For the steering wheel and seat, your own strength may also be sufficient. A headlight with a brake light is installed from trucks.
Most owners can carry out tuning on their own using only purchased parts due to the simplicity of the designs and the low cost of spare parts.
Preparation
Russian is Russian, so until we process all the parts properly with a file before installation, nothing will work out...
Insert the cylinder rings and use a feeler gauge to measure the gap in the lock.
To reduce engine noise and speed up the ring grinding process, remove small chamfers on their working edges (preferably)
To improve lubrication of the piston pin, use a 5-6 mm drill to drill through holes in the piston bosses (optional)
We remove flashes and deposits of metal in the cylinder windows and round the edges along which the rings go
After finishing work, we thoroughly wash all the parts, prepare a clean work area and begin assembly.