Review of IZH Planet Sport 350 (1978)
Greetings!
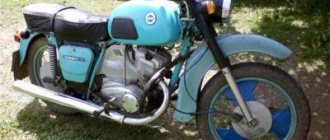
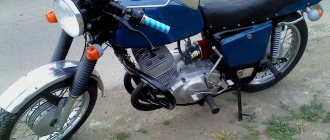
I had the opportunity to serve in the army with guys who rode motorcycles a lot, some in the villages, some in the city. Before that, I NEVER imagined that I would be interested in motorcycles. But it happened, and after demobilization I began to think seriously about my father’s 1978 Izh Planet Sport, which had been sitting in a friend’s garage for several years. I really loved the Japanese and British motifs that permeated the Triumph Bonneville and Kawasaki W800/650, since the Planet Sport looked very much like Japanese motorcycles of the 60s and 70s.
After studying at a driving school, I began to study it. The knocking piston pin ordered the replacement of the piston with rings and itself, the rear shock absorbers with springs and the rear chamber were replaced. The motorcycle was no longer from the series that was equipped with Mikuni carburetors and imported electrics; there was no separate lubrication system. The car had a Soviet K-62 carburetor and wheels with thick spokes. The carburetor also asked for a replacement, and the K-62 had not been made for a long time, so the K-65 with the same characteristics came to the rescue. By the way, Sports with Mikuni had 4 hp. more powerful due to a larger diffuser; my Planet has a power of 28 hp.
At the end of winter they began to tinker, try, change. A problem emerged: the motorcycle started relatively easily, but responded to the application of gas with a loss of traction. And after it was turned off, it flatly refused to start again. This was my first time dealing with a motorcycle, so I dealt with knowledgeable people. As a result, suspicions remained about the capacitor, high-voltage wire and contacts. The contacts were removed, inspected, cleaned, the gap was set - all the same. They changed the wire and a miracle happened. He started working!
I heard that Minsk often starts in the opposite direction, getting 4 reverse gears and not one forward
The effort on the controls, of course, cannot be compared with my BM Classic 200: the clutch is tight, the gears are also not so easy to engage. But the seating position is very comfortable, the rear brake, and the gear ratios are chosen more rationally, except, perhaps, for first gear. At idle I would like to roll more slowly, the VM at first just crawls if necessary. I’m used to using the front brake on the VM to a greater extent, unless a radical reduction in speed is required, but on the Planet there is a drum in front, which does not slow down much, plus it is not connected to the brake light switch, so the rear brake always helps. The tank seemed narrow to me, so it was difficult to wrap my knees around it. But the motorcycle is very easy to lean in turns, although I don’t race. Initially there was one rectangular mirror at the end of the left handle, it became loose from strong vibrations and lived its own life, so I replaced it with two round ones on high stands. The turn signals are very bright, but the headlamp is already too dim.
The motorcycle lacks a side stand so that it can be quickly positioned. Plus, the Izhmash designers thought that it would be great to make the center stand hook on the right and the handle on the left, but I had already gotten used to lifting the motorcycle while standing to the right of it. A two-stroke engine causes a lot of trouble, so I got myself a measuring jar for oil. I use Lukoil for 2-stroke engines 1:50. The Sport instructions require MS-20 oil in a ratio of 1:25, but this oil is very rare for the average person, so Lukoil works quite well. There is a little smoke in the exhaust, but when the oil is overfilled (more than 1:50), the engine runs very poorly, is unstable, and throws the spark plug. It feels very good when there is too much oil.
Recently I rode it out onto a highway, and when turning onto a dirt road, the front wheel rolled across the sand and the motorcycle fell over. Fortunately, I was driving in first gear at idle, so I caught it on my right leg and held on. Lack of experience is taking its toll.
A warmed-up engine starts from the first or second pumping, but not everything is smooth with idle speed. I adjusted the idle speed with the screw on the carb, drove it - the engine in neutral roared like mad. I turn it down, drive a little, and when it stops, it’s already choking, trying to stall. I don’t understand what’s the matter.
Repair
Detailed instructions and connection diagram for a pioneer car radio
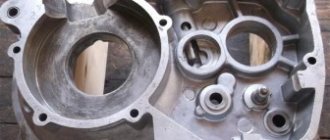
After the unit has been gutted, you can begin to determine the parts to be replaced. As a rule, you have to buy a set of shims, a set of gaskets and sealant. This is the case if there are no more serious damage. Once you have decided on the elements to be replaced, you will need to adjust the worm shaft axis, and after final assembly, the clearance along the axis of the primary, intermediate and secondary shafts.
Adjusting washers are placed on the far ledge of the copy roller; they should be lubricated with a special compound. A support washer is mounted on the near edge, and the shaft is put in place. It should be turned so that the neutral sensor with its protrusion fits into the deepest groove. Then, using a ruler (without the gearbox cover yet) on the plane of the crankcase, measure the gap between the washer and the dipstick. It should be no more than 0.2 mm. Depending on the indicator, regulators are added or removed. If it is impossible to accurately set the gap, it is better to make it smaller.
Assembly procedure for the Izh Planet 5 gearbox
Disassembly and assembly of the gearbox
If you are doing a complete overhaul of the engine, and at the same time the gearbox, after the above-mentioned repair work has been completed, and replacement of all worn components after complete disassembly of the gearbox, its correct assembly will be required. The first step is to install the input shaft, then install the first speed gear with the groove down. Next, the return spring is installed with the gear shift shaft, while the spring is first put on, then the assembly is placed in its seat. Then the input shaft yokes and gears are installed. Then we take the worm shaft, first putting on the adjusting washers, usually in the amount of three pieces.
To make it easier to install the worm shaft, lubricate the adjusting washers with lithol, as well as the shaft itself. Due to this, the washers will not fall off during installation. When installing this shaft, be careful not to damage the neutral speed sensor. By slightly bending it with your finger or a screwdriver, the worm shaft will fit completely into place. Now all that remains is to insert the copy shaft.
Then we install the gear shift sector.
Pay attention to the mark in the middle part of the sector, which during installation must be aligned with the mark on the shaft. Well, lastly we put the crankcase cover
If you did everything correctly, then the lid will sit in place without jamming.
After tightening, check again by rotating the drive sprocket, because it is possible that the shaft is pinched. The number of shims will need to be changed. If you did everything correctly, move on. Install the ratchet with the return spring, then the clutch drum bushing and the drum itself, connecting the drive chain to the drive sprocket.
Don't forget to fill the gearbox with gear oil. The level can be determined by the dipstick; the filling volume is 1 liter of oil. It is advisable to use good oil. Then a properly assembled and repaired Izh Planet 5 gearbox will be able to serve for many years, and shifting will be easy and clear.
Installation of the cylinder-piston group
It is not advisable to remove the gearbox cover until the sealant has dried; there is no need to rush in this matter. It’s better not to rush things and install the cylinder while the sealant dries.
Add some motor oil:
- into the upper head of the connecting rod
- lower connecting rod head
- into both oil channels of the crank chamber
To improve lubrication, it is advisable to drill holes in the piston bosses. But you don’t have to drill - it depends on your desire.
Install the piston pin retaining ring into the boss. Before installation, it is advisable to bend the locking ring a little and be sure to check how it fits after installation:
- If the retaining ring dangles, straighten it or replace it with a new one.
- If the retaining ring is not completely flat, replace it with a new one.
We heat the piston with a hairdryer and, using a mandrel, drive the finger into the piston so that it comes out no more than 5-6mm.
We look for an arrow-shaped mark on the bottom of the piston.
We orient the piston with the arrow towards the exhaust port of the cylinder (“towards the exhaust”), put the piston on the connecting rod, hammer in the piston pin and install the second retaining ring.
We insert the rings into the cylinder and measure the gap between the locks with a feeler gauge:
- If the gap is less than 0.3-0.45, sharpen the ring locks with a file
- If the gap is greater than 0.3-0.45, install new rings; if that doesn’t help, bore the cylinder to the repair size
To improve the wearability of the rings and reduce noise from engine operation, it is advisable to chamfer the edges of the rings. If hunting gets too much trouble: place the ring on a flat surface and use a file to slightly round the edges.
We put the rings on the piston, fill the piston with the rings with oil, install a gasket under the cylinder (preferably with sealant), tighten the rings with a clamp. We cut the clamp out of tin and from the same tin we bend the bracket with which we will fix it.
We put on the cylinder.
After the rings go into the cylinder, unfasten the clamp, lower the cylinder and screw it to the crankcase.
We turn the crankshaft several times and if the piston moves in the cylinder easily and without grinding, lower it down a little, pour a little engine oil into the cylinder, install a new gasket on the cylinder and screw the head on.
We install the additional crankshaft support bearing in its place, place the required number of adjusting washers on top and secure it with a retaining ring. The adjusting washers must ensure axial play of the crankshaft within 0.1 mm.
Before installation, sealed bearings must be opened! The usual 304 goes here.
On the other side of the crankshaft we install a flange with a main oil seal.
Pay attention to the oil channel through which oil flows to the right main bearing of the crankshaft. According to the good old collective farm tradition, this channel is sealed with sealant and the lubrication of the bearing stops. To avoid this problem, place the flange dry without sealant and everything will be fine
To avoid this trouble, place the flange dry without sealant and everything will be fine.
After the sealant has dried, you can begin adjusting and assembling the gearbox and replacing the clutch basket.
Numbers of bearings and oil seals for the Izh-Planet motorcycle engine 2, 3, 4 and fifth model.
- Crankshaft main bearings 2505k
- Additional crankshaft support bearing 304
- Right oil seal IZH-yu sb. 1-48-3
- Left main oil seal IZH-yu sb. 1-50
Familiar problems
"Gazelle": disassembling the box. “Gazelle Next”: disassembling and assembling the gearbox
Reviews from owners indicate that, regardless of the version and year of manufacture, the Izh Planet-3 motorcycle had the same disadvantages:
- Engine vibration associated with its design features. Almost all single-cylinder engines suffer from this.
- Problematic electrical equipment. Almost identical to the Jupiter of the same years of production, the 6-volt wiring installed on Izh Planet-3 was not of very high quality. An insufficiently powerful generator created problems when driving at night.
Completely eliminating engine vibrations is almost impossible. Even serious engine tuning does not completely solve the problem. You have to put up with this feature of technology. As for electrics, motorcycle lovers who are interested in tuning Izh Planet-3 often ask the same questions:
- How to detect ignition system malfunctions?
- What to do if charging is lost?
- How to replace the relay regulator?
- Does it make sense to install electronic ignition?
- How to replace a failed generator?
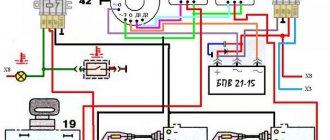
- Where can I find the wiring diagram for Izh Planet-3 at 6 volts?
- How to install BSZ?
These questions are countless and it is simply impossible to answer them in one review article. This requires digging deeper. And therefore we will try to answer as briefly as possible.
- Since the wiring diagram on Izh Planet-3 was repeatedly changed even depending on individual series, one cannot count on an exact match of its description. Sad but true.
- Replacing electrical wiring, switching electrical equipment operating from 6 volts to 12 volts and installing contactless ignition are completely justified steps to improve the performance of a motorcycle. After such modernization, ignition installation is simplified, and engine operation becomes more stable. At the same time, you will know exactly how the electrical circuit of your Izh Planet-3 works!
But it’s clearly not worth getting down to business without the necessary skills or suitable tools. As for DIY tuning enthusiasts, for them the Izh Planeta-3 motorcycle is an unplowed field for activity. There is room to expand here. Go for it!
Maintenance Features
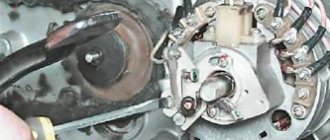
Often during operation it is necessary to correctly set the gap between the contacts of the breaker. To do this, you need tools and a diagram to see which elements need to be dismantled.
Tip: a video on servicing a particular motorcycle component is a good help these days. For example, on our website there are materials on servicing several brands and models, and you can glean the information you need from them (see, for example, the article on Java 350 wiring).
The algorithm of actions is as follows:
- place the motorcycle on the stand;
- turn on neutral;
- unscrew the spark plug from the cylinder;
- remove the engine crankcase cover;
- turn the crankshaft until the contacts are as open as possible;
- using a screwdriver, loosen the locking screw;
- using a special feeler gauge, set the gap to 0.35-0.45 mm and fix it with a screw;
- we collect everything in reverse sequence;
- turn on the ignition and start the engine. Its stable operation at idle indicates that the adjustment has been correctly performed.
In general, all the wiring of IZH Planet 5 is very easy to do with your own hands.
The need for such work often arises when operating a motorcycle:
- in wet weather, driving in the rain for a long time (oxidation or dampness of electrical contacts);
- when traveling over rough terrain, replete with vegetation and bushes (mechanical damage to wiring);
- when used in winter (snow and slush stick to the wires and can damage them).
Often the sound signal suffers during operation. Its malfunctions manifest themselves in the form of deterioration in sound quality.
To restore its functionality, you must perform the following procedure:
- loosen the locknut using an open-end wrench;
- turn on the ignition;
- press the button to turn on the sound signal;
- use a screwdriver to adjust the tone;
- repeat the procedure until we get a clear and loud sound;
- tighten the control nut.
Conclusions: we are confident that this article will help you in servicing motorcycles of the IZH family (see also the article on the IZ Jupiter 5 wiring diagram). Both the attached diagrams and description will help you avoid making mistakes during operation.
Purpose of the clutch IZ Planet and IZ Jupiter
Clutch - the name speaks volumes about the job it does. In our case, the crankshaft engages the gearbox of the IZH Planet and IZH Jupiter engines. The connection should occur smoothly without jerking, this is necessary to start moving and smoothly change gears. In case of heavy loads, it protects engine parts from damage. The clutch is located in the left half of the crankcase, under the left engine cover.
To get to the clutch, you need to drain the oil and remove the cover with the gasket, first remove the levers and unscrew the mounting bolts.
The basket is constantly in working condition, the discs are tightly compressed by springs.
The motor transmission consists of two sprockets. The small drive is located on the crankshaft. A large star driven on a drum. The connection is made by a motor chain.
The engine gear ratio is 2.17 for all single-cylinder IZh models. For IZ Jupiter, the gear ratio is 2.57.
When assembling the motor transmission, the planar arrangement of the stars is controlled. No more than 0.4 millimeters are allowed.
Switching off occurs using a special device. The shutdown mechanism is installed in the right engine cover. This mechanism is used to make adjustments.
Assembling the box on the Izh-Planet 5 motorcycle
For proper assembly, you first need to install the input shaft, then the first gear gear with the groove down. Then the return spring is mounted with the range shift shaft; first, put on the spring mechanism and place the block in the seat. After this, a worm shaft with adjusting washers is installed. To make installation easier, lubricate the moving mechanisms with Lithol.
When installing the unit, care must be taken not to damage the neutral speed sensor. To get the shaft into place, use a screwdriver to bend this indicator slightly. When installing, remember the small washer, which eliminates play. A similar part is installed on the copy shaft. After this, the gear shift compartment is installed.
Important
When performing these operations, follow the mark in the middle part of the sector. It should coincide with a similar mark on the shaft. The last step is to install the crankcase cover. If the work is carried out correctly, it will sit in its place without problems.
It is necessary to ensure that all rods and shafts coincide with their original mounting sockets. They should rotate freely without creaking or jamming. Use moderate force when tightening the screws as the threads in a soft metal crankcase can easily be stripped. All fasteners are tightened evenly to avoid distortion.
Source
Most common problems
Most often, the motorcycle in question loses or shifts poorly in second gear. This may be due to careless turning on of speeds. For example, when picking up high speeds in first gear without neutral, when engaging the second speed gear, an impact occurs, which contributes to intensive wear of the unit. Therefore, it is not recommended to “spin” the first speed too much. If, nevertheless, problems with the second position continue, there are several options for resolving them.
In some cases, the simplest method will help, without completely disassembling and then reassembling the Izh-Planet 5 box. It is necessary to place the motorcycle on the right side, and then remove the kick starter and gear shift foot along with the shaft. Next, the crankcase cover and clutch basket along with the discs are dismantled.
When the gears of the box wear out, the meshing of the teeth deteriorates. In turn, this leads to slipping, jerking and failure of the second gear. Another reason could be wear on the input shaft bearings. Since it moves slightly to the left due to vibration, it is necessary to move it into place with light blows using a mallet. The installation of washers of suitable diameter will allow you to fix the element in the desired position. Then the bearing stopper and other dismantled parts are reassembled in the reverse order.
Comments • 0
why does the box click
at the age of 13 I already knew this
I have an Izh pl 4 4th gear with jerks
Guys, those who understand Izh Planet 5 don’t give me the speed, but when I put it in 2nd gear or 3rd, the box starts to rumble and squeak, this is also behind this plate under the clutch basket or this and for something else, please help, otherwise it’s the season motorcycles opens but my moto doesn’t work properly
Or maybe this happens with 3rd gear?
Don’t get carried away with the grab itself, you shouldn’t overwhelm it, but the planet’s checkpoint has been collected and adjusted once and forever, simple and reliable good luck
nothing to say
And then I changed gears because of a broken tooth.
Well explained, I think anyone can get it. Like
And if on planet 4 2 the gear went out 2 times, what could this mean?
Good afternoon, what is the name of that thick washer that sits on the input shaft under the secondary shaft? I disassembled my box, I don’t have one, because of this there is play in the primary and secondary shafts. The stores don’t understand me; they offer me anything except what I need! Maybe there is an alternative, put another washer there, what are its diameters and thickness?
Malfunctions and clutch adjustment of Izh motorcycles
There are two possible types of clutch malfunction: incomplete disengagement of the discs and slipping. If the motorcycle is slipping, it will not develop speed as the crankshaft speed increases. The reasons for this malfunction may include: wear of the discs, insufficient spring pressure due to loss of elasticity or loose adjusting nuts, incorrect adjustment of the clutch mechanism. When the clutch is not fully disengaged, the motorcycle wheel continues to rotate while the control lever is fully pressed. This may also be due to incorrect adjustment, or this malfunction may occur when thick oil is used, especially in cold weather. First of all, if you discover one of the clutch malfunctions, try to eliminate it by correct adjustment. First, you need to adjust the gap in the shutdown mechanism; this is done using the adjusting screw located on the right engine cover. To do this you will need a screwdriver and a 13 mm wrench. Using a wrench, loosen the locknut and use a screwdriver to tighten the screw until it stops, and then turn it in the opposite direction half a turn - one turn. Tighten the locknut with a wrench. Secondly, after this, adjust the free play of the lever using the cable adjusting screw on the left handlebar handle. It should be within 5-10 millimeters. The correct clutch adjustment can be checked in this way: place the motorcycle on a stand, engage first gear and try to manually turn the rear wheel with force. If the adjustment is correct, you will not be able to do this. Now you need to perform one more check: to completely disengage the clutch. To do this, in the same position (motorcycle on a stand, rear wheel not touching the ground), start the engine and engage first gear. Then fully depress the clutch control lever and apply the rear brake, the wheel should stop. Release the brake, the clutch is depressed, and the wheel should remain stationary if adjusted correctly. If it starts to rotate when the lever is pressed, you need to loosen the adjusting bolt on the right side of the engine.
To check the ease of movement of the clutch cable in the sheath, press the lever and release sharply. The lever should spring back to its original position. It may be worth lubricating the cable with a few drops of liquid oil, such as Autol.
Preparing for assembly
Preparation for assembly can be divided into two main stages: measuring and, if necessary, eliminating the axial play of the tracer shaft and checking the suitability of the secondary shaft bearing for further operation.
The first stage is measuring and eliminating the axial play of the copy shaft
We put adjusting washers on the tracking shaft from the locking side. In my case, there were four adjusting washers, but you may have more or less, or maybe not... We move the locking bar to the side and install the copy shaft in its place. We put a standard thrust washer on the second end of the tracing shaft.
We place a new gasket (required) on the plane of the gearbox cover connector, on which you will later finally assemble the gearbox, and tighten the gearbox cover fastening screws with the required force.
We turn the engine over and measure the axial play of the copy shaft, the norm is 0.2-0.4 mm, but it will be better if you can ensure the axial play at a level of no more than 0.2 mm. Adjustment of axial play is accomplished by simply adding or removing shims.
I measure the play with an indicator. If you don’t have one, try measuring the backlash with a caliper; if you don’t have a caliper, so be it - measure by eye...
Second stage: checking the suitability of the secondary shaft for further use
Under normal operating conditions, the secondary shaft bearing runs for quite a long time. But no matter how much we want and try, it wears out. It would be nothing if it weren’t for safety: if your secondary shaft bearing falls apart while driving, and it will certainly fly apart if you don’t change it in time, the gearbox sticks together with the rear wheel, and it’s tight and you’re grinding the asphalt with your butt...
Carefully, take out the secondary shaft over some tray and carefully inspect the shaft bearing raceway, the races and the rollers themselves. The working surfaces of the bearing and rollers should be free of holes, edges, signs of wear or overheating
The path must have a perfectly flat working surface.
Example of a secondary shaft race and race in perfect condition.
To facilitate reassembly, apply some kind of lubricant, such as lithol, to the treadmill and carefully place the rollers on the track and, turning it a little, insert the shaft into the cage. As soon as the sprocket splines rest against the edge of the oil seal, use a thin screwdriver in a circle to straighten the edge of the oil seal and push the shaft until it stops. And immediately, so that the shaft does not fall out, put the sprocket on it and secure it with a nut.
"Sores"
There are three problems in the planetary checkpoint:
I solve the problem with oil leakage very easily and simply: I take out the retaining ring; I remove the intermediate shaft bearing, degrease the plug, retaining ring, mounting hole, then apply sealant to the outer edge of the plug, put it in place and immediately press it with the bearing and voila - the leak is eliminated!
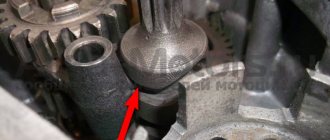
Due to a factory defect, the gear-carriage for engaging the first-third gear does not fully engage the first-gear gear with its cams, but only in a small part, barely catching the gear with its cams, which is why the edges quickly wear out and the first gear begins to knock out.
This moment is clearly visible in the photo. For this particular gear, the hook was no more than a couple of millimeters. It is difficult to cure this “sore”: from the side of the first gear gear, you need to grind the end of the intermediate shaft by 3-4 mm and, using adjusting washers, move the first gear gear to the carriage. I don't see any other way.
During operation, the bolts securing the stop are constantly unscrewed, either due to vibration or something else - they are unscrewed and that’s it, no matter how you tighten them... Even special lock washers do not help. I struggled with this disgrace for a long time using all the traditional methods known to me and came to the conclusion that the best solution to this problem is red thread locker. Feel free to put bolts on it and get rid of this problem once and for all.
Checking the clutch drum
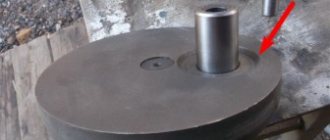
The first step is to check the foot start ratchet mechanism. This is where the main load falls. Turn the clutch basket over with the ratchet facing you, remove the retaining ring and disassemble the ratchet.
We inspect the teeth of the ratchet: they should be sharp without chips or other damage. If the teeth are wrinkled or broken, the winding foot will slip 100%. Many suffer from this problem due to thick oil or a weak spring - in fact, the reason for the foot slipping lies in the ratchet.
If the teeth on the basket are not worn out, it is advisable to rivet the ratchet: buy a new one in the store or remove it from another basket and rivet it. I riveted several baskets and they went without any problems until the “victory”...
An example of ideal ratchet teeth.
Often and thickly, the rivets on the ratchet weaken and if you don’t notice this in time, they are cut off. To prevent this trouble from happening to you, move the ratchet with your fingers. If it wobbles, drill out the old rivets and rivet them again. Pulling old rivets usually does nothing.
If you are making a clutch “for yourself” and for a long time, be sure to check the condition of the teeth for the motor chain.
If the teeth have already begun to turn back, then such a basket should be immediately thrown into the trash. It will no longer be of any use: the operating noise will increase, it will 100% eat up the motor chain, and there’s never an hour when one “fine” day it will lick your teeth and you will then be forced to push your jalopy for a long time and tediously...
An example of worn teeth.
It is not uncommon for the basket body to burst. Unfortunately, the body is made of cast iron and welding it will be problematic. If you find cracks on the body, try to find a welder who welds non-ferrous metals, the so-called “argon welder”; they usually take on welding cast iron.
An example of cracks in the basket body. By and large, this basket can still be saved: chamfer the cracks, weld and turn the seams on a lathe. But the teeth under the motor chain were worn out and I threw it away.
Final stage
Next, the second and third speed gears are removed from the input shaft, after which the input shaft is dismantled. To do this, you will need to carefully knock it out using a stopper and a light hammer. The upper and lower forks are removed.
Next comes the intermediate shaft assembly
Using a screwdriver or other suitable tool, bend the clamp with the neutral indicator and carefully pull out the worm wheel. On its far side there are adjusting washers that could stick to the crankcase
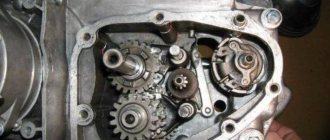
They need to be collected and stored with the rest of the removed parts. Next is the turn of the copy shaft. Check the edges of the shaped sockets in which the guide forks move. They should not have chips or dents. We unscrew a couple of screws securing the switching mechanism, which is also removed. Now you can replace unusable parts and assemble the Izh-Planet 5 gearbox according to the scheme. The figure below shows: retaining cap (1), bolt (2), crankshaft sprocket (3), double-row chain (4), clutch drum (5), input shaft (6).
Main stage
As noted in the assembly diagram of the Izh-Planet 5 box, further disassembly operations are carried out above the insides of the roof of the unit, since the secondary shaft and sector could remain in it. If it is necessary to remove them, you need to straighten the petals of the lock washer, unscrew the nut, remove the star and washer. Holding the gear very carefully to prevent the shaft from jumping out, the cover is moved to a clean and flat surface with the gear facing up.
It is worth noting that the bearing of this part of the assembly does not have a retaining ring. Therefore, when removing the shaft with bearing, the rollers may fall out, so be careful. If the specified element has exhausted a decent service life, there is a risk that when dismantling the secondary shaft, the outer ring may jump out of the seat and remain on the rollers. Next you need to start pressing out the oil seal. To do this, the installation rings are removed from the hole in the cover, after which the outer ring of the bearing is removed.
First changes
In 1977, the next version of the motorcycle went into production - Izh Planet 3 01. When creating this model, the developers followed the same path as when modifying the Izh Jupiter. The changes affected:
- Front fender, height-adjustable above the wheel.
- Rear shock absorbers, the design of which has been significantly improved, adding the ability to change the spring preload.
- Power unit. Boosting the engine by increasing the compression ratio made it possible to increase power to 20 hp. With. But this required installing a spark plug with a different heat rating - A-23, increasing the area of the cooling fins and changing their shape.
- The design of the steering wheel, on which rear-view mirrors appeared, and the ends of the control handles received protection for hands in case of a fall in the form of rubber balls.
- Front brake that got a brake light frog.
- Installed standard safety bars that protected the motorcyclist in an accident
The last motorcycle Izh Planeta-3 01 rolled off the assembly line in 1981. By this time, 400,845 copies of this modification had been produced.
This is interesting: Kawasaki ER-6N 2006 motorcycle: explained in detail
Improved ride quality
The icing on the cake, and in our case the final touch of tuning, is the improvement in driving performance. Some of the tuners approached this issue earlier when they sawed the frame of their motorcycle or raised the tail of a future crossover. For the rest, first of all, you should get rid of your original tires. Among its advantages, only wear resistance can be noted, for which you pay with your safety. It is both universal and useless. The lugs are practically useless; if they get into a mess, under normal conditions on the highway it is noisy, but relatively holds the road, turning into a killer on a wet highway.
Therefore, without hesitation, we throw it away and purchase road, cross or all-purpose tires, based on your requirements. The second point is the suspension. If everything is generally clear with the rear shock absorbers, they are extremely reliable and, in addition, have stiffness settings, then the front fork does not leak only for those who have chosen a different brand. There are two ways to get out of this situation. The first is to add thicker oil. The second is to carry out a complete overhaul of the feathers and replace all parts. Both options do not last long, so the most demanding owners simply change the fork to an imported one, while the rest endure all the shortcomings of their iron horse.
Clutch faults
Possible malfunctions that may appear during operation of IZ motorcycles.
The clutch of IZH Jupiter IZH Planet is slipping reasons
The malfunction is noticeable during sudden acceleration. We increase the speed, but the motorcycle does not accelerate. The same thing happens when driving on a steep hill as the load increases. The motorcycle cannot overcome the obstacle and stops, although the crankshaft speed does not drop. The discs get very hot and wear out quickly. It is impossible to operate the equipment in this condition; the cause must be found and eliminated.
This malfunction indicates that the disks are poorly pressed against each other.
There may be several reasons:
- The adjustment was not carried out correctly
- The springs have lost their former elasticity
- The discs have worn out and become thinner.
- Wear of drive parts
A serious problem could be a jammed control cable. The reason is damage to the shell and the resulting rust underneath. Gentle cleaning and lubrication, better replacement.
Check and wash the adjustment mechanism itself located in the right engine cover. Small particles of road sand that get into the mechanism with water can slow down the operation. After squeezing the lever, the parts do not return to their original position.
You'll find some, you'll lose some.
The Third Planet, due to its lower motor power, was somewhat inferior to Jupiter in dynamics. Owner reviews indicate that this shortcoming was compensated for by better traction at low speeds. This gave certain advantages when driving over rough terrain.
But, despite the fact that the engine capacity of the Izh Planet-3 remained almost the same as that of the two-cylinder unit of the older model, fuel consumption increased significantly. At high speeds it reached 5 liters per 100 km. But the ignition adjustment has been simplified.
Izh Planeta-3 was produced from 1971 to 1977. During this time, 478,496 vehicles of this modification were manufactured. They had minor differences, such as the color of the seat upholstery materials and the side trims on the tank.