What I like about the Planetovskaya checkpoint is that it can be disassembled and repaired without disassembling the engine or even removing it from the frame: directly in place, without even draining the oil: we lay the motorcycle on its side and repair it - this is actually in terms of repair and the service is very convenient.
The second pleasant point is that the gear ratios of the first second and third gears in the “Planetovskaya” gearbox can be changed at your discretion by simply selecting gears and shafts from other models of motorcycles of the “Planetovskaya” series. Thereby making the desired gear faster or more high-torque.
Assembly
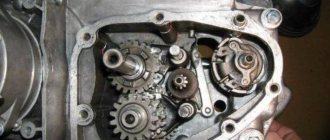
In a carefully washed and prepared for assembly crankcase we place the input shaft, the first gear gear and the follower shaft with pre-selected shims.
We put a fork on the gear-carriage for engaging the second-fourth gear (it is smaller than the gear-carriage for engaging the third-first gear, you can’t go wrong) as shown in the picture. We put the gear on the input shaft and insert the fork pin into the upper groove of the follower shaft.
We put a fork on the gear-carriage for engaging the first-third gear, as shown in the picture, place it on the first gear gear and insert the fork pin into the lower groove of the copy shaft.
We install the fork guides in their places (with grooves towards the clutch basket). By the way, if necessary, the “Planetovskaya” gearbox can be assembled and disassembled without disassembling the clutch basket and without removing the guides. But to do this, during installation you will have to pull the tracing shaft towards you a little, insert the pins of the forks into the grooves and after that, remove the locking bar and push the tracing shaft all the way.
Install the intermediate shaft.
On older engines, the end gear is installed separately. On later ones, it is made integral with the intermediate shaft.
We fill the return spring of the gear shift shaft as shown in the picture.
We check the functionality of the gearshift shaft pawls: compress and unclench them several times
We pay special attention to their working edges: they should be sharp and not licked. And don’t forget to check the spring that compresses the pawls: it must be of the correct shape and ensure the elasticity of the pawls’ movement
We squeeze the pawls and install the gear shift shaft in its place.
We rotate the tracking shaft with the mark on the body towards the gear shift shaft and so as not to miss the mark during installation, we cover the gap between the teeth opposite the mark of the tracking shaft with lithol or paint it. It will be more noticeable this way.
We look for a mark on the sector and when putting the sector on the gear shift shaft, we combine the mark on the sector with the mark on the tracking shaft body: the tooth opposite the sector marks should strictly fit between the teeth opposite the mark of the tracking shaft.
To ensure that our marks do not get lost during installation, we tie together the sector and the copy shaft with ordinary sewing thread.
We put standard thrust washers on the input and follower shafts and insert the guide bushings of the gearbox cover into place.
We degrease the surfaces, apply sealant, lay the gasket, install the cover and tighten the mounting bolts with the maximum possible force. We adjust special washers under the bolts marked with yellow arrows.
After tightening the gearbox cover, we check the axial play of the primary and secondary shafts. Normal: 0.2-0.4mm.
If the play is greater than normal, remove the plate, seat the bearing and adjust the required number of shims under it.
Characteristics of the IZH-P5 motor
| engine's type | Single-cylinder, carburetor, two-stroke, air cooled. |
| Working volume, cm3 | 346 |
| Maximum power, l. With. | 22 (20.9…23.1 at 4850±10% rpm |
| Cylinder diameter, mm | 72 |
| Piston stroke, mm | 85 |
| Compression ratio | 8,2-8,7 |
| Cylinder-piston group lubrication system | mixture of fuel and oil. On later motorcycle models, oil supply is used by an oil pump, which proportions the oil supply depending on the crankshaft speed and engine load in ratios of 1/25-1/100 to the gasoline supply. The filling capacity of the Izh P-5-01 motorcycle engine crankcase is 0.7 l, oil M-8V, M-10V2, MS-14, MS-20, MGD-14M or their foreign analogues. |
| Carburetor | K-65I (in earlier ones - K-62I) |
| Fuel used | motor gasoline with an octane number of at least 76. With a joint lubrication system, gasoline is used in a mixture with motor oils M-8V, M-10V, aviation oil MS-20 in a ratio of 25: 1, or a mixture of gasoline and oil for two-stroke engines MGD-14M (or its foreign analogues) in a ratio of 50:1. |
| Gas tank capacity | 18 l. |
| Air filter | contact-oil |
| Oil filling capacity in the air filter | 0.15 l engine oil |
| Generator | Generator - a three-phase electric machine with electric machine excitation and an electronic rectifier-voltage stabilizer BPV-14-10 (BPV-21-15), with a power of initially 100, then 140 W, or a single-phase generator with excitation from permanent magnets and an electronic regulator RNM-1, power 90 W. |
| Ignition | battery contact capacitor, on later models electronic non-contact, with automatic control of ignition timing based on crankshaft speed and independent of the battery. |
| Spark plug | A23B (or foreign analogues) |
| Accumulator battery | lead acid, type 6MTS-9, 12 volt 9 Ah |
| Transmission | |
| Transfer from engine to clutch | double-row bushing drive chain (reinforced) in an oil bath |
| Clutch | multi-disc in oil bath |
| Gearbox housing filling capacity | 1.0 l, oil M-8V, M-10V2, MS-14, MS-20 or their foreign analogues. |
| Transmission | three-shaft four-speed in one unit with engine and foot gear shift. |
| Transmission from gearbox to rear wheel | closed bushing single row chain |
| Gear ratio from engine to clutch | 2,17 |
| Gear ratio from gearbox to rear wheel | 2,33 |
| Gearbox ratios in gears: | |
| I | 3,88 |
| II | 2,01 |
| III | 1,26 |
| IV | 1,0 |
Repair
Once the unit has been gutted, you can begin to determine the parts that need to be replaced. As a rule, you have to buy a set of shims, a set of gaskets and sealant. This is the case if there are no more serious damage. Once you have decided on the elements to be replaced, you will need to adjust the worm shaft axis, and after final assembly, the clearance along the axis of the primary, intermediate and secondary shafts.
Adjusting washers are placed on the far ledge of the copy roller; they should be lubricated with a special compound. A support washer is mounted on the near edge, and the shaft is put in place. It should be turned so that the neutral sensor with its protrusion fits into the deepest groove. Then, using a ruler (without the gearbox cover yet) on the plane of the crankcase, measure the gap between the washer and the dipstick. It should be no more than 0.2 mm. Depending on the indicator, regulators are added or removed. If it is impossible to accurately set the gap, it is better to make it smaller.
Installation of the cylinder-piston group
It is not advisable to remove the gearbox cover until the sealant has dried; there is no need to rush in this matter.
It’s better not to rush things and install the cylinder while the sealant dries. Add some motor oil:
To improve lubrication, it is advisable to drill holes in the piston bosses. But you don’t have to drill - it depends on your desire.
Install the piston pin retaining ring into the boss. Before installation, it is advisable to bend the locking ring a little and be sure to check how it fits after installation:
We heat the piston with a hairdryer and, using a mandrel, drive the finger into the piston so that it comes out no more than 5-6mm.
We look for an arrow-shaped mark on the bottom of the piston.
We orient the piston with the arrow towards the exhaust port of the cylinder (“towards the exhaust”), put the piston on the connecting rod, hammer in the piston pin and install the second retaining ring.
We insert the rings into the cylinder and measure the gap between the locks with a feeler gauge:
To improve the wearability of the rings and reduce noise from engine operation, it is advisable to chamfer the edges of the rings. If hunting gets too much trouble: place the ring on a flat surface and use a file to slightly round the edges.
We put the rings on the piston, fill the piston with the rings with oil, install a gasket under the cylinder (preferably with sealant), tighten the rings with a clamp. We cut the clamp out of tin and from the same tin we bend the bracket with which we will fix it.
After the rings go into the cylinder, unfasten the clamp, lower the cylinder and screw it to the crankcase.
We turn the crankshaft several times and if the piston moves in the cylinder easily and without grinding, lower it down a little, pour a little engine oil into the cylinder, install a new gasket on the cylinder and screw the head on.
We install the additional crankshaft support bearing in its place, place the required number of adjusting washers on top and secure it with a retaining ring. The adjusting washers must ensure axial play of the crankshaft within 0.1 mm.
Before installation, sealed bearings must be opened! The usual 304 goes here.
On the other side of the crankshaft we install a flange with a main oil seal.
Pay attention to the oil channel through which oil flows to the right main bearing of the crankshaft. According to the good old collective farm tradition, this channel is sealed with sealant and the lubrication of the bearing stops
To avoid this trouble, place the flange dry without sealant and everything will be fine.
After the sealant has dried, you can begin adjusting and assembling the gearbox and replacing the clutch basket.
Numbers of bearings and oil seals for the Izh-Planet motorcycle engine 2, 3, 4 and fifth model.
Common faults
The most common problem with IZ Planet 5 is the spontaneous switching off of second gear. This problem is common on many other motorcycles, but this breakdown is often associated with careless gear shifting. When the first gear “spins” to high speeds, bypassing the “neutral” gear, the engagement with the second speed gear causes an impact, which causes wear. To prevent such a malfunction, it is not recommended to spin the first gear too much. But if the second one still dies, then some ways to eliminate the problem are possible:
The simplest method that will help in some cases. Place the motorcycle on its right side, then remove the kick starter and gear shift lever along with the shaft. Then remove the left crankcase cover, and then remove the clutch basket along with the discs. During operation, the gearbox gears wear out, which causes the meshing of the teeth to deteriorate. This leads to slipping and jerking of the transmission until the second gear fails. Sometimes, when replacing a gear, the problem is not always solved, and lies in the wear of the bearings of the input shaft, which moves to the left over time due to vibrations. To fix the problem, you need to remove the stopper of the input shaft bearing, then move this bearing with light blows of a mallet or with a hammer through the “spacer”, so as to move the shaft to the right. To fix it in this position, you should place washers of appropriate diameter under the bearing. Using the number and thickness of washers, ensure that there is no play in the input shaft, then return the bearing stopper to its place, reassemble the clutch basket and other parts in the reverse order.
- If fourth gear disappears. This is often due to failure of the secondary shaft bearings. This is due to the appearance of axial play in the secondary shaft when the bearings are displaced or fail. This malfunction can be repaired in the same way as repairing the second gear by removing the left crankcase cover.
- If the gear shift jams from upshift to downshift, the spring of the shift mechanism pawls has broken and must be replaced.
- If the gearbox switches tightly after assembly, it indicates incorrect installation of the adjusting washers.
How to change gears in Izh Planet-5
For beginners, changing gears on a motorcycle is difficult.
In fact, thanks to the existing gearbox, this is not so difficult. Attention! On motor vehicles, there are two types of gear shifting: “up” and “down”. In this case, the first is used to engage a higher gear, and the second – a low one.
In order to increase the speed on Izh Planet-5, you need to follow several steps:
- engage first gear and gradually increase speed;
- quickly release the gas while simultaneously lowering the speed. At the same time, you should squeeze the clutch lever;
- engage the next gear;
- release the clutch, after which you can immediately increase the speed and increase the revolutions.
When going uphill, it may be necessary to engage a low gear using the down shifter to increase power from the rear wheel. In this case, the action algorithm will be as follows:
- slow down and squeeze the clutch lever;
- engage low gear;
- The clutch can be released and the gas applied.
The Izh Planet gear shift shaft has the following speed modes: first (goes with downward pressure), second and the rest up to four (goes up), and between the second and third there is a neutral position.
Detection of faulty parts
To learn how to determine the damage and degree of wear of gearbox gears, consider the classification by which you can make the right decision about repairs. The gear needs to be replaced if:
- there is at least one broken tooth, or the presence of cracks in any part of the tooth caused by plastic deformation of the gear material.
- when the working surface of the gear is chipped by 20 percent or more, when the depth of chipping is 5 percent or more of the tooth thickness.
- if there is corrosion on the working surface of the gears;
- if the contact patch is less than 80 percent of the width of the teeth, and less than 60 percent of the height.
Installation of bearings and seals
We install a retaining ring in the left half of the crankcase.
Depending on the model of the main oil seal, we install a spacer sleeve in the mounting hole of the main bearing, or, if the oil seal was initially wide (there are some), we heat the crankcase and, on the inside of the crankcase, place the oil seal until it stops against the retaining ring.
My engine had a regular narrow oil seal, so I put in a bushing.
Using a mandrel, install the main oil seal into the preheated crankcase.
Quickly, before the crankcase cools down, place the oil guide washer on the oil seal. The oil guide washer has a saucer-shaped profile. We place it on the oil seal so that the concave side faces us, and the curved side faces the clutch basket.
While the crankcase has not cooled down, we press the outer race of the main bearing into it using a mandrel.
If you are going to replace the main bearings with new ones, don’t be lazy: find a sheet of iron 7-8 mm thick, cut a wedge in it for the connecting rod, pass the sheet of iron between the cheeks of the crankshaft and use a mandrel to drive the main bearing onto the axle.
This way you will protect yourself from damage to the crankshaft. The main bearing has a very high interference and fits into the axle with a very large force. It is not uncommon for people to simply knock out the axle (the axle on the planetary crankshaft is pressed into the cheek) inside the crankshaft, but they were never able to put the bearing on.
Source
Maintenance Features
Often during operation it is necessary to correctly set the gap between the contacts of the breaker. To do this, you need tools and a diagram to see which elements need to be dismantled.
Tip: a video on servicing a particular motorcycle component is a good help these days. For example, on our website there are materials on servicing several brands and models, and you can glean the information you need from them (see, for example, the article on Java 350 wiring).
The algorithm of actions is as follows:
- place the motorcycle on the stand;
- turn on neutral;
- unscrew the spark plug from the cylinder;
- remove the engine crankcase cover;
Familiar problems
"Gazelle": disassembling the box. “Gazelle Next”: disassembling and assembling the gearbox
Reviews from owners indicate that, regardless of the version and year of manufacture, the Izh Planet-3 motorcycle had the same disadvantages:
- Engine vibration associated with its design features. Almost all single-cylinder engines suffer from this.
- Problematic electrical equipment. Almost identical to the Jupiter of the same years of production, the 6-volt wiring installed on Izh Planet-3 was not of very high quality. An insufficiently powerful generator created problems when driving at night.
Completely eliminating engine vibrations is almost impossible. Even serious engine tuning does not completely solve the problem. You have to put up with this feature of technology. As for electrics, motorcycle lovers who are interested in tuning Izh Planet-3 often ask the same questions:
- How to detect ignition system malfunctions?
- What to do if charging is lost?
- How to replace the relay regulator?
- Does it make sense to install electronic ignition?
- How to replace a failed generator?
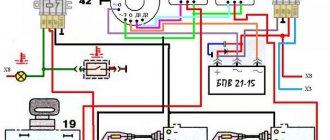
- Where can I find the wiring diagram for Izh Planet-3 at 6 volts?
- How to install BSZ?
These questions are countless and it is simply impossible to answer them in one review article. This requires digging deeper. And therefore we will try to answer as briefly as possible.
- Since the wiring diagram on Izh Planet-3 was repeatedly changed even depending on individual series, one cannot count on an exact match of its description. Sad but true.
- Replacing electrical wiring, switching electrical equipment operating from 6 volts to 12 volts and installing contactless ignition are completely justified steps to improve the performance of a motorcycle. After such modernization, ignition installation is simplified, and engine operation becomes more stable. At the same time, you will know exactly how the electrical circuit of your Izh Planet-3 works!
But it’s clearly not worth getting down to business without the necessary skills or suitable tools. As for DIY tuning enthusiasts, for them the Izh Planeta-3 motorcycle is an unplowed field for activity. There is room to expand here. Go for it!
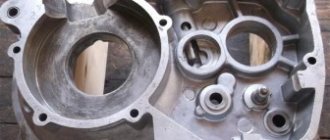
Preparation
To perform a high-quality repair, the engine parts must be clean, the threads in the crankcase must be threaded, the seals and gaskets must be new.
First, we clean the oil channels in the crank chambers. There are two channels in the Izh-Planet engine: one in the left half of the crankcase, the other in the right. We find the channels and if they are very clogged, we clean them with wire, rinse them with clean gasoline and blow them with compressed air.
Retro style
Detailed instructions and wiring diagram for a pioneer car radio
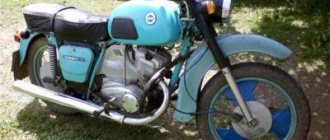
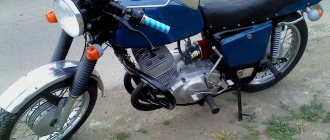
Nowadays, the fashion for old and vintage cars and motorcycles is actively developing. Models from 30 to 50 years ago are kept in barns and distant villages to be restored to their original form. The idea of this style is a complete or partial restoration of the motorcycle to its factory appearance. The closer and better the work is done, the better the tuning of IZH Planet 5 with your own hands looks photo:
Do not think that it is so simple, because even for such a relatively new model, it is becoming increasingly difficult to find original spare parts. Particularly expensive are fragile dashboards, original trunks and dented gas tanks. You'll have to hunt for these details. It will be very expensive to restore Soviet chrome and paint all chips and scratches. This style is suitable for true connoisseurs of the brand and those who prefer to spend hours and days in the garage.
You'll find some, you'll lose some.
The Third Planet, due to its lower motor power, was somewhat inferior to Jupiter in dynamics. Owner reviews indicate that this shortcoming was compensated for by better traction at low speeds. This gave certain advantages when driving over rough terrain.
But, despite the fact that the engine capacity of the Izh Planet-3 remained almost the same as that of the two-cylinder unit of the older model, fuel consumption increased significantly. At high speeds it reached 5 liters per 100 km. But the ignition adjustment has been simplified.
Izh Planeta-3 was produced from 1971 to 1977. During this time, 478,496 vehicles of this modification were manufactured. They had minor differences, such as the color of the seat upholstery materials and the side trims on the tank.
Checking the clutch drum
The first step is to check the foot start ratchet mechanism. This is where the main load falls. Turn the clutch basket over with the ratchet facing you, remove the retaining ring and disassemble the ratchet.
We inspect the teeth of the ratchet: they should be sharp without chips or other damage. If the teeth are wrinkled or broken, the winding foot will slip 100%. Many suffer from this problem due to thick oil or a weak spring - in fact, the reason for the foot slipping lies in the ratchet.
If the teeth on the basket are not worn out, it is advisable to rivet the ratchet: buy a new one in the store or remove it from another basket and rivet it. I riveted several baskets and they went without any problems until the “victory”...
An example of ideal ratchet teeth.
Often and thickly, the rivets on the ratchet weaken and if you don’t notice this in time, they are cut off. To prevent this trouble from happening to you, move the ratchet with your fingers. If it wobbles, drill out the old rivets and rivet them again. Pulling old rivets usually does nothing.
If you are making a clutch “for yourself” and for a long time, be sure to check the condition of the teeth for the motor chain.
If the teeth have already begun to turn back, then such a basket should be immediately thrown into the trash. It will no longer be of any use: the operating noise will increase, it will 100% eat up the motor chain, and there’s never an hour when one “fine” day it will lick your teeth and you will then be forced to push your jalopy for a long time and tediously...
An example of worn teeth.
It is not uncommon for the basket body to burst. Unfortunately, the body is made of cast iron and welding it will be problematic. If you find cracks on the body, try to find a welder who welds non-ferrous metals, the so-called “argon welder”; they usually take on welding cast iron.
An example of cracks in the basket body. By and large, this basket can still be saved: chamfer the cracks, weld and turn the seams on a lathe. But the teeth under the motor chain were worn out and I threw it away.
Final stage
Next, the second and third speed gears are removed from the input shaft, after which the input shaft is dismantled. To do this, you will need to carefully knock it out using a stopper and a light hammer. The upper and lower forks are removed.
Next comes the intermediate shaft assembly
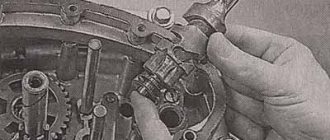
Using a screwdriver or other suitable tool, bend the clamp with the neutral indicator and carefully pull out the worm wheel. On its far side there are adjusting washers that could stick to the crankcase
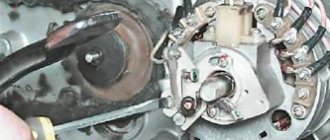
They need to be collected and stored with the rest of the removed parts. Next is the turn of the copy shaft. Check the edges of the shaped sockets in which the guide forks move. They should not have chips or dents. We unscrew a couple of screws securing the switching mechanism, which is also removed. Now you can replace unusable parts and assemble the Izh-Planet 5 gearbox according to the scheme. The figure below shows: retaining cap (1), bolt (2), crankshaft sprocket (3), double-row chain (4), clutch drum (5), input shaft (6).
First changes
In 1977, the next version of the motorcycle went into production - Izh Planet 3 01. When creating this model, the developers followed the same path as when modifying the Izh Jupiter. The changes affected:
- Front fender, height-adjustable above the wheel.
- Rear shock absorbers, the design of which has been significantly improved, adding the ability to change the spring preload.
- Power unit. Boosting the engine by increasing the compression ratio made it possible to increase power to 20 hp. With. But this required installing a spark plug with a different heat rating - A-23, increasing the area of the cooling fins and changing their shape.
- The design of the steering wheel, on which rear-view mirrors appeared, and the ends of the control handles received protection for hands in case of a fall in the form of rubber balls.
- Front brake that got a brake light frog.
- Installed standard safety bars that protected the motorcyclist in an accident
The last motorcycle Izh Planeta-3 01 rolled off the assembly line in 1981. By this time, 400,845 copies of this modification had been produced.
This is interesting: Kawasaki ER-6N 2006 motorcycle: explained in detail