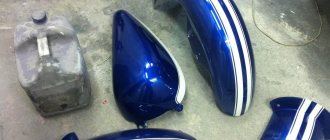
If you have a hand painted motorcycle, most of the paint is on the gas tank. Unfortunately, this is also the area most prone to dents and dings. Having a dented motorcycle gas tank professionally repaired is expensive, not to mention the fact that you'll be without your bike while it's being repaired. Before you call a repair shop, try getting the dent out yourself with this automatic dent repair trick that pulls out dents without damaging your paint job.
Dent on the gas tank? Let's straighten it out!
Does your motorcycle tank have a dent?
It’s okay, it happens, because only those who don’t drive don’t fall. But now the gas tank needs repairs, and the service center will charge a lot of rustling pieces of paper for straightening and painting... But you can do everything yourself if your hands grow from the right place, and at the same time they are no more crooked than the face of the alcoholic Petrovich from next door entrance on Monday morning. You can fix a dent on the tank yourself! First you need to determine the extent of the damage. If the dent on the gas tank is small, and the tank itself is painted without any tricks like stickers under the varnish or airbrushing, then you can get by with local editing and painting. If the damage is serious, you will have to paint the entire tank. In the second case, everything is clear, but what to do in the first? First, you need to estimate the surface area that will be subject to deformation during the process of straightening the dent, and carefully clean it from the paintwork. There’s probably no need to explain to anyone how to remove paint from a gas tank. Having finished this, you need to straighten the dent. A reverse hammer is ideal for these purposes - a special device for straightening such dents. It is unlikely that it was lying around in your garage purely by chance, but you can buy it or borrow it from friends. But we are not looking for easy ways! Or, suppose we don’t have a reverse hammer, there’s no one to borrow it from, and the lack of extra finances doesn’t allow us to buy it. Then there is another way, but we will need a soldering iron, soldering acid, solder and braided steel cable. Intriguing start, huh? So, you need to strip about five centimeters on one side of the cable, unravel it and tin it. The dent on the tank must also be tinning. Having finished with this, take the cable and firmly solder its unbraided elements to the place on the motorcycle tank that needs to be straightened. Then we begin to use moderately brute force - we pull the cable, if necessary we jerk it, but only carefully, then the cable will not come off from the solder point. This way you will gradually draw out the dent in the gas tank enough so that it can be hidden during the painting process. Only if you still use a reverse hammer, and not this whole Kama Sutra with a cable and a soldering iron, do not overdo it.
Having finished editing, remove the remaining solder from the gas tank (if you used a cable circuit), clean the surface, level, prime and prepare for painting. That's it, you can paint, after, of course, carefully covering with masking tape all those parts of the motorcycle that should not be accidentally painted.
Source
Many motorcyclists experience dents appearing on various parts of their bikes. It is also not uncommon for a new coat of paint to be applied. This spectacle cannot be called pleasant. Immediately the appearance of the motorcycle becomes less attractive.
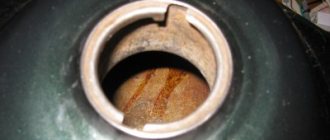
The gas tank very often suffers from mechanical damage. All sorts of dents and chips often appear on it, which are very difficult to correct. Moreover, to eliminate them you need to spend a lot of money, which not every motorcyclist has. Today, every owner of his own bike has a wide choice of means to bring his motorcycle’s gas tank into proper condition.
Very often putty is used for this purpose. You must be careful when using it. After all, it is very important to do everything in such a way that others do not even suspect that the dent on the tank was hidden with putty.
How to steam a tank correctly
If you decide not to buy a new tank, but to repair the old one, you should not be afraid of gasoline vapors. Yes, they are dangerous, but you can get rid of them quickly and effectively.
The first thing to do is remove the gas tank and inspect it for damage. If the iron tank is repairable, then you can begin to displace gasoline vapors. To do this, you will need hot water and “fairy” (or another highly foaming detergent).
Instructions for steaming the fuel tank and containers
Pour boiling water after adding 50 ml of “fairy” detergent to the tank. It will produce enough foam to clean the container. The tank must be filled to its entire volume with as hot water as possible (taking into account where the damage is located). Then you should wait 2-3 hours.
After several hours, you can drain the water and start drying. A construction hair dryer is best suited for this, but if you don’t have one, then you can get by with an ordinary household hair dryer. However, its effectiveness will be several times lower. The hairdryer should be placed in the neck and left to dry. It is advisable to ensure that the tank dries completely.
Steaming tanks like this gives good results for several reasons:
- water is heavier than gasoline, and therefore will displace its remains upward;
- hot water will cause gasoline to evaporate;
- The detergent removes oil from the tank without damaging the inner surface.
After drying, there should be no gasoline vapor left and you can begin the welding process using a semi-automatic machine (as with regular body repairs). The optimal wire thickness for this is 0.8 mm.
How to Use Putty to Level the Surface of a Motorcycle Gas Tank
Not many modern motorcyclists know how to properly putty a motorcycle tank. For many, this is a rather difficult process. Many people don’t even take up this task because they are afraid of cracks appearing on the surface of the motorcycle’s gas tank.
During work, you need to use putty correctly. Its main purpose is very often to be used for applying paint. It is used to level the surface. In order to hide all the irregularities or small dents, it can be applied in several layers. This must be done carefully using special tools for applying it.
The main task of puttying is to create an absolutely even layer on the surface of the gas tank. The main problem for applying putty is the shape of the motorcycle gas tank. Because of this, cracks may form on its surface, which may subsequently become an obstacle to the application of paint.
Stages of proper puttying of a motorcycle tank
Proper puttying of a motorcycle gas tank is carried out in several stages:
Important: Without degreasing, the putty will not lay down in an even layer, which will lead to cracks.
Thus, to give the tank of your motorcycle an aesthetic appearance, it is not at all necessary to go to motorcycle dealerships, where they charge a large amount of money for the work. At minimal cost, you can putty and make the surface of a motorcycle tank smooth and attractive in your garage, having everything you need at hand.
Tips for choosing and applying putty correctly
Motorcyclists for the most part very often choose those types of putties that they can afford. There is a wide variety of them on the modern market.
When choosing, it is very important to pay attention to the following:
Under no circumstances should putty be applied by hand. It is better to use a special tool for this purpose. With its help, the putty surface will be even and smooth. It will be possible to apply a layer of paint on it evenly.
The tank has a streamlined shape. That is why it is necessary to pay attention to the side areas when applying putty. Only if putty is applied correctly to them, the result will be of high quality and will delight any motorcyclist.
Dent on a motorcycle
Source
How to make bokeh on a camera?
In order to get the bokeh effect in a photo, you must meet simple conditions:
- “open” diaphragm to the maximum;
- longest focal length;
- minimum distance between you and your subject;
- a very impressive distance from the selected object to the background (the greater this distance, the stronger the blur).
- It’s best to choose a less uniform background - the photo will be more interesting.
A lot also depends on the lens you're shooting with. It is best to choose a lens for bokeh with the smallest aperture number, in other words: with the largest aperture opening. In most cases, the lenses that come with DSLR cameras cannot allow you to get a pronounced effect. That’s why some photographic equipment manufacturers have released special lenses for bokeh.
A lens with a focal length of 55 mm and no zoom will contribute to a soft artistic blur of the background.
Garage → We fix the dent on the tank ourselves.
Below the cut I post a description of the method with a photo report of the work done. The author is not me, but Ivan Potapov, I just combed the report and posted it (he doesn’t mind). Can you send him an invite to BP????
We drain the gasoline, unscrew the gas valve, the cap and blow the tank with air.
We clean the dent and a little around it with a circular metal brush (the kind you use on a drill).
This can also be done with abrasive (sandpaper), the result in any case will be something like this:
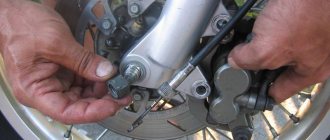
Next, take a powerful soldering iron-axe...
... and tin the soldering points of the nut on the tank with soldering acid. You can also tin the entire area of the dent if it is small, as in this case.
Due to the lack of special tools and devices for tin work, I made a homemade reverse hammer (made in 10 minutes from an M6 bolt, an electrode with a diameter of 4 mm and a weight mounted on it, weighing about 200-300 grams).
The trick is to choose the right soldering location. I started pulling out dents from the edges.
Naturally, having tinned the surface of the nut to be soldered, we solder it in the right place. I did not use a simple nut, but one with an increased area that will be soldered (essentially a piece of a 12 hexagon with an M6 thread).
To prevent the nut from moving from the selected location when soldering, I used an M6 pin approximately 120 mm long.
Solder it. We wait until the solder hardens. By the way, I used solder of an unknown brand, but it is refractory. It won't melt with a regular soldering iron. Actually, we screw the reverse hammer to the soldered nut and begin, holding the weight, to tap out the dent. The number and force of impacts depends on the depth of the dent. When the metal returns to its original shape, the nut simply comes off with the blow of a reverse hammer. That is, unlike welding, it is impossible to tighten the metal.
The elongated surface can be straightened with an ordinary hammer, preferably through a wooden block. It turned out very well. The solder is simply removed from the metal using the same brush attachment on the drill. A thin layer of putty will smooth out the micro-dimples left on the metal. I think for larger dents you will need to use a larger diameter nut.
Source
Types of bokeh in photography
Bokeh can take on different shapes: from pentagons, various circles to all sorts of fancy shapes. In the classic version of bokeh, the number of faces of polygons directly depends on the number of aperture blades: the more blades there are, the more round the bokeh will be.
The degree of brightness also divides bokeh into three main types: low, uniform and high brightness.
- The first type is characterized by fairly bright edges and low brightness in the center of the frame.
- The second is a rather harmonious type of bokeh. It provides an equal distribution of brightness and a “loyal” color scheme. You can create a bokeh effect of this kind only with a high-quality lens.
- The latter is distinguished by faded edges and a high degree of brightness of the elements located in the center of the image.
Removing dents without painting on a motorcycle
Comments 39
the best way is water and cold
It’s a pity you can’t inflate the doors like that! )))
This is how it turned out from the phone. Reply to the one who suggested using alcohol
Half liter? To pieces? Yes I love you ©
In the village, we always ran our tanks with gasoline. 15-20 gr. gasoline and a match, cotton and the tank is even, sometimes more round.
Together with my brother, I inflated the Jupiter tank, pumping a weak compressor. there was a dent on the cheek of the tank from a good kick (the poor design of the ignition drove my brother crazy) in general, the cheeks of the tank swollen in different directions very quickly, but the dent remained.
haha) it turned out to be a drop)))
Together with my brother, I inflated the Jupiter tank, pumping a weak compressor. there was a dent on the cheek of the tank from a good kick (the poor design of the ignition drove my brother crazy) in general, the cheeks of the tank swollen in different directions very quickly, but the dent remained.
but it’s probably roomy)))
A friend of mine once wanted to straighten a luxury tank in real life) So it was swollen, but the dent remained)))
And if there is a dent from the steering wheel, do you think this method will help?
take a photo and I'll tell you
no, there won’t be a photo, I asked for general development! I had a Karpaty moped, and the previous owner drove it without a steering limiter and there were dents on the tank from the triangle that is placed on top of the fork (the steering wheel is screwed to it). It turns out that when the steering wheel was turned, the tank was pressed in like a triangle! I just wanted to remove these dents. I read your thread and decided to ask. Many mopeds, Javas, Izhas, have such dents from the fork!
there's thick metal there, I don't think so
no, there won’t be a photo, I asked for general development! I had a Karpaty moped, and the previous owner drove it without a steering limiter and there were dents on the tank from the triangle that is placed on top of the fork (the steering wheel is screwed to it). It turns out that when the steering wheel was turned, the tank was pressed in like a triangle! I just wanted to remove these dents. I read your thread and decided to ask. Many mopeds, Javas, Izhas, have such dents from the fork!
Bokeh in photography: creating different aperture shapes
Have you ever admired stunning blurs in the form of Christmas trees, hearts and other unusual shapes? In this article we will tell you the secret of creating such an effect.
How to make bokeh in a photo? Yes, it’s very simple: you don’t have to disassemble the optical device, you just need to acquire the following items:
- cardboard;
- a camera with a more or less fast lens;
- pencil;
- scissors;
- and tape.
Let's start making our accessory:
- Use a pencil to trace the edge of your camera lens.
- Surely you will get an even circle of the required diameter. You can also add small “ears” in order to later attach the structure to the lens.
- Now, strictly in the center, draw what you want to see in the picture instead of circles.
The only difficulty in this operation is that for different lenses and focal lengths you will have to make a slot of a certain size. If you make the figure too wide, you will not see the result at all. If, on the contrary, you make the slit not wide enough, you will get the effect of a DX lens: i.e. 100% vinentation at the edges.
But as practice shows, it is better to cut a hole that is too narrow and then expand it, than to overdo it and create the workpiece again.
To quickly check the correct bokeh, simply set the focus mode to manual and point the lens at the nearest object so that behind it there is something like a garland with many lights. If you have a magical shot with a blurry multi-colored background, then you can safely go in search of interesting shots on the evening streets, cafes and shopping centers - there you will find a large accumulation of lights, especially on New Year's holidays.
How to Use Putty to Level the Surface of a Motorcycle Gas Tank
Not many modern motorcyclists know how to properly putty a motorcycle tank. For many, this is a rather difficult process. Many people don’t even take up this task because they are afraid of cracks appearing on the surface of the motorcycle’s gas tank.
During work, you need to use putty correctly. Its main purpose is very often to be used for applying paint. It is used to level the surface. In order to hide all the irregularities or small dents, it can be applied in several layers. This must be done carefully using special tools for applying it.
The main task of puttying is to create an absolutely even layer on the surface of the gas tank. The main problem for applying putty is the shape of the motorcycle gas tank. Because of this, cracks may form on its surface, which may subsequently become an obstacle to the application of paint.
Correct braking technique on a motorcycle
[sc:ads3]
When driving around the city, there is always the possibility that an emergency stop may be necessary. In order to successfully cope with the problem that has arisen, you need to sit on the motorcycle correctly. When seated correctly, the rear should be positioned as far away from the tank as possible. Your knees must rest against the tank, and your arms must be straightened at the elbows.
When braking, you should adhere to the following sequence of actions:
The motorcycle must be leveled vertically.
While driving when braking, you should analyze how the pads behave, how the tires adhere to the asphalt, you should pay attention to how the speed changes depending on the heating of the pads.
You should also determine and select for yourself the best option for how many fingers are best to press on the lever and what effort needs to be applied for this. All these actions will greatly help if the need arises to use an emergency stop.
[sc:ads5]
The most popular types
Depending on the location, bath tanks are divided into built-in, mobile and pipe-mounted. Built-in tanks are installed separately from other structures. They are installed during the construction of the stove inside the heating system using various fasteners and installations. In built-in containers, water is heated directly from the fire, so the efficiency is quite high.
It is impossible not to mention that this reduces the heat transfer from the stove itself, since most of the energy is spent on heating the water in the tank. The volume of the built-in tank is determined by the size of the stove itself.
Dent on the gas tank? Let's straighten it out!
Does your motorcycle tank have a dent? It’s okay, it happens, because only those who don’t drive don’t fall. But now the gas tank needs repairs, and the service center will charge a lot of rustling pieces of paper for straightening and painting... But you can do everything yourself if your hands grow from the right place, and at the same time they are no more crooked than the face of the alcoholic Petrovich from next door entrance on Monday morning. You can fix a dent on the tank yourself! First you need to determine the extent of the damage. If the dent on the gas tank is small, and the tank itself is painted without any tricks like stickers under the varnish or airbrushing, then you can get by with local editing and painting. If the damage is serious, you will have to paint the entire tank. In the second case, everything is clear, but what to do in the first?
First, you need to estimate the surface area that will be subject to deformation during the process of straightening the dent, and carefully clean it from the paintwork. There’s probably no need to explain to anyone how to remove paint from a gas tank. Having finished this, you need to straighten the dent. A reverse hammer is ideal for these purposes - a special device for straightening such dents. It is unlikely that it was lying around in your garage purely by chance, but you can buy it or borrow it from friends. But we are not looking for easy ways! Or, suppose we don’t have a reverse hammer, there’s no one to borrow it from, and the lack of extra finances doesn’t allow us to buy it. Then there is another way, but we will need a soldering iron, soldering acid, solder and braided steel cable. Intriguing start, huh? So, you need to strip about five centimeters on one side of the cable, unravel it and tin it. The dent on the tank must also be tinning. Having finished with this, take the cable and firmly solder its unbraided elements to the place on the motorcycle tank that needs to be straightened. Then we begin to use moderately brute force - we pull the cable, if necessary we jerk it, but only carefully, then the cable will not come off from the solder point. This way you will gradually draw out the dent in the gas tank enough so that it can be hidden during the painting process. Only if you still use a reverse hammer, and not this whole Kama Sutra with a cable and a soldering iron, do not overdo it.
Making a motorcycle gas tank from scratch with a concave bottom
From scratch.
Making a bent gas tank (with a concave bottom) may take a little longer than making a flat bottom tank, but you won't need to cut out a wooden model to make it. We start work as always by cutting out a cardboard template of the side of the tank, but before this we attach a rectangular sheet to the frame tube and draw the shape of the sidewall corresponding to the length of the frame and a silhouette that suits the design of your motorcycle.
motorcycle tank with a concave bottom.
Also take into account how many degrees the steering wheel with traverses is turned to make sure that when turning they will not rest against the manufactured tank. On most motorcycles with a normal steering angle and wide crossbars, the distance between the steering column and the front of the tank is approximately 60 - 80 mm.
Having drawn the silhouette of the side of the tank you like on cardboard, cut out the cardboard template and attach it to the motorcycle frame, make sure the length and shape are correct, adjust if necessary with a marker and trim off the excess with scissors. Now we transfer it to a metal sheet, 1 mm thick, outline and cut out two sides. By putting them together and holding them with clamps, we grind the burrs and at the same time achieve complete uniformity of the sidewalls. Next, we take one of the sidewalls, place it on a leather pillow and begin to give a convexity to the sidewall, using a hammer with a spherical polished striker (for a deeper convexity, a special hammer is needed). As I already said (when making a flat-bottomed tank), we move in a spiral, from the edges to the center. We achieve uniform convexity throughout the entire plane, but naturally more in the middle than at the edges. When struck, the metal sheet will begin to bend inward; we periodically level it and continue beating.
When the required convexity is achieved (approximately 30 - 40 mm), we put the side panel aside and start working on the second one. When beating off the second side, we constantly check its convexity with the first and, having reached approximately the same profile, we put them together with their concave sides - we check the symmetry of both parts. Having reached the same convexity and the same bend arc, we move on to the initial alignment of the bumps on the parts. To do this, turning them over with the convex side, we place them on a flat polished anvil, we pass through the concave side with blows of a plastic mallet with a spherical striker, and with the blows we seem to smooth out the unevenness. This operation will help make rolling on an English wheel faster and easier.
The next operation will be bending by tapping the edges of the parts on a convex round anvil. We work with a flat spatula or a hammer with a flat polished head, striking along the edge of the sidewall and moving around the perimeter. Having tapped and bent the edge to the required radius on one side, we move on to the second and, tapping the second, we constantly check the first. As I said in the first article (a tank with a flat bottom), all the work of bending the edge around the perimeter would go much faster if you had a shrinkel and a creasing machine. But in the absence of these devices, you can achieve an acceptable result using a hammer. At least the tank I made in the top photo was made without a shrinkel and a zig machine. Therefore, for those who do not have these devices, never mind, you can do without them for the first time, it will just take a little more time to make the tank, but you will gain invaluable experience in manual work.
Having tapped both sidewalls on a flat anvil and bending the required edge around the perimeter, you can begin rolling the sidewalls on an English wheel. Some may wonder what this required edge should be and what the bend radius should be. You will answer this yourself when you make the top of the tank and try to join the edges of the sides and the edge of the top of the tank. Here the discrepancy between the radii will be immediately visible, and as I said in the first article, the radii of the edges of all parts must be the same, and the sheets (edges) of both parts must be in the same plane (flush). The side of the tank should smoothly transition to the top, without a step or wave. Only in this case can you achieve the correct welding seam and after cleaning it, putty will not be needed.
Having rolled both sidewalls between the rollers of the English wheel and achieved a smooth polished surface, we proceed to the manufacture of the upper part of the tank. To do this, you need to secure both sides strictly vertically (we check it on the table with a square) using 4 clamps and two metal strips cut from sheet metal in twos, the length of which depends on the width of your future tank, and the width is approximately 25 - 30 mm.. One strip holds side in front, and the other in back.
We install the vertically fixed side panels on the table and take a paper sheet (not cardboard), place it on top of the edge of the side panels and begin to take the impression. This is easier to do by slightly wrapping a sheet of paper around the plates, pulling it tightly, and pinning it to the plates with clothespins. Next, using a pencil or just dirty fingers, we stroke (with three fingers) on the paper, where the upper edge of the metal sides goes. Gradually, an outline of the top of the tank appears on the paper.
Having removed the paper print from the sides, we cut out the outline of the future upper part of the tank with scissors and fold it strictly in half, checking the symmetry of the right and left sides. If the contours of the sides do not converge a little, then we correct them, achieving complete symmetry of the sides. Now, as usual, we transfer the paper to a metal millimeter sheet and outline the outline with a marker, then cut out and clean off the burrs with a fine file. All that remains is to give the top of the tank the necessary convexity, as well as the sides, and achieve the same bending radius of the edges, for the correct and beautiful joining of the parts. We tap the top part of the tank with a convex hammer and give it a convexity a little less than that of the sides.
Tips for choosing and applying putty correctly
Motorcyclists for the most part very often choose those types of putties that they can afford. There is a wide variety of them on the modern market.
When choosing, it is very important to pay attention to the following:
Under no circumstances should putty be applied by hand. It is better to use a special tool for this purpose. With its help, the putty surface will be even and smooth. It will be possible to apply a layer of paint on it evenly.
The tank has a streamlined shape. That is why it is necessary to pay attention to the side areas when applying putty. Only if putty is applied correctly to them, the result will be of high quality and will delight any motorcyclist.
Dent on a motorcycle
Dents on the tank of a motorcycle, moped or ATV can appear as a result of an accident or an accidental fall, even in a parking lot - without your participation.
Important: Without degreasing, the putty will not lay down in an even layer, which will lead to cracks.
Thus, to give the tank of your motorcycle an aesthetic appearance, it is not at all necessary to go to motorcycle dealerships, where they charge a large amount of money for the work. At minimal cost, you can putty and make the surface of a motorcycle tank smooth and attractive in your garage, having everything you need at hand.
Tips for choosing and applying putty correctly
Motorcyclists for the most part very often choose those types of putties that they can afford. There is a wide variety of them on the modern market.
When choosing, it is very important to pay attention to the following:
Under no circumstances should putty be applied by hand. It is better to use a special tool for this purpose. With its help, the putty surface will be even and smooth. It will be possible to apply a layer of paint on it evenly.
The tank has a streamlined shape. That is why it is necessary to pay attention to the side areas when applying putty. Only if putty is applied correctly to them, the result will be of high quality and will delight any motorcyclist.
Dent on a motorcycle
Removing dents from a motorcycle tank in AutoTemple
Paintless dent removal technology, popular among car enthusiasts, is now available to motorcycle owners.
If the paintwork is not damaged, then dents from the tank of a motorcycle or moped can be removed without painting.
Fast and safe
The repair does not require disassembling the motorcycle, and the tank itself does not require painting; as a result, leveling the motorcycle tank takes a little time.
Profitable
Repair using paintless coating technology will cost you much less than completely repainting the tank.
Effectively
The technology for removing dents from a motorcycle tank without painting makes it possible to preserve the factory paintwork.
Our local repair center offers professional services for removing dents from a motorcycle tank in Moscow without painting. At the same time, the repair itself takes place quickly and consists of the following stages:
If the paint coating is damaged, then the part is mechanically leveled, the old paint coating is removed, the part is straightened, and then a new paint coating is applied and final polishing is carried out.
Preparing the tank for painting
Owners of modern motorcycles often want to change the appearance of their equipment, so they turn to painting specialists. You can find good craftsmen to perform tasks of any complexity in Pm-moto.
Painting a motorcycle tank in Moscow involves careful selection of the color and type of paint itself. Thanks to this approach, our specialists will not only effectively paint the tank of your bike, but also ensure its protection from the harmful influences of the external environment.
The benefits of service in our motorcycle service include:
After all work, the tank must be checked for leaks and a protective coating is applied to its internal surfaces.
The motorcycle tank is painted using the best materials from well-known manufacturers. We have a wide range of high-quality paints and enamels in our warehouse, so customers always have plenty to choose from in a suitable color and shade.
We have an excellent reputation, which once again proves that the best bike maintenance and impeccable motorcycle tank painting in Moscow is carried out at Pm-moto. To make an appointment to paint a motorcycle, call our managers or do it using a special online form, indicating the desired time to visit the motorcycle service center.
Selection of materials
There are several materials that are used to make sauna tanks.
Cast iron
The classic option for making sauna tanks is cast iron. However, this option has a number of both pros and cons. Despite the fact that this material is undoubtedly very strong and durable, heating water in such a container requires a large amount of fuel and time, but the high temperature of the water remains for a long time. Cast iron is not afraid of corrosion and temperature changes. One of the most significant disadvantages of cast iron is its large mass and the difficulty of making it yourself. In addition, it requires mandatory protection from exposure to high humidity.
Stainless steel
Stainless steel bath tanks are increasingly being used. Their popularity is due to the fact that they:
- do not need protection from high humidity and negative environmental influences;
- have a high percentage of heat conductivity, which ensures heating of water in a short time;
- practically do not give in to deformation under sudden temperature changes;
Enameled material
Sauna tanks made of enameled material are practically rust-resistant.
Also, enameled containers have one important limitation during installation - they should not be built into the surface of the oven. In principle, these are all the basic rules when choosing a container for a bath, following which will help you enjoy the washing process for a long time
In principle, these are all the basic rules when choosing a container for a bath, following which will help you enjoy the washing process for a long time.
Most likely, you just (or a week ago) saw on the Internet a beautiful photo with a completely unusual, one might even say “magical” effect, and now you passionately want to create the same thing with your camera.