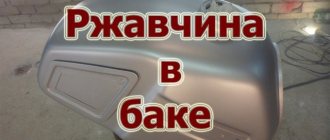
How to remake the Ural: gas tank
A gas tank on a motorcycle is an undoubtedly necessary detail, but the gas tank of a standard Dnepr is a very dull and undecorative thing. And the custom gas tank must comply with the canons of style and completely fit into the overall layout of the motorcycle. There are many types of tanks and, it should be noted that the most beautiful, stylish and unusual tanks are made not by factory stamping, but by hand.
Very good results are obtained when using drop-shaped tanks from K-750, IZH-49 motorcycles, standard nuclear weapons and similar tanks. It’s enough to go to a market that sells used spare parts (in Kharkov it’s the Blagoveshchensky Bazaar) and luck will definitely smile on you.
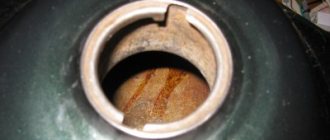
Working with an old tank has a number of features. First of all, you cannot trust the strength of old, thin metal. Typically, old tanks begin to rot from below in the area of the gas tap and also in the area of the rubber lining on the side (nigrips). But everything can be fixed. Let's look at the working methods using the example of expanding a tank. First of all, you need to clean the outside of the tank. This can be done with a grinder and a thin cutting wheel.
The tank fragments are thoroughly cleaned from the inside. Moreover, some tanks are coated with zinc on the inside and it is impossible to weld such metal efficiently. In this case, use a grinder to remove the zinc coating in the weld area.
The tank is then expanded to the required size and securely fixed in position using threaded rods or rods welded directly to the tank. All linings covering the cavities are made of sheet metal 1 mm thick. Then everything is welded. It is necessary to cook in short batches, always in different places, otherwise severe warping of the product cannot be avoided. After this, the various cavities and tunnels in the tank are made from sheet metal. The cover plate for the instrument tank is made of metal 1.5-2mm thick.
The most delicate point is sealing the finished tank. Of course, it is necessary to cook as carefully as possible. But even the most perfect seam will leak over time. This is due to the loss of mechanical properties of steel in the weld area with the formation of microcracks.
I have tried various sealing options. Tinning, for example, is a very labor-intensive and time-consuming process. The simplest and most reliable way is sealing with special sealants. Coating welds with epoxy glue and aluminum powder gives good results. The composition must be applied to a clean and well-degreased weld with a hard brush, rubbing it into the surface of the seam.
It is necessary to ensure that during further puttying of the tank the sealant layer is not damaged.
Do-it-yourself gas tank repair: four proven methods
Roads are not always perfect, and it is difficult to insure against breakdowns while driving on them. The most common problem is tire breakdown, but this problem is not so difficult to fix, especially if you have a spare tire with you. Much more questions arise when you need to repair the gas tank yourself if it suddenly turns out to be broken and fuel begins to pour out of it. It is not always possible to call a tow truck, and in some situations there is no need at all, since any driver with the appropriate knowledge can repair the gas tank on the spot using available means.
Bokeh in photography: creating different aperture shapes
Have you ever admired stunning blurs in the form of Christmas trees, hearts and other unusual shapes? In this article we will tell you the secret of creating such an effect.
How to make bokeh in a photo? Yes, it’s very simple: you don’t have to disassemble the optical device, you just need to acquire the following items:
- cardboard;
- a camera with a more or less fast lens;
- pencil;
- scissors;
- and tape.
Let's start making our accessory:
- Use a pencil to trace the edge of your camera lens.
- Surely you will get an even circle of the required diameter. You can also add small “ears” in order to later attach the structure to the lens.
- Now, strictly in the center, draw what you want to see in the picture instead of circles.
The only difficulty in this operation is that for different lenses and focal lengths you will have to make a slot of a certain size. If you make the figure too wide, you will not see the result at all. If, on the contrary, you make the slit not wide enough, you will get the effect of a DX lens: i.e. 100% vinentation at the edges.
But as practice shows, it is better to cut a hole that is too narrow and then expand it, than to overdo it and create the workpiece again.
To quickly check the correct bokeh, simply set the focus mode to manual and point the lens at the nearest object so that behind it there is something like a garland with many lights. If you have a magical shot with a blurry multi-colored background, then you can safely go in search of interesting shots on the evening streets, cafes and shopping centers - there you will find a large accumulation of lights, especially on New Year's holidays.
Repairing a plastic gas tank using a special plastic soldering iron
Buy or rent plastic welding.
Remove the plastic gas tank from the vehicle and place it in a safe location for welding. Drain the gasoline from the tank and let it dry both inside and out. Wear safety glasses, a welding helmet, and welding gloves.
Use a plastic welding rod made specifically for this purpose and fill the crack or hole with liquefied plastic. Start at the edge and work your way all the way down the length of the crack or hole. Fill it with a little extra plastic and then sand it down.
Let the weld cool, sand it and, if desired, paint it with plastic paint.
If your hole is really huge, then it’s easier to replace the plastic fuel tank on your car with a new one.
Selection of materials
There are several materials that are used to make sauna tanks.
Cast iron
The classic option for making sauna tanks is cast iron. However, this option has a number of both pros and cons. Despite the fact that this material is undoubtedly very strong and durable, heating water in such a container requires a large amount of fuel and time, but the high temperature of the water remains for a long time. Cast iron is not afraid of corrosion and temperature changes. One of the most significant disadvantages of cast iron is its large mass and the difficulty of making it yourself. In addition, it requires mandatory protection from exposure to high humidity.
Stainless steel
Stainless steel bath tanks are increasingly being used. Their popularity is due to the fact that they:
- do not need protection from high humidity and negative environmental influences;
- have a high percentage of heat conductivity, which ensures heating of water in a short time;
- practically do not give in to deformation under sudden temperature changes;
Enameled material
Sauna tanks made of enameled material are practically rust-resistant.
Also, enameled containers have one important limitation during installation - they should not be built into the surface of the oven. In principle, these are all the basic rules when choosing a container for a bath, following which will help you enjoy the washing process for a long time
In principle, these are all the basic rules when choosing a container for a bath, following which will help you enjoy the washing process for a long time.
Most likely, you just (or a week ago) saw on the Internet a beautiful photo with a completely unusual, one might even say “magical” effect, and now you passionately want to create the same thing with your camera.
Do-it-yourself gas tank for a motorcycle
Message Dig » 03 Feb 2014, 08:31
I’ll separate the technology, maybe it will be useful to someone
Fiberglass tank 8 liters
1. Foam plastic blank is cut into pieces. I got 4 pieces.
Next, we glue them together with glue for ceiling tiles or any other, but only so that the foam does not corrode. Let it dry. The result is a blank for the “boob”
Drawings of templates in three projections were made in advance in Compass, printed and plywood copies were cut out from them. two plywood copies of each projection.
I covered unnecessary recesses and sinks with plasticine (thanks to my daughter)
2. Neck and tap
Next, the neck and nut of the gas valve were made. A bolt is also welded onto the nut support plate to ground the tank.
A jumper is welded between the neck and the nut
Fiberglass fabric is cut into strips 100x300 and 100x150. The glue is mixed in 150. 200 grams. Mixing the resin with the hardener and impregnating the fiberglass is best done on a sheet of glass and wearing rubber gloves. I made 6 layers of fiberglass in total. The neck of the tank with the nut for the faucet is glued in after the third layer. Waiting time between layers is 30. 60 minutes. It is advisable to glue all layers together in one day. After polymerization, etch the foam with acetone/degreaser/gasoline
After fitting and marking the tank, we glue the fastening ears made of fiberglass. Also 6 layers.
Use a petal disc to gently sand out large uneven areas.
Then we sand again and putty the imperfections left after the first layer. Let it dry and sand again.
Degrease and prime in 2 layers with intermediate drying
Source
Types of bokeh in photography
Bokeh can take on different shapes: from pentagons, various circles to all sorts of fancy shapes. In the classic version of bokeh, the number of faces of polygons directly depends on the number of aperture blades: the more blades there are, the more round the bokeh will be.
The degree of brightness also divides bokeh into three main types: low, uniform and high brightness.
- The first type is characterized by fairly bright edges and low brightness in the center of the frame.
- The second is a rather harmonious type of bokeh. It provides an equal distribution of brightness and a “loyal” color scheme. You can create a bokeh effect of this kind only with a high-quality lens.
- The latter is distinguished by faded edges and a high degree of brightness of the elements located in the center of the image.
Made of stainless steel and aluminum
When making a stainless steel tank yourself, it is recommended to use 1.1-2 mm metal. To prevent swelling of the filled structure, expansion tanks must be installed to protect against excessive pressure.
You can use food or technical steel as a working material. It is clear that food grade stainless steel will cost more.
Common welding methods include working with tungsten electrodes in argon or ground electrodes. A semi-automatic argon welding option using stainless wire is possible.
Aluminum tanks can be welded independently, but the process involves fulfilling a number of technical conditions that are only subject to specialists:
- it is necessary to calculate the dimensions of the water tank;
- choose the right grade of stainless material;
- calculate the wall thickness to avoid swelling of the structure;
- when using a hatch or roof, determine its type;
- determine the presence of partitions, frame and edging;
- possess welding skills.
Much in this process depends on the welding machines used and the skill of the welder. If welding is done incorrectly, microscopic cracks may appear, through which liquid will leak over time.
Typically, water storage tanks are made from stainless steel. It is better to order containers for a bath made of stainless steel from a permanent production facility. There is no need to paint them, because when heated, the paint will evaporate, polluting the air and water.
If you nevertheless decide to carry out your plans on your own, you should take into account that the most suitable grades of steel for storing water in this case will be 08Х17 (aisi 430) and 8-12Х18Н10 (304).
As for the volume of the stainless structure, in a bathhouse designed for 2-3 people, it is more advisable to install a water tank from 50 to 80 liters. According to the formula, 25-30 liters of water per visitor.
Manufacturers usually offer 1 mm thick sheets for tanks. When welding yourself, it is recommended to use sheets with a thickness of 1.2-1.8 mm. Design options may vary in size and shape.
Welding water tanks made of aluminum is a complex process that requires the master to have practical skills in working with this metal, an understanding of the drawings and two hands that are friendly with the tool.
Making tanks for showers, baths and other needs can be done on your own, although desire alone is not enough. If something doesn’t work out, you can consult a person with welding skills.
Self-production allows you to get the most practical design, invaluable experience and save money.
To enjoy all the delights of a Russian bathhouse, it is not enough to install a high-quality and reliable stove; you also need to equip the bathhouse with a durable water tank. The capacity of the container, its location and material are selected based on the frequency of use of the bath, the number of washables and other significant indicators. If you decide to make a sauna tank with your own hands, you should first carefully prepare everything, choose the material, the method of supplying water to it and the heating method.
Making a motorcycle gas tank from scratch with a flat bottom.
homemade gas tank with a flat bottom
homemade gas tank with a concave bottom.
Tank with a clean slate.
There are a huge number of types and shapes of gas tanks for choppers, from the simplest to fancy-shaped exclusives. And sometimes an ordinary person, when seeing products from, for example, American customizers, always asks the question: how and in what way are they made? But believe me, you just have to make a couple of the simplest tanks, which I will describe, and you will be able to realize a tank of the most bizarre shape in metal (one of the not very complex, but interesting tanks, you can see here). Once you understand the technology itself and the assembly process, more complex tanks will seem like just creativity to you and over time you will want to do something new and different. just like others. There is almost no point in describing the technology of a tank of some bizarre shape, since such products are made for a specific frame and usually in one copy. It all depends on the flight of fancy. And besides, having understood the process of making simple tanks, you will not have problems in making complex ones, except that you will spend more time on it. And even if something doesn’t work out the first time, it will work out the second time, because metal is like plasticine, you can always cut off the fragment you don’t like and weld a more beautiful new one.
But there is one “BUT” - for these works you simply need a machine called an “English wheel”, the most important tool, without which it is impossible to make a correct gas tank (see about the machine here). The correct, in my understanding, tank is one on which, after its manufacture and welding, there should not be a single gram of putty. And if you order a gas tank of the shape you like from some custom studio, and making a custom gas tank in the workshops of St. Petersburg, Moscow or some city in Europe or America can cost from 500 to 1000 dollars, and this tank will be re-plastered, then know that it was not made by a master.
tool for making a gas tank.
a cushion of leather to give a convexity to sheet metal.
Therefore, I advise you to spend money on making an English wheel - you can fit into a budget of 150 - 200 dollars (I managed to fit within 100 dollars - see the article English wheel) and then make gas tanks for everyone, rather than pay for one tank (again, the right tank) 500 green.
In addition, you will need round anvils (made from a steel blank, see photo), a regular flat anvil, but with a smooth ground surface, hammers with a spherical head, which I made from ball joints from a truck, a hammer shovel, hammers with a flat and polished head , a leather pillow stuffed with sand or shot, or a stump with a hole in the middle, approximately 20 - 25 cm in diameter and 1.5 - 2 cm in depth.
In addition, you will need a shrinker - a machine for drawing metal. With it, work will go faster, but it is not as necessary as English. wheel and, moreover, expensive for some - 300 - 500 dollars depending on the model. I started making a shrinkel and as soon as I make it, I will definitely describe the manufacturing process in one of the articles. In the meantime, I’m making tanks without it, I don’t argue - it takes longer and is a little more complicated, but it’s quite possible to do it without a sprinkler and, moreover, a proper tank without putty.
Yes, you will also need such common tools as a grinder, an electric jigsaw and metal scissors, and, of course, a welding machine - preferably, of course, an argon one with a non-consumable tungsten electrode, but I can get by with an ordinary carbon dioxide semi-automatic machine.
gas tank cardboard templates
Tank with a flat bottom (like on a sportster). In this article I will describe making a tank with a flat bottom. And who is interested in making a tank with a concave bottom (as in the top photo on the left), you can click on this link and read.
We start work, as always, with a clean sheet of paper, or rather cardboard. We take a sheet of cardboard and, having attached it to your frame, using clothespins (such as welding ones) or tape, and stepping back, we turn on our imagination. Take a pencil or marker and draw the shape of the tank (when viewed from the side), according to the size of your frame. We cut out the shape we like with scissors and attach it to the frame, evaluate and correct it, and then approve it. Let me just remind you that the more convex you draw the top of the tank, the harder you will have to work with the hammer. I recommend the middle version of the convexity (see photo at the very top), as it is the most pleasing to look at and the easiest to make.
gas tank layout
Next, using a cardboard template, you will need to make a mock-up of a tank from chipboard or MDF (see photo), it will help in further work and will be useful for making many tanks of the same size if you want to make them to order. When making a model, all parts are fastened with screws or glue and, most importantly, at a right angle of 90°.
First make the base of the layout (the bottom of the further tank) also from cardboard and attach it to the frame, check the symmetry and width that will suit your frame, and then attach the template to the chipboard and outline it with a marker. Naturally, the length of the bottom and sides should be the same. Make a cardboard template for the side panels (2 pieces) lower, to the thickness of chipboard or MDF.
Having assembled the layout, you can start working with sheet metal. I choose the thickness of the sheet depending on the size of the convexity. For a medium convexity, a sheet with a thickness of 1.0 mm is suitable, and if you need to knock out a more convex sphere, then take a sheet of 1.2 - 1.4 mm, since with deep knocking out the metal stretches out more and becomes thinner, by about 0.2 - 0.4 mm.
We attach the cardboard template of the side of the tank to the metal sheet, outline it and cut it out with a jigsaw or grinder. When cutting, it is better to first cut the part five mm larger, and then, exactly along the marker line, cut it with metal scissors. We make two mirror copies of the sides of the tank and, after cutting them out with scissors, we clamp them together with clamps (through wooden blocks) and process them together with a grinder and a grinding wheel (from sandpaper glued together overlapping) - this will give the sides complete uniformity and at the same time remove metal burrs.
Having cut out the side panels, we apply one of them to the model turned over on its side and bend it according to the shape (bend) of the model, and do the same with the second side panel. Having bent the sides along the length, you now need to bend their upper part inward according to the shape of the layout (widthwise) and at the same time maintain the previously made concavity along the length.
This is difficult to do without a shrinker, but it is quite possible, by attaching the side piece to a spherical anvil (gray in the photo), we begin to bend it inward, tapping it with a hammer (with a polished flat head) along the entire length and constantly applying it to a wooden model, checking the bend.
Leather hammer.
When tapping the bend of an edge, it is very effective to use, in addition to a hammer, a special spatula with a polished working (impact) part, since its working plane is larger than the hammer head. Well, if you are making a tank from a softer aluminum sheet, and not from steel, then to bend the edge of the side of the tank, I advise you to use a leather hammer, as in the photo on the left.
Such a hammer, when struck, will never leave scratches on aluminum, but rather polish it. It can be made from a beech or oak block, and then wrapped in a piece of a leather soldier’s belt. I think everything is clear from the photograph in which I showed the hammer from three angles.
After tapping and bending inward, the side panel is unbent along its length; naturally, you need to return it back, bending it according to the layout. This will be more difficult to do, since the metal acquires structural rigidity, but it is quite possible. As a result, you need to achieve bends in two planes, and these bends must completely coincide with the shape of the wooden model.
Next, we press both finished side panels to the wooden model, using welding clothespins or small clamps. To do this, 8 holes with a diameter of 18 - 20 mm are drilled in the model (so that the clamp or clothespin fits in), near each wooden partition. When we press the steel sides, one of them will overlap the other in front, since the sides are longer than necessary.
You should draw a scribe along the overlap and cut out the excess with scissors, ensuring that when crimping the side panels with clamps or clothespins, there is a welding gap of about 1 mm between them in front. Having achieved this, we tack the sides by welding directly without removing them from the model, making about 5 - 6 tacks.
Then we remove the tacked iron from the wooden model and scald the sheets of the side panels, but be sure to make sure that both sheets of metal are at the same level (flush), it is better to track this even during the first tack. And if some sheet of one of the sidewalls protrudes higher than the other, then insert a thin knife or metal plate into the welding gap, press the more protruding sheet, pressing it with a knife and immediately weld it. When both sides at the front are welded together, we clean the seam and return them to the wooden model, tightening them with clamps (or clothespins).
Now you can place a sheet of cardboard on top and draw a template for the upper (convex) part of the tank, but in such a way that the upper part of the tank is slightly wider (by 3 - 5 mm) around the perimeter. This is important, since the metal of the upper part, when it is given a convexity, will be slightly reduced in width and it is better to cut off the excess later than to think about how to close a large welding gap.
Having drawn and cut out a cardboard template for the top of the tank, we check it for symmetry of the sides by folding the cardboard in half, and if the right side, for example, is wider than the left, then naturally we cut off the excess. Then we do the same as with the sides, apply the template to the metal sheet, outline and cut out the upper part of the tank, and cut it out and grind it, removing burrs.
Now comes the most interesting stage in working with sheet metal, work that was performed by our distant ancestors in the Middle Ages, in the manufacture of knightly armor. We need to give the top of the tank a convex volumetric shape. To do this, we place the sheet (the upper part of the tank) on a leather pad, and taking a hammer with a spherical polished head, we begin to knock out the so-called bumps, or rather a large number of them, and it is this large number of small bulges that together gives the overall large bulge and volume to the part.
Strikes can be applied moving in a spiral from the edges to the middle and monitoring the uniformity of the number of cones over the entire area. When striking, the metal sheet will bend its entire plane inward, no problem - constantly level it by turning it over and placing it on a table or pillow and pressing on it with all your weight, since the metal acquires structural rigidity from its convexity.
Having aligned the sheet, we apply it to the model and check whether the overall convexity is sufficient and if so, then turning the sheet over, we place it with the convex part on a flat and ground anvil and begin to tap the cones from the inside with a plastic mallet with a convex striker. This will slightly straighten the sheet from the bumps and this will make work on the English wheel much easier and faster. After tapping with a plastic mallet, we check the upper part again by attaching it to the model.
And do not try to make the volume larger than that of a wooden model; all the details: both sides and the convex upper part should fit tightly onto the model. If something doesn’t work out the first time, it will work out the second time and experience will come with time, remember that in skillful hands, hard metal is no worse than plasticine.
All that remains is to roll the already convex upper part of the tank between the rollers of the English wheel to remove irregularities and bumps. We select the convexity of the roller in accordance with the convexity of the upper part of the tank, otherwise if the roller has a flatter convexity than the sheet of the upper part, then you will not achieve a smooth convexity. It is better to install a roller that is more convex than the sheet of metal, rather than flatter.
We start rolling first with a slight pressure on the rollers, and then gradually increase the pressure with the wheel steering wheel to maximum. Having rolled the sheet crosswise, turn it 90 degrees and roll it lengthwise. You can experiment by rolling the sheet at 45 degrees, because the English wheel looks like a simple device, but in fact it is a machine with unlimited possibilities. As a result, after rolling is completed, the upper part of the tank acquires not only a smooth surface, but also a polished mirror convex part (see photo).
Now we place the finished upper part of the tank on the model strictly in the middle, measuring with a ruler and drawing a marker in front of the center of the upper part. In the place where you want the neck of your tank to be, drill a hole for a self-tapping screw and, having drilled, screw the sheet of the upper part to the wooden model.
We drill the second hole at the back of the upper part of the tank, where the tank tunnel for the frame pipe will subsequently cut in, and also fix the sheet with a self-tapping screw. When we have firmly fixed the upper part of the tank with self-tapping screws, relative to the sides, we can now accurately draw a line along the perimeter with a scriber along which we will cut off the excess metal from the sides with scissors, because the upper part was a little wider just in case. As a result, after trimming the excess edge, we again achieve a welding gap of about 1 mm between the sides and the top.
It happens that the radius of the bend of the edge on the sides does not coincide with the radius of the bend of the edge of the upper part. Ideally, the upper part around the perimeter and the sides at the top should also be walked on a shrinkel, or the edges should be rolled on a zigging machine, using rollers of the appropriate profile (see the article zigging machine).
But these devices are expensive and not everyone can afford them, but you can make them yourself and I will definitely describe their production later. If these devices are not available, then it is still possible and necessary to achieve the same bending radius of the edges of the upper part of the tank and the sides, you just need to work longer with a hammer or, better yet, with a spatula, gradually giving the desired radius with blows. If I managed to join the edges at the same level and with the same bend radii without these devices (shrinker and zig machine), then you will definitely succeed too.
hole cutter for cutting a hole for the neck.
Next you need to weld the sides and top together. We screw the top part with self-tapping screws to the model and check the same gap around the perimeter (about 1 mm) between the top part and the sides. If there is no gap somewhere (an overlap has formed), then we trim off the excess with scissors, the main thing is not to cut off the excess, otherwise the welding gap will be more than 1 mm and you will not achieve a high-quality weld.
As I already said, when tacking, you need to ensure that the sheet of the upper part and the sheets of the side panels are on the same level, if not, then we level it with a thin knife (the sheet plays when pressed) and immediately tack it. Having grabbed the sheets along the perimeter, we remove the now solid top part with the sides from the layout and completely scald and clean the seams.
After cleaning the seams, they should be hammered a little, placing a convex anvil on the inside, tapping the seam and bend using a hammer with a flat polished head. This will help to straighten the plane of the metal in the area of the seam, if, for example, the side or top part protrudes one above the other, which happens after welding. Having tapped and leveled the planes in the seam area, we grind them with a flap wheel with 250 - 300 abrasive. Half the job is done.
finished bottom with a tunnel for the gas tank.
All that remains is to make the bottom with a tunnel, but before that you need to cut out the neck of the tank, using a metal crown of the appropriate diameter and a hole from a self-tapping screw as a guide. Having cut a hole for the neck, we order it from a turner or buy a ready-made one, hammer it tightly into the hole, and scald it from the inside in a circle.
We make the tunnel and the bottom as one whole. For high-quality production of the bottom with a tunnel, a sheet bender is required (see article sheet bender). But those who don’t have it, or haven’t made it yet, can do without it, and I made (bent) the bottom with the tunnel shown in the photo using two corners.
The bottom of the gas tank is ready for welding.
To do this, we take two corners about a meter long and approximately 20 - 30 mm wide. We fold them lengthwise in a T shape and clamp them in a vice, drill two holes with a diameter of 7 mm, retreating approximately 10 cm from each edge.
These holes are needed for clamping bolts, with which we will clamp the sheet of metal to bend it. The simplest sheet bender is ready for work. Now you need to take a sheet of metal a little longer in length than the length of the bottomless tank we made, and in width by 17 centimeters, since the diameter of the tunnel will “eat up” 13 centimeters of the width of the sheet.
Having marked the middle of this sheet, we place the sheet exactly in the middle on the fixed pipe and begin to bend the sheet into the shape of the letter U. I sometimes use a pipe from the stand of my English wheel, and if you work somewhere in a garage cooperative, then you will probably find a grape arch stand nearby, with 60 mm pipe. in diameter.
But it is better, of course, to have a separate piece of pipe of the required diameter, about 80 - 100 centimeters long, which can be pressed with clamps to the table (by the edges of the pipe), before placing a metal sheet between the table and the pipe (the pipe should be approximately in the middle of the sheet). This will make it much easier to bend the sheet, and the bend will be more accurate.
Having folded the sheet, we mark the fold points on it on one side and the other with a marker, drawing lines along a ruler. We insert the sheet bent into an arc into the corner up to the marked fold line and clamp the corners with M6 bolts inserted into pre-drilled holes. Next, for reliability, we clamp the corners with the sheet in a vice and, slightly bending the sheet with our hands, then tap the sheet along the fold line with a hammer, bending the sheet 90 degrees.
We open the corners and, holding the other side between the corners along the fold line, bend the metal. The result should be a bottom along with a tunnel made of a single sheet of metal as in the photo. Round cutouts are cut in the tank corresponding to the diameter of the tunnel. The upper part (tank without a bottom) should fit tightly onto the tunnel and, having put it on, the excess metal of the bottom immediately becomes visible,
which needs to be cut off. Some people make a bottom with a tunnel from pieces and weld along a line where you just need to bend the sheet. I think these are extra seams and extra time.
The tank is coated with a rust converter.
All that remains is to drill holes in the bottom for the gas tap or membrane tablet, and for the threaded bosses for which the gas tank will be attached to the frame. My bosses are 14 mm in diameter with an m 6 thread and are plugged on one side by welding. We insert them into the holes and weld them so that the entire length goes into the inside of the tank and the threaded holes are flush with the bottom plane. Then we weld a threaded fitting to attach a faucet or pneumatic valve (tablets with a membrane).
All this is welded from the inside so that from the outside there is a neat appearance without unnecessary seams. Having welded the liner, bosses and trimmed off the excess metal of the bottom, all that remains is to assemble everything and weld the bottom to the tank by welding along the perimeter, and then finally weld it around the perimeter.
After cleaning and grinding the welds, we screw the neck through the rubber gasket and connect the adapter fitting to the fitting for the gas tap, put on the hose from the compressor and turn it on and start pumping air (you can use a pump).
Having pumped up about two kilograms, we begin to coat the seams with a brush moistened with soapy water. If there are pores or holes in the welds that are invisible to the eye, then during such a test they are usually detected. To guarantee one hundred percent tightness of the seams, the tank is completely immersed in a container of water and when air bubbles come out, we detect a defect, boil it, clean it and check it again.
By the way, if anyone is interested in seeing how I made a tank of a more complex shape, click on the video below, where I show the manufacturing process in detail. The first episode is shown below, and the remaining two episodes can be viewed on my YouTube channel suvorov-custom. Enjoy watching everyone! And finally, I advise you to watch a video that shows how to make a simple gas tank, consisting of two parts. And despite its flat parts, which do not require an English wheel, such a tank is now quite popular, as it is made for motorcycles in the now popular boardtracker or bobber style. In addition, after watching this video, it will become more clear to beginners why a sprinkler is needed when making a tank from scratch; Good luck everyone!
If this article is useful to you, please share it on social media. networks by clicking the buttons below. Thank you.
RќСЂР°РІРёС‚СЃСЏ
The most popular types
Depending on the location, bath tanks are divided into built-in, mobile and pipe-mounted. Built-in tanks are installed separately from other structures. They are installed during the construction of the stove inside the heating system using various fasteners and installations. In built-in containers, water is heated directly from the fire, so the efficiency is quite high.
It is impossible not to mention that this reduces the heat transfer from the stove itself, since most of the energy is spent on heating the water in the tank. The volume of the built-in tank is determined by the size of the stove itself.
Is it possible to make a motocross motorcycle yourself?
Many people dream of a cross-country motorcycle, since it gives a person unprecedented freedom of movement. Unlike most sportbikes and city models, such a motorcycle is capable of moving quite quickly even outside good roads, without threatening its owner with falling and injury. At the same time, a cross bike is much easier to control than an enduro bike and other heavy types of equipment, also adapted for off-road riding. However, many simply cannot afford a high-quality motorcycle, because cheap models of real sports SUVs with two wheels are practically not found on the Russian market. Therefore, you should learn how to make a motocross motorcycle with your own hands - this will help you save a lot of money and adapt the resulting equipment to your needs.
Updating the motorcycle: airbrushing the motorcycle tank
Regular motorcycle painting has a number of features, but this applies to painting any surfaces. For example, if you want to create some kind of image on the surface, the process will become more complicated. After all, such manipulations will require artistic skills, although you can paint a motorcycle without them. Here you will only need the necessary materials, with which ones - read below.
We will need:
- motorcycle gas tank; - paint of several colors; - paint remover; - lace, varnish, electrical tape, primer; - fine-grained sandpaper.
First, completely remove the old coating from your motorcycle gas tank. The author used a special paint remover for this purpose. Be sure to wear protective gloves when working with this product!
Step 2
If you have a gas tank with an imperfect surface, then at the same stage eliminate all irregularities and level the surface of the tank.
Now the author coats the gas tank with primer, he applies it in two layers. After this, wait until the primer dries, then sand the surface with fine-grit sandpaper. As a result, the surface of the tank will be quite smooth.
Step 4
The gas tank needs to be painted beautifully, so it needs to be divided into zones using electrical tape or ordinary masking tape - in general, whatever you have on hand at the moment.
Paint the sides black and wait until the paint dries. Then paint the top with silver paint. Of course, you can choose a paint of a different color and paint the tank in any order; it is not necessary to strictly follow the author’s advice at this point. Now the base coat of paint should dry completely, leave the gas tank for at least a few hours.
Now add texture in layers. To do this, cover the motorcycle tank with a piece of lace, tighten it tightly, otherwise the fabric will slip. Secure the ends of the lace fabric with sewing pins or tape. Paint the tank in zones from above, only paint in a mirror image.
After painting, carefully remove the lace and do not touch the gas tank until the paint has dried!
Step 7
That's almost all, the airbrushing of the motorcycle tank is almost finished. To secure a beautiful result, coat the tank with varnish.
Receive a selection of new homemade products by email. No spam, only useful ideas!
*By filling out the form you agree to the processing of personal data
Parts selection
First of all, you need to pay attention to the wheels of the future motocross motorcycle, since they will bear the main load. It is better to immediately abandon the use of alloy wheels, since they will not be able to properly absorb strong impacts, which will lead to their rapid deformation. The best option is to buy ready-made wheels based on spokes. A budget-friendly way to get wheels for a motocross motorcycle is to buy rims and install spokes of the required length yourself. There is no need to think long about the size of the wheels and reinvent the motorcycle, since the sport has adopted the standard - 120/70-17 in the front and 160/60-17 in the rear.
If you want to make a cross bike from Minsk, you will have to tinker with converting the rear suspension to a monoshock absorber. It is much easier to disassemble and select a fork of the appropriate size from a 125 cc Japanese motorcycle. All that remains is to choose the shock absorber itself - in this case, it is better to select the desired model based on the weight of the vehicle itself and its rider, and then make adjustments after assembly. Remember that the rear wheel travel of a motocross motorcycle should be 200–280 mm - based on this value, rear suspension components are selected.
Next, you should take care of the front suspension, which is subject to the highest demands. Unfortunately, in this case it will not be possible to make do with economical compromise options, so it is better to buy a fork from a motocross motorcycle assembled. You don’t have to look at the performance of the shock absorbers and the presence of high-quality oil in them - some components of the fork can be changed during operation. For a motocross motorcycle, the ability to fine-tune the front suspension is very important, so you should pay attention to the integrity of the adjustment mechanisms. The fork travel should be approximately similar to that of the rear monoshock.
For safety reasons, you should also take care of installing other brake mechanisms that will effectively slow down the motocross motorcycle if necessary. The best option is to purchase a special sports kit consisting of other discs, calipers, hoses and fasteners. However, buying one can be quite expensive, so you can also buy used brakes from a larger motorcycle, which will provide fast deceleration without any problems. If your future motocross bike has drum brakes, you will either have to completely redo the wheels, or accept the mediocre performance of them, improving the deceleration slightly by fine-tuning the pads.
The last thing you need to take care of is the frame. Once you have purchased all of the above components to build your motocross bike, you will see that the standard mounting points need some work. Try to make maximum use of standard places for fixing certain parts, if possible without resorting to welding. However, you may need to completely reshape some parts of the motocross motorcycle frame, for which it is best to use high-strength steel pipes and a fairly powerful welding machine.
How to make bokeh on a camera?
In order to get the bokeh effect in a photo, you must meet simple conditions:
- “open” diaphragm to the maximum;
- longest focal length;
- minimum distance between you and your subject;
- a very impressive distance from the selected object to the background (the greater this distance, the stronger the blur).
- It’s best to choose a less uniform background - the photo will be more interesting.
A lot also depends on the lens you're shooting with. It is best to choose a lens for bokeh with the smallest aperture number, in other words: with the largest aperture opening. In most cases, the lenses that come with DSLR cameras cannot allow you to get a pronounced effect. That’s why some photographic equipment manufacturers have released special lenses for bokeh.
A lens with a focal length of 55 mm and no zoom will contribute to a soft artistic blur of the background.
How to patch a plastic gas tank
Method one - patch the gas tank with epoxy glue
Drain the gasoline from the tank and let it dry. Sand the area around the hole or crack and wipe it down with an alcohol-soaked rag.
Mix 2 parts epoxy resin and apply around the entire perimeter of the hole. Cut the fiberglass patch wide enough to cover the hole and seal it off.
Place a fiberglass patch over the entire diameter of the hole and press the epoxy resin to cover the fiberglass. Apply more epoxy to the area and apply your patch, press down with something and let dry.
After drying, you can carefully clean it and apply paint to match the color of the tank.