Hello.
They sent me an article with a request to translate it, I looked at it and realized that it was useful. This is an article about one of the options for making a resonator guard for a KTM 250 EXC two-stroke motorcycle, written by a certain Pete, and he is clearly a very cool dude. I’ll shorten a little the very lengthy swirls of Pete’s thoughts about local garage manufacturers of protection for motorcycles - anyway, they are somewhere far away and do not concern us. I am posting the main part of the article, use it for your health and for the health of your motorcycle.
In my opinion, Pete's resonator guard is one hell of a monster, and the whole job could be made simpler and more elegant. But, on the other hand, this is a really affordable option that you can focus on. In general, think for yourself, decide for yourself, my translation follows. I will post an alternative article about proper protection of the Made in Russia resonator later.
I love two strokes. With their ease of maintenance, light weight and two-stroke sound, I will remain a fan until they are discontinued. Compared to their four-stroke counterparts, in my opinion, they have one big drawback - the presence of a resonator on the exhaust. It is located in such an unfortunate place that it takes on all the stones, of which there are quite a lot in our area. A long time ago, resonators on two-stroke motorcycles were laid under the gas tank and were protected, but on modern technology the resonator looks like a thick loop hanging in front of the frame and protruding from both sides of the motorcycle, taking on all the stones flying from under the wheel.
How to deal with this? You can ride quietly, but for this I would prefer some kind of Harley. You can also become a pro rider and learn how to carry the front wheel over all obstacles, or, like a real professional endurist, simply change the resonator after each race for sponsorship money. Or you can spend half your life straightening small and large dents with a torch and compressor. You can also give up on two-strokes and switch to 4t, and at the same time get an even bigger pack of headaches. Well, you can try to protect the resonator. As you can see, there are many options, and in 30 years in enduro I have experienced almost all of them.
The first protection option is to wrap the resonator in some heat-resistant material. It helps with small dents, small stones flying out from under the front wheel, but does not help at all with hard impacts (with age, my driving speed has dropped, but the speed of stones flying into the resonator, on the contrary, has increased many times over). Hit the rock harder and you will still dent the resonator.
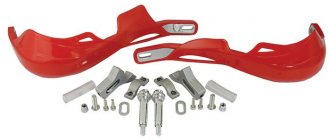
The second option is plastic or carbon linings for the resonator. They protect much better than the previous version, they are attached to the resonator and frame with clamps, but give them a good kick and they tend to move. They collect dirt well, but do not protect well from strong impacts, which often affect the junction of the resonator and the cylinder of a motorcycle. I, however, believe that this is the best ready-made solution available in the open market. But they simply do not meet my expectations for resonator protection.
The third option for protecting the resonator is quite good, it is not very common in other countries, but here (I still don’t understand which country the author is from) it is found everywhere. At its core, it is a cage welded around the motorcycle's resonator, rigidly attached to the frame, made of an 8-mm sheet of steel (from the photo it actually looks like aluminum, but Pete writes about steel, approx. transl.) or, preferably, stainless steel, which mounted independently of the resonator. The advantages are that the design is quite lightweight, allowing dirt to slip between the resonator and the protection without getting stuck in it. I found only two shortcomings. The first is that in order to install the protection, you will have to drill several new holes in the frame and weld on several new lugs. A more serious problem is that the fastening geometry itself bends due to strong impacts, and when you try to install it in place after dismantling, you will notice that the fastening holes do not line up. To restore the protection to its original form, you will have to heat it with a gas burner and bend it. In addition, when the suspension is compressed, the front wheel of the motorcycle should not catch the protection. Believe me, I personally know one guy who for a long time was perplexed as to why the checkers on the front wheel of his motorcycle were constantly disheveled.
What requirements do we have for motorcycle resonator protection?
Here is a short list of the most important of them, in my opinion:
1. The resonator guard must be firmly attached to the motorcycle frame. In the places where it is attached to the frame, the protection should withstand impacts well, and at the same time, we need to drill and weld the frame itself as little as possible. 2. The resonator protection should not come into contact with the resonator itself, since the resonator and exhaust pipe vibrate during engine operation. 3. The resonator protection must withstand multiple strong impacts and then maintain its geometry. 4. The resonator guard should be easy to remove and then just as easy to install back on the motorcycle to ensure ease of washing the motorcycle. 5. Protection of the resonator should be light. 6. It should be cheap and easy to make with your own hands in a simple garage.
And this is where the legs of the structure in question come from. Over the years of riding different motorcycles, I have made 5 such protections, and I can’t vouch for only the very first one, which I made for my Kawasaki KDX200, since it was sold 10 years ago. But the next three, on the 1998 KDX200, 2003 KDX250 and 2006 KDX200, performed excellently. Look at my resonator protector from the KDX200, it's all in dents, the resonator itself is like new. I expect the protection on my KTM 300 to show the same results.
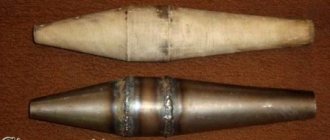
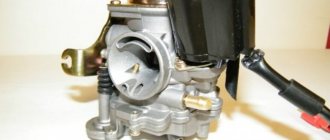
Greetings to all! A year ago I wanted to order a new resonator for my motorbike. And it was not only the mass that my “cast iron” resonator had obvious problems with weight (its weight was about 5 kg), but also the fact that I doubted that my pipe was working as required. Despite the fact that the main part of my homemade pipe from water taps seemed to correspond to the prototype in the form of a Chinese resonator, the part from the cylinder to this main volume, as well as the reverse cone, did not correspond VERY MUCH. And for this reason, I was never able to get the engine to reach normal speeds, which would correspond to 14 thousand. Yes, these engines are very “evil”, high-speed, capable of producing more than 12 horses easily, but only at high speeds, which, coupled with only one fixed gear, makes it very difficult to use. Especially when this engine is on such a powerful, heavy chassis like mine, and my own weight, which is more than 80 kg, added difficulties with starting from a standstill even with a huge gear ratio. But so far this has not been discussed. I didn’t even understand what I would have to change in the engine settings to make it “go.” The new resonator was perceived as a “magic pill”, capable of instantly reviving my rather “dead” (for such potential engine power) bike and bringing it to life, giving the project a second life. The new resonator was made by Nikolai Gruzdov from Pyatigorsk, known in certain circles as capable of making any resonator for 2T equipment, incl. according to individual order, i.e. this was clearly my case. No sooner said than done. Nikolay, based on my samples in the form of a “cast iron” resonator and the remains of a Chinese one, a new one was made from 1mm stainless steel, completely repeating the Chinese configuration in terms of the fastening elements and bends, and my homemade one in terms of fasteners and bends. 5 days after production, I already had it and I started assembling it.
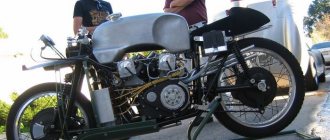
Installing the pipe in its place generally did not take much time. Yes, in some places the holes did not coincide exactly millimeter to millimeter with mine, but in general, this did not cause any difficulties. And as soon as the weather turned out to be normal, I took the bike outside for testing. Tests that will last for a whole week, but the beginning was impressive! I started the engine, and after accelerating, warming it up quite a bit, I unscrewed the throttle. The bike flew like crazy, the front wheel almost came off the asphalt and I let off the gas. This was EXACTLY IT! Exactly what I was waiting for from the very beginning, from the very start of the project. This was what I wanted initially. Little monster, monster, motorcycle in the form of a bicycle! Which, however, during its assembly, quite noticeably gained weight and acquired a completely unbicycle chassis... But at that moment I realized how critical the resonator is for this engine. I can say for sure that even with the best version of the homemade resonator, the motorcycle did NOT RIDE AT ALL compared to the new pipe! And if you remember what happened during the very first test at the end of April 2022... There the patient was more likely dead than alive...
However, the setup was just beginning. The first thing I encountered was that after warming up the engine was ungodly “stupid”. The stupidity was that after running on asphalt for a distance of 300-400m at full throttle, the moped no longer reacted so sharply to the opening of the gas, and then could not accelerate to resonant speeds at all! At the same time, the engine seemed to “bark”, “bark”, i.e. made some fluctuations in speed. And at first I couldn’t understand why this was happening. More precisely, I incorrectly interpreted these symptoms as “rich mixture with warming up.” Therefore, I began to frantically sort out various jets, make my own jets for different throughputs, soldering wires of different sizes into the drilled jets and spilling the jets on an improvised stand. And at first this seemed to have a result, but only in the form that the “barking” began a little later. But it still came, and the moped simply drove 20 km/h, making strange sounds and scaring people.
The spark plug also added problems. According to the engine manual, an NGK BR9ECM spark plug should have been installed on it. I didn’t find one at the time, so I bought two candles at once - BR9ES and BR8ES. The latter was in my engine until recently. But with the new resonator, inexplicable misfires appeared on all spark plugs, sometimes reaching a complete “line” and also the inability to drive normally. It was very strange, I couldn't understand why this was happening. Only after I remembered how the correct resonance tube works on two-stroke engines was the hypothesis made that due to the increased pressure in the cylinder, it is more difficult for the spark to break through, and the gap needs to be reduced. This is what was done, and yes, it partly solved the problem, but only partly. The “bark” hasn’t gone away. The moped still could not drive normally. And then the carburetor suddenly began to “float” - its shut-off needle jammed and the gasoline in the float chamber ran out, after which it was impossible to start the engine. I simply gave up...
This is how it DIDN'T GO:
The candle looked like this:
And I finally realized that I was probably doing something wrong. “Victory” was so close! The motorbike was in a state of superposition - when cold it drives just fine, but as soon as it warms up even a little, it doesn’t ride at all. This made me start looking for similar problems on the English-speaking segment of the Internet. Lots of ktm sx 50 threads on motorcycle forums were researched for the information I needed. And I found the data I needed. Clutch. It was the centrifugal clutch of the ktm sx 50 engines that seemed to be responsible for my problem. And in the process of searching for a solution, I even tried to “toughen” my clutch! Well, that is. increase gear speed. And it was in this version that I first saw how the brick color of the insulator began to appear from the blackness of my eternally black candles. This means that the engine worked in optimal mode for the first time! And I found a text describing the clutch setting on my engine. Literally, it contained the following lines:
A worn or not maintained properly clutch will cause problems that sometimes are misdiagnosed as carburetion or even ignition problems and really may be due to a clutch that is engaging far too early or low in the working RPM range
And translation into Russian:
A worn or improperly maintained clutch will cause problems that are sometimes misdiagnosed as carburetor or even ignition problems, and may actually be due to a clutch that engages too early or runs at low rpm.
The key words here were “misdiagnosed as carburetor or even ignition problems,” which is exactly what I had. I was sure that I couldn’t adjust the carburetor, and these spark plugs were just as bad. However, the candles turned out to have nothing to do with it. In general, my search area immediately narrowed, and I began to look for a suitable setting for the spring washers for normal clutch operation. It would be possible to put just one more, 15th puck, but in what order? The spring, assembled from spring washers, had to not only be stiffer than before, but at the same time not be overly stiff, because then the moped, on the contrary, would become very sluggish during acceleration, although the problem with engine speed would no longer be relevant . It was found that the total height of the shim set varied from 0.635 inches for very soft options for beginner riders (the engine from a children's cross bike, don't forget!) and to 0.67-0.69 inches for the “pros”. The setups differed in the speed of operation. In general, judging by the manual, the operating speed of the centrifugal clutch of this engine should be 8500-9000 rpm. In my case, these revolutions were 4900 revolutions. Everything was becoming clearer. Also, having rummaged through the forums, the following setup was found: (())(())(())(())(|| At the same time, my current setup was like this: (())(())(())(( || What is characteristic is that this was the setting of the washers in the manual that corresponded to the “passport” 8500-9000 rpm. This was extremely strange. However, the new configuration was a whole millimeter higher, which gave me hope that it would work as it should. I began reassembly clutch for a new washer configuration.
Having put everything together, I began the final tests. Jet 85 Malossi, spark plug BR8ES. The first start pleased me - the clutch began to engage much later. Looks like this was what was needed. But then I decided to look at the color of the candle. She was dry and no longer black. For some reason, I decided to replace it with Denso W24ESR-U, which was definitely not fake (I had my doubts about NGK). And so it began! Interruptions with the ignition right up to the line and the inability to drive! I stopped and made a gap on the spark plug even less than 0.4mm. Screwed the spark plug into the cylinder. And the moped took off! I was shocked. After making a circle around the block, and then another, I unscrewed it and was no less amazed! This is the first time I have seen this color on this engine.
And here is a video of how it was driving at that moment:
However, in the video it is noticeable that when the gas is opened sharply there is still a small dip, which still reduces the overall dynamics of acceleration. Now I have slightly enlarged the jet, which made it possible to completely get rid of it while maintaining the same maximum speed and significantly improving the dynamics of the motorcycle. We can say that now everything is going as planned.
Well, just one last photo)
Replacing a return flow muffler with a direct flow one with your own hands
When manufacturing a direct flow, it is advisable to use the positive properties of several types of structures.
Reasons for replacing a standard muffler with a direct-flow muffler
Car owners change the factory muffler to a direct flow one for several reasons:
Tools and materials for work
A direct-flow muffler is often purchased, but for lovers of tools and an insatiable thirst for creativity, we recommend making it yourself. It is preferable to make parts from stainless steel with a thickness of 0.8–2.0 mm. Select ferrous metal blanks with a thickness of 1.0–1.5 mm for the case, the rest 2.0–4.0 mm to avoid premature burnout of parts, and also use standard blanks. For the body, use a suitable size: a fire extinguisher, a thermos, an empty gas or scuba cylinder.
To fill the muffler chamber, non-flammable porous material or a combination of them is used:
Resonator instead of a muffler for a motorcycle
Messages: 171 Registered: May 31, 2011, 00:00 Car: Ford focus 111
| Rating: 171 |
| Reputation: 0 |
Is it worth changing the standard resonator to direct flow?
Post by Liss-solo » June 22, 2011, 01:34 pm
Messages: 310 Registered: June 01, 2011, 00:00 From: Tyumen Experience: 2002 Car: VW Transporter
| Rating: 310 |
| Reputation: 0 |
Post by EXPERT-AUTO » June 22, 2011, 15:22
Messages: 322 Registered: Oct 06, 2005, 00:00 From: Tyumen Experience: 2000 :
Awards: 1
| Rating: 972 |
| Reputation: 0 |
Thanked: 3 times
Post by Andy09y » Jun 22, 2011, 03:25 pm
I drive: LuAZ 969
| Rating: 14 477 |
| Reputation: +57 |
Thanked: 128 times Thanked: 110 times
Post by goodron » June 22, 2011, 4:40 pm
Messages: 171 Registered: May 31, 2011, 00:00 Car: Ford focus 111
| Rating: 171 |
| Reputation: 0 |
Post by Liss-solo » Jun 22, 2011, 4:58 pm
Messages: 2793 Registered: April 16, 2009, 00:00 Experience: stopitsot :
Awards: 1
| Rating: 23 503 |
| Reputation: +108 |
Thanked: 226 times Thanked: 198 times
Post by DUB-er » Jun 22, 2011, 05:04 pm
Messages: 171 Registered: May 31, 2011, 00:00 Car: Ford focus 111
| Rating: 171 |
| Reputation: 0 |
Post by Liss-solo » Jun 22, 2011, 5:08 pm
I drive: LuAZ 969
| Rating: 14 477 |
| Reputation: +57 |
Thanked: 128 times Thanked: 110 times
Post by goodron » Jun 22, 2011, 05:24 pm
Calculation and manufacture of a resonator for any two-stroke engine
I decided to write an article because I’m tired of all sorts of people on the site with ideas like: is it possible to install a muffler from a Zhiguli or from some other four-wheeler on an Izhak, pursuing only the goal of beauty.
And everyone thinks that there should be a resonator in the mufflers, but why? But in the muffler, a complex pulsating back-and-forth movement of gas waves occurs, which has a certain frequency. For an optimally selected muffler, it is necessary that by the time the exhaust window is closed, the reverse wave ensures that part of the sucked working mixture is returned to the cylinder. In other words, it is necessary to achieve resonance or match the frequency of natural oscillations of the gas wave with the pulse frequency of this wave at the outlet, i.e., with the engine speed. But since the frequency of natural oscillations of the wave also depends on the parameters of the muffler (section, length), as well as on the temperature of the gas in the muffler, their careful selection is necessary. In a muffler, such an important parameter as the overall length is selected by changing the length of the exhaust pipe and the cylindrical part of the muffler
So the Glushak was calculated, now it would be necessary to make it. The exhaust pipe elbow can be made from a straight thin-walled (1-1.25 mm) pipe or by selecting an existing elbow from a production motorcycle. The bending radius of the exhaust pipe is adjusted to the motorcycle frame and depends on the location of the muffler. To bend the outlet pipe to the required radius, it should be welded at one end, filled with dry sand and tightly plugged at the other end with a wooden plug. Take two blowtorches and light them. The pipe is heated along the outer radius, leaving the inner one colder. The pipe should be bent slowly so that there are no cracks or folds, all the time checking the bending radius with a pre-made template. The bending of the exhaust pipe can be done on metalworker's rollers, it can be filled with rosin, water and frozen, and bent without heating. Adjust the finished bent elbow to the location of the motorcycle so that it fits snugly into the exhaust pipe and muffler, does not interfere with the rotation of the front wheel and fits well into the motorcycle frame. If it is a top exhaust pipe, it should not interfere with the rider's operation of the motorcycle. To securely fasten the exhaust pipe, a mounting bracket is welded to it, as well as an eyelet to prevent it from sliding off the cylinder pipe. The exhaust pipe is fixed to the cylinder using steel wire. The straight cone and muffler are made of sheet steel 0.7-1 mm thick. It is desirable that the muffler be as level as possible and located in the same plane. Small turns of individual parts of the muffler are allowed when fitting them to the motorcycle frame.
Types of mufflers and their differences
There are 4 types of mufflers based on the method of absorbing acoustic waves:
The reflective circuit is reverse-flow, the rest are direct-flow.
Reflective
If one muffler is installed in a car, then a reflective version is used. It uses the principle of “breaking” the flow of exhaust gases by creating several partitions, expansion chambers and turns. Exhaust volume is reduced to standard levels. For this reason, the vast majority of factory vehicles are equipped with the reflective type.
Flaws
1. Change in sound. Yes, this fact can be attributed to both the pros and cons of installing direct flow. In the latter option, we are talking about incorrectly configured sound, which can cause inconvenience not only to others, but also to you personally, especially on long trips;
2. The appearance of vibration. As the car's power increases, the level of vibration also increases. Therefore, when installing a direct-flow muffler with your own hands, you will have to think about additional vibration isolation;
3. Increased fuel consumption. Despite the fact that the power of your car will increase slightly, its “appetite” will also increase.
How to make a direct-flow muffler with your own hands: tips and tricks
Have you noticed that some cars have a deep voice that literally screams about the power of the engine? Such horses are considered to be AMG configurations from Mercedes Bens, the M series from BMW and other cars with a sporty disposition. If you own an ordinary car, but want to give it a little character, then it will be useful for you to learn how to make a straight-flow with your own hands.
To understand what a direct-flow muffler is, you first need to talk about the purpose and design of the standard one, the one that is installed on most cars. The main task of the muffler is to reduce noise from exhaust emissions, which is why there is a corrugation inside the acoustic filter for civilian cars, and the pipe itself bends several times. A straight pipe is a pipe without any bends; only some models provide for expansion and contraction of its diameter, so there are no barriers to the exhaust gases and they fly out of the pipe with such a roar.
Initially, forward flow was installed on sports cars, since the absence of obstacles in the path of gases increases engine power. The owners of such cars were absolutely indifferent to the fact that the cars made so much noise; what was more important was how they drove. Despite this, today most powerful cars coming off the assembly line (for example, Subaru WRX STI) are equipped with direct-flow mufflers with variable pipe diameters, which reduces noise to the level permitted by law.
Attention: the officially permitted car sound limit is 100 dB; a fine is imposed for exceeding the sound pressure.