Motorcycle bearings "Voskhod" 3, 3M, 3M-1, 3M-2
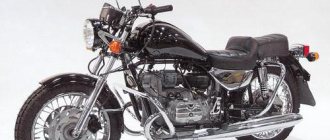
Brief information. Voskhod-3 (1979) - differs from its predecessor in a different gas tank (holds 2 liters more fuel), intake system, rear shock absorbers with increased energy capacity (located at an angle of 12° to the vertical, providing a wheel travel of 105 mm). Modernized brakes were used (the diameter of the brake drums was increased from 125 to 160 mm), wheels, a G-427 generator (rated voltage 7V), and an improved saddle. Maximum speed 105 km/h, dry weight 125 kg.
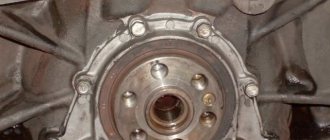
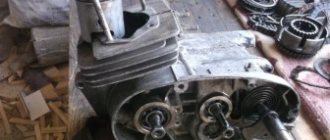
Motorcycle engine assembly Voskhod
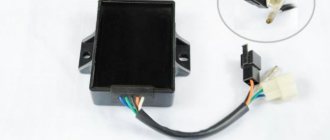
Voskhod-3M (1983-1993) The cylinder fins have an increased cooling surface. Some engines were equipped with Czechoslovak-made carburetors. 12-volt electrical equipment was installed, an FG-137B headlight with a “European beam” diffuser, and a new rear light with side reflectors. Above the headlight there is a block of control devices made of plastic: ignition switch, speedometer, indicator lamps for direction indicators, low and high beams. In addition, an anti-theft lock was installed. The front shock absorbers received corrugated rubber covers. "Voskhod-ZM" was equipped with a wear indicator for the brake linings of both wheels. The motorcycle received a new profiled front wheel guard, a kickstarter lever with a folding pedal instead of a solid one, folding driver's footrests, and two rear-view mirrors. Maximum speed 105 km/h, dry weight 122 kg. On the basis of this model, the production of the Voskhod-3M Krokha tricycle was organized; the body had a load capacity of 200 kg. Speed 80 km/h, rear gearbox borrowed from the Ant scooter
Voskhod-3M-tourist (1985) - The motorcycle received a new sports-type steering wheel with a jumper, roll bars, two rear-view mirrors, tourist equipment (rear trunk with side sections, side bags made of artificial leather, a tablet bag on the fuel tank). The motorcycle has new inscriptions on the tank and tool box lids, stickers are made of lavsan film. Maximum speed 105 km/h, dry weight 125 kg.
Voskhod-3M-01 (1989) A new engine with a reed valve was installed on the old chassis. The modernized engine featured a cylinder with a five-channel scavenging and one exhaust port (the Voskhod-ZM model has two channels). An intake reed valve reduced fuel consumption to 4.2 l/100 km. Power increased to 15 hp. at 6000 rpm, maximum torque up to 1.7 kgf m at 5500 rpm. The engine has one muffler. The motorcycle's handlebars became wider and received a crossbar. The piston skirt is enlarged.
Bearing table
| Installation location | Number | Bearing type | Size | Qty |
| Engine, crankshaft | 204 | Ball radial single row | 20x47x14 | 2 |
| Rear wheel sprocket | 60304 | Ball radial single row | 20x52x15 | 1 |
| Rear wheel | 60204 | Ball radial single row | 20x47x14 | 2 |
| Front wheel | 60204 | Ball radial single row | 20x47x14 | 2 |
| Gearbox, primary shaft | 203 | Ball radial single row | 17x40x12 | 1 |
| Gearbox, intermediate shaft | 202 | Ball radial single row | 15x30x11 | 2 |
gdepodshipnik.ru
Site dedicated to motorcycles Voskhod - Pressing out the right crankshaft bearing.
WITHOUT ANY WORRY
Craftsmen always keep some tricks in stock with which they can use an unconventional method to repair or replace a part in a matter of minutes. Let's say, many people know how much trouble replacing the right crankshaft main bearing will require. If you follow all the points in the operating instructions, then you will spend at least half a day on this operation: for now, remove the engine from the motorcycle, while you halve it... Then, again, installing the engine in the frame is a nightmare!
Everything happens much easier if you know... that you don’t need to do any of this - neither remove, nor install, nor half. And we’ll teach you how. Take a regular tool and, in addition to it, a narrow chisel, a sharpened pin or a powerful screwdriver.
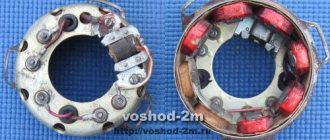
1. Remove the right engine cover, unscrew the generator stator mounting screws, remove the generator itself and hang it on the driver’s footrest.
2. Unscrew the bolt securing the generator rotor from the crankshaft journal. We will also compress the rotor in a special way. So, in one hand you have a mallet (however, a copper hammer will do), and the other hand, pulling the rotor, turns it along with the crankshaft. Two or three blows of the mallet are enough (if it is a copper hammer, then not backhanded), and the rotor will be compressed.
3. Usually the right crankshaft bearing fails due to the fact that air is sucked through the oil seal, so always replace the oil seal along with the bearing. And don’t stand on ceremony when dismantling the old one: punch it with the sharp end of the pin as close to the outer diameter as possible and simply uproot it from the crankcase.
4. Remove the shaped washer and slightly push the bearing deep into the crankcase. Use special “duckbills” or a regular bit to pry and remove the bearing retaining ring.
5. Now it’s time to use a thin chisel for the first time. Use it to cut off the bearing cage on each ball, and then, striking between the balls, push the cage deep into the crankcase.
6. Now that the balls are mixed, group them into two groups of equal size. And into the spaces between the groups of balls, insert two screws with sanded heads. Turn the screw heads 90° and they will fit into the spacer on the raceway between the bearing races.
7. An improvised puller can be any metal plate, say, an eyelet for a padlock unscrewed from a barn gate (your own, not your neighbor’s). There should be two holes in it at a distance from each other, close to the diameter of the circle described by the balls when the bearing rotates. Press the plate against the end of the crankshaft, passing the threaded part of the bolts into the holes, and screw the nuts onto them.
8. Tighten the nuts one at a time until the bearing is completely pressed out of the crankcase.
9. Press the new bearing into the crankcase, striking the races alternately. Use a spark plug wrench to hit the inner race, and use a pipe with a diameter slightly smaller than the outer race to hit the outer race.
10. Install the retaining ring and washer. Take a new oil seal and lubricate its side surface with grease - this will make it easier to press it in.
11. Without distortion, aim the oil seal into the mounting hole and press it in until it stops. To do this, you can use an old bearing and a spark plug.
This is how you can cleverly replace the crankshaft main bearing in a matter of minutes. Now this method is not a secret for you.
MOTO No. 12/1999
zid-voshod.narod.ru
Voskhod motorcycle engine crankshaft
The crankshaft of a motorcycle engine or a homemade all-terrain vehicle consists of a crank pin on which a large connecting rod head is mounted and rotates in roller bearings, two cheeks and two conical pins pressed into the cheeks.
Before inspection, the crankshaft must be washed with clean gasoline.
When inspecting the crankshaft parts, check for wear on the roller bearing of the large end of the connecting rod. Wear can be easily detected by rocking the connecting rod from side to side and lifting it up and down in an accurate radial direction. If the lateral vibrations of the connecting rod in the upper part exceed 5 mm, and knocking noises are clearly heard when the connecting rod is lifted up and down, then the crankshaft, together with the connecting rod attached to it, is replaced with a new one.
The service life of the crankshaft, subject to normal engine operation, is approximately 15–20 thousand km of motorcycle mileage or 500–700 hours of engine operation.
Repressing the crankshaft can only be done in a workshop, as it requires special tools.
Wear and development of crankshaft ball bearings is determined by the movement of the inner race of the bearing relative to its outer race. If, during an engine overhaul, one of the ball bearings is found to be damaged, then all three ball bearings must be replaced with new ones at the same time.
Next you need to check the condition of the crankshaft seals. If the oil seal springs have weakened or their rubber has ceased to tightly cover the axle due to temperature and time, the worn oil seals are replaced with new ones.
The right oil seal can be inspected or replaced with a new one without completely disassembling the engine, removing only the stator and the generator armature.
To prevent oil from being thrown out of the crankcase, the right oil seal should be inspected every 4-5 thousand kilometers.
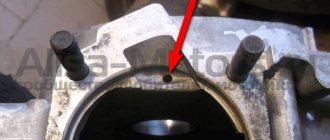
You should check the cleanliness of the grooves in the body of the crankcase halves, through which oil is supplied to the crankshaft ball bearings. These grooves need to be cleaned with thin soft wire.
After disassembly, the crankcase halves, as well as its covers, must be thoroughly washed with kerosene and inspected; they should not have cracks or any other damage.
Related topics:
Complete disassembly of the Voskhod motorcycle engine - we do it ourselves
voshod-2m.ru
Removal and installation of crankshaft, bearings and oil seals Voskhod
To remove the crankshaft, ball bearings and crankshaft seals of the Voskhod-2m motorcycle, you must:
- remove the clutch release rod and ball
- press the guide bushings out of the upper holes in the right half of the crankcase, unscrew 13 screws;
- using a special device attached to the right half of the crankcase at the mounting points of the generator stator, separate the crankcase halves, making sure that there is no distortion of the crankcase halves, so that the roller bearing rollers of the main gear do not fall apart;
- Press out the bearing, remove the adjusting washers, locking ring, and then press out the oil seal.
- Install a special device on the left half of the crankcase and press out the crankshaft. When pressing out, it is strictly forbidden to hit the trunnions with any object;
- Press out the ball bearing, remove the washer and locking ring, and then press out the oil seal.
Wash the removed parts thoroughly in clean gasoline and carefully inspect, paying attention to:
- on the working edge of the oil seal, reliable locking of the spring lock;
- crankshaft ball bearing rings. They should rotate freely relative to each other without jamming (there should be no play);
- the radial play of the roller bearing of the lower head of the crankshaft connecting rod should be no more than 0.3 mm, and the connecting rod rod should not touch the flywheels;
- The piston pin must fit freely into the upper head of the connecting rod and have no radial (transverse) play.
Install the crankshaft, bearings and oil seals in the reverse order, using tools and having previously performed the following operations:
- place the locking ring in the left half of the crankcase, pull the crankshaft into it until it stops;
- install the right half of the crankcase. Press in the bearings. Fill the resulting space between the bearing and the annular groove with adjusting washers and install a locking ring;
- Place shaped washers on the right and left sides, press in the seals.
Before installing series 204 bearings, fill the cage cavity with CIATIM 202 GOST 11110-75 or US-1, US-2 GOST 1033-73 lubricant. Press the 204 series bearing onto the crankshaft after connecting the crankcase halves on the control bushings. In order to protect the crank from damage, a wedge must be placed between the flywheels. In the assembled engine, the crankshaft should rotate freely, without jamming.
>
Similar articles:
- Complete disassembly of the Voskhod motorcycle engine
Resuscitation of main bearings on the left axle of Java-250 (353 and 559)
The case was very simple and common - the outer main bearing of the left crankshaft journal of my Chekhushka © began to sit by hand when pressed in, and when installing the crankshaft, it simply fell out. The reason is also simple - the crankcase is weak here, and is reinforced with only a few stiffening ribs. Tapping with a core didn't help, and thread sealant didn't help either. It seems that the problem was solved quite simply - I gave the crankcase and bearing to a person who had access to metal spraying and a jig boring machine. The idea was simple - spray aluminum onto the inner surface of the seat, and then use the above-mentioned machine to restore the original geometry. The man decided that I was not worth his efforts, and therefore sprayed metal onto the bearing, after which he sealed it into the crankcase using liquid nitrogen. The bearing stood tightly by itself, and was the cause of all my glitches with equipment throughout the entire season, because I had to replace two oil seals that were facing each other (© gazzz) with a badly worn original labyrinth seal.
After a season of torment, I disassembled the engine, with difficulty knocked out this bearing, after which the seat began to resemble a Copernicus crater, and the bearing flew all the way to the retaining ring without stopping. After scratching my back, I came up with the following idea...
Need to:
1. One double-row bearing 3205C from a Java-638 crankshaft. It has the same internal diameter as the original 6305, but its external diameter is smaller.
2. Crankshaft oil seal from IZH-Yu (has exactly the same parameters as the above-mentioned bearing).
3. Find a good turner.
4. A little brain.
So, the idea: we sharpen the bushing into the crankcase, into which we place the double-row bearing from the outside, and the oil seal from IZH into the same bushing between it and the inner bearing. Between the outer double-row bearing and the oil seal there is a technological step of about 1 mm, so that the oil seal does not touch the bearing. On the other hand, the same role is played by a locking ring, which limits the fit of the sleeve.
The Izhevsk oil seal very conveniently has two edges, so there is no need to install two Java oil seals. By the way, by the season I will try to replace the right axle seal with it by turning a simple clip.
The idea was a success, at least technically. A bushing, machined with a tightness of about 0.01-0.02, plus a few microns removed under the cone with emery, set “hot”, T ~ 150-180 °C - fits like a glove and looks incomparable. The resource of the left axle will thus hopefully become almost transcendental. Besides, now I’m not afraid for the crankcase. Unfortunately, I can’t post the dimensions - everything was done locally exclusively for my crankcase.
I’ll definitely tell you about the changes in the nature of the engine’s operation.
08/17/05 After a run of about 2 thousand km, no jambs were identified. There is no play either in the bushing or in the crankcase. The bearing works as it should. A small extraneous sound was added - a slight howl at mid-speed. If you don’t know about him, you won’t even listen. There are no changes in dynamics or maximum speed. The Izhevsk oil seal causes slight skepticism, but pah-pah-pah works so far.
(click on the picture to enlarge)
Source: https://www.jawaold.su
izh-motor.ru
List the bearings used on the Voskhod-3 motorcycle and indicate their number and dimensions
Crankshaft bearings 205, 3 pieces, 47 X 20 X 14; input shaft bearing 203, 1 pc., 40 X 17X 12; steering column bearing 746905, 2 pcs., 44 X 26Х2И needle bearing of the lower head of the connecting rod 464805D, 3 pcs. 31Х25Х18.5; gearbox intermediate shaft bearings 202, 2 pcs., 35 X 15 X 11; wheel bearings 60204, 4 pcs., 47 X 20 X 14; secondary shaft bearing roller, 42 pcs., 4X6; clutch release rod and central switch ball, 3 pcs., 4.763; kickstarter pedal ball, 1 pc., 6.35; rear wheel sprocket bearing 60304, 1 pc., 52 X 20 X 15.
After several cases of disassembling the crankcase, the bearings began to hang loosely in their seats. What should we do now?
This should have been taken care of earlier: the bearings should be pressed into a crankcase preheated at least in boiling water; You can, on the contrary, cool the bearing itself with “dry ice” - then it will easily sit in its place without damaging it. Now the situation can be corrected in two ways: by installing a special auxiliary bronze bushing into the cut hole (usually this method is used when the hole is broken extremely badly and its alignment is disturbed), or by chrome plating the outer surface of the bearings. The second operation is simpler and increases the diameter of the outer race by about 0.03 mm, which is quite enough to ensure tension if the wear of the socket is not very great. In this case, the balls and raceways of the bearings are covered generously with wax, several bearings are bolted together into a bag (Fig. 20) and the outer surfaces are protected
Rice. 20. Preparing bearings for chrome plating:
1 - hook for hanging the bathtub; 2 — rubber sealing washers; 3 —
metal washers;
4 -
tightening bolt. rubber or other washers, and the entire set is placed in a galvanic bath.
The M67-36 motorcycle only covered 10 thousand km, but at the end of the season it began to smoke sharply, and the oil from the crankcase began to decrease. What could be the reason?
If black smoke comes from the muffler, this usually indicates excess fuel; if gray, it means excess oil. Pay attention to the spark plug: if oil gets into the combustion chamber, the spark plug quickly becomes overgrown with soot, is constantly “wet”, and constantly fails. It can be assumed that the ring broke or the rings “got stuck” in the grooves and lost mobility. Also check whether the channels for draining oil from the cylinder heads are clogged; Pay attention to the serviceability of the breather.
For some time now, the oil level in the Dnepr engine crankcase has begun to rise. How to explain this?
The most likely reasons are two: gasoline getting into the oil or accumulation of condensate (water) from crankcase gases in the crankcase during operation in the cold season. Gasoline can get into the cylinders, and from there into the crankcase, when parked with an open or leaking fuel valve, when the float chambers are overfilled due to leaky seating of the shut-off valves in the seats. An increase in the fuel level leads to its flow through the idle system nozzles into the inlet channels of the heads. Gasoline is deposited on the cylinder walls and enters the oil during engine starting and warming up. A “cooled” crankcase at low operating temperatures, as well as disruption of the breather due to freezing of condensate in the tube, can make it difficult to evaporate high-boiling fractions of gasoline that has entered the oil and lead to its gradual accumulation in the oil. The low temperature of the crankcase walls and oil in the pan promotes the condensation of water vapor contained in the crankcase gases and prevents its evaporation. To reduce the accumulation of condensate in the oil, it is necessary, obviously, to raise the operating temperature of the crankcase and oil, insulate the front part of the crankcase, and check the proper operation of the ventilation system.