A moped, like a bicycle, is a very convenient vehicle. Moreover, it drives faster than its older brother, thanks to its built-in drive. The ability to move quickly without much effort – isn’t this the dream of every cyclist? It’s quite possible to bring it to life - equip your bike with a gasoline engine or an electric motor.
An assembled moped from a bicycle is a fairly common occurrence in rural areas or regional towns. It is there that they like to put innovative ideas into practice, in particular, to make nimble and economical transport out of an ordinary old bike. Have you noticed a similar interest in yourself? Then it's time to get down to business!
snow blower
If in the previous design you replace the shaft with plowshares or harrow spokes with an auger mechanism, add a casing, an intake device and a pipe for throwing out snow, the cultivator will turn out to be quite a decent snow blower. Many home craftsmen design their homemade products with replaceable attachments for different seasons. Motor from a Shtil saw with a power of 3-5 hp. It will cope quite well with cultivating the garden in spring and autumn, and with removing loose snow from a summer cottage in winter. The most important unit is the screw mechanism.
If you are not a professional designer, then it is better to download ready-made drawings from the Internet. The auger blades are made of thick rubber, for example, from a conveyor belt. The intake device is made of galvanized steel. A plastic sewer pipe is suitable for the snow disposal pipe.
Tuning features
The Alpha tuning argument is quite common as there are many ways to improve the quality of this moped. At the same time, the cost of modernization will be an order of magnitude lower than that of a similar Chinese scooter. After all, Alpha is made simply enough to make access to the power supply and external elements as convenient as possible.
You can improve the model in different ways, so before you start, you need to decide on the qualities that you want to change. Another important nuance is that you must understand the difference between style and tuning. The first requires only changing the appearance, the second option also affects the functional parameters of the car.
In addition, many see tuning an Alpha moped not only as a task to improve certain characteristics, but also as a real hobby that can keep the owner busy. There are many options for improvement, and you can also use your own ideas to optimize the functionality of the device. We will now focus on each specific area.
Legal subtleties
By the way, adding a bicycle motor dramatically complicates the rider’s life from a legal point of view. Of course, even on a regular bicycle we are full participants in the road traffic and are responsible for our behavior on the road. With the acquisition of a source of work additional to muscular strength, the bicycle becomes a vehicle. Do you need a license to drive a vehicle? Yes, we do. This is a 2014 innovation.
Rights category "M" are quite accessible. At a minimum, all those who passed category “B” have them “by default.” Driving motorcycles, mopeds and scooters are rarely taught separately, although access to exams for this category is available 2 years earlier. In practice, the majority simply ignores this letter of the law and does not have any special problems. Traffic police officers rarely get involved with maneuvering purposes, only if the driver is a very young driver.
Consequences of various violations:
- For driving without a license – 800 rubles. fine and prohibition by management (the practice of application is not entirely clear - either the bike is taken away, or non-existent numbers are removed).
- If you are involved in an accident, you are personally liable, since compulsory motor liability insurance was clearly not issued for the bicycle.
Sports equipment
If the crossbike has all the necessary documents, you can ride it around the city, having previously installed all the missing parts. However, such motorcycles have a narrow seat, so riding long distances is very tiring. It is difficult to drive it for more than a couple of hundred kilometers, besides, large treads on the tires lead to excessive vibrations of the steering fork when driving on asphalt, which, in turn, loads the driver’s hands.
The Chinese IBRIS TTR motorcycle is an excellent option for a beginner. Although these inexpensive models require some modification (usually replacing some parts with similar ones made in Japan). It could also be BaltMotors Enduro 250. Other global manufacturers also have many models for motocross. As a motorcycle for off-road and city use, for example, the Honda CRF250L, which feels great both on the highway and on difficult sections of the road, or the 250 cc Kawasaki KLX250S.
Option 2: assembling a moped with a gas engine
This is an advanced method, and the result is more reminiscent of a real moped. To make it, we need:
- gasoline engine;
- moped parts: wheels, shock absorbers, exhaust pipe, brakes;
- proven bike frame;
- tools.
Since here we are going to get a real moped, the frame must have increased strength and weight. Also, mopeds have a slightly different frame design, which may require some modifications.
Wheels from a moped are put on the frame. It will be necessary to change the fork design, since the width of the wheels will be wider than the distance between the dropouts. If possible, install shock absorbers on the fork.
Carefully overhaul the moped power unit and replace all faulty parts. The propulsion system will require a separate space; for this, a welded metal platform at the bottom of the frame would be a good option. The engine and fuel tank are secured to the site using metal fasteners. It is better to place the battery closer to the steering wheel. An exhaust pipe is connected to the bottom of the engine. The pipe must be firmly secured to the frame so that it does not dangle while driving.
- Remove the pedals and chainring from the bicycle frame.
- Install sprockets on the rear wheel of the moped and the engine shaft. A star on a wheel with a larger diameter.
- Place the rear wheel on the frame.
- Connect the stars using a chain.
Motor connection. The clutch and throttle valve are connected to the ignition lever via drive cables. The tension is selected so that the engine can immediately start and start spinning the wheel.
Brakes. If only one brake (for example, the front brake) may be sufficient for a bicycle, then it is better to play it safe and install them on both wheels. The rear one can be used as the main one, and the front one as an auxiliary one, to adjust the speed.
In general, a homemade moped based on a bicycle will look like this:
Converted bike
Since a vehicle equipped with an engine moves faster than a regular bicycle (this is why the modification is intended), for safety reasons it is necessary to install lighting devices on it. Personal protective equipment – helmet, knee pads and special shoes.
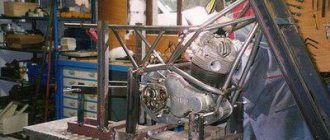
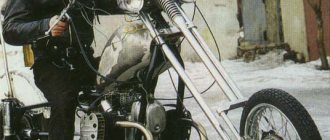
Old Friend (motorcycle from scratch).
Author of the project and article: On the bikepost Lame_Rider VKontata Lame Rider
From left to right: Storm, Mikhail, Lame, Blues.
Start.
Where to start building a new motorcycle? Neither my brother nor I have done anything like this before, and we don’t have any acquaintances with motorcycle builders or custom builders.
Google knows everything. Google said that you need a pipe bender (yes), welding (yes), an angle grinder - grinder (yes), a slipway (?). We started looking - we didn’t have a slipway. Even in the basement (!). But there is a channel.
The width of the slipway depends on the width of the frame, which in turn depends on the dimensions of the engine...
Need an engine. After digging around in the basement, they pulled out pipes and a couple of engines (the engine from the tractor was missing one piston): a large one from Zaporozhets and a small one from a motor scooter. Let's do a ZAZocycle!
When we welded the slipway and began to bend the pipe.
The blues bends the pipe, on the right behind my personalized stool there is a slipway leaning against the wall, on the left there is a motor from a scooter, in the depths there is a Zaporovsky power unit
A slight doubt crept in about the feasibility and safety of installing an engine from Zaporozhets on a structure made from existing pipes. A piece of channel material has been welded into the slipway and we are already building a motorcycle with a small 200 cc engine with forced air cooling.
They bent two pipes, secured them to the slipway, attached the engine, stood back and looked. “Oh, what a beautiful motorcycle we got!” Everyone's imagination drew the final image of the finished motorcycle. Everyone represented something different. How naive we were... After an hour and a half of clucking tongues around the structure, the question arose about the design of the front fork and the absence of traverses, a glass and, in fact, the front fork itself. As usual, in difficult situations, Blues went to the basement...
From all the variety of wine glasses, amphorae and glasses, he fished out exactly what he needed:
We put on the wheels.
By this time, the rumor about the lucky guy who sold the collective farm tractor to two city idiots had spread throughout all the surrounding villages. Someone even began to sympathize with our rapidly developing MGM (brain motorcyclism) and people began to present us with all sorts of rubbish. This is how we got the Izhevsk tank.
And somehow the question about traves came up again. We wanted to use a steel sheet (15mm) for production, but... Stop... The size of the traverse is determined by the wheel, and we just didn’t have one. As, in fact, there was no back one. And we had no idea how to make the rear part of the frame without a wheel. There were a bunch of different wheels and tires in the basement, but not a single one met our requirements. I had to go online to sort it out.
The result: Transalp 21" x 1.85", Michelin tires; Yamaha R1 17"x 180 mm, Dunlop tires. Two wheels + tires + delivery - $270.5 Front wheel bearings - 103 - 2 pcs. VBF (D=35, d=17) rear hub - 104 - 1 pc. VBF (D=42, d=20), 304 — 1 piece. NSK (D=52, d=20) 4 bearings - $14.0.
But then one “BUT” came up, but more on that a little later (Yamahaerians and transalpavods are already beginning to guess). The front axle was found in the Basement. The axle from the “Tourist” scooter made excellent friends with the Transalpian wheel. The rear axle was removed and machined from a Dnepr brand all-wheel drive sidecar.
The basement was slowly filling with rubbish pulled from everywhere. Several pendulums from scooters, feathers, frames... But there was nothing suitable for us yet. The Internet came to the rescue again. Found a fork with a Yamaha FZR EXUP for only $56.0. At the same time, we bought 205 tapered roller bearings - $7.5 per pair. The metal that they wanted to transfer to the traverses was used to make a platform for the battery.
Fight for the saddle.
Little by little the understanding began to dawn that the frame and two wheels were not a motorcycle at all. You also need to put your ass down somewhere. Blues confirmed my assumptions with his proposal to make a seat. The next stage was the construction of the cantilever saddle.
I resisted and insisted on the “egoist” model, and Blues pushed the idea “... and take the girls for a ride...”... Age won, not reason.
This is me standing in the background in a beautiful napidnik (“napizdnik” is an apron in Ukrainian - the national clothing of Ukrainian customizers, and not what you thought), which my wife altered for me from an old mattress.
I don’t remember how much the shock absorbers cost. The sales assistant in the auto store again started asking, “What model of scooter are you looking for?” Try to explain that you need the softest ones, 30-35 cm long. He doesn’t have a tape measure, but they are all the same in softness because they are metal. But this is all lyrics. Let's get back to the wheels. More precisely, to the rear Yamaha one. There is a special sexuality in it - we were so tortured knocking out our own bearings, so many times we remembered the relatives of all the Japanese engineers... They took it out and picked out the bearing in parts, when studying the outer race it seemed that it was fused into the seat. When we dug it out, there was a layer of some transparent and sticky substance between it and the body of the wheel. “This is the saliva of a Japanese mother.” - we thought in unison.
How to fix a homemade star on a cast disk? Blues decided to make a rubber damper from an old electric car wheel that happened to be lying around in the Basement. And I attached pins to the body of the star and married it all to the axis using bushings.
This is white soil
Stainless steel.
Before continuing the story, I will make a couple of comments on the previous parts. Throughout the entire work on building the motorcycle, we drank tea in the garage, ate all kinds of food, and sometimes we left all this pig untidy. The next day they came - the pack of tea was chewed, the bagels were bitten, etc... We blamed Mouse, we thought that she went out and took away all the goodies left after us. But judging by the comments, it was not Mouse, but one of the locals. This is the first. And secondly, assembling a motorcycle, making everything yourself, is not playing with a designer. In my spare time, I watched a lot of videos about the work of foreign customizers. — We invited John Jonovich Johnson, my old friend from Philadelphia, a specialist in cleaning welds (!). — 10 people, all components are from the catalogue, and for their equipment you can buy our entire garage cooperative with cars, dogs and watchmen. Somehow I got distracted. Dobrechko, let's get back to the motorcycle.
We decided to slightly modify the shock absorbers for a softer ride.
The chain is riveted from a two-row chain taken from an agricultural grinder. I apologize for the size, but to complete the picture and accurately convey it I had to insert it like this.
Front engine mount.
We remembered about driving and immediately wanted to steer. The steering wheel was first made of black carbon, so as not to waste the valuable stainless steel. Measured by Blues.
Something like this
When we were dismantling the Zaporozhets from the Basement, a fragment of the exhaust system caught our eye - a receiver or manifold made of black carbon, about a hundredth in diameter. This gave us the idea to make one for ourselves. Therefore, in front, at the exhaust, a stainless elbow is welded into a stainless thick-walled pipe, from which two exhausts extend. Cooking stainless steel by electric welding, and then cleaning it... this... In short, a day of welding work means three days of cleaning. Actually this also applies to chernukha.
The idea was that the motorcycle would not look aggressive, but elegant and kind. Narrow front, gradually widening towards the rear wheel. I wanted, perhaps, some kind of lightness in the silhouette.
They decided to abandon the roll bars. Their role is played by the design of the footrests.
The footboards are made of thick stainless steel and are stylized to resemble pistons)))
Wings.
We decided to make the wings deep and large. By chance, old pieces of metal were found in the Basement - the remains of some kind of gate. With the help of an angle grinder, a sledgehammer and an EMF, they were transformed into two stunning motorcycle fenders.
The wings are not yet attached. And in the background is another addition, an almost new table - an absolutely necessary thing.
And the thought in my head is this: clean it up a little, putty a little and you can paint... And you can already select the paint)))
In my dreams I already saw an almost completed unit. It was decided to continue the topic of pistons further:
Although sometimes, during the construction process, some strange feeling was born inside. A feeling of some kind of complete retardation. Well, this is, like, when the slots for tensioning the chain are made, the brake disc is installed - everything is wonderful and pleasing to the eye.
and you start making the rear wing, attaching it. And then you realize that the fender made according to the wheel is evenly fixed to the frame, and the wheel with the axle doesn’t want to move in the slots for tensioning the chain, because the fender made according to the wheel is evenly fixed to the frame.)))
As a result, the frame is primed
The rear wing was sawn, a strip was inserted into it, welded and puttied.
An insert is visible in the center along the lower edge of the wing.
The front is also puttied.
By the way, what a funny word “PUTTY” is. We had a blast with it. None of us had the slightest idea about leveling metal surfaces using two-component putties. The first time we bought 50g. jar with hardener included. I didn’t even have time to mix it - it became a stake in the jar. Somewhere after another 150g. managed to find the right ratio. Then we did the following: kneaded, smeared, waited for it to dry and sanded. About 5-10% of what was spread remained. And for normal application of primer I had to buy a compressor and all sorts of special effects for it.
By this time, the garage began to resemble the primary state of the Universe, i.e. chaos.
Foam plastic vs Argon
Sometimes the power of the mind triumphs over age. In short, I managed to convince Blues to make “Egoist”.
Sitting. I phallomorph it onto the foam sidewall.
There was a monoshock absorber under the ass, which proved to be excellent in tests. It's time to come up with something with the sidewalls. And once again we were struck by a brilliant idea. Having worn out enough of the one and a half millimeter wings, we decided to make the sidewalls plastic. To make plastic products, you need epoxy resin with a hardener, fiberglass and, in fact, a mold. Having looked at the Ulyanich volcano, we decided to cut out a shape from hardened polyurethane foam. In the photo above, the rear wing rests on three cans of this foam - now we have a comfortable low seat. But the forms for the sidewalls never appeared.
Next in line was polystyrene foam, glued in several layers. They cut out a shape from it (with the required allowances) and coated it for hardness... Yes, to hell with that coating. When processing foam plastic, very unpleasant sounds and a huge amount of snow-white foam chips of any size are released into the air, which, in turn, stuck to us (thanks to static electricity) from head to toe. A sort of foam Tsereteli.
Around the same time, the Blues stole a refrigerator by chance. Upon autopsy, it turned out that the patient’s body was made of thin cold-rolled sheet (0.8 mm). Blues subtly hinted to me with gestures that the sidewalls should be made of metal, but since metal of such thickness is difficult to weld with EMF, it would be nice to get hold of argon welding. In the Basement there were all the odds and ends for this. Everything except the argon itself. No, there was a lot of it in the basement air, about one percent, but this was not enough for welding. I had to buy an argon cylinder. As the play progressed, we bought more new collets, electrodes, wire and a cool chameleon mask.
This is not soil on the sidewall. This is enamel.
The photo shows a black cylinder with a head. This happened thanks to another useful gadget - sandblasting. I wrote about buying a compressor here, and Blues bought a special gun and a couple of bags of sand to go with it. The sand was fiercely calcined on an electric stove and sifted. As a result, we were able to get a clean surface of the cylinder (for painting) and a mini beach in front of the garage.
After putting argon welding into operation, Blues played with it for about a week: welding different thicknesses, using different currents, trying all sorts of seams, trying to fool the mask. And quite by accident, I welded a stainless steel box for a speedometer from an old Java car - they gave us a couple of them as a gift.
About friends.
Now it's worth going back a little. I already mentioned the wheel from Honda Transalp, but it was purchased without a brake disc. This is where this “BUT” came out. Until some distant year, Honda made brake discs for transalps with seven bolts. And on the wheels there were, respectively, seven holes for fastening. The cost of the original disk on the Internet was about $200... The idea with the adapter, after much practical training and a series of failed experiments, was sent to the floor and declared completely illiquid. But as the old Indian parable says, “The mind of a naked warrior will always find a way out.” In the last photo, attentive bikers noticed a rust-colored circle next to the rear wheel. This is a circular saw blade, made to order at one of our factories. Brakes require sacrifice and we put this artifact on the front brake.
On the front wing there are traces of the torment of creativity and aesthetic throwing.
Now it is worth mentioning two wonderful people - Alexander and Mikhail.
The first one appeared in our garage, and subsequently in the team, thanks to Cupid's arrows. This man, let's call him Mikhail, is the boyfriend of Blues' daughter. Periodically visiting his potential father-in-law's garage on all sorts of automotive issues, he contracted (apparently through teacups) MGM (motorcyclism of the brain). And soon he came to the garage to take part in the process. In addition, he turned out to be very knowledgeable in matters of electrical equipment, electrical wiring, etc. Considering that we were complete idiots when it came to electrics, Mikhail turned out to be very helpful.
The second was our new neighbor in the garage from the next block. One day he was walking with a girl through the garages and they passed by us. Well, more precisely, I was not there at that moment, and Blues needed help and he called a passing guy to support the motorcycle. The guy turned out to be the owner of the sport and the same MGM-nut. He liked our project and a sort of neighbor-garage friendship began. On top of everything else, Sasha turned out to be a professional car painter.
Size difference
The birth of the rear turn mount. Those who are attentive will notice the turn signal itself))
Continuing the piston theme
The front turn signals are the same style.
Having looked at our titanic work of putty and primer, Alexander highly appreciated our ability to make shit. And he forced everything to be remade, to hell. True, he kindly told me and showed me how to do it correctly, and in some places I finished it myself. Theoretical classes alternated with practical ones. But all this happened without me. During this period, in connection with the birth of my daughter, I rarely appeared in the garage.
Saddle, primer, paint.
Pistons were lying all over the garage. Apparently, they multiplied by multiplication and took root well with us. They found themselves in a wide variety of places. It would have been a sin not to take advantage of this. Therefore:
But this is so, a lyrical digression. I continue the story about sculpture and painting based on MGM.
While Blues was practicing and ruining the sandpaper, I was telling him: “Let’s order a saddle.” Let's bring a master so that he can take a look, take measurements and order a saddle... Finally, we phoned the tanner Oleg and agreed on a meeting. We picked him up and brought him to the garage. The blues showed our creation. In order for a person to quickly understand the concept of Blues, he even played special music for him. Blues likes special music, you'll never guess what...
A special antique jacket was chosen as the material for the manufacture of our cool saddle - leather and Turkish. Oleg suggested embroidering the name of the motorcycle on the saddle. When we started choosing a font, we couldn’t draw it and just asked them to make sure the letters were good. Oleg worked some magic around the saddle using a centimeter and patterns cut out of paper for milk cartons, removed the seat and said: “It will be ready at the end of the week, you’ll pay $65.” After that we took the master home.
Finally, I was able to breathe easy and for the next few days Blues continued preparing our motorcycle for painting under the strict guidance of Alexander. And then the day came (I was at home) when the compressor was turned on, the sandblaster was filled, the wheels were sandblasted and priming work began.
The scenery of a performance of some experimental theater by a young idiot spectator
For wheels, Sasha recommended using primer for non-ferrous metals, and for a motorcycle for ferrous metals. The primer is two-component and, as a result, gray. Alexander allowed Blues to apply primer, but did not allow him to paint. He painted while locked in the garage, even turning off the lights so that no one would see the secrets of their Painting Lodge.
Further, I think, comments are unnecessary.
Assemblage point.
After painting, assembly usually begins. But not in our case. Seeing the quality of the paint, we began feverishly polishing all the aluminum and stainless steel. Polishing aluminum is easy and simple, but stainless steel, as always, was difficult - the torments of masturbation squared. At the same time, final assembly of the product began.
I forgot to mention that we came up with the idea of putting a continuation of the air cooling casing on the engine, codenamed “vacuum cleaner”. Which should visually enlarge the engine and compensate (again visually) for the asymmetry of the power unit. So, during final assembly, it stupidly began to catch on the gear shift piston. So the vacuum cleaner was trimmed and welded during the course of the play. I encouraged Blues that in all films about customizers, such moments always arise during assembly.
Here the Blues’ daughter in a beautiful sundress, Mikhail in the leader’s yellow T-shirt and Storm Rider (aka Alexander) in a camouflage suit were captured in the frame.
The air filter deserves special attention. A hair dryer was used to make its body. More precisely, this is a HAIR DRYER...
Also, the mondulatins on the tank (nigrips) did not give me peace of mind. I already forgot why the hell they were needed there in the original. And the brain was intensely looking for use for them in the built motorcycle. There were different thoughts, from some functional leather body kits with pockets to clip-on wings.
But at the end, without further ado, they added aluminum plates.
From left to right: Storm, Mikhail, Lame, Blues.
Bottom line.
Short video with sound
Summing up, I can say that during the construction of the “Old Friend” motorcycle we: - gained invaluable experience and proved to ourselves that WE CAN - found new friends - got hold of tools and all sorts of useful things in the form of a bunch of cool scrap metal - had a great time...
- no animals were harmed during construction
The plans include installing bi-xenon, horns, mirrors and panniers. While working on it, a moment came to me when it was no longer important what the outcome would be, the process itself became important. And after the final assembly, a certain feeling of unreality periodically came over me - I couldn’t wrap my head around two bent pipes and a motorcycle standing in front of me.
It’s even a little sad that it’s all over... Although, here Blues picked up a decommissioned device at the airport for a couple of money. We climbed around it and made some cool stuff.
This is one of them.
We thought about adding something to the Old Friend for charm. They twisted it this way and that... And then we realized that we could go wrong out of the blue. Well, the altimeter doesn’t fit into the overall design concept of the Old Friend motorcycle and we don’t want to attach this motorcycle to it.
As a result of brainstorming, it was decided to build another new motorcycle.....
motodoor.wordpress.com
Homemade walk-behind tractors from chainsaws
- To make a homemade motor cultivator from a chainsaw, you need a saw engine, several pieces of pipe and...Open photo A simple homemade motor cultivator from a chainsaw in a large size. Picture upon request “Design of the frame of a motor cultivator with a saw engine,” from the section “How to make a motor cultivator from a chainsaw »
- To make a walk-behind tractor with your own hands, they very often use a motor from a chainsaw (Druzhba, Ural, Taiga or any other domestic or impo... Open photo Do-it-yourself walk-behind tractor from a Ural chainsaw in a large size. Picture upon request “Making a homemade walk-behind tractor with a chainsaw engine,” from the section “Ural saw engine, frame, gearbox and two chain drives”
- A simple design of a lightweight walk-behind tractor from a chainsaw with a very simple layout of the engine, a reduction gearbox and a r...Open photo A lightweight walk-behind tractor from a chainsaw Friendship with your own hands in a large size. Picture upon request “Simple layout of the working shaft and reduction gearbox of a motor-cultivator”, from the section “Design of a motor-cultivator from chainsaws Druzhba"
- Using a claw clutch and an engine from a Druzhba, Ural or any other chainsaw, you can make a reliable and easy-to-control...Open photo The design of a claw clutch in a large size. Picture upon request “Instructions for making a controlled drive clutch,” from the section “How to make a claw clutch” turning on the drive"
- The construction of a homemade walk-behind tractor from a Druzhba chainsaw is quite simple, because... the engine is small, compact and weighs little, then the frame for such a m...Open photo Homemade walk-behind tractor from a Friendship chainsaw in a large size. Picture on request “Making a walk-behind tractor from a saw”, from the section “How to make a walk-behind tractor from a Friendship chainsaw”
- Having an engine from a saw or moped, you can make such a simple one-wheeled motor cultivator with your own hands. The main advantage of this...Open photo A single-wheeled motor-cultivator made from a saw in a large size. Picture upon request “Simple design of a lightweight walk-behind tractor with the function of cultivating land,” from the section “photo and description of the design”
- The design of the frame of a homemade portable winch, which can be used as a walk-behind tractor for plowing and cultivating a vegetable garden, is quite simple and so on...Open the photo The design of the frame of a walk-behind winch in a large size. Picture on request “Homemade winch for plowing a garden using a Druzhba chainsaw”, from the section “Design and fastening the main components of the winch walk-behind tractor"
Types of chopper bicycles
In common parlance, chopper bicycles, regardless of type, are called “rastabikes.” Let's try to understand in more detail what types of these unique bicycles can be found on domestic roads.
Chopper
One of the most popular types of bikes. It has similar design elements to a motorcycle of a similar style, such as: an elongated frame, which is based on an unusual geometry using main pipes of different sections, a high handlebar and a long fork.
In addition to the features discussed above, factory models of such bikes are often equipped with planetary hubs and disc brakes. of tuning parts on sale , which allows you to customize your bike.
Cruiser
A comfortable bike for moving along city streets and alleys equipped with hard road surfaces. The main distinguishing feature of this bike is the bicycle frame, made in the style of the 50s. Similar bicycles were in demand in the southern part of the United States. That is why they are often called “beach people.”
Making a motorbike with your own hands
So, how to make a moped from a chainsaw with your own hands? To do this, you do not need to have a higher technical education and have a mobile workshop at hand - just the required minimum of tools, a working motor from a chainsaw of almost any brand and a bicycle frame, preferably made of metal tubes, to withstand the load from the engine.
Motor selection
There is nothing complicated about how to make a bicycle with a chainsaw motor. But you need to understand that the motor will not be suitable for a light chainsaw that is used for small jobs - its power must be at least 2 hp. or 1.5 kW. But as for the volume, the situation here is exactly the opposite - the volume should not exceed 50 cm3, otherwise it will violate the provisions of the Vienna Convention. Otherwise, such a vehicle does not require a license or registration, since this vehicle is defined as a “bicycle with an outboard engine.”
Frame equipment
A homemade moped from a chainsaw is made from a bicycle in any, even the most “dead” condition - the main thing is that there is a whole frame. The engine from a chainsaw is installed on a bicycle at the junction of the lower and seat tube - this is the optimal location method. A gasoline tank is screwed next to it, and a battery is installed above the engine, on the top pipe. You need to install the chainsaw engine so that it is fastened firmly and securely - the motor is subject to vibration and if it is loosely secured, it will fall.
If you don’t have a frame from a finished bicycle, you can easily weld it - for this you need several pipes and a welding machine. It’s even better - such a DIY chainsaw motorbike will be more durable and reliable, and a self-welded frame will allow you to position the motor as close as possible to the drive wheel.
Transmission
Simply installing a chainsaw motor on a bicycle is not enough - you need to make sure that the torque from the motor is transmitted to the wheels. For this, pulleys or a chain mechanism are used:
- Pulley system. In this embodiment, the engine from a chainsaw on a bicycle will transmit torque through a belt. This system is simpler - it uses factory or homemade pulleys, one on the engine shaft, the second on the rear wheel hub, as well as a tension belt. The downside is that the belt stretches faster than the chain and is less durable, although V-belts are not inferior to chains in durability.
- Chain transmission. Here you can use a rear sprocket and install a gear on the motor shaft. The transmission of torque occurs through a chain - it is more durable and resistant to stress, but requires regular maintenance. Choose for yourself how to make a bicycle with a chainsaw motor, or rather, which transmission to install on it.
Motor connection
A DIY motor scooter made from a chainsaw will not work if the engine is not connected correctly. To do this, you need to connect the battery to the engine ignition unit, as well as to the brake handle. Position the connecting cable so that it can be easily wound using the handle. The last step will be to install an exhaust pipe - you don’t have to install it, but in this case the chainsaw scooter will “delight” with the exhaust right in your face.
As you can see, there is nothing complicated about how to install a chainsaw engine on a bicycle - here you only need to put in a little effort and have the necessary minimum of spare parts and assemblies. But such a self-propelled mechanism will go a little faster than a regular bicycle. But homemade go-karts made from a chainsaw are on a completely different level. With the right approach, you can organize real races, so we’ll look below at how to make a go-kart from a chainsaw with your own hands.
Two classes
There is a boom in sportbikes, and more and more people are imbued with the romance of long journeys on motorcycles, and those who like extreme sports are fond of motocross. To choose an off-road motorcycle, you need to decide what tasks will be assigned to it first. If these are comfortable trips, then you should choose from the “enduro” class. If extreme trips are required in areas without asphalt, the choice will be a cross-country motorcycle. There are also models that include elements of both classes.
Main parts of a moped
First, let's look at the main parts of this technique. In other words, let's take our future scooter apart, so to speak, and find out its main elements so that making a moped is easy.
Engine
It is clear that without a good engine you cannot go far on a scooter. In this case, it is usually installed on the D-6 power unit. Recently, chainsaws have also become very popular, from which a homemade moped is made. In the video instructions you can see in detail how to do this. Chainsaws will be discussed in more detail below.
Exhaust system: forward flow
It is necessary to carefully consider a high-quality exhaust system so that the muffler does not have a negative impact on the power unit with which homemade mopeds are equipped, but, on the contrary, helps to quickly get rid of the remaining air-fuel mixture. A direct flow made by yourself will be what you need.
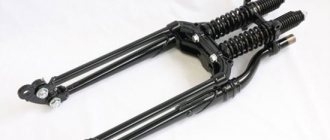
Suspension: pendulum fork
A pendulum fork that looks much better than other versions of this part of the scooter. The fact is that a large number of varieties of forks can be made, but any expert will confidently tell you that nothing is better than a pendulum one, nothing has been invented yet. As you know, this part of the scooter bears the hardest work. It is the fork that takes the brunt of the impact when going over various bumps, and generally uneven sections of the road. This is a kind of suspension on which the driving characteristics depend. Thanks to the pendulum fork, you can achieve stability of the scooter on any road.
For comfort when traveling
If you choose an off-road touring motorcycle, an enduro is the best choice. As a rule, such a motorcycle is more massive compared to a cross-country motorcycle, especially if you take into account the huge zip-on panniers, which will contain everything you need, from food supplies to a tent and sleeping bag. Although an off-road motorcycle is intended for other purposes, it will be quite capable of covering various areas without asphalt, although it is unlikely to be able to ride, for example, on wet clay. An off-road touring motorcycle (photo below) traditionally has a comfortable seat that can accommodate two people, which is also important for long trips.
Brake system
Instructions
First of all, draw a picture of your future masterpiece. You don't need to have the skills of an artist to do this. A sketch of the future moped helps the master decide on the design and technical features of the creation. Then create a technical sketch to determine the parts that will be needed. Then purchase all the necessary parts. At this stage you will have to spend money, since many parts cannot be made: engine, gearbox, wheels, frame pipes.
Assembly of a moped begins with the frame. It’s easier to take ready-made parts and elements from the frames of other mopeds and mini-motorcycles. Your entire frame will have to be made on a special one from pipes. However, do not use seamed water pipes - they are not strong enough. It is better to use pipe elements from motorcycles. Use a blowtorch to bend them, and a welding machine to weld them. Don't forget to reinforce the frame with spacers and brackets.
Weld the front fork to the frame through the bushing. You can also bend it yourself from pipes or remake a ready-made one to your liking. For a simple moped, a bicycle fork will do. For a chopper, you will have to work on the fork yourself.
It is better not to take a rear fork from a bicycle, since a moped has higher speeds and greater mass, therefore the loads will be high. Ready-made ones from mopeds or motorcycles are recommended. When making a swingarm rear suspension, try to install the swingarm as firmly as possible on the frame and cylinder. When using a classic suspension with two shock absorbers, the latter can be taken from any domestic light-class motorcycle.
The next step is installing the engine and gearbox into the frame. Think about its mounting in advance and cut the brackets from a steel sheet. Screw the brackets with bolts and nuts to the engine and tie the engine to the frame with wire. Then “tack” the brackets by welding, remove the engine and finally weld the brackets.
The final step is to install the wheels. If the rear wheel is a bicycle one, it will have to be modified by welding a new sprocket. Install the fuel tank and power system onto the frame. The fuel tank is up to the owner's taste, and the power system must match the engine, although it can be upgraded.
Electrical equipment must be moped or motorcycle type and include all lighting devices required by law: headlight, tail light, turn signals. After this, small parts will remain: the saddle, controls, additional equipment.
Engine and tank
People's opinions may differ regarding the optimal cubic capacity for a tourenduro. Some claim that they feel great on 250cc, others say that more traction is needed, because a loaded enduro with a small engine capacity does not “pull” when moving uphill. However, medium-sized (from 600 m3) enduros are considered universal. They perform well on the highway, in the city, and off-road.
The nature of the intended trip also determines the size of the fuel tank. If refueling is required every 100-200 km, such a motorcycle will not be suitable for long-distance travel. A large tank is a guarantee that you won’t have to be left without gasoline somewhere on a country road, although in any case it is useful to carry an extra canister with you.
Motorcycles that use dry sump lubrication are considered more reliable. During sudden stops, when the motorcycle falls or overturns, such a lubrication system eliminates “oil starvation” of the engine and a drop in pressure, so overheating will not occur.
An excellent choice would be the Honda Africa Twin, based on the racing XLV750R and the Transalp model. The KAWASAKI KLE500 is also loved by travelers, especially since its price on the secondary market starts at 80 thousand rubles. The YAMAHA XTZ750 Super Tenere, a multiple Dakar winner, can also be an excellent vehicle for both long-distance travel and rally entertainment.
Motor types
Only a few types of motors are suitable for such miniature and fragile equipment, so it won’t be possible to talk about them for a long time.
You can hang the engine on the frame or put it on the trunk - this is not so important, the main thing is what fuel the new “heart” of the bicycle will run on
Petrol
Until recently, a gasoline engine was the first thing you should think about when powering your bike. As already mentioned, the history of the use of gasoline engines on bicycles goes back more than half a century. Not only serial engines for bicycles were used, but also various exotic ones, for example, engines from trimmers and chainsaws.
To move the bike, there is enough minimal force, by the standards of gasoline engines. Usually it is 1-2 hp. Accordingly, engine volume starts at 50 cubic centimeters. There are single-cylinder (most Soviet models, retired engines) and two-cylinder engines. With a difference in power of 1.5-2 times, the latter are usually installed when motorization is taken seriously. Usually, of course, these are imported engines, for example, Honda.
Typically, a gasoline engine is as simple as possible, and two-stroke mechanisms are used, which are fueled with a mixture of gasoline and oil and do not require special care. Comet, D-5 and D-6 and their Chinese clones F50 and F80 are two-stroke. In addition, they are easier to start and can be removable. A 4-stroke engine is a rarity on a bike; a more complex mechanism is more economical, but its “grip” is lower, and repairs, weight and cost are much more expensive.
Electric
Electric bikes have dramatically overtaken gas bikes in recent years. Several factors came into play here:
- Reduced cost of electric motors due to unification of production in China.
- Inventions in the field of batteries, which have become much lighter and more spacious.
- Increasing the complexity of bike designs to the point where an electric motor becomes an acceptable accessory.
An electric motor on a bicycle is easier to install and maintain, but engineers went further than just the first step of replacing a gasoline engine with an electric one. Nowadays, wheel motors have become very popular, when an electric motor for a bicycle is installed on the wheel hub in an integral way. This increases both ease of installation (just attach the wheel and battery) and service life. The absence of an additional chain drive and switching mechanisms makes the design simpler and more reliable.
Chainsaw ignition for a motorcycle
Chainsaw parts are also used to upgrade outdated or in need of repair vehicles such as motorcycles. The saw ignition system is often used to improve this vehicle.
You will need:
- they fly;
- flywheel spacer with key;
- fan;
- coil with high voltage wire;
- aluminum plate for mounting the coil;
- bolts, nuts.
Chainsaw ignition is suitable for Ant and IZH Planet motorcycles. Unlike a magnet, such ignition is reliable and durable, and is not afraid of shaking and water.
For proper assembly of a moped with your own hands, reliable maintenance, modification and construction of other equipment, listen to the recommendations:
- Before assembling the motorcycle, make sure that the main part - the bicycle - is in optimal technical condition. Modernization will increase the load on all its parts.
- Carefully check the condition of the gas tank. Fuel must not be spilled as this may cause a fire.
- In addition to engine power, do not forget about volume and weight. The volume should not exceed 50 cm³, weight - no more than 6 kg.
- When installing the belt, make sure that the part is securely fastened to the wheels, otherwise the accuracy of impulse transmission from the motor to the wheel will decrease.
- Using a chainsaw engine, you can independently design other equipment - a go-kart or a tricycle. You will have to make an effort: weld a strong metal frame, prepare a working gearbox.
- With a strong frame, gearbox, driver's seat, at least 35cm wheels and a saw motor, try building an ATV.
The versatility of chainsaws is demonstrated not only by their multitasking and functionality, but also by the abundance of useful homemade products that craftsmen have learned to make with their own hands. They save on expensive factory-made devices that most people simply don't have the money for. But, as they say, the need for inventions is acute. Therefore, when talking about chainsaws, many represent not only cutting down or pruning orchards, but also winches, ice augers, boat engines, shredders, sawmills, which technically competent craftsmen have learned to adapt from everyone’s favorite gasoline-powered tool.
Vehicles that deserve no less attention: bicycles, mopeds, go-karts, ATVs and much more that can be assembled using a chainsaw with a gasoline engine. In this article we will talk about how and what to recreate them from and surprise others with their stunning motorized design.
How to make an electric bike
If you don’t want to bother with a gasoline engine, there is another option - install an electric motor. It can be purchased or installed from another device. The first option for creating electric mopeds is preferable, since the engines already provide the necessary power.
Installation options - wheel motor and independent engine on a chain or belt drive.
The wheel motor differs from the usual one by the presence of a drive mechanism in the central part. It is connected to the control unit using wires. A significant advantage is the ability to make the bike front-wheel drive without making changes to the classic transmission. And if you wish, you can even install two motor wheels. Installation is quite simple, provided that the bike itself allows it. However, it’s a stretch to classify a bike with such wheels as a moped.
Motor-wheel kit
An electric moped, that is, an analogue of the one discussed above, is a completely different matter. Of course, an exhaust pipe will not be needed here - this is a plus both in terms of reliability and overall weight.
Assembling an engine from scratch at home will be problematic, so let’s look at how to install a ready-made shaft motor.
Progress:
- Install a new sprocket and belt pulley onto the carriage axle.
- A shaft with a drive pulley is attached to the seat tube.
- The pulleys are connected by a belt.
- The shaft is connected to a power source through wires.
- Route the wires from the battery to the switch on the steering wheel.
Speed bike with electric motor
The location of the battery is on the lower front tube of the frame or trunk. Electric motor operation diagram:
- When the electric motor is turned on, the rotating roller engages the rear tire tire, pushing it.
- The pulleys and front sprocket transmit torque to the transmission.
- Changing gear causes a change in torque output. At the same time, the rotation speed of the roller remains constant.
DIY electric bicycle:
Main features, advantages and disadvantages of a chopper bike
Chopper bicycles have recently become popular in Ukraine, thanks to the original design, reminiscent of cool biker motorcycles, and the simplicity inherent in bicycles. With an elongated frame, a heavy handlebar and a special fork, these bikes resemble motorcycles . Easy riding on asphalt, as well as excellent aerodynamic parameters during descent, is achieved thanks to a shift in the center of gravity and the biker’s original position.
Main advantages of choppers:
- high comfort of movement;
- beautiful appearance and original style;
- wide tires that can dampen vibration from uneven domestic road surfaces;
- the possibility of simple and quick tuning changes, which allows the owner to have a unique, exclusive bike;
- easy operation and maintenance of the bike;
- minimal impact on the back, thanks to the level landing;
- The high steering wheel ensures optimal placement of rear-view mirrors, which allows for safe driving on city roads.
The main disadvantages of choppers:
- low speed gain;
- reduced maneuverability;
- difficult climbing.
Option 1: how to quickly assemble a moped with a gasoline engine
Before you start creating a new moped from a bicycle, you need:
- bike;
- gasoline engine and gas tank;
- battery;
- pulleys or gears;
- transmission belt or chain;
- drive cable;
- fastening clamps.
The working unit of the engine, gas tank and battery are securely fastened to the frame using fastening clamps. Convenient location:
- on the top pipe there is a battery;
- the junction of the lower front and seat tubes is the engine;
- Next to the engine is a gasoline tank.
At the next stage, you need to make pulleys - special transmission units through which the engine force will be transmitted to the rear wheel. The source material for the pulleys can be small wheels with external barriers, the size of a CD. Mandatory conditions are the strength of the material and reliable fastening.
Do-it-yourself installation of pulleys on a bicycle:
- The front gear wheel is attached to the motor shaft.
- A second pulley is attached to the hub of the rear wheel of the bicycle.
- A belt is placed on the pulleys. The tension force is approximately the same as that of a chain. The belt must hold firmly to the wheels; this determines how accurately the engine will transmit force to the wheel.
If a chain is used instead, then gears are installed on the motor and wheel instead of pulleys.
So, the transmission is ready, now let's move on to connecting the engine:
- The working motor housing is connected to the battery.
- Assemble the “ignition” mechanism: a regular brake lever is attached to the steering wheel, then it is connected to the engine body through a cable.
- Set the tension so that the engine starts freely through the handle.
How much will a homemade product cost?
If you look at ready-made offers for the purchase of mopeds made from a chainsaw, you can see how prices change. Someone sells a moped for 5 thousand rubles, and someone asks for all 15.
If you write down all the costs, the lion's share will be on the chainsaw. The Ural 2T model can be bought for 5 thousand rubles, to this figure we add another 4-5 thousand rubles for additional devices.
In total we get the amount of 9-10 tr. We eliminate the cost of tools, since a person who wants to make a moped from a chainsaw himself always has the tool “a priori” at hand.”
An amount of 10 thousand rubles will seem meager if you look closely at the price tag of branded motorcycles, mopeds and scooters.
What you might need
In order to make a homemade moped, you first need to decide on the parts that will be used during assembly. In most cases, the basis of the design is an unnecessary bicycle. You immediately need to think about where all the details will be placed. The most cumbersome of them is the engine. It is usually located in the rear trunk or at the bottom of the frame. If the frame has such a structure that placing the engine will create inconvenience when moving the moped, then it can be made separately. This will require welding work. The frame should be made from bicycle parts that are specially designed for the appropriate load. If necessary, you can change the geometry of the desired part. For this, a stop is used and the use of water pipes is strictly prohibited, since they do not have sufficient strength. Such a homemade moped will not go far. Engine mounts can be cut from sheets of iron with a thickness of at least 5 mm and welded to the frame.
Final decision
Touring enduros can be divided into two types. The former feel great in off-road conditions and cope excellently with any conditions on the road, but are less comfortable when driving on the highway. The latter, on the contrary, are comfortable, but can fail in difficult areas.
There is always some dualism in choosing such a motorcycle. As a rule, almost any route consists mainly of driving on the highway, and only some, although often the most beautiful places, will have to be driven off-road, which may turn out to be quite passable under normal weather conditions. Therefore, you should decide what is better: to endure inconvenience during the main route, but easily pass difficult places, or to drive comfortably along the highway and “sweat” through difficulties.
However, there is a third option: traveling with a large group. The optimal option is 5-6 people, including a backup driver.
https://fb.ru
DIY motorbike
The domestic market offers buyers a motorbike with a D-type engine. However, such devices have some disadvantages, the most significant of which is the presence of only one gear, due to which the capabilities of the device are significantly reduced. However, their cost is not too high, so as they say, you get what you pay for.
But you can make homemade units with your own hands. For this you need all the necessary materials. Until recently, motorbikes were every boy’s cherished dream. Yes, in childhood such homemade products aroused a lot of admiration. The difference from a regular bicycle was that such a device was equipped with a gasoline engine. And the current in the circuit could be created using a regular hair trimmer. Although the use of a trimmer is not mandatory, since it can be replaced with any other suitable device.
You can create a motorbike with your own hands, but to do this, you may need a video on a similar topic. If the rights to the required video are protected, then you can use any suitable instructions.
Homemade moped: manufacturing features and video instructions
Nowadays, many people have begun to engage in constructive creativity. Fortunately, there is time for this, materials and video instructions that can be easily found. If a homemade bicycle is interesting to some part of our society, then there is nothing to say about a homemade scooter or tricycle, which are easy to make. In city conditions, this is a very useful type of transport, which can be maneuvered quite successfully. You can buy a scooter or a tricycle, but making them yourself means turning all your ideas into reality, a unique opportunity to save money, and much more. You can always make it using a high-quality video guide.
The procedure for self-assembly of a motocross motorcycle
It would be best to start assembly with wheels, which can be freely purchased at any motorcycle parts store. There are two most common options for attaching these elements: purchase a rim and replace the spokes, or simply install cast sports wheels on the device.
A fork for a motocross motorcycle should be classic and have a full range of adjustments. The optimal size for it would be 43 mm.
In order to increase the reliability of the brake system, it is necessary to increase their power. Alternatively, sometimes the diameter of the brake disc is simply increased.
Particular attention should be paid to the suspension, which is mounted on a homemade motocross motorcycle. The most suitable for it will be stock shock absorbers, which can be ordered directly from the manufacturer, but it is important to indicate the possible weight of the device so that the suspension elements are equipped with the appropriate springs.
If we talk about the engine, it is definitely worth mentioning that its thrust can be increased by reducing intake losses. To ensure this, the standard paper filter in the old engine is replaced with a foam one, after which the updated motor is installed in the system of the future motocross motorcycle. In addition, the carburetor is also subject to changes, which should ensure good engine operation at maximum speed.
Homemade bicycle with motor – Velobaggio
If you are eager to make a bicycle with a motor with your own hands, then get ready for the fact that you will have to work a little. In this article we will tell you how to install a wheel motor on a bicycle and how to make a bicycle with a chainsaw motor your own.
- Do-it-yourself bicycle with a motor: installing a motor wheel
- DIY bicycle with a chainsaw motor
The easiest and most affordable way to make a bicycle with a motor with your own hands is to install a motor wheel. Connecting a wheel motor is not as simple a task as a person who has never encountered it might think. The most difficult part of this process is connecting the electrical connections.
By purchasing a wheel motor, you also become the owner of a controller, Pas system, throttle handle, charger and brake handle, which are included in the kit.
Since the wheel motor is driven by alternating current, the need for a controller is due to the need to convert direct current from the battery into alternating current.
On special brake handles there is a microswitch designed to cut off the power current from the motor during braking.
To install the wheel motor yourself, you will need to perform the following steps:
- First of all, you need to put the bike with the wheels up and dismantle the old rear wheel. In place of the old wheel, you will need to install a new wheel with an electric motor. The wheel motor is installed so that the bundle of power wires is on the left, in the direction of movement of the bicycle. If this requirement is not taken into account, the wheel motor will simply spin in a different direction.
- After attaching the wheel motor, you will need to attach the batteries to the bicycle frame and connect the controller. When connecting the controller, a very important point is its additional insulation. You can, for example, protect the device with a plastic bag.
- Next, the remaining equipment is connected. Do not forget that all electronics must be connected to the battery through a 20A fuse; it will prevent the system from burning out if a short circuit occurs. You will find a detailed installation and connection diagram in the delivery package for the wheel motor.
DIY bicycle with a chainsaw motor
Over time, many cycling enthusiasts get tired of simply pedaling, and their engineering talent and imagination push them to take such a step as installing an engine on a bicycle. A chainsaw is perfect as a “donor” for the motor. But how to assemble a bicycle with a chainsaw motor with your own hands? Let's try to figure this out.
Let's take a chainsaw engine with a power of 1.5 hp. Many will doubt that a motor of such power will move a bicycle with a 100-kilogram cyclist, but believe me, there is no need to worry: the bicycle will easily accelerate and pick up a speed of 30–35 km/h.
For the sake of fairness, it must be said that acceleration cannot be called fast, but this does not interfere with driving. What's good is that with such an engine you will hardly smell gasoline, which makes it possible to store it at home.
Naturally, while driving there is a crackling sound, like a regular chainsaw, which means that you will be moving with quite a loud sound.
The bushing to which the belt is tensioned from the engine is secured with special washers and screws. There are bushings of different diameters for different wheels: from the smallest to simply huge, for 28-inch wheels.
The inside of these bushings has a rubberized surface. Based on what was said earlier, it is not difficult to guess that the drive belt needs to be selected taking into account the diameter of the bushing and the diameter of the wheel. An important point is that the sleeve must be fixed evenly, eliminating any distortions.
Best articles: How to disassemble a bicycle yourself
"Gas" lever. It is controlled using a cable that regulates the angle at which the damper in the engine carburetor will deflect. This lever is similar to the brake lever on a bicycle, which means that you will accelerate without turning the handle, as in a moped, but by pressing the lever, as in a chainsaw.
Let's summarize the result you should get: a great bike at a low price. Very nimble and a lot of fun. Although, this option also has its drawbacks: due to the noise, every dog in the holiday village considers you a personal enemy, trying to catch up with you and bite you!
https://2kolesa.com.ua/kak-sdelat-velosiped-s-motorom-svoimi-rukami/