Bearing arrangement in a scooter wheel
A scooter's rear wheel bearing has one job: rotation. The quality and design of the bearing must withstand the most difficult loads and operate stably throughout the entire life of the scooter. Regardless of its location in the front or rear wheel, the bearing may sooner or later wear out. In this case, the controllability of the scooter is significantly lost and the acceleration dynamics disappear. The malfunction is especially noticeable when overtaking, sharp maneuvers, or reaching maximum speed. In such cases, the steering wheel begins to move, it is difficult to control the scooter, and the condition of the tires and other important elements is normal.
Results
Every scooter needs repairs from time to time. Malfunctioning of a vehicle not only interferes with a comfortable ride, but also endangers the life of its driver. Repairing a scooter with your own hands is quite simple, if you sit down first and properly understand the details. Sometimes the process may stall at some element, then it is recommended to carefully follow the entire sequence of steps from the very beginning - perhaps a mistake was made somewhere. When replacing a rear wheel, you need to take your time and be careful, and then you will succeed.
Diagnostics
You can check for bearing faults as follows:
- Place the scooter on the main stand;
- Point the scooter so that the rear wheel is raised;
- Spin the wheel as you wish;
- Pull the wheel to the sides.
If there are extraneous sounds, the wheel moves too tightly, or there is noticeable play, you can assume that the bearings on the wheel are faulty. The difference between the rear wheel and the front is that there is a gearbox on the rear wheel, which means the scooter gearbox bearings will have to be replaced.
Tips and tricks
The clutch and transmission, like any component of a motorcycle, require periodic inspection and maintenance. If signs of malfunction (wear) of the clutch appear, it is necessary to carry out diagnostics.
What to pay attention to:
- Clutch slipping appears as an increase in engine speed, without an increase in the speed of the scooter. Most often this is noticeable when driving with a load;
- Slipping occurs when the linings of the automatic clutch pads wear out. Such pads must be replaced or the linings must be re-riveted;
It is necessary to diagnose the clutch if signs of malfunction appear.
It happens that the clutch, on the contrary, “drives”. That is, even at idle, the scooter pulls forward. This situation most often occurs when the pad springs are weakened or broken;
- weakened, worn-out springs no longer effectively retract the pads, so even at low speeds, centrifugal force presses them against the disc. Such springs must be replaced;
- It also happens that the lining is separated from the block. This happens when using low-quality pads from unknown manufacturers. A detached block simply jams the clutch and it stops disengaging;
- If the clutch operates jerkily, a possible cause is wear of the clutch bearing. When it gets wedged, the gear disk periodically engages with the motor shaft, which is why jerks occur.
Diagnostics of the clutch and transmission as a whole must be carried out every season or immediately when signs of malfunction appear. A stuck bearing or a broken pad can lead to serious consequences.
When tuning the engine, it is also necessary to adjust the clutch. With increased engine power, the standard clutch will slip and quickly fail. In general, when tuning, it is advisable to configure all systems of the scooter, including the transmission, muffler and others. The owner of a moped with a gearbox must decide what is more important to him - some need more speed, while others need to carry more cargo. Modifications will vary greatly, so when tuning it is better to seek the help of professionals. This will avoid mistakes and unnecessary waste of money.
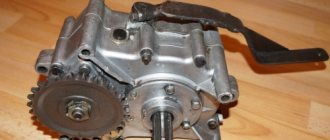
Replacing scooter gearbox bearings
In most scooter models, bearings are located in the same places; let's give an example of removing and installing bearings on a Honda Dio. The first step is to pull out the old bearings that are tightly pressed into the gear housing. In most cases, you will have to find a puller to remove it.
It is very important to carefully remove old parts and not touch important parts of the gearbox. On the Honda Dio scooter, three bearings are installed in the gearbox:
- on the body;
- on the intermediate shaft;
- on the gearbox cover.
It is extremely important not to tear the gaskets on the gearbox; they are extremely difficult to find in stores. Otherwise, you can make it yourself from paranit or thick cardboard. The replacement process is carried out as follows:
- We place the scooter on its side for better access to the gearbox, if necessary, remove the plastic;
- Afterwards, the old bearings are dismantled;
- Installation of new ones is carried out by preheating the seat, while the bearings themselves need to be cooled;
- We check the integrity of all gaskets, if damaged, replace them, do them yourself, or fill the gasket area with high-quality sealant.
- In the next 100-300 km after the replacement, it is recommended to change the oil in the gearbox.
Important Features
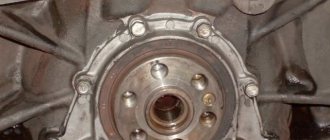
Usually it is not possible to simply install the crankshaft back into the block; to do this you need
know a few tricks. Bearings must be installed with great difficulty, and to simplify the work, the landing site is heated with a hair dryer. Thermal expansion will help complete the job much faster. When the crankshaft is placed in the first part of the block, the joint is pre-treated with sealant. In the same way, the place of the second bearing is heated, after which the halves of the block are connected. Both parts should be aligned exactly, without deviations or unnecessary distortions.
Any repair involving engine disassembly is comparable to surgery, so all work is carried out extremely carefully. Before work, the engine is washed and the oil is drained. All repair operations must be carried out exclusively on a clean workbench. It is better to disassemble a scooter yourself for the first time under the guidance of a more experienced technician, this will allow you to avoid unpleasant mistakes.
Replacing front wheel bearings
On the front wheel, the replacement process is much simpler; on most scooter models, the bearing is located on a spacer sleeve. After removing the wheel and if there is a brake disc, it is enough to install and fix the wheel as securely as possible with the ability to rotate in a circle. Next, we need a punch or a simplified analogue - a screwdriver and a hammer. The next stage is to apply an accurate and strong blow to the punch located in the inner side of the sleeve. You need to knock along the entire perimeter of the hub so that it comes out evenly from the wheel. Together with the bushing, the bearing will be dismantled, which needs to be replaced.
Source
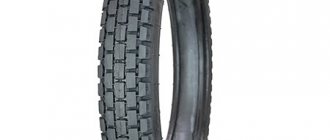
Tire classification
There is also a classification of tires into classes and design. Regarding the latter, tires can be tubed or tubeless. Each class has its own pros and cons. According to experienced scooter riders, tubeless tires are better and more reliable, since in case of a puncture, which happens unexpectedly and is dangerous at high speeds, they are able to hold air for some time, which allows them to get to a service station to replace the damaged wheel. However, tubeless tires require special rims, which involve additional expenses.
In short, replacing a tire is the most common and common reason that requires removing a wheel on a scooter. By and large, there is nothing complicated in this process if you have the necessary tools at hand, a little perseverance and patience, and also know the sequence of actions that need to be performed.
Table. Correspondence to motorcycle tire sizes and decoding of abbreviations.
Replacing bearings on a scooter
?I rocked the wheel, but it rocked on the hub. The front wheel bearings were not just damaged - they were completely destroyed and it’s a miracle that no accident occurred. The rear hub bearings were pretty worn out - you could feel shells on the grooves when rotating, I had already changed the grease in them twice, so there was no point in prolonging the agony. The brake disc also became bent (probably after intense braking, it ran into a puddle somewhere), the wheel began to jam and also felt the need to be replaced.
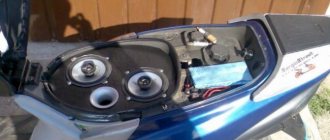
Bend the plastic of the rear shield upward so that it does not interfere with the wide travel of the muffler mounting. Remove the muffler by moving the “tail” counterclockwise around the outlet pipe, downstream from the scooter. Be careful not to “break” the outlet pipe and the cylinder window. Once all the fasteners are loose, you can slide the muffler pipe out of the cylinder window. Plug the cylinder's outlet with a real cloth wad.
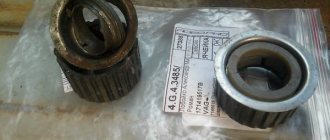
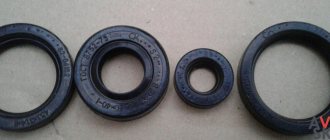
For reference - values (dxDxB): 12x32x10; 15x35x11 ; 17x40x12 ; 20x42x12, respectively. 201, 202, 203 were not found open in the formation, so I took all the locked ones. It became about 200 UAH. + I also bought a seal for the output shaft (30x42x7) - for the input shaft (clutch) (17x30x5) - I did not find it. I reused the old one. (was released delicately) All mode: Remove the engine. To do this, turn off everything that interferes: the rear brake cable, fuel and oil hoses, the enrichment agent, the throttle cable from the throttle, the wiring coming from the generator. We unscrew the bolts securing the shock absorber and the engine itself to the frame. Roll it out. Unscrew the rear wheel. Drain all the oil from the gearbox.
Now there is little about the selection of a similar bearing. I carefully measured it and went looking everywhere for a similar one. Figurines. our specialists have no idea about such a concept like bearing dimensions. Then I wrote off the markings placed on the previous one (only the front ones were Made in Russia, the rear ones were imported). And at the same time I discovered several options to choose from. You need to look for scooter bearings in automobile sections that sell spare parts for automobile starters and generators.
Source
Bearing arrangement in a scooter wheel
A scooter's rear wheel bearing has one job: rotation. The quality and design of the bearing must withstand the most difficult loads and operate stably throughout the entire life of the scooter. Regardless of its location in the front or rear wheel, the bearing may sooner or later wear out. In this case, the controllability of the scooter is significantly lost and the acceleration dynamics disappear. The malfunction is especially noticeable when overtaking, sharp maneuvers, or reaching maximum speed. In such cases, the steering wheel begins to move, it is difficult to control the scooter, and the condition of the tires and other important elements is normal.
Dimensions of interacting rings
- The inner rings are designated - WS;
- Outer rings - GS;
- Thrust rings - AS (extra thin) and LS (with guide).
Interlocking Ring Size Chart
| Interacting rings | Dimensions (mm) | |||||||
| AS... | LS... | GS811… | WS811… | dgs | Dws | B | Bas | r |
| AS 2035 | LS2035 | GS81104 | WS81104 | 21 | 35 | 2,75 | 1 | 0,3 |
| AS 2542 | LS 2542 | GS81105 | WS81105 | 26 | 42 | 3 | 1 | 0,6 |
| AS 3047 | LS 3047 | GS81106 | WS81106 | 32 | 47 | 3 | 1 | 0,6 |
| AS 3552 | LS 3552 | GS81107 | WS81107 | 37 | 52 | 3,5 | 1 | 0,6 |
| AS 4060 | LS4060 | GS81108 | WS81108 | 42 | 60 | 3,5 | 1 | 0,6 |
| AS 4565 | LS 4565 | GS81109 | WS81109 | 47 | 65 | 4 | 1 | 0,6 |
| AS 5070 | LS 5070 | GS81110 | WS81110 | 52 | 70 | 4 | 1 | 0,6 |
| AS 5578 | LS 5578 | GS81111 | WS81111 | 57 | 78 | 5 | 1 | 0,6 |
| AS 6085 | LS 6085 | GS81112 | WS81112 | 62 | 85 | 4,75 | 1 | 1 |
| AS 6590 | LS 6590 | GS81113 | WS81113 | 67 | 90 | 5,25 | 1 | 1 |
| AS 75100 | LS 75100 | GS81115 | WS81115 | 77 | 100 | 5,75 | 1 | 1 |
| AS 80105 | LS 80105 | GS81116 | WS81116 | 82 | 105 | 5,75 | 1 | 1 |
| AS 85110 | LS 85110 | GS81117 | WS81117 | 87 | 110 | 5,75 | 1 | 1 |
Diagnostics
You can check for bearing faults as follows:
- Place the scooter on the main stand;
- Point the scooter so that the rear wheel is raised;
- Spin the wheel as you wish;
- Pull the wheel to the sides.
If there are extraneous sounds, the wheel moves too tightly, or there is noticeable play, you can assume that the bearings on the wheel are faulty. The difference between the rear wheel and the front is that there is a gearbox on the rear wheel, which means the scooter gearbox bearings will have to be replaced.
Read also
16.2. Scooter repair. Spark plug - replacement
16.2. Scooter repair. Spark plug - replacement SERVICE INTERVIEWS It is recommended to replace the spark plug after every 8-10 thousand kilometers. REMOVAL 1. Using a hex wrench, unscrew the bolt of the battery compartment cover located under the seat.
16.5. Scooter repair. Engine oil - replacement
16.5. Scooter repair. Engine oil - replacement Before changing the oil in a four-stroke engine, you must first warm up the engine for 5-7 minutes and place the scooter on the center stand. If the engine has a replaceable oil filter, it is also
16.8. Scooter repair. Rear gearbox - oil change
16.8. Scooter repair. Rear gearbox - oil change SERVICE FREQUENCY Changing the oil is usually recommended after 5 thousand km of the scooter. Before you start changing the oil, it is advisable to warm up the oil in the gearbox by driving the scooter for 5–10 km.1. Installing the scooter
16.11. Scooter repair. Tires - replacement
16.11. Scooter repair. Tires - replacement REMOVAL 1. Remove the cap from the valve and press the spool to relieve pressure in the tire. 2. Remove the wheel (see Front wheel - removal and installation or Rear wheel - removal and installation. 3. Set the tire beads off the landing
JavaScript is disabled in your browser
Even the smallest detail in a scooter performs its, sometimes very important, function. For example, scooter wheel bearings, despite their small size and simple design, actually ensure comfortable movement of the vehicle. After all, rotation - the main movement in most systems of such a vehicle (wheels, crankshaft, steering wheel, gearbox) is provided by different types of bearings:
Let's take a closer look at the design of scooter wheel bearings.
The front wheel of any scooter model rotates thanks to special wheel bearings, which are designed for the entire service life of this motorcycle equipment. The lubrication of this unit is located inside the closed bearing circuit and cannot be replaced throughout the entire life of the wheel.
Unlike the front wheel, the rear wheel rotates using the gearbox shaft bearings, which are located in the variator housing. This lubrication system requires constant monitoring, systematic replacement and topping up of oil.
Symptoms of wheel bearing wear and their diagnosis
When the bearings of the front or rear wheels are worn or damaged, the controllability of the scooter decreases, and this happens smoothly and imperceptibly. It is possible to determine obvious wear only when driving at a significant speed and when performing maneuvers (overtaking, turning or turning). If the wheel does not obey the steering wheel well, the scooter skids or moves from side to side with normal (not worn out) tires, then you must first check the serviceability of the front and rear wheel bearings.
To diagnose the front wheel you need to:
- install the scooter on the central support;
- lift the front so that the wheel is suspended;
- turn the wheel several times along the way;
- rock the wheel itself from side to side.
If during such manipulations the wheel moves tightly, extraneous sounds are heard (knocking, grinding, noise, crackling), and there is play when rocking, the bearings are probably damaged.
The rear wheel should be diagnosed in the same way, but if the same characteristic symptoms are present, the gearbox shaft bearings will have to be replaced (for most scooter models).
Replacing the front wheel bearing of a scooter
The most common arrangement of wheel bearings is on a spacer sleeve, so we will consider the process of replacing them using this example.
To replace both front wheel bearings you need:
- place the scooter on the main stand;
- raise the front wheel so that it does not touch the ground;
- dismantle the front wheel, having previously disconnected the elements of the brake and other systems from it;
- It is imperative to remove the brake disc, as further manipulations may damage it;
- place the wheel on a table or other flat surface;
- fix the wheel so that it does not slide on the surface, but moves in a circle;
- arm yourself with a metal punch or just an old screwdriver and hammer;
- rest the punch against the inner race of the bushing and apply a precise sharp blow to it with a hammer;
- you need to tap along the entire protrusion of the bushing, while moving in a circle;
- Remove the knocked-out bearing along with the bushing from the reverse side.
The other bearing is knocked out in the same way, after which it is necessary to rinse and clean the inner surfaces of the wheel. After cleaning procedures, you can begin installing new bearings.
To do this, you need to install the spacer sleeve in its place and press both bearings in turn using a head of a suitable size. In this case, the tool head should only act on the outer race. After installation, be sure to install a new hub seal, because the service life of the bearing directly depends on its condition.
A wheel with new bearings can be installed on a scooter and all previously disconnected systems can be installed. The result of the work done is that:
- there is no backlash;
- the wheel spins perfectly and does not “stick”;
- there is no noise, knocking, grinding or other extraneous sounds;
- The scooter's handling has improved significantly.
The front wheel bearings of a scooter must be replaced approximately every 15 - 18 thousand kilometers. New bearings must match the parameters and technical specifications of those removed from the scooter. It is best to use original bearings, but if you can’t get them, you can use high-quality analogues. Also, you should not buy such parts that were used or on the automotive spare parts market - such bearings are of very dubious quality.
Installation
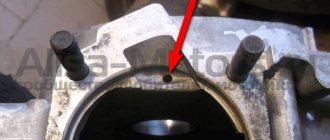
Everything would be fine, but the crankshaft has a collapsible design and also does not have a central axis. And if you stuff a new bearing without placing some kind of base under the axle cheek, then there is a high probability that the alignment of the crankshaft axes will be disrupted and then its place will only be in the trash.
Therefore, we are looking for a piece of some kind of iron sheet and cutting out a wedge in it for the connecting rod.
We pass the sheet between the cheeks and, using a mandrel, without fear of disturbing the centering of the axes, we stuff a new bearing, then we stuff the sprocket there. To make the installation process easier, the crankshaft can be frozen in the freezer, and the sprockets and bearings can be heated with a hairdryer or in the oven (no more than 250 degrees!!!) and then everything will fit literally by hand and there will be no need to stuff anything.
Dimensions of thrust needle bearings
| d | D | de | De | Bx | |||
| AXK 2035 | 999904 | 20 | 35 | 22 | 34 | 2 | 5 |
| AXK 2542 | 999905 | 25 | 42 | 29 | 41 | 2 | 7 |
| AXK 3047 | 219806 | 30 | 47 | 34 | 46 | 2 | 8 |
| AXK 3552 | 999707 | 35 | 52 | 39 | 51 | 2 | 10 |
| AXK 4060 | 219808 | 40 | 60 | 45 | 58 | 3 | 16 |
| AXK 4565 | 219809 | 45 | 65 | 50 | 63 | 3 | 18 |
| AXK 5070 | 219810 | 50 | 70 | 55 | 68 | 3 | 20 |
| AXK 5578 | 219811 | 55 | 78 | 60 | 76 | 3 | 28 |
| AXK 6085 | 219812 | 60 | 85 | 65 | 83 | 3 | 33 |
| AXK 6590 | 219813 | 65 | 90 | 70 | 88 | 3 | 35 |
| AXK 75100 | 219815 | 75 | 100 | 79 | 98 | 4 | 61 |
| AXK 80105 | 219816 | 80 | 105 | 84 | 103 | 4 | 63 |
| AXK 85110 | 219817 | 85 | 110 | 89 | 108 | 4 | 67 |