Aside from the tires, no other component affects your scooter's steering and handling more than the headset bearing where the fork meets the frame. Ignoring their timely maintenance, repair and replacement can lead to dire consequences.
Honestly, when was the last time you serviced your moped's steering bearings? Never? There is nothing surprising. I'd bet a significant percentage of drivers don't even know they need maintenance, let alone get serviced regularly. But keep in mind: not many other parts have the same impact on the control of a scooter as the steering column bearings.
Every turn goes directly through these bearings. Ignore them if you like, but when your old new scooter with nice steering starts to act like a piece of farm equipment, don't say we didn't warn you.
What's happening?
When your new motorcycle was assembled, its head bearings were coated with good, fresh grease. Solid oil or lithol lubricates bearings, acts as a spacer between support rollers and their raceways, and prevents corrosion damage.
Over time, due to frequent hot water high pressure washing at a local car wash, the lubricant tends to dry out (or wash out). Once the lubricant disappears or becomes useless due to age, the support rollers stop rotating and begin to rub dry. After this, it is only a matter of time before the bearings wear out and seize.
Because this process usually takes several years or more, the average driver adapts to the situation and usually has no idea that anything is wrong until someone else tells him or significant damage has been done. To prevent premature bearing wear and its attendant problems, your vehicle manufacturer would like you to periodically remove, clean and lubricate your steering column bearings. As a rule, bearings should be inspected every two to four years, or more often if the mileage is quite high.
Now you know
Now that you know when the steering column is due for inspection, you have three options:
- You can do nothing and replace the bearings when they fail. This alternative is chosen by a large number of scooter owners.
- You can have your moped serviced at a service station, which is certainly an acceptable option.
- You can do bearing maintenance yourself.
Before you decide, let me warn you that servicing your bike's head bearings is neither a particularly quick job nor a very fun one. You will have to work hard, but the interaction between the driver and the vehicle is always good J.
I recommend scheduling the maintenance alongside your regular annual essential service, or doing it along with all the other work you've been putting off over the last few years, such as replacing a leaking fork seal or a worn front wheel.
This is mostly routine work. However, there is one aspect that can create real cramps. All mopeds manufactured since the early 1980s use tapered roller head bearings.
The lower rod bearing usually fits tightly to the steering rod. To properly lubricate the lower bearing, it must be removed from the rod. Fifty percent of the time they come off right away. But in the remaining 50 percent, difficulties may arise. Although there are methods to remove thrust bearings without using any special tools, it requires time and experience and you will most likely end up with a damaged bearing.
Finally, although I don't recommend it, some bearings can be cleaned and lubricated without removing them from the rack. In some cases this may be the most practical solution.
How long will it take
A full steering column service—removing, cleaning, checking and reinstalling the bearings—usually takes an experienced technician between two and eight hours, depending on the type of scooter, available funds and level of ambition. If this is your first time doing this, plan to spend at least a day.
I'd also suggest taking a look at the list of recommended tools before you start. There's nothing more frustrating than stopping in the middle of a job because you're missing some important tool or part.
Tools and Supplies
Here's a typical list of the unique tools and supplies you'll need to service your motorcycle or scooter's steering column bearings. The instructions may indicate some additional items you will need.
- High temperature wheel bearing grease; Anything designed to be used in a disc brake mechanism will also work.
- Service manual from your moped manufacturer.
- A work stand to support a bike without a front wheel.
- Keys and sockets are designed to fit your scooter.
- Torque wrench capable of displaying up to 500 N.
- Any special attachments or wrenches specific to your scooter (the manual should list these).
- Heavy steel or copper hammer (1 kg or better more).
- Steel pipe of appropriate sizes. Will be used to return the lower bearing to the steering stem. The pipes must be positioned directly on the inner race of the bearing.
- Plastic hammer.
- Solvent; WD-40 works great.
- Rags.
- Additionally: new lower bearing dust seal, latex gloves, factory recommended tools for bearing removal/installation. All this can be found in the same place where they sell steering rack repair kits and other spare parts for cars.
Is it possible to bend the handlebars of a motorcycle?
It is, of course, undesirable to bend the steering wheel. But not everything depends on the driver, and hardly anyone does it at will. The most common cause of such a problem is a vehicle fall. This is especially true for cross-country motorcycles or enduro-type cars.
Did you know? At motorcycle racing in Northern Ireland, in the event of an accident, doctors on motorcycles are the first to come to the aid of the victim. Their average speed is 290 km/hour.
It should be said right away that the curvature of a part can be completely different - it’s one thing when only the steering wheel is deformed. In this case, you are allowed to straighten it yourself; the chances of a successful operation are quite high. A completely different option, in which, as a result of an impact, the fork legs and yokes are bent. If you can straighten the second part in a garage, then putting the first part in order on your own is an extremely difficult task, bordering on impossible.
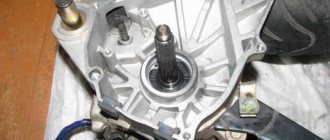
How to remove a scooter's steering column
Place your scooter on a work or center stand and lift the front off the ground.
Start by removing anything that doesn't look like a triple clamp. Your manual details the exact procedure. Resist the temptation to shorten the job by removing some of the knots in large chunks. Struggling with the fork while it's still attached to the front wheel and fender isn't as fun as you think.
Before loosening the top clamp lock nut, rotate the clamp from lock to lock. Without the weight of the front assembly on it, any roughness or dents in the bearings will feel much more obvious. If in doubt, now is the time to replace the bearings.
Remove the top clamp; you may have to knock it down with a plastic hammer. Remove the preload adjusting nut from the stem. If you are ready to replace the nut with a new one, you can help yourself by hitting it with a hammer to loosen it. The stem should fall when you loosen the nut, so be prepared for this. If the fork doesn't fall off, screw the nut back onto the first few stem threads (to protect them from damage), then lightly hit the stem with a plastic hammer.
Remove the top bearing and set it aside. Typically the top and bottom bearings have different inner diameters so there is no chance of getting them mixed up, but to be on the safe side you may want to mark them as removed to avoid any confusion in the future. Clean both bearings thoroughly and inspect them for dents, chips or any other damage. Dark lines by themselves do not mean anything serious. However, they may be hiding other problems.
Run the tip of your finger or nail around the bearing. If you feel anything other than a perfect surface, the bearings and races should be replaced.
disc painting
Painting stamped wheels is almost no different from painting a body. The surface is cleaned of dirt, washed, degreased and dried. Then they prime, paint and apply varnish.
Rolling
The procedure is as follows: the disc is rolled and pulled out using a hydraulic press with roller profiles. The geometry of the disk surface is monitored using a laser meter.
Motorists (and especially car owners) often suffer from various problems with their cars. For example, if something goes wrong with alloy wheels, logically you need to fix it, but is it worth carrying out this procedure? Car owners cannot always find the correct answer to this question.
The tricky part
This is the hardest part of the job.
Clamp the steering rod in a vice with soft jaws and move the lower bearing away from the rod (use a piece of cardboard or wood to protect the rod). If it doesn't budge, you can try applying some heat, but be careful—splattering hot grease isn't much fun, and some bearings use easily meltable plastic cages to position the rollers.
The bearing should be allowed to air dry or wiped with a soft cloth. If you are using compressed air to dry them, blow air into the bearings parallel to the roller. Whatever you do, do not rotate the bearing without lubrication.
Place the lubricant in the palm of your left hand. Hold the clean bearing in your right hand, with the large diameter side facing the grease (if the bearing is a ball or non-tapered roller bearing, it can be sealed on either side). Pull the bearing across your palm as if you were using it to wipe grease off your palm, rotating it as each roller becomes completely lubricated.
When done correctly, you will see curls of fresh grease rolling out of the small end of the bearing. It may take a few iterations to get this right, but I've packaged thousands of bearings this way and never had a single failure.
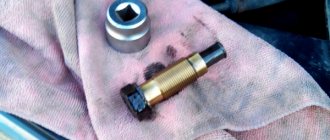
Installing a bearing on a moped steering column
Keep the bearing at room temperature or higher, but not so high that it melts the lubricant. This will also help polish the bottom of the stem where the bearing is located. Use a piece of sandpaper and sand lightly. The goal is not to remove a lot of metal, but to clean the area and remove burrs.
Install the boot and slide the lubricated bearing onto the rod. Place the bearing drive or piece of pipe over the bearing, making sure it only touches the inner race, then slide the bearing onto the shaft. There is no need to beat the snot out of him - for this you need to give a few strong blows.
As the bearing settles, the tone of the hammer will change. This is your signal to stop. As shown in the photo, I have had some success using a piece of heavy PVC pipe and a composite hammer to reinstall the bearing. This works great as long as the bearing presses lightly on the shaft.
Bearings must be preloaded according to manufacturer specifications. In some cases, this means tightening the nut to some initial torque, disengaging, and then resetting to the recommended preload. Using moderate pressure, lower the adjusting nut until the rod begins to bind. Rotate the steering arm back and forth several times, then turn the nut half a turn.
Repeat again: turn, release the tension several times, always turning the steering stem from side to side. For final adjustment, pull the nut up firmly and then turn it back one turn. Don't worry if the rod feels a little tight at this point - it will release as you install the rest of the front end.
Install the top clamp snugly, but do not overtighten. Insert the fork tubes into the clamp, positioning them where you want them. Tighten the bottom pinch bolts only. Insert the front axle, making sure it slides smoothly into place. If not, check the fork height and alignment.
Using the manufacturer's recommended torque settings, tighten the top clamp nut first. This will ensure it is fully seated on the steering stem, followed by the upper and lower clamp bolts.
From here on out it's just a simple assembly job followed by a road test.
Back on the road
Before returning your motorcycle to active use, give it a thorough road test, especially if it was a winter repair and the scooter was parked in the garage while the snow melted. If something seems unusual, investigate and correct the problem before proceeding.
During the first few miles, new or freshly lubricated bearings may loosen slightly. This is completely normal, so be sure to keep an eye on them. Check the preload after the first road test and again at the 500 km mark, re-adjusting if necessary.
If everything looks good, give yourself a pat on the back J. Now you're an expert at replacing steering column bearings, maintenance on your scooter won't be as hard next time.
Video on this topic
No. 16 Rear wheel repair. How to paint rims on an alpha moped.
Vkontakte community.
How to straighten a rim on a moped.
Straighten the rear rim on the moped. It turned out very well. This method works.
Editing alloy wheels in a garage. For questions, my VK: Money for the development of the Yandex channel.
Correcting a dent in a motorcycle wheel on a machine.
HOW TO STRAIGHTEN A DISC ON A MOPED ALPHA.MOPED ALPHA,DELTA,TTR125 moped,alpha,delta. MOTO EVERYDAY
Why do you need to check tire pressure?Watch this video and find out, other questions in vk, link below.
Editing disks. Lipetsk
Restoring the geometry of a motorcycle rim with numerous damages. Description of the modified.
Alfa moped - dent on disk
We are straightening the crumpled disk. The video was shot back in the summer, but there was no time to edit and post it. Now I have a new one.
branches: Moscow | St. Petersburg | Ekaterinburg | Nizhny Novgorod | Samara | Ufa | Chelyabinsk | Tyumen | Novosibirsk | Vladivostok | Khabarovsk
Wheel rims are not the only ones that suffer from unexpected encounters with potholes or potholes on the road. They are easily damaged by pressing against, for example, a high curb. And the reagents used to water the capital’s roads do not spare the paintwork. But cosmetic flaws are not a big deal. Yes, it’s unpleasant and ugly, but you can drive with it. As a last resort, the disc is sent for repainting. But if you fly into a pit with sharp edges at speed, the consequences can be much more tragic. You will not only “sentence” the tire, but also write off the disk. Especially if it's cast. After all, such a disk has a solid metal structure, and if damaged, it is completely impossible to restore it. But first things first.
Painting
Let's start with the least of the evils - the loss of the attractive appearance of the disks. Powder painting can restore it to its original state. Before the procedure, the discs are washed with an abrasive cleaner and dried. Then the previous coating is removed with sandpaper. The surface is degreased with a special solution. The paint is applied with a gun with an electrostatic effect: paint particles stick to the disc due to a static charge. The disc is then placed in a special oven, where it is kept at temperatures up to 200 °C to achieve polymerization of the paint. The process takes about 15 minutes.
The discs can also be painted with acrylic paint. Unlike powder, which is based on a dry concentrate, acrylic is liquid. And this greatly simplifies the process. Plus, if the entire discs are covered with powder paint, then with acrylic you can paint part of the surface, apply a certain design, for example. You don't have to turn to professionals for this. The paints are sold in aerosol cans, which allows you to work in garage conditions.