How to set timing marks on an alpha moped
Checking the timing belt by marks on the Delta EX 50 moped engine 1P39FMB (139FMB)
Comments from those interested:
Roman Khimchenko 2 weeks. reverse And if it doesn’t match WHAT to do
Vladimir Voronov 2 weeks. reverse Set it to match.
Vladimir Voronov 1 month ago This is nice. )) And of course there will be new videos, just wait a little.
Vladimir Voronov 1 month ago Yes! Another thing, don’t install two gaskets; it won’t make things any better; an increase in the combustion chamber will result in a drop in power.
Hunter38767 3 weeks reverse And if you have a 50cc head and a 72cc piston, then you need to change the head.
Hunter38767 3 weeks reverse Two gaskets are not allowed, look, the valves may be overtightened, unscrew the two caps on the head, and look at the gap, it should be 0.05 on the feeler gauge. But if they hit the piston, then there is no gap.
Sergey Vasiliev 1 month back Vadim, thank you, I read a lot of useful information, thank you, I will be glad to see new videos on alpha, I’m really looking forward to it
Arkady Novoselov 1 month back, well done, thank you for you!
Is it possible to drive?
In short - NO NO! We immediately go to the service station and look for the causes of this malfunction. Of course, if the chain rattles for a short period of time, you have a few days, maybe even weeks. But again, I wouldn't wait. All this can end very badly!
When replacing, I also do not advise you to save money - we change the tensioners, the chain, you should not change everything separately. As a rule, the complete set is changed, especially if your mileage is really high.
Now let's watch the video version
I’ll end here, I think my article and video were useful to you. Sincerely yours, AUTOBLOGGER
(
24 votes, average: 4.88 out of 5)
Similar news
Sensors for an injection engine. Let's look at the VAZ as an example
Carbon deposits on valves. Causes, symptoms and how to get rid of it?
Source
How to Tension the Timing Chain on an Alpha Moped
Photo report: how to check the drive chain of a scooter?
In life it is always like this: one wonderful thing, another bad. The same principle applies to various types of manual transmissions. Chain transmission was no exception. On the one hand, there is nothing simpler, more reliable, simpler, more compact and cheaper than a chain drive.
On the other hand, we get endless hemorrhages with chain stretching, sprocket wear, endless cleaning and lubrication, maintenance and stretching of the chain itself. But nothing can be done, the gearbox has many advantages over other types of mechanical gears, since these types of gears are used almost everywhere.
In general, now we will not talk about the chain drive as such, but about a method for diagnosing chain synchronization, which drives the scooter .
To change or not to change?
Let's say you're using most of your engine: you're replacing gaskets, crankshafts, gaskets and other things, but you're hesitant about replacing your timing chain with a new one. There is no doubt in your mind that you should replace it with a new one as soon as possible. And now I will explain why.
See for yourself: the average lifespan of a chain is approximately 18,000-20,000 km (personal experience), which is approximately the same as the average life of the engine itself. And for example, after driving 6000 km, the crankshaft jammed or the engine leaked, or something else that required complete disassembly of the engine. Naturally, you disassemble the engine, replace the crankshaft with a new one and leave the chain, which by that time has exhausted a third of your resource.
READ How to Twist Mileage on Accent
So what's going on? After 12,000 km the chain will fail and become unusable and the crankshaft and other parts will start to work and you will, if not want, have to halve the engine again through one chain. It's necessary? The chain is a consumable item. Never skimp on this!
check
Personally, I never check the time. I just throw them in the trash, no matter how wonderful they seem to me. For me it's a chain. This is a consumable item, the same as a spark plug, oil or oil seal. But if it's important to you or money is stressful, you can use your old grandfather.
Alpha tensioner repair
Tensioner repair £149.
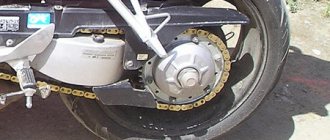
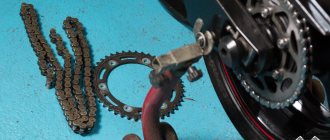
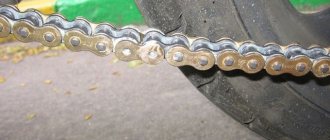
We stretch the chain along its length, squeeze it with our fingers and try to position it in a horizontal position.
READ Replacement Timing Chain Volkswagen Jetta 1.4
To be clear, I took a new and very worn chain, connected them and checked for horizontal bending. As you can see: the new chain (above) has made a slight arc and is worn and no good, like snot, almost 90 degrees.
The worn chain was almost an inch longer than the new one.
How to replace the chain of scooters?
It's very simple, friends: remove the engine from the frame, disassemble it and replace the chain with a new one. There are no special secrets in this, and there are also no special ways to cheat fate without disassembling the engine. The chain can only be replaced by completely disassembling the engine.
The timing chain is not intended to be riveted or riveted in any way. It can be easily twisted or twisted while riveting and this is the correct way to ensure that the chain in the engine is pushed against the sprocket and luckily it can work and possibly bend the valve. And one more thing: a beginner will not be able to rivet a quality network. This work is not as simple as it might seem at first glance. So don’t suffer from debris, but disassemble the engine.
READ Replacing Timing Chain Honda Cbr 600 Rr
How to set the chain to pull?
But you won't receive or configure it, and it won't interfere with Google or Yandex searches with such queries. The chain in the scooter engine is tensioned automatically. And if it is stretched so far that it begins to fly or jump through its teeth, feel free to disassemble the engine and replace it with a new one. There are no miracles there.
Why is there a knock?
It's all just wear and tear. Either the chain drive itself or its “tensioner” fails; now, as a rule, it is hydraulic, somewhat similar to a hydraulic compensator.
I would like to immediately say about a cold and hot engine . When cold, if the oil does not meet the standards, even a new “tensioner” will not be able to effectively pump it into itself. This also happens in very cold weather, when the lubricant becomes thick. Then the chain will rattle for a while and then calm down. When it’s “hot,” it’s already worn out, the whole point is that it can no longer hold pressure, or the chain drive has stretched to a critical value.
In any case, if you feel that there are abnormal sounds coming from under the hood, you need to urgently go and look at the timing system.
How to replace the timing chain in an engine
Having decided on such an action as replacing the timing chain of a scooter, you need to decide on how to implement your plan.
There are two replacement options:
How to change, everyone decides for themselves. Both methods, advantages and disadvantages are described in detail below.
With disassembly
You should choose the right tools - generator and variator pullers (you can make them yourself), a kickstarter sprocket puller, 8, 10, 12 and 17 mm sockets, a hammer, two screwdrivers (flat, Phillips).
The engine is removed from its place, the oil is poured out, all parts are wiped and cleaned. Next, remove the muffler and cooling casing. We remove the generator only with a puller. To do this, unscrew the bolts from the impeller and remove it from the rotor. It is necessary to fix the rotor with a puller and unscrew the nut. Then we tear the rotor off the crankshaft journal. Remove the variator cover. Also, secure the impeller with a puller, unscrew the nut, and remove the variator from the axle.
Below the variator is the kickstarter gear. Likewise, a puller is required for it. Then we clean the cylinder connector, valve covers and cylinder head. After unscrewing the bolts on the valve covers, remove it. Next, remove the scooter's timing chain tensioner. After unscrewing the bolts on the cylinder head, we pull out the camshaft bed.
Next, remove the chain from the camshaft and pull it out of bed. To avoid losing the guide bushings that center the parts relative to each other, you need to remove them and put them away. We remove the cylinder head, the cylinder itself, and the piston (to do this, remove the retaining ring and pin from the upper connecting rod head).
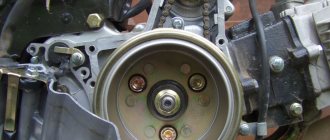
After unscrewing the bolts on the crankcase cover, tapping it a little, remove it from the engine. We take out the starter intermediate gear, use a screwdriver and a hammer to unscrew the overrunning clutch nut (clockwise) and remove the gear and housing from the trunnion. We reached the chain!
Remove the protective shield from the oil pump. Place a metal stick under the chain, twist the nut on the oil pump sprocket, remove it and remove the chain.
No disassembly
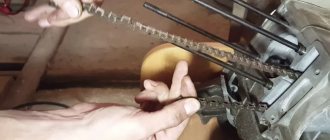
We take the following tools: a Phillips screwdriver, pliers, a new chain and a special puller. More details about it will be below. We flare the new chain - to do this, use a puller to press the pin out of the joint of the links, but not completely.
A little about the puller
It is called a timing chain puller. It can be made by a turner by turning a threaded extruding pin and rolling a strong pin into it with a diameter similar to that of a chain pin. You can purchase a ready-made bicycle one. Just narrow the pin a little to the desired size.
Remove the cooling casing from the scooter engine, then the cylinder head cover. Next you need to remove the chain tensioner. We remove the camshaft bed, take out the shaft, remove the star.
We take the puller, center it with the pin, and gradually press out the pin. You can press it out completely, it will not be useful. We compare the links of the new and old chains, thread the wire into the seat of the pin and fix the ends of both chains. We turn the cooling impeller counterclockwise, gradually replacing the old chain with a new one.
Then we separate the ends of the chains, throw out the old one, and combine the new links from the ends. We check the alignment, install the pin, and use pliers to carefully press the pin in so as not to damage the new chain. We first check the mobility of the links. We finalize the pin with a puller. Again we control mobility. This point is very important: if you install the pin unevenly and miss it, it will begin to rest against one of the links and squeeze out the next one.
As a result, the subsequent pin or link bends, causing it to jam and become immobile.
Next, we assemble the engine in reverse order, placing marks on the rotor. When installing the camshaft bed, after tightening the nuts, you need to check the valve clearances with a feeler gauge. Upper valve – inlet: 0.05mm, lower – exhaust: – 0.1. The feeler gauge should fit freely between the valve and the adjusting bolt.
Then install the chain tensioner. We unscrew the bolt on the top of the tensioner, install a screwdriver in the groove, and, turning it, push the rod back. We fix everything else back according to the diagram.
Source
Tools
To work with the chain you will need a fairly extensive list of tools. The most important tool in this case will be a special chain riveter - such devices are produced by many companies, so finding one will be relatively easy. The cost of the tool varies between 1000–5000 rubles, depending on the manufacturer and the grade of steel used. From some experienced craftsmen we hear that the riveter is successfully replaced with a hammer, chisel and core. This point of view is completely erroneous - it will not be possible to achieve a reliable connection of the chain with their help, and, most likely, it will soon break.
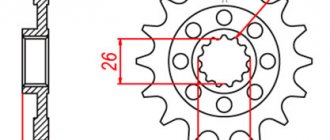
In addition, replacing sprockets and chain will require the following tools:
- Torque wrench with comfortable handle;
- Set of keys and sockets;
- Compact grinder with a diamond blade for metal;
- Grease as well as cleaner and chain oil.
It is better not to neglect the selection of high-quality tools, since it will be very unpleasant if during the work the key breaks in your hands and the motorcycle remains half disassembled. Remember that you will have to replace the chain regularly, so it is worth purchasing a quality set once and then using it for several years.
Setting the timing belt on a delta moped
1. Install a new cylinder head gasket.
ATTENTION!
The cylinder head gasket is made of soft metal (copper, aluminum) and after tightening the cylinder head nuts it is deformed, thereby ensuring a tight connection. Reinstallation of the cylinder head gasket is not permitted.
2. Install the timing chain guide.
3. Install the cylinder head.
4. Set the piston to TDC according to the marks on the flywheel. This is usually the "T" mark on the flywheel. Align the mark with the tide on the engine crankcase.
ATTENTION!
The following operation is one of the most important when assembling the engine. It is important to align all the marks very accurately. An error in installing the chain even by 1-2 teeth will result in the engine not working correctly, and it will probably even lead to serious damage to the timing and cylinder-piston gas parts when trying to start the engine!
5. After making sure that the timing chain has not jumped off the drive sprocket on the crankshaft, install the camshaft into the cylinder head, at the same time putting a chain on its sprocket so that the marks on the camshaft sprocket are parallel to the plane of the edge of the cylinder head, and the cams are directed downward (inside the head).
6. Install the rocker arm support, orienting it according to the installation marks. Lubricate the cams and camshaft bearings.
general information
Consumer qualities
Buyers, first of all, are attracted not only by the fairly affordable price of mopeds of this brand, but also by:
Appearance plays an important role in the popularity of Delta mopeds
Technical features
For convenience, technical information about the most popular moped from China is grouped into a table:
| Parameter | Meaning | Parameter | Meaning |
| Name | DELTA YH 50 QT | Manufacturer | Chongqing Wonjan motorcycle China |
| Power unit | Single-cylinder, 4-stroke, gasoline, air-cooled, 40 cc. cm and 110 cc. cm | Supply system | Carburetor |
| Delta moped wiring | Single-wire, 12-volt with “-” to ground | Ignition system | Non-contact – capacitor discharge (CDI) |
| Battery | Lead or helium 12 volt 9 A/hour | Starting system | Electric and kickstarter |
| Transmission | Chain, rear wheel, 4 gears | Fuel consumption | 2.0 l per 100 km in mixed mode |
| Brakes | Mechanical, drum | Gas tank capacity | 4.8 l |
For reference: the wiring of the Delta moped is designed for capacitor ignition. The photo below shows its schematic diagram.
The attached instructions for the moped also contain a CDI diagram
Video on this topic
repair of alpha tensioner 149 fm.
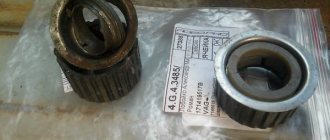
Replacing timing rollers 139FMB (1P39FMB)
Why does the timing chain rattle in Racer Alpha? and how to remove it!
Subscribe to the channel and post how!
#41 How to determine the alpha chain stretch of a magnifying glass?
Subscribe to the channel) Link to vk-https: //vk.com/id352703079 My group vk-https: //vk.com/club116536286.
Modification of Delta with a tricky time change
How to replace the oil pump sprocket without disassembling the clutch basket. Chinese moped Delta 72cc.
replacing a Gm chain in an ALFA moped
Spare parts for scooters in Belarus Online store in Belarus https://scooterbaza.by/ Group in contact https://vk.com/scooterbaza.
Alpha 110 (Change timing chain)
They brought in a moped (Alpha 110) with a complaint about a foreign knocking noise in the engine, as it turned out that it was loose timing chain. Foam.
Replacing the camshaft tensioner and Delta timing belt
Alpha 110 (Replacement of magnet chain)
Foam filter for Alfa moped https://goo.gl/MF6F3b Digital thermometer.
Before you start adjusting the valves
Therefore, after purchasing a new Alpha RX, I checked the valve clearance. For this procedure I had to buy a set of probes. In our case, you will need a probe with a thickness of 0.05 mm.
In order to calmly begin adjusting the valves, I had to unscrew the safety bars. For this we need a key of 8.
To get to the valves, you need to unscrew the valve covers located on the top and bottom of the cylinder head. To do this we need a 17 wrench. I used a spanner.
Setting TDC on Alpha
To start adjusting the valves on the Alpha moped, you need to set the top dead center. To do this, remove two covers on the rotor cover. Rotate the rotor until the T mark appears.
To accurately control this process, you need to remove the timing sprocket cover. To do this, on the opposite side you need to unscrew the clamping bolt, which can be unscrewed with a 10mm wrench. Remove the timing chain sprocket cover carefully so as not to damage the gasket.
The star has a mark in the form of a dot. It should be aligned with the mark on the head body.
To easily turn the engine mechanisms, I unscrewed the spark plug, reducing the compression to nothing.
Now you can begin adjusting the valves on the engine.
Electrical equipment maintenance
What can overshadow the operation of a moped is its unpredictable breakdown. And although the manufacturer uses a fairly proven operating diagram for the main components and assemblies, nevertheless, failures in the operation of one or another electronic equipment are possible. (see also the article Features of wiring an Alpha moped)
Wiring to Delta requires attention to connectors and terminals
To avoid this, the owner is required to carry out scheduled technical inspections according to the manufacturer’s recommended periods (based on mileage):
Delta battery
Such close attention to electrical equipment is due to the fact that when driving a moped, the low beam headlights must be turned on at all times. This causes increased wear and tear on all elements of the electrical system. The wiring on the Delta moped also requires attention - the quality of its connectors and connections leaves much to be desired.
The battery deserves special attention for the simple reason that if the charging relay fails, the electrolyte will begin to boil away. (see also the article IZH Planet 2 wiring diagram: installation features)
Mopeds use 2 types of batteries:
Note! Gel batteries are afraid of being completely discharged. Therefore, prolonged movement with a full load on the electrical system is unacceptable.
How to tension a chain on an Alpha moped - step-by-step instructions
To simplify access to the necessary components, first remove the rear left passenger footrest. The moped must be placed on the center stand. It is also advisable to unscrew the bolt and remove the exhaust pipe. If this is not done, the ratchet heads cannot be used.
Next, take two keys - 17 and 14 mm. You need to unscrew the nut to loosen the wheel axle. The nut is unscrewed, but not completely. With the second key you need to hold the axle on the reverse side so that there is a stop. If you don't hold it on the reverse side, the axis will spin.
To change or not to change?
Suppose you are overhauling your engine: changing oil seals, crankshaft, gaskets and other devices, but you doubt whether to replace the timing chain with a new one or not. If you have any doubts, change it for a new one at the first opportunity. And now I will explain why.
See for yourself: a chain has an average service life of approximately 18,000-20,000 km of a scooter (personal experience), approximately the same as the average service life of the engine itself. And for example, after driving 6,000 km, the crankshaft jammed or the engine leaked, or something else happened that requires complete disassembly of the engine. Naturally, you disassemble the engine, replace the crankshaft with a new one, and leave the chain, which by that time has exhausted a third of its service life.
And what happens? The chain, after 12,000 km, will exhaust its service life and become unusable, but the crankshaft and other parts will be in good order and whether you like it or not, you will have to halve the engine again, because of the chain alone. Is it necessary? The chain is a consumable. Never skimp on it!
Personally, I never check timing chains. I simply throw them in the trash, no matter how awesome they seem to me. A chain is a consumable item for me, just like a spark plug, oil or oil seal. But if you are important, or money is tight, you can use the old fashioned way.
Examination
First, you should determine whether your chain needs tension - for this you need to take a control measurement. The motorcycle must be placed on the side stand, removing panniers and other foreign objects from it. As a tool, you should take a tape measure, a ruler or a fairly large caliper. Make sure there is no load on the suspension and start taking measurements.
Very often the question arises, how should the chain be tensioned to avoid accelerated wear of motorcycle components? It is best to check the operating instructions developed by the motorcycle manufacturer, since the standard indicator may be individual for a particular vehicle. If this is not possible, you should use average values equal to:
When checking, it may be discovered that the actual indicator is outside the acceptable range. In this case, it is necessary to urgently tension the chain to avoid motorcycle breakdown in the near future. In addition, it is worth performing another check, assessing the technical condition of the circuit. Gradually spinning the rear wheel, determine the degree of sagging at each point - if this indicator differs significantly, the part urgently needs to be replaced. If your chain is very stretched, but you need to get to a store or service center, then to adjust you need to choose a position with minimal slack.
Valve adjustment on Alpha
I want to touch on an interesting topic that everyone has heard about, but not everyone understands its essence - let's talk about valve adjustment.
A little theory.
First, a little theory. Where did the need to adjust the valves come from and why is the thermal gap needed?
Any four-stroke engine has at least two valves: an intake valve, through which the working mixture enters the combustion chamber, and an exhaust valve, through which exhaust gases exit. Part of the valve is constantly located in the combustion chamber and therefore the valve becomes very hot. And as we know from school physics courses, bodies expand when heated. Moreover, the stronger the heating, the greater the expansion.
The valves in the engine are always in a “spring-loaded” state, while the valve plate is pressed very tightly to its seat - the valve seat. This ensures that the valve closes tightly.
To open the valve, you need to press on it. In our case, the valve is pressed by a rocker arm, which moves under the influence of the camshaft cam.
Now let’s imagine that the engine is cold (it stood for several hours and all the parts cooled down to “room” temperature). If you start the engine, the valves will begin to heat up quickly and, as a result, lengthen. If you do not leave it room for expansion (the gap between the rocker arm and the valve stem), then the moment will come when the valve will elongate so much that it will not fit tightly to its seat and will begin to leak gases from the combustion chamber. This leads to a loss of engine power and can also lead to overheating and burnt valves.
IMPORTANT: the gaps are set on a cold engine , when the valve has not yet had time to lengthen.
What happens if the valves are adjusted incorrectly?
Very often on various forums questions are asked: “What will happen if the valves are adjusted incorrectly?” There are two possible options:
Thus, too little clearance is much more dangerous than too much. It is for this reason that it is not recommended to set gaps “by ear” without feeler gauges. If there is a feeler gauge between the rocker arm and the valve, there will already be a gap between the rocker arm and the valve, unless of course you clamp it with great force.
Why combine tags?
The valves must be adjusted in a position where the rocker arm does not press on the valve stem, that is, the valve is closed. When a four-stroke engine is running, both valves are closed at the end of the compression stroke, so for ease of adjustment, align the mark on the camshaft sprocket with the mark on the head housing. This position corresponds to the top dead center - the end of the “compression” stroke and the beginning of the “power stroke” and both valves are closed at this moment and can be adjusted.
By and large, it is not necessary to clearly combine these marks, because both valves close already at the beginning of the compression stroke and do not open until almost the end of the power stroke, that is, the valves are closed at least half a revolution. That is, there is nothing to worry about if you “overshoot” the mark a little, or if you don’t reach it a little (within reasonable limits, of course).
For some reason, some “craftsmen” in their video instructions combine the “T” mark on the crankshaft flywheel. It is not necessary to do this to adjust the valves. For one revolution of the camshaft, the crankshaft makes two revolutions, and the mark will coincide twice: once at the end of the compression stroke, and the second time at the end of the exhaust stroke (when the exhaust valve is still open and the intake valve is preparing to open).
What should the valve clearance be on an Alpha?
The intake valve clearance on most engines is usually less than the exhaust valve clearance. This is due to the fact that the intake valves heat up less. They are cooled by fresh air flows.
The thermal clearance of the intake valve for the 139FMB engine is 0.03 mm. For the exhaust valve, the gap is 0.05 mm.
When and why to check the circuit
Manufacturers recommend checking every 1,000 kilometers.
Under intense loads, if you have to travel hundreds of kilometers per day, inspection is required much more often. But by installing a high-quality chain, the motorcyclist will be able to reduce the number of checks. Just by looking at the moped from the outside, it is not difficult for a specialist to determine if the chain is not tensioned correctly. Such an error when servicing a moped can lead to a break in the chain during a trip. Over-tightening occurs quite often and, despite the presence of lubrication, leads to accelerated wear of the chain. As a result, the suspension begins to work incorrectly. Over time, the hub may fail.
A poorly tensioned chain also often causes breakdowns. When moving, it will fluctuate greatly, and as a result, difficulties will arise with switching speeds. The shock load on the gearbox gears and rear hub will increase. The chain can lock the wheel axle by wrapping around it. Such a breakdown can lead to a serious accident.
The transmission of torque from the motor to the rear wheel in Alpha mopeds is carried out through a chain drive. This mechanism uses two stars connected by a chain. The first sprocket is connected to the gearbox, the second to the rear wheel.
The degree of tension changes as the pendulum moves along an arcuate path by the length of the suspension stroke. When stretching, it is important to remember that there should be a margin of 2-3 centimeters in length. Maximum tension is achieved when the following elements are lined up: