Tip 1: How to change a chain on a bicycle
Why is it necessary to change the chain?
It is recommended to change a bicycle chain every one and a half to two thousand kilometers, since it is subject to a lot of wear, and specifically, it stretches.
This is not surprising, since this part of the transmission is subject to a huge load, a large longitudinal force, which leads to the distance of the chain elements from each other, which entails a number of unpleasant consequences. This is, first of all, chain slippage, which will occur when a large load is applied to the connecting rod. Thus, it will be quite difficult to develop high speed on a bicycle with a worn chain, and you will have to completely forget about steep climbs. The second unpleasant consequence of chain wear will be difficult gear shifting. When you try to transfer the chain from one sprocket to another, it will jump off, unable to be firmly fixed on the sprocket teeth. Consequently, all the advantages of a bike with more speeds come to naught.
If the listed problems are not so terrible for everyday use of a cheap bicycle, then professional athletes and advanced amateurs are deprived of most of the advantages of their expensive, sophisticated bicycles.
How to determine the degree of chain wear?
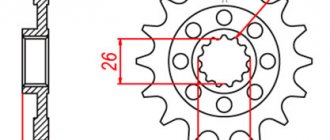
Having convinced yourself of the need to periodically change the chain, you should move on to explaining the process itself. First of all, you should learn to determine the moment when the chain requires replacement, because it is difficult to systematically monitor the mileage. The most accurate way to determine the degree of wear is to measure the distance from the center of an arbitrary pin (the axis connecting the links) to the center of the twenty-fourth pin after it with a simple ruler. This distance should be 304.8-306.4 mm. If the measured distance exceeds the recommended one, the chain requires replacement.
How to change the chain?
There are two types of chains: lock and pin. The first case is not of particular interest, since such chains are used on children's bicycles and replacing them is not difficult; for this you only need a screwdriver.
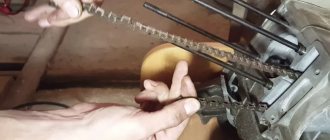
The situation is more interesting with the second type of circuit - a circuit with a pin. First of all, you will need a special tool - a chain squeezer. It is highly not recommended to remove such a chain using improvised means. A chain squeezer is used to separate and connect the links of a bicycle chain. The sequence of actions when working with this tool is as follows:
— place the chain pin opposite the squeeze pin; — tighten the screw of the pin, squeezing out the pin; — remove the pin.
That's it, now the chain is disconnected, you can remove it and install a new one. The process of installing a new chain is fundamentally no different from the process of removing it.
So, what to do if the chain falls off?
- If the bike is fast and the chain has not fallen between the system and the frame, then simply throw the chain over the desired sprocket with your hands, bending the derailleur tab. Turn the pedals and enjoy the ride further.
- If the bicycle has one speed , and the chain is tensioned by moving the rear wheel in the fork, then the situation is a little more complicated. We turn the bike over and rotate the carriage with the system. We try to hook the chain that has fallen off with the tooth of the front sprocket. If it begins to engage, then carefully help the chain to fall into place with your hands and do not forget to rotate the connecting rods at the same time as this action. You can use a screwdriver or a regular stick to help.
- If the chain has fallen into the space between the frame and the system , then you are in the most unpleasant situation. You need to try to catch the position in which the chain fell into this space. Of course, if you have a squeezer or connecting rod puller with you, then the situation can be simplified. But usually there are none. Therefore, you need to try to push the chain back. The chain itself needs to be rotated in different planes and looking for an advantageous angle. Sometimes you have to help the chain get out by hooking it with a sprocket and turning it through the frame. It's better not to do this because you will create a notch on the aluminum frame and it may crack at this point. This option can only be used if the situation is completely hopeless.
Try to help yourself with various objects - sticks, screwdrivers, etc. The star can be bent slightly (1-2 mm) using a lever (just don’t overdo it, otherwise you will need to change the entire system later).
- The situation in which the chain gets between the cassette and the spokes is solved in a similar way (if suddenly the protection is not installed).
Remember! The most important thing here is to have patience. The situation seems unsolvable only at first glance. After a long search for an advantageous position, the chain will definitely jump out of this dead position, and you can throw it back on. The main thing is not to make it worse J Do not use excessive force and do everything carefully.
Write in the comments what methods you use to fix this problem!
Repairing a bicycle chain
The most common defect in a bicycle chain is its sagging due to an increase in length. Of course, you can remove a stretched bicycle chain and replace it with a new one, but you can also try to restore it. Due to the loosening of the axles, the bicycle chain expands in the transverse and longitudinal directions. It is impossible to eliminate the transverse expansion, but with the longitudinal expansion, perhaps something will work out.
The extra links must be removed in such a way that the bicycle chain passes freely, without unnecessary tension, over the large sprocket. When shortening, also use a squeeze
It is important here not to overdo it by pulling out extra links.
It helps to install so-called stabilizers on a bicycle, which prevent the chain from flying off the sprocket when riding. Of course, installing a damper as a temporary measure is a good solution, but we must not forget about replacing the bicycle chain.
000_moto_0811_070
After work, I often stop by an old friend’s workshop. The pleasant atmosphere and the opportunity to tinker with the hardware yourself are very invigorating. One day, a new snow-white R6 stops at the entrance and a young guy asks if the service is still working. As usual, he needed to check the chain tension and lubricate it. After 10 minutes, satisfied service workers shook hands with the equally satisfied owner of the Yamaha. “What a wonderful client,” I thought then, still not understanding why he didn’t do such a simple procedure himself.
Manufacturers of modern goods are purposefully turning us into white-handed people. We don’t wash our cars, we don’t wash our clothes, we don’t hem our clothes. Many people no longer cook food at home. And they are unlikely to prepare anything edible if all the restaurants in the area close. Simply because they have never done it. Moreover, some believe that wasting time on such nonsense is beneath them. Maybe so, but I am sure that a person should still have a choice. I may not do something because I don’t want to, but not because I don’t know how. It's worth knowing! Be able to ride a horse, be able to cook deliciously, be able to take care of your own home, be able to drive a car and motorcycle well and be able to maintain them.
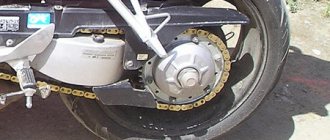
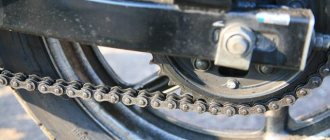
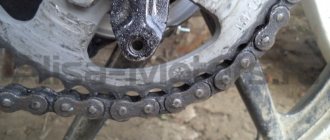
The chain drive is one of the most loaded components on a motorcycle. In powerful motorcycles, the forces generated in it reach several tons. And when accelerating and braking, they change direction. This often happens very abruptly, and at this moment the chain experiences serious stress. If the chain is loosely tensioned (sags a lot), then at the moment of load change, this excess supply of chain will first be selected, and then, when its free play ends, a sharp blow will occur, harmful to all elements of the transmission. By the way, it’s also unpleasant for the driver to drive such a motorcycle that jerks whenever the gas is opened or closed, especially in a sluggishly creeping traffic jam. The second disadvantage of a sagging chain is that when the tension is weak, its unloaded shoulder tends to move in a straight line by inertia, which is why it rests imperfectly on the sprocket teeth, thereby wearing them and itself out.
Is it possible to tighten the chain so that it does not sag at all? No, because as the rear suspension operates, the distance between the drive and driven sprockets changes. And the tensioned chain will be subjected to enormous loads (stretch greatly) if you do not leave it with a little slack, which will be removed during suspension operation. (And the shafts with bearings with a tightened chain, I note, will have a hard time.) The reason is that the axis of the pendulum and the axis of the drive sprocket on most motorcycles are located at a distance from each other, so the maximum tension occurs approximately in the middle of the suspension stroke - when the axles of the secondary the gearbox shaft, pendulum and rear wheel lie in the same plane.
How to remove a chain from a bicycle to replace it?
When an old chain becomes physically and morally obsolete and does not satisfy the bicycle owner with operating conditions, it must be urgently changed. As a replacement, select a chain with the same number of links. However, its length should be somewhat shorter.
How to remove a chain from a bicycle correctly? To do this, you need to use a special tool - a squeeze. Having placed the squeeze opposite any of the rollers, you need to tighten the screw so that this leads to the pin being squeezed out. Next, you should loosen the tool and then remove it. In a similar way, using a squeezer, the chain is removed for regular scheduled cleaning.
Quite often, experienced cyclists use special locks for quick maintenance, removal and cleaning of the old chain. The use of this device makes it possible to instantly remove it for replacement. However, some bicycle owners have prejudices regarding the effectiveness and reliability of using a lock. After all, if it is present, the risk of a sudden break in the chain increases. It is not known for certain how often chains break when there is a lock, but without it the mechanism still looks more reliable.
What does installing a lock give?
If it is necessary to frequently service the chain or change it, experienced cyclists use special locks with which the chains can be removed instantly. But there are also bicycle users who question the usefulness and reliability of using a lock. It turns out that with its presence the risks of accidental circuit breaks increase. This fact has not been reliably established, but a chain that does not have a connecting lock is more reliable in operation.
How to remove a chain from a bicycle
The need to remove a bicycle chain occurs when it needs to be replaced, thoroughly washed, or boiled in grease (in the case of a single-speed chain). Therefore, a small guide for beginners.
It is possible to remove the chain from the bicycle only by removing the axle connecting the links (pin). You can squeeze out a pin without a tool, right in field #8212; placing the chain on the edge of a hard object and tapping the axle with a thin knitting needle.
Unfortunately, this method will not allow you to put the chain back together, because there will be nothing to press the pin into. Therefore, to remove a bicycle chain you need to have a special tool #8212; squeegee, it is best to take a multitool, which includes all the basic bicycle keys, including the squeezer. I have this one. very satisfied.
The chain link must be placed on the squeezer so that the pin is directly in front of the release axis of the tool. Then just #8212; gently twist the handle and the pin is squeezed out.
The main thing is to stop at the end so that the pin doesn’t pop out completely, otherwise you won’t have enough swear words in your vocabulary to push it back in.
Below is a video where you can see what I'm talking about (1:05).
In general, ideally, I recommend putting a lock on the chain, this allows you to remove and put the chain on the bike instantly.
When installing a chain on a multi-speed bike, you need to follow the pattern of pulling along the rollers of the rear derailleur, I drew it in red in this picture:
Everything is very simple, and there is absolutely no need to go to a bicycle mechanic because of some minor problem with the transmission.
How to use?
Before you start installing the lock, you need to check whether it already has another lock, which was included directly when purchasing the bike. Finding a lock is usually not difficult, since the manufacturer's name will definitely be stamped on it. Whether to install it or not is everyone’s choice. But if there is a need to frequently remove links, then a lock in this case will be useful. To install the lock, half the link must be removed to make room for it. In order to do this carefully and not damage the links, you need to use a tool called a squeezer. The removed pair of outer links can be discarded, and the lock plates must be installed in their place. After the operation is completed, it is necessary to secure the lock. To do this, you need to stretch the chain until a click appears. If you suddenly need to remove this spare part, then it will be enough to bend the chain and move the hole until it opens.
It should also be noted that not every lock will be easy to push apart by hand, so removing it may require additional force and the appropriate tool. For security reasons, you should not use a lock with an old chain. It would be better if this part is individual for each vehicle, since at the most inopportune moment it can fail, because... was turned to fit the previous chain.
When should you remove the chain from your bike?
Let's figure out how to find out that the chain assembly of a multi-speed bicycle is faulty. You can estimate the mileage of a two-wheeler, but other factors also influence the serviceability of the bicycle chain.
- Correct selection of gears;
- Pedal load;
- Quality of roads;
- Driving speed.
The appearance of suspicious sounds (provided that the lubrication is in order) and difficulties with shifting gears are the first signs of a malfunction of the chain assembly. The simplest way to assess the health of links is as follows:
- Bend the bicycle chain away from the largest sprocket;
- If it moves freely from 3 or more teeth, then the bicycle chain must be replaced. Two prongs are a kind of warning. You can still drive it for a while, but it will have to be removed soon.
This same method works for single speed bikes.
An informative method is to measure the length of the bicycle chain.
- 30.5 cm is the best length;
- 30.6-30.8 cm – average degree of wear, high maintainability;
- More than 30.8 cm - links and sprockets are heavily worn. The entire transmission is damaged.
To correctly measure elongation, the chain must be completely removed from the bike.
Buy parts
Before you start disassembling, you should make sure that you have all the necessary tools and parts to carry out the work. At a minimum, you will need the following materials:
New front and rear sprockets
Set of tools for disassembling the chain, squeezing the chain
Vernier caliper for measuring
“Wait, why do I need new stars?” - a beginner may ask this question. The answer is that, as with all components that have metal-to-metal surface contact, friction between the sprockets and chain rollers (pins) wears out the surfaces. This sprocket wear does not bode well if a new chain is placed on the worn sprocket teeth.
Type 2: Chain lock with 2 symmetrical parts
The most common and convenient type of locks. Installed on almost all modern multi-speed bicycle chains. These locks are often difficult to remove. When I removed such a lock with my hands for the first time, my hands were bloody, but the lock remained in place. Most often found on KMC, Sram, FSA chains. Surprisingly, Shimano does not use such locks. Can be used for almost any number of speeds from 1 to 11.
How to install a chain lock with 2 symmetrical parts
Installing a lock is very simple. It does not need to be latched, since we will do this as soon as we press the pedal for the first time. But you can try pulling the chain in different directions to hear the click of the lock. The main thing is to make sure that all parts of the castle fit into each other.
How to remove a chain lock with 2 symmetrical parts
To remove the symmetrical lock, you will need regular pliers. We bend the chain so that it resembles the letter “P”, where the top of the letter is our lock. In this position, we need to press the lock with pliers diagonally (diagonally) to move the two parts of the lock (press with pliers from the sides where the pin comes out of the cheek). The method works perfectly! And the hands are intact, and it takes 15 seconds.
Watch the video for more details:
There is also a method of removal using hands, rope or cable - this is when the pins are wrapped with rope and then pulled together, but usually “tight” locks cannot be opened in this way.
Disadvantages of use
Like any other bicycle parts, the lock mount has its drawbacks. And the most important thing, perhaps, is strength. Since it can be disassembled into two parts, it automatically becomes less reliable than ordinary chain links. In this regard, there is a risk that the chain will most likely break at the exact place where it is installed. But you shouldn’t worry about this, since this happens extremely rarely and after long-term use.
Of course, a chain lock is a very convenient thing. With it, you can easily disassemble and reassemble the chain so that you can easily remove it from the bicycle and then install it. If you install a new copy, it will last much longer and will not be life-threatening. That is, having installed a new one, you don’t have to worry about it breaking at the most inopportune moment. Also, do not forget about the sizes that are suitable for this or that option. In some cases, the same spare part may be suitable for different sizes.
How to install a chain on a bicycle
Before installing the chain, you need to make sure that it is suitable for your bike. A special axle with a pointed end is usually sold complete with the chain. It serves to facilitate installation; after pressing the axle in, this end must be broken off with pliers. Also, the axle may already be in place if the chain is supplied without a special axle.
We connect the open links and install the axle. We insert the link into the chain squeezer and secure it with a fixing screw. By rotating the chain release handle, press the axle into place; it should be level with the edges of the chain. Remove the chain from the wringer and, if necessary, break off the end of the axle.
Check that this chain link bends freely; if it moves tightly, then you need to adjust the axle with a squeeze. In this case, insert the link into the second squeeze seat, then you will be able to see both ends of the axle.
The chain is installed.
000_moto_0811_070
After work, I often stop by an old friend’s workshop. The pleasant atmosphere and the opportunity to tinker with the hardware yourself are very invigorating. One day, a new snow-white R6 stops at the entrance and a young guy asks if the service is still working. As usual, he needed to check the chain tension and lubricate it. After 10 minutes, satisfied service workers shook hands with the equally satisfied owner of the Yamaha. “What a wonderful client,” I thought then, still not understanding why he didn’t do such a simple procedure himself.
Manufacturers of modern goods are purposefully turning us into white-handed people. We don’t wash our cars, we don’t wash our clothes, we don’t hem our clothes. Many people no longer cook food at home. And they are unlikely to prepare anything edible if all the restaurants in the area close. Simply because they have never done it. Moreover, some believe that wasting time on such nonsense is beneath them. Maybe so, but I am sure that a person should still have a choice. I may not do something because I don’t want to, but not because I don’t know how. It's worth knowing! Be able to ride a horse, be able to cook deliciously, be able to take care of your own home, be able to drive a car and motorcycle well and be able to maintain them.
Unlocking the bicycle chain lock
It is not difficult. Follow the algorithm.
Pry up the clamp with a screwdriver or knitting needle
It is important not to break the clamp, since it will not be possible to connect everything back without it; Unhook the link.. Now you can freely remove the bicycle chain and perform the necessary manipulations on it: shorten it, clean it, or, if it is hopelessly damaged, throw it away
Now you can freely remove the bicycle chain and perform the necessary manipulations on it: shorten it, clean it, or, if it is hopelessly damaged, throw it away.
To disconnect a solid structure, you will need a special tool called a squeezer. Using this device will allow you to remove the link without damaging it. The algorithm is as follows.
- Select the link to be disassembled;
- Place the bicycle chain in position for pressing out and pressing in the link axle, or pin;
- Tighten the screw and pull the axle towards you.
There is no need to completely pull out the pin, as it will not be easy to insert it back into place. Manipulations with the squeeze slightly loosen the axis. To re-release, select another link. Press the axle in in reverse order.
- Connect adjacent links to each other;
- Press the pin in using the screw.
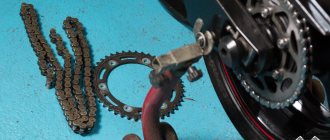
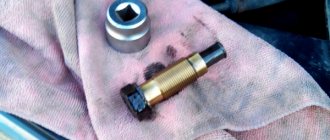
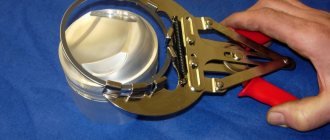
About the brands of chains and sprockets and the chain riveter.
There are quite a lot of chains and sprockets of different manufacturers and models on the market now. I’ll write a separate article about this later, but now I’ll just say that the chain is good - DID, and the sprockets - AFAM I didn’t discover America with this, but let there still be one more positive review addressed to these manufacturers. The combination of DID chain and AFAM sprockets works perfectly, this has been tested in my experience!
The chain riveter/river is an almost indispensable tool. No, of course, you can use a grinder or a Dremel to cut the chain, and rivet the chain using a small vice and a ball from the bearing! And I’ll even say that when I used this method before, it didn’t seem painful to me, I thought that’s how it should be. But with the purchase of a special tool, the process of replacing the chain becomes much easier, so I recommend spending the money and buying one for yourself. Moreover, the cost of such a tool is equal to 2 replacements of a motorcycle chain.
A motorcycle chain riveter looks like this:
..and consists of a vice, a needle for riveting the chain and a die for riveting the chain.
On the Russian market, such instruments are found in German and Chinese. The Chinese one is cheaper, but you should only buy it if you plan to change the chain ONLY ON YOUR motorcycle, that is, once every couple of seasons. If you plan to be kind and responsive to help friends for beer, take the German one, it is more expensive, but the quality is higher, and such a tool can be used more often.
Instructions on how to use the chain rivet/riveter are on the packaging (in German or Chinese, choose for yourself)), but in the article I will also try to illustrate how to use it.
When should you change your bicycle chain?
A good bicycle chain lubrication can significantly increase the service life of the entire system responsible for movement. At the same time, you need to be able to notice the moments when it begins to need maintenance or repair.
Excessive wear on a bicycle chain not only causes constant discomfort while riding, but also causes active deformation of the chainrings. If a worn chain is left unattended for a long period of time, it is guaranteed to lead to the need to replace a whole set of expensive mechanisms.
In order to assess its condition as objectively as possible, it is necessary to look not at the mileage, but first of all to measure the length of all its links. The chain length in normal condition is approximately 305 mm. The reason for its replacement is its stretching to 308 mm or more.
Look and feel good
The cost of this repair depends greatly on the type of motorcycle you ride and the quality of the parts used. There are chains on sale for 4 thousand rubles , as well as expensive ones costing 11-12 thousand rubles .
The time it takes to complete the job can also vary greatly depending on your experience and how much of a process you want to clean your bike.
Replacing the drive chain is one of those maintenance items that can be performed even by a novice motorcyclist. A minimum number of specialized tools are required to complete the task. If the chain was not in the best condition, a new part can make your motorcycle quieter and smoother to ride.
The season is coming, so prepare your motorcycle in advance so that it doesn’t let you down!
Tip 2: How to remove a chain from a bicycle
If the bicycle chain begins to make noise and the speed slows down, it becomes necessary to repair or replace it. To do this, the chain must be removed from the bicycle. to clean and replace worn links. The same procedure is necessary after installing sprockets with an increased or decreased number of teeth. In this case, it is necessary, accordingly, to add or remove links, which cannot be done without removing the chain from the bicycle. If this is done incorrectly, problems will subsequently arise with the chain that will require its replacement.
- - a set of keys;
- — device for squeezing the chain;
- - screwdriver;
- - pliers.
Remove the chain from the bike sprockets. To do this, turn it over, installing it on the handlebars and saddle. After this, unscrew the rear wheel nuts holding it to the frame. Carefully release the chain from the rear sprocket or from the chain pulley rollers on a multi-speed bike and remove the rear wheel. Next, release the chain from the front sprocket. It will be fixed to the frame, so in order to remove it, you will need a special device for squeezing the chain.
A similar device is sold in most stores that sell spare parts for bicycles. To disconnect the chain, press out one of the pins (pegs) of the bushing. Select the chain segment to be disassembled. This can be absolutely any segment that has not previously been disassembled, which will be evident from its condition, since after each disassembly and reassembly such a segment loses a little strength and becomes loose.
Insert the selected link into the squeezing tool and secure with a special knurled screw. This will allow the chain to be secured in the device. Secure the link so that the pin (chain peg) is exactly opposite the release axis of the device. After this, simply rotate the release axis handle, which is attached to the bolt, and it will press out the desired pin. Be sure to control this process so that it is not completely squeezed out of the outer part of the link. If this happens, it will be very difficult to insert it back.
After you press out the pin, the circuit will open on its own, remove it from the bicycle and perform the necessary operations. Be sure to ensure that the extruded pin is not lost. If you need to shorten the chain, use a chain squeezer to remove the required number of links. If you need to increase its length, insert links. After this, assemble the chain directly on the frame, insert the rear wheel into the connectors, and pull the chain onto the sprockets, then secure the wheel with nuts. After pedaling several times, make sure that the mechanism operates effortlessly and does not create unnecessary noise.
There are variations of bicycle chains in which one link is a lock. In this case, in order to remove the chain from the bicycle, find such a link. Using a screwdriver, bend the locking plate and remove it with pliers, after which the chain will be disconnected. But when choosing a new bicycle chain, be sure to keep in mind that this option is less durable and reliable.
No comments yet!
Share your opinion
Adviсe
- Get a squeeze, even if there is a lock. The chain may break and this tool will come in very handy on the road. In addition, it is much easier to shorten a bicycle chain by squeezing. When choosing squeezing equipment, focus on high-quality, expensive models made of high-quality metal. The ideal option is to take a multi-set.
- Don't avoid using a padlock. The thing is practical and reliable. A chain with a split link is faster and more convenient to remove for the same routine cleaning before lubricating it.
- Do not use an old lock with a new chain. New – only new.
How to put a chain on a bicycle without a lock
Before reconnecting the chain on mountain bikes and sports bikes, it must be correctly pulled through the rollers, see fig. below, marked with a red line:
Next, move on to the direct connection of the chain link. To do this, you need to carry out the same operation, only in reverse order. We place the chain in the groove near the fixing bolt so that the protruding pin faces the spout of the squeezer. By turning the handle, we smoothly press the pin back until it completely enters the link. After this procedure, the links into which the pin was pressed should move freely; if this does not happen, then you need to use the chain release adjustment groove. Having placed the desired link in the adjustment groove, it is necessary to ensure that the ends of the pin protrude equally from both ends.
If the chain is from Shimano with a disposable connecting pin, then using a squeezer you need to press it into the link and break off the tip with a rounded end. This tip is needed to simplify the process of pressing the pin.
Or for replacement when it is already .
With a lock
To remove the chain you need to open the lock. There are several types of locks, but the processes for opening them are similar; to do this, you need to close the lock axes and remove the cover.
If problems arise when opening locks, you can use tools, such as special lock pliers.
Without lock
If your bicycle has a chain without a lock, then you will have to press the axle out of the chain link. This process will also need to be carried out in order to reduce the number of chain links when necessary.
To press out the chain axle you need a special tool - a chain squeezer. For this operation, you can choose any chain link, the only condition is that when pressing out again, it is better to use a new one, since after the operation the link becomes slightly looser.
Insert the chain link into the tool and secure with a screw
Please note that some chain squeezers have two seats, one space for pressing out the axle (it is located closer to the locking screw), and the second place is used only for adjusting the axle. Carefully tighten the release screw, thereby squeezing out the axle.
Do not push out the axle all the way if you plan to assemble a link with the same axle, otherwise it will be problematic to install it back!
The chain has been removed.
What is this spare part?
These are quick-release links consisting of two plates. Thanks to its design, it becomes much easier to lock and unlock the links of a bicycle. When purchasing a lock, you should pay attention to what is written on the package. As a rule, the most important information is reflected there, which will help in the further use of the lock. Particular attention must be paid to the number of speeds this lock is suitable for. Most likely, more than one indicator will be indicated there, which is beneficial for users.
How to deal with chain stretching?
A common problem with a bicycle chain is its sagging. The reason for the development of this process is the gradual wear of the links. Moreover, it is almost impossible to prevent wear of individual chain elements. The problem can be eliminated only by removing excess links as they stretch.
To correctly perform the necessary actions, you must:
- Decide how to remove the chain from the bicycle by first disconnecting the rear wheel.
- Disconnect the chain using pliers.
- Determine the number of unnecessary links.
- Remove unnecessary elements.
- Connect the links, install the chain, check its mobility and functionality.
Link curvature
During operation, minor accidents and falls, the links of a bicycle chain can become deformed, which adversely affects the entire operation of the bicycle transmission unit. Perhaps the problem lies in the poor condition of the chain, which periodically leads to its slipping. To restore operation, you need to align the links using a special device - a squeezer. This device should be purchased at a bicycle parts store and carried with you. It does not take up much space, but at the right time it can be very helpful. If the deformation occupies a large part of the bicycle chain or cannot be repaired, you need to replace the chain with a second one and get rid of the deformation of the teeth .
Sequence of actions for removing a chain from a bicycle without squeezing it yourself
The squeezer is a useful device. However, it is not always at hand. What to do then? The prospect of being left in the middle of pristine nature somewhere many kilometers from the city does not look attractive. You can remove the chain from the bike without squeezing it. Doing this on your own will not be easy, but it is quite possible. Let us consider in detail the options for disassembling a chain with and without a lock.
Model with lock
Lock.
How to check if a chain has a lock? As easy as pie! A quick inspection to see if the chain has a link that is different from its neighbors. This is the castle. You can disconnect it by moving the pins on each of the links with your hands or pliers. To assemble the chain, you need to do the same steps in reverse order.
Model without lock
In this case, it will be difficult without squeezing. And the result will be unpredictable. But, if there are no other options, choose the lesser of 2 evils. So, we remove the chain without a lock from the bicycle using improvised means in this order.
- Screw an ordinary vice to the table.
- Secure the chain in a vice by placing a nut on one side, the hole of which corresponds to the pin.
- Attach a small screw with a head on the other side.
- While holding the vise, push the pin into the nut hole with the ball.
Important! In order to open the circuit, freeing one side is not enough. You need to move the link and remove the chain or add another ball and continue trying
Summing up, we can confidently say that the squeeze is an indispensable thing on the road for every cyclist. And if a broken chain with a lock can still be removed from the bicycle without this device, then as for a chain without a lock, it will be difficult to do without it. However, in case of form major circumstances, you can use the instructions given above.
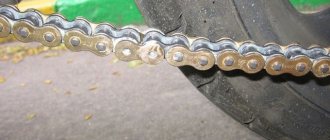
Press lock-clip
A press clip is something between a rivet and a regular clip. The press clip has greater fatigue strength than a regular clip, but does not have the strength of a rivet lock and is approximately 80% of the strength of a regular chain link. Installing a clip under a press is more difficult than a regular clip; ideally you need the same press, but if you really want to, you can get by with a good clamp.
Attention: if you decide to install the clip under the press using available tools, make sure that during pressing, the pressure on the pressed plate is uniform and it does not become distorted, as this can cause stress in this plate, which will weaken the strength chain lock.
Home | Cart | To the top © 2014—2019 Motomagazin biker.su COPYING SITE CONTENT IS PROHIBITED!
To be the first to know about new arrivals and promotional offers, subscribe to our newsletter:
There are several reasons:
- Strong shaking while driving
- Chain too stretched
- The chain has been recently lubricated
- The switch is incorrectly configured
- One of the chain links bites and does not turn
- The sprocket is bent or the cassette is damaged
Most often we deal with a combination of factors at once.
The most unpleasant situation when the chain gets into the space between the frame and the sprocket occurs if at one moment the chain was “in an advantageous” position for this. All of the factors described may play a role.
The principle of a light bulb in the mouth works here - it falls in one direction, but cannot be reached back. But, unlike a light bulb, the situation can be corrected without the help of a traumatologist.
Causes of chain slippage through sprockets
Often, when changing gears, especially when you need to go uphill and the pressure on the pedals is maximum, the links slip through the sprockets.
There are several reasons:
- elongation of links due to wear of rollers and rollers;
- grinding the teeth of the rear and front sprockets;
- sometimes both causes occur simultaneously;
- incorrect gear shifting.
There is a chain wear indicator that monitors its degree and shows when chain links should be replaced.