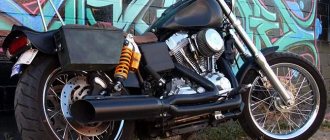
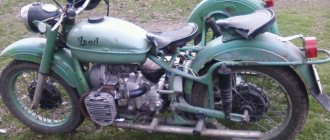
For many years, buying a bike has been every man's dream. Traveling on a two-wheeled beast with the ability to reach incredible speeds, enjoying the whistling of the wind and the cars flashing past, is truly an amazing experience. And if such a vehicle provides its owner with maximum safety and driving comfort, then the upcoming ride will be not only exciting, but also enjoyable.
Every motorcyclist must understand that his new “friend” needs appropriate maintenance, which consists of diagnosing and removing all kinds of faults. And in order to successfully carry out repair work at home, you need to equip your workshop with such a device as a motorcycle underride.
Motorcycle tackle: types, features, DIY creation
For many years, buying a bike has been every man's dream. Traveling on a two-wheeled beast with the ability to reach incredible speeds, enjoying the whistling of the wind and the cars flashing past, is truly an amazing experience. And if such a vehicle provides its owner with maximum safety and driving comfort, then the upcoming ride will be not only exciting, but also enjoyable.
- Using a motorcycle stand
- Using a lift to repair a fork
- Buying a factory model
- Existing types of tackles
- Features of creating a homemade lift Step-by-step guide
Every motorcyclist must understand that his new “friend” needs appropriate maintenance, which consists of diagnosing and removing all kinds of faults. And in order to successfully carry out repair work at home, you need to equip your workshop with such a device as a motorcycle underride.
How to use?
Dollies or platforms are easy to use. One person can handle the installation of the snowmobile. To place a snowmobile on a dolly, you need to position the tool so that the snowmobile's skis are between the wheels of the dolly. The design has a special hook with which the skis cling to the tackle. Thus, there is no load on the skis and track.
Use a long handle to move the snowmobile around the garage. This eliminates the possibility of mechanical damage to the vehicle.
Rolling platforms have the same installation principle. As a rule, the kit consists of several elements, each of which is installed under the skis and track. Wheels for snowmobiles are a must. Using the tool, you can transport vehicles or move from place to place. The use of various tackles allows you to move the snowmobile freely and eliminates damage to the floor covering and the vehicle itself.
This article introduces the reader to the best models, and tips on use will help you install the device correctly.
Types of motorcycle stands
Today, tackles have proven themselves to be very convenient devices for repairing and servicing a bike. Every motorcycle owner who has had to repair their equipment has thought about purchasing such a device. The tackle allows the owner of the iron horse to install it very steadily for repairs. The roller is very convenient when changing a wheel - it allows you to hang the motorcycle and thereby easily remove the wheel.
We can say that a homemade stand is a do-it-yourself motorcycle stand, only without a table. If there are wheels, the lift can easily be moved to a given location for repairs. The small dimensions of the device allow it to be used in places with limited space.
Types of stands:
- rear - for servicing the rear of the motorcycle;
- front - for servicing the front of the motorcycle.
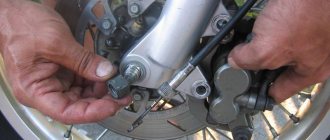
The front type lift comes with an adapter that allows you to hang the wheel for repairs. The adapter is selected for a specific bike model. This tool is suitable for repairing the front fork. A do-it-yourself car tray is ideal for storing cars in the winter. It has a simple design and does not require special knowledge to operate it.
The rear type tackle is a little more structurally complex. It features an L-shaped device with a handle. It is equipped with clamps whose task is to securely hold the wheel. The width of the clamps is selected for a specific wheel. Such tackles are mainly used by repair services, as they allow lifting weights up to 300 kg . With the help of such a tackle, you can hang the motorcycle in such a way that the suspension is maximally unloaded. Thanks to this feature, it is quite easy to replace the chain.
Regular trailer vs snowmobile
Many people think of using a standard trailer to haul literally everything, including a snowmobile. But in reality, you will not be able to properly transport such equipment on a short flatbed trailer.
This is due to several factors:
- Remember that regular trailers are absolutely not suitable for transporting snowmobiles. Attempts to remake them or adapt them for such tasks will end in failure and the need to buy not 1, but 2 new vehicles at once.
- There are certain transport regulations that impose requirements on caravans. If you are going to transport snowmobiles on them, then the vehicles must:
- Some people also buy special sleds for snowmobiles to transport people. An interesting and fascinating thing, I tell you. Unforgettable feelings. But here it is important to follow the transportation rules so that during the next maneuver the sled does not skid and turn over. Safety comes first.
Do-it-yourself motorcycle tackle
Motorcyclists among themselves call a motorcycle lift a lift. On websites on the Internet you can find any catalogs with a huge list of proposed tackles. But, firstly, they are quite expensive. And secondly, it is very difficult to choose a tackle for a specific motorcycle model.
Many manufacturers offer universal mounts, but their fasteners to motorcycle swingarms are not suitable for everyone.
And then some motorcyclists, taking into account the high price of tackles, their unreliability and the danger that they will not fit their model, think about making a tackle for a motorcycle with their own hands. A good tackle should lift the bike and hold it.
If you feel strong enough and have the necessary knowledge to make a motorcycle stand yourself, you will save a lot of money and make a device that exactly fits the size of the bike. For many, the most important point is the reliability of the manufactured tackle.
In order to do everything yourself, be patient. Because it will take a lot of time. You will need to select and prepare the necessary parts and tools.
What will it take?
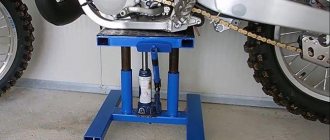
First of all, it is necessary to prepare an approximate drawing of the future structure. You can take a photo of any finished stand as its basis. In our case, it will be a kind of stool with four lifting legs, which will be raised to the desired height using any old jack.
The main thing is to take the necessary measurements. First, let's measure the ride height. For cross-country models it is approximately 32 mm. Accordingly, the minimum height of the stand for storing a motorcycle will be about 26 mm. In order to carry out repair work, the unit must be raised by approximately 40-45 cm. Accordingly, for this you will need to purchase 4 pipes 30 x 30 mm about 20 cm long and the same number of pipes of a slightly smaller diameter (25 x 25 mm) about 25 cm long One pipe should fit into the glass (pipe of a larger diameter) not too tightly, but it is better not to allow the elements to dangle too much. The optimal space between the pipes is considered to be 1 mm, so if you purchase parts of a different size, you should take this into account.
In order for the structure to be a full-fledged lift, when making a stand for a motorcycle with your own hands, you additionally need to prepare:
- a piece of corrugated metal, about 4 mm thick;
- corners 35 mm;
- welding machine.
Healthy! Of course, expensive equipment is difficult to obtain, so if desired, you can fasten the entire structure with ordinary bolts.
After this you can start working.
Types of devices
The most popular type is the platform lift. It is quite mobile and versatile - it allows you to service different types of motorcycles. Hydraulic ones are used mainly for servicing heavy touring motorcycles and massive choppers. This type of lift is installed under the motorcycle frame and lifts it using hydraulics. Thus, the motorcycle is left in a suspended state, which allows for comprehensive maintenance and repair of equipment. Tools of this type have many adjustments and settings, which allows them to be used for repairing motorcycles of any type.
Factory or homemade
When repairing and servicing a bike, it is advisable to use both types of tackles - front and rear types. Factory solutions will meet all safety requirements, will be more functional and will have additional accessories, but all this will be quite expensive. On the other hand, homemade options will be several times cheaper, but the safety and functionality of such products will be much lower.
Advantages of factory devices:
- factory tackles are used by professionals;
- they have ideal proportions and geometry;
- can be operated by one person;
- can be installed under the pendulum and slider;
- have many adjustments and settings.
Making a stand
First you need to prepare the foundation of the future structure. To do this, you need to install the corners so that they form a rectangle and weld them. After that:
- We install 4 30 mm tubes in the corners and weld them to the base. It is important to ensure that all elements are installed parallel to each other.
- We install smaller tubes (25 mm) into the resulting glasses. They can be pre-lubricated to make them rise and fall easier.
- We measure the height of all the “legs of the stool”. If they differ, then the finished structure will constantly stop.
- Preparing the upper platform. To do this, we adjust the corrugated sheet of metal to the required size and weld it to the ends of the pipes installed in the glasses.
- To add strength, we weld square pipes, angles or channels onto the longitudinal parts of the platform.
- We prime and paint the finished structure.
Additionally, you can weld on guide corners, which will be used as handles for carrying the structure.
After this, all that remains is to install the jack inside the motocross stand and enjoy the homemade unit. The cost of such a design will be no more than 800 rubles, and the functionality is no different from the finished product.
Alternative options
Flaring brake pipes: types, tools and DIY
If you have an unnecessary jack at hand, then you don’t have to worry about making a “stool”. To do this, we weld two channels to the jack on both sides of the lift and two more to them. After this, all that remains is to fix the guides and enjoy the finished design.
If the vehicle only needs to be transported or stored in a garage, then rolls can be made. These designs are footrests on wheels. They are installed either on the rear or front wheels. To make such a stand, you will also need a welding machine. You will also need to take measurements as shown in the picture.
The length of the product must correspond to the dimensions of the two-wheeled “horse”, so everything depends on its specific type and model.
Thus, you can save quite a large amount of money and repair your motorcycle without any problems.
Motorcycle repair tool
Today, a motorcycle tackle is in great demand; it is a mandatory attribute in the arsenal of every motorcyclist who knows how to properly care for his bike. It is used in the process of various works, when repairing cars. For example, a motorcycle lift is used when it is necessary to lift the rear of a motorcycle and change wheels or tires, or when repairing a cooling radiator.
If the owner repairs his motorcycle himself, then buying a mount requires a lot of responsibility. They are relevant both for the home workshop and for specialized repair shops. Thanks to the convenient wheels, the equipment can be easily transported to the required location to perform repairs or other work on the motorcycle. This design is a type of motorcycle lift, but it does not have a table. The small dimensions of the rolls make it possible to install them in chambers where the product is dried or painted. Their service life is almost unlimited and they do not require any special care.
The motorcycle lift is made in two types and, taking into account the part of the motorcycle that needs servicing, it happens:
- Rear;
- Front lift.
How to use?
Dollies or platforms are easy to use. One person can handle the installation of the snowmobile. To place a snowmobile on a dolly, you need to position the tool so that the snowmobile's skis are between the wheels of the dolly. The design has a special hook with which the skis cling to the tackle. Thus, there is no load on the skis and track.
Use a long handle to move the snowmobile around the garage. This eliminates the possibility of mechanical damage to the vehicle.
Rolling platforms have the same installation principle. As a rule, the kit consists of several elements, each of which is installed under the skis and track. Wheels for snowmobiles are a must. Using the tool, you can transport vehicles or move from place to place. The use of various tackles allows you to move the snowmobile freely and eliminates damage to the floor covering and the vehicle itself.
Making a stand for a motocross motorcycle
The stand for a motocross motorcycle is made somewhat differently. Since such a vehicle is not mounted under a pendulum or crossbar, but under the lower engine protection, an additional mechanism will be required to raise the stand platform. Typically, the base of the stand is made in the form of a parallelogram, a vertical stand made of squares, a crossbar made of a corner or also made of squares. It is better to make the base with overhangs for greater stability. The squares of the racks must have open internal holes, cleared of burrs. A jack is placed in the center of the base, onto which a lifting platform or H-shaped frame is welded on top. Smaller squares are welded to the platform or frame; they must fit inside the squares of the base, providing the necessary stability.
Wheels for snowmobiles. Which ones are better? Is it cheaper to do it yourself?
A steel ski blade leaves deep scratches on the floor covering. And if you don’t mind the concrete floor, then you can damage the ridge itself. There are many ready-made options for snowmobile wheels and wheels on the market. What to choose? Or is it cheaper to do it yourself? Let's find out!
The following solutions exist:
Set of transport trolleys.
They are 3 metal platforms that are placed under the skis and track.
The advantages of this solution:
- The snowmobile can be moved in any direction - forward, backward, sideways
- Does not take up storage space
- Affordable price
But there are also disadvantages:
- Inconvenient to place under a snowmobile. You can still somehow slip it under the skis by lifting them by the handle. Under the caterpillar - only with assistants and a load on the back. You can, of course, “run over” the caterpillar, but with this method deformation of the wheel brackets and a reduction in service life are inevitable.
- Only suitable for perfectly flat floors. Any joints tend to knock the cart out from under the skis. Not suitable for tiles and paving stones.
Wheels for skis.
Unlike carts, there are large rubber wheels installed here, rather than flimsy furniture wheels. They are mounted on a metal frame. When assembled, they are adjusted to the size of the ski of a particular snowmobile. Raise the ski above the floor, clinging to the handle.
- Easy to install without much effort
- Suitable for any coating. Even uneven paving stones are not a hindrance to use
- The snowmobile can only be moved back and forth
- Not suitable for studded tracks.
- Price. They cost 2000-3000 rubles more than carts.
Do it yourself.
Will you be able to save money? Let's figure it out. Even the simplest design will require a minimum of 12 furniture wheels. With an average price of 1200 rubles. for 4 wheels it turns out at least 3600 rubles.
Add here the fasteners, a can of paint and the time spent. It turns out that making wheels for a snowmobile with your own hands makes sense in two cases:
- Enjoy the process
- Make a set free of shortcomings “for yourself”
Everyone decides for themselves which kit is more convenient to use in their specific operating conditions. The main thing is to store the equipment properly in a preserved state.
Photos and drawings of the Naryl tackle on the Internet!
#1 Andreyka
- Group: Members
- Posts: 119
- Registration: 09 October 10
- Up of the page up there ^
#2 maxo
- Group: FB Veterans
- Posts: 1,111
- Registration: 02 April 08
Andreyka (25.2.2011, 18:49) wrote:
- Up of the page up there ^
#3 JJ
- Group: FB Veterans
- Posts: 1,628
- Registration: 16 September 07
- Up of the page up there ^
#4 CyBeR
- Group: Members
- Posts: 42
- Registration: 29 January 09
The photo in its original size had to be uploaded on the radical. There is a check mark there.
There would be a drawing of the front one so that it would be stuck along the lower traverse.
- Up of the page up there ^
#5 sz83
- Group: Members
- Posts: 243
- Registration: 19 August 09
CyBeR (7.3.2011, 19:10) wrote:
The photo in the original size had to be uploaded on the radical. There is a check mark there.
There would be a drawing of the front one so that it would be stuck along the lower traverse.
I brewed one for myself today. On the 954th. I did it without any drawings. (Like the rear one last winter). Everything is elementary there. The turner just ordered a boss for the traverse. The rest myself. Budget - pennies. The work of a turner and a 25mm square pipe. I don’t consider consumables such as electrodes and discs for the grinder. Then I’ll spend a little more on paint (I want to blow it out with a spray gun, with primer, car paint). If anyone is interested, I can take a photo and give you the dimensions.
- Up of the page up there ^
#6 CBRak
- Group: Members
- Posts: 63
- Registration: 02 March 10
sz83 (7.3.2011, 16:59) wrote:
- Up of the page up there ^
#7 Andreyka
- Group: Members
- Posts: 119
- Registration: 09 October 10
maxo (1.3.2011, 18:15) wrote:
- Up of the page up there ^
#8 Garik
- Burn everything.
- Group: FB Veterans
- Posts: 4,097
- Registration: 26 May 07
- Up of the page up there ^
#9 sz83
- Group: Members
- Posts: 243
- Registration: 19 August 09
Here are photos of my “creation”. I did it without any drawings, after looking at a bunch of pictures of tackles. There are no drawings yet - when I have time, I’ll get confused and post it (If only I can show it in a photo).
Material: 25mm square pipe, 6m length (they didn’t sell less, but the rest won’t go to waste) - about 450 rubles. "Boss" 1 pc. — 300 rub. Roller wheels 4 pcs - price: cold. - rolled them from old ones that had been lying around since childhood. Washers, screws, nuts, studs (for 6 wheels: threaded on a nail 200) - 40 rubles. Fork with thread either from the Volga or from the Gazelle 2 pieces - 120 rubles. Consumables - electrodes (I didn’t count), 3 discs for an angle grinder (125x22x1.2). 1 free day.
The boss has such a shabby appearance because... Due to some mistakes, I had to cut it off and re-weld it a couple of times.
A fork with a thread (screwed into a welded nut and locked with another) either from the Volga, or from the Gazelle - I stupidly went to the first car store I came across and bought suitable pieces of hardware, although this hinge unit can be made in any way - for some reason I was so confused, in a welded nut can be screwed into anything.
Rear roll (20mm square pipe, skate wheels)
I plan to then treat the surface and paint it (I just don’t want to use a spray can, but I don’t have time to bother with car enamel and primer yet).
PS: There is no oil on the floor in the garage. Melted ice from a car - spring