What indicates the fuel pump is not working properly?
If the pump is faulty, this will primarily affect the pressure in the fuel supply system to the engine.
If the pressure is too low, the optimal composition of the air-fuel mixture in the combustion chambers will not be ensured, which means problems will arise in the operation of the engine. External manifestations may be different.
·
- The sound of the engine may be slightly different from usual, especially during warm-up. This symptom is characteristic of the early stage of gas pump disease.
- Noticeable loss of power. At first it affects mainly at high speeds and when driving on an uphill slope. But as the condition of the pump deteriorates, twitching and periodic decelerations may also appear in normal modes on flat sections of the road.
- Troubling and floating speed are signs of a further deterioration of the situation.
- Increased noise or a loud hum coming from the fuel tank indicates the need for urgent attention. Either the pump itself is on its last legs, or it cannot cope with the load due to contamination in the system. It is possible that simply cleaning the coarse filtration mesh will save the fuel pump from death. The problem can also be caused by the fuel filter that performs fine cleaning if it is defective or has not been changed for a long time.
- Startup problems. Things are really bad if even a warm engine has difficulty starting. The need to crank the starter for a long time means that the pump cannot create sufficient pressure in the system to start the engine.
- The engine stalls when you press the gas pedal. As they say, “we have arrived”...
- The absence of the usual sound from the gas tank indicates that the fuel pump is not working. Before putting an end to the pump, you need to check the starting relay, fuse, integrity of the wires and reliability of the contacts in the connector.
It must be borne in mind that some of the listed symptoms may indicate not only the fuel pump, but also a number of other parts - mass air flow sensor, throttle position sensor, throttle valve actuator, idle speed control, clogged air filter, unadjusted valve clearances.
If there are doubts about the serviceability of the pump, it is worth carrying out additional diagnostics, in particular, measuring the pressure in the system.
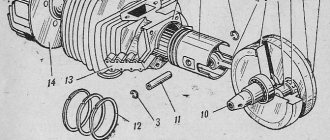
The principle of operation of the enrichment
Inside its plastic body there is an electric heating element through which electric current begins to flow as soon as the scooter's motor starts running. At this moment, the thermal element begins to heat up, and from its heat the capsule with a special composition is heated, which expands as the temperature rises and pushes out the enrichment needle.
When the current flow to the heating element of the enrichment unit stops, the capsule cools down and the needle rises to the upper position.
When starting a cold engine, the scooter's generator begins to produce current, and at the same moment the thermoelement of the enrichment begins to heat up, receiving current from the generator. Until the enrichment needle drops to the bottom position, the channel in the carburetor remains open for an additional portion of gasoline entering the engine, this makes it easy to start a cold engine.
But the engine should not constantly run on a rich mixture, if only because this will lead to excessive fuel consumption. In fact, with an enriched mixture, the scooter motor only works for the first few minutes, because after the motor starts working, the heating element of the enrichment heats up more and more (after all, the generator is running and current is supplied to the heating element), the needle of the enrichment gradually lowers, and blocks the path to the additional flow of gasoline, as a result of which the fuel mixture acquires a normal composition.
From this moment on, the motor can operate normally. In turn, after the engine stops, the generator stops producing current, the enricher thermoelement stops heating, it cools down, the needle rises to the upper position, and now, when starting, the enriched mixture will again be supplied to the cylinder.
How to properly check?
How to check the fuel pump on a scooter? This question worries many fans of this vehicle when the vehicle does not start. There could be several reasons for this, one of them is that there is something wrong with this part. You can carefully check the performance of the fuel pump yourself.
First, let's try to configure the fuel pump:
- It has two screws: the first is for idle speed, the second is responsible for the quality of the fuel mixture. We tighten both screws, then release the second screw two turns, the first two and a half turns. We start the scooter, listen to the engine: smooth - no adjustment required, intermittent - continue.
- We fix the equipment with a step, slowly tighten the idle screw until the clutch engages - the wheel begins to rotate. Unscrew it a quarter turn. We check while driving: if acceleration is difficult, then tighten the screw a quarter turn. Acceleration is normal - the screw should be turned a quarter counterclockwise. Then we adjust the idle speed screw again.
Let's take a closer look at how to check the vacuum fuel pump on a scooter if the adjustment fails:
- Unscrew the four screws using the hexagonal star handle;
- carefully pull out the fuel pump cover, remove the rubber gasket, membrane, see the valve;
- due to the vacuum, gasoline passes through the valve from the tank into the upper chamber of the carburetor, we clean it;
- close it in the same sequence: gasket, membrane, gasket, screw it on, install it on the scooter and ride. It is necessary that there is always gasoline, otherwise these parts in the gasoline pump may dry out;
- You must tighten it carefully so that gasoline does not spill out.
Application area:
- Medical institutions - prevention of iodine deficiency
- Municipal children's institutions, including: kindergartens, schools, boarding schools for mentally retarded children, orphanages, health schools - prevention of iodine deficiency, combating delayed mental and physical development.
- Private schools and kindergartens - prevention
- Private sanatoriums - prevention
- Sports schools
- Large hotels in Moscow - increasing hotel ratings
- Commercial enterprises – increasing staff efficiency
- Fitness centers
- Transnational companies in the region – increasing the physical and intellectual performance of employees
- Private cottages
- Private clients - with thyroid diseases, pregnant women, parents of frequently ill children, people suffering from various bronchopulmonary diseases, allergy sufferers, parents of newborn children, elderly people.
Purpose and principle of operation of the fuel pump
The fuel pump is designed to pump fuel from one point to another. In a car, the role of the first point is played by a fuel reservoir - the tank, and the second - by the engine, where the pumping takes place. This process occurs at a certain pressure, which is maintained by the pump reducer, which is a very important point.
Fuel pump diagram
Fuel pumps are divided into 2 types according to the type of drive: electric and mechanical. Inside the first there is an electric motor with a mini-pump, which operates from the mains and uninterruptedly pumps fuel into the engine. The second type is becoming increasingly rare, as it is installed on carburetor cars, and operates due to the reciprocating movement of the lever.
Fuel pump diagram
Checking the fuel tap
The simplicity of the crane design significantly increases its reliability. However, you need to remember that the fuel taps of the scooter cannot be repaired. This is due to the integrity of the product body, which cannot be disassembled.
To check the functionality of the faucet, you need to disconnect the hose from the carburetor and place it in any container that is at hand. Unscrew the air tube from the engine through which vacuum should be supplied. You can simply draw in air through it, and gasoline should begin to flow out of the fuel hose.
If fuel does not flow from the carburetor hose, it means the valve is clogged or faulty. It is imperative to clean the fuel filter installed on the tap. It is not recommended to blow the product with a compressor or pump; this will not give an effective result and will only increase the likelihood of serious damage to the membrane.
Gasoline supply problems - common symptoms
Malfunctions of the fuel supply system are conventionally divided into 2 categories:
- The combustible mixture is not supplied to the cylinders at all.
- Gasoline is supplied intermittently or under insufficient pressure.
In the first case, the engine does not start and does not engage the starter during rotation, that is, it does not show signs of life. In such a situation, it is always easier to determine the cause of the breakdown.
When insufficient fuel enters the cylinders, the following symptoms appear:
- starting the power unit “from cold” is very difficult, the engine seizes and “sneezes”, it starts in 3–10 attempts;
- idling is unstable, the engine “troubles”;
- dynamic acceleration becomes impossible - a sharp opening of the throttle causes a long dip and deceleration;
- when the driver releases the accelerator pedal, the engine often stalls;
- The car has difficulty climbing hills and accelerates slowly when fully loaded.
The cause of the above phenomena may be a malfunction of the fuel pump or other elements of the system, and the primary symptoms are almost the same. To carry out an accurate diagnosis, you need to understand how the car's power system works.
Cooling system
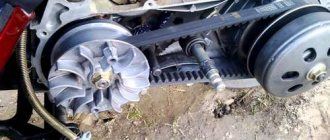
All Nexus scooters are equipped with a forced air cooling system. It is needed to prevent jamming and damage to parts due to overheating, which causes excessive expansion of the piston, as well as disruption of lubrication conditions. Since the motor of all scooters is covered with a casing and is located under the seat in the rear, the flow of oncoming air cannot effectively cool it. Therefore, a fan impeller is used, mounted on the right side of the engine on the generator rotor. This centrifugal fan forces air under a casing that covers the outside of the cylinder and cylinder head.
Cooling system details:
- fan impeller;
- casings
Signs of Problems
In addition to the diagnostic reasons for resorting to this procedure, the pressure is also measured when you observe some problems in the operation of your car. These include unstable engine operation with characteristic knocking, jolting and jerking. Also, you need to think about it when the idling speed of your car has become insufficiently even and smooth.
In some cases, you may notice that the car begins to “trouble” when some of the cylinders seem to refuse to work normally. It is quite possible that your car’s fuel consumption will increase significantly, which is noticeable even without special devices. And, in the most difficult cases, the engine may even begin to stall while it is idling - this indicates that the engine is running on a lean mixture.
If you go to a service station, they can also measure the CO content in the exhaust gases. If this parameter is too high, then this may indicate the problems described above.
So, we have figured out the reasons, so we can proceed to direct measurements in the fuel rail. This procedure is not much different from measuring the air pressure in the tires.
Engine won't start
This is the main symptom of a faulty fuel pump. In the summer heat, a dying fuel pump may appear. The junction of the impeller with the rotor axis expands, and it rotates. You should check the fuel pressure from the rail and from the pump directly.
The service life of the fuel pump is determined by the owner's use of the vehicle. What is required for the fuel pump to last longer and not fail:
- Check the presence of water in the tank. For prevention, pour any pure alcohol into the tank. It mixes with water and burns out through the exhaust. There is a moisture displacer available in stores. Contains isopropyl alcohol.
- When purchasing other displacers or desiccants, carefully read the ingredients, as there may not be alcohol, but other chemical compounds may be present that will clean the tank and clog the injectors.
- It is advisable to have a fuel level of at least half the tank. This minimizes the water-gasoline ratio and the pump cools better.
- Change the fuel pump mesh every 30,000 km, and the fine filter (barrel) every 15,000 km. It is in this filter that all sediments and water accumulate. Causes of pump failure due to compressed water mesh are a common occurrence.
This is interesting: How many seasons can you drive on one set of tires - the shelf life of car tires
The fuel pump is humming
The fuel pump may hum or squeak for a variety of reasons. The fuel pump may hum due to the nature of the system design. If there is a suspicion of a malfunction of the electric fuel pump, you need to check the fuel system completely.
If the fuel pump makes noise at high ambient temperatures, you need to check whether the gas tank is breathing. Check the gasoline vapor pipe and absorber valve. If you cannot find the cause, drill a hole in the filler cap.
The car does not accelerate well
Loss of traction when the fuel pump fails is a fairly common symptom number two. The cylinders begin to work poorly, there is no normal injection by the nozzle, and ignition of the mixture becomes ineffective. The injector produces an uneven spray, and the flow rate of the mixture into the combustion chamber drops. Thus, if the electric fuel pump fails, the engine power is reduced.
How to clean the vacuum tap on a scooter?
Let's figure out how to clean the vacuum tap on a scooter. I would like to immediately reassure you that this process is not complicated, it is more difficult to get to it. On some scooters it is necessary to remove a lot of trim. For example, for the Yamaha axsis I had to remove the seat and the entire upper trim. Here you will have to work hard, if you don’t want these worries, then contact the service center, and if you want to dig around yourself, then read on.
After we removed the lining and got to the vacuum tap. It is necessary to drain the gasoline. He won’t just run away from the phone on his own. So we remove the gasoline supply hose from the carburetor and insert it into a clean and dry canister or bottle, we also remove the second air supply hose from the carburetor, put it in our mouth and try to suck air from it (the feeling is not pleasant, but don’t worry, gasoline is with it won't leak). Thus, due to the resulting pressure, the membrane opens the way for gasoline and almost all of it flows into the canister. After draining all the gasoline.
Remove the gasoline supply hose and the compression supply hose. And unscrew the two bolts that hold the vacuum valve. Unscrew it, remove it and unscrew the four bolts on the vacuum valve. We remove the cover, there we see (photo) a membrane, one spring. Carefully remove the membrane and look at the inner walls of the vacuum valve. If you see a white coating, you need to clean it well; this coating was formed from water. We thoroughly clean the vacuum valve of the scooter with gasoline and use a screwdriver to remove all deposits. Reassemble the vacuum valve in reverse order. We check the gasket between the vacuum valve and the tank for any damage.
Carefully put it back, gently tighten the bolts on the tank, if you break the threads there, you won’t have any trouble, be extremely careful. After putting the vacuum valve in place, connect the hoses. You should not immediately install the entire lining, wait, fill in gasoline, check for leaks, start it and let it run, if possible, drive it. After making sure that there are no leaks, we install the entire cladding.
Advice: put a filter on the gasoline supply hose, it will be more reliable, it is not so expensive that you can save on it. Fill with high-quality gasoline, do not use 80, Yamaha are especially picky, once you fill it up, then there will be problems with traction, it will even be difficult to start.
I think our article “how to clean the vacuum valve on a scooter” helped you solve your problem, thank you for your attention. If you decide that I missed something, write in the comments, I will be happy to read your comments
The scooter does not suck gas. | Topic author: Natalya
Hello. I have a problem. I have a vacuum valve on my scooter, and I installed a new one a year ago. And so the vacuum valve does not receive draft from the carburetor and does not open the fuel valve. Moreover, I checked the carburetor and everything is in order. And the most important thing is that this problem is only in the morning. To start the scooter, I remove the vacuum hose and pull it manually, after that everything works. I don’t know where to look for the problem. I think the rings need to be changed.
Petr, perhaps it’s a matter of compression, when it’s cold, i.e. in the morning the gaps in the CPG are larger, and he doesn’t have the strength to tighten the fuel and lubricants, and after thermal expansion the compression increases and everything comes back to order
Adjusting the throttle shut-off needle
My Honda Tact AF-31 scooter was distinguished by its exquisite gluttony. Without any twinge of conscience, he could burn up to 8-10 liters of gasoline per hundred kilometers. This is absolutely insane consumption for a 6 hp scooter, because the same consumption for my 175 hp car. Every now and then I drove the canister to the gas station.
No matter what I did, I changed the spark plug, adjusted the carburetor, but even after replacing the cylinder-piston group, nothing changed. The spark plug is wet, the scooter continues to empty the gas tank with an enviable appetite. Until one fine moment I thought that I needed to check and adjust the position of the throttle shut-off needle.
The whole procedure is extremely simple, you don’t even need to disassemble anything.
Unscrew the cover attaching to the carburetor.
Having compressed the spring, we remove the throttle cable from the throttle, the W-shaped needle holder, and here it is - the locking needle. There is a lock on the needle, with which you can adjust the position of the needle, and marks on the needle itself.
If the scooter does not have enough fuel (the spark plug looks light, there is no traction, the maximum speed is low), fuel must be added. To do this, the needle needs to be raised, that is, the lock should be lowered by 1 division. If the scooter consumes an excessive amount of fuel, the spark plug is covered with black soot or is wet, then the amount of fuel supplied must be reduced by lowering the needle - that is, the lock must be raised by one notch.
In my case, with an excessive appetite, I moved the lock 1 notch up, while lowering the needle.
It’s hard to believe, but gasoline consumption after such a simple action dropped by about 2-3 times. In this case, neither traction nor maximum speed were affected. It turns out that before this procedure most of the fuel simply flew into the exhaust pipe.
Please note: This article and the images in it are subject to copyright. Partial or complete reproduction on other resources without permission is prohibited
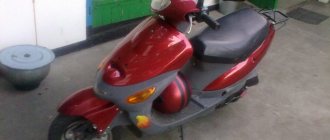
On what models is it installed?
The fuel pump is installed on various models of scooters. The most common ones are presented below.
The scooter's fuel pump plays a role in the proper functioning of gasoline in the engine operating system.
On Japanese models:
- Honda Dio - easy to use, with a glove compartment that allows you to store a helmet and other things on the go, tank capacity is 4-6 liters;
- Vamaha Jog – has great maneuverability, the volume of the power unit is 49 cubic centimeters.
On Chinese scooters:
- Suzuki Address V110 is a two-stroke with a medium speed engine, its wheelbase is designed for movement around the city and beyond;
- Viper Storm 150 is a two-seater, reliable, comfortable model.
Gasoline pumps are installed on equipment from Russia - a manufacturer in Yoshkar-Ola, an official dealer of Polaris and the Russian brand of several companies Irbis:
- Lifan LF 125T-27 - it has a four-stroke engine, 125 cubic centimeters, speed 80 kilometers per hour, gas tank capacity 5 liters;
- Irbis Z50R is a high-speed scooter for driving outside the city with wide tires.
A fuel pump is installed on various scooter models
How to check fuel system pressure
Once you know the fuel pump is delivering fuel, a fuel system pressure test can sometimes identify the source of the problem. In the next series of tests, you will use the fuel pressure sensor to check the pressure in the system.
1. Relieve pressure in the fuel system.
If your vehicle's fuel system has a Schrader valve or test port (similar to the air valve on your tires), cover the valve with a shop rag and gently press the valve with a small screwdriver. Use a rag to catch the fuel. This valve is similar to the air valve on your tires. If your fuel system does not have a test port, you can remove the fuel pump fuse and start the engine. He will die in a few seconds due to lack of fuel. Reinstall the fuel pump fuse.
- Connect the fuel pressure sensor to the test port. If you do not have the correct adapter to connect the sensor to the Schrader valve, try removing the valve and connecting the sensor to the fitting; however, if there is no test port, disconnect the fuel line from the rail (this is the line coming from the fuel filter) and connect a T-adapter to the line so you can reconnect the line to the fuel rail and connect the sensor as well.
- Start the engine and let it idle. NOTE: The repair manual for your specific vehicle may include a power-on test. Check your manual if necessary.
- Compare fuel pressure to specifications. Check the pressure reading on the pressure gauge and compare it to the specification in your vehicle's repair manual (if the vehicle does not start, turn the ignition key to the ON position and read the fuel pressure. Compare the reading to the specification in your manual for the pressure switch). The injection system typically produces 15 to 40 pounds per square inch (psi) (100-280 kPa) or more, depending on the application. The reading includes pressure from the fuel pressure regulator (FPR). So if your readings are out of specification, you may have a problem with your FPR, so keep measuring.
NOTE. New modern fuel systems do not use FPR in the injection system; rather, they vary the voltage at the pump or use an internal pump valve to regulate system pressure.
A. What to do if the pressure is correct
- With the fuel pressure sensor still connected and the engine idling, disconnect the vacuum line from the fuel pressure regulator (FPR - the small metal cylinder that connects to the fuel rail).
- Make sure the vacuum line is completely dry. If you find traces of fuel inside the hose, it is sucking fuel from the pressure regulator because the diaphragm is torn. Replace the fuel pressure regulator.
- Fuel pressure should increase from 3 to 10 psi. Otherwise, check the vacuum line: if there is no vacuum in the line, check that the hose is properly connected and not damaged, and that the vacuum port is not restricted; If there is vacuum in the line, but the pressure does not increase when you disconnect the vacuum hose, replace the fuel pressure regulator. For best results, perform the test described in the next section, Testing FPR with a Vacuum Pump.
- Stop the engine and wait at least 5 minutes. Compare the pressure reading with the specification (for pressure holding) in the repair manual. If the pressure drops below the specified value within five minutes, you may have detected a leak somewhere: check the fuel lines, fuel pump, injector or pressure regulator for leaks.
- What to do if your blood pressure is low
- Place a rag over the fuel return line.
- Pinch the hose using suitable pliers to block the flow.
- Watch the pressure gauge; If the pressure remains low, the fuel pump is not getting enough voltage or the pump is worn out. However, if the pressure increases, replace the FPR.
- What to do if your blood pressure is high
- First, perform the test described in the next section, “How to Test FPR with a Vacuum Pump.”
- Then turn off the engine.
- Disconnect the fuel return line.
- Blow through the return line to ensure it is not blocked. If the return line is blocked, find where it is.
NOTE. The video below provides an idea of how to check the voltage and ground at the fuel pump electrical connector.
How to properly check?
How to check the fuel pump on a scooter? This question worries many fans of this vehicle when the vehicle does not start. There could be several reasons for this, one of them is that there is something wrong with this part. You can carefully check the performance of the fuel pump yourself.
First, let's try to configure the fuel pump:
- It has two screws: the first is for idle speed, the second is responsible for the quality of the fuel mixture. We tighten both screws, then release the second screw two turns, the first two and a half turns. We start the scooter, listen to the engine: smooth - no adjustment required, intermittent - continue.
- We fix the equipment with a step, slowly tighten the idle screw until the clutch engages - the wheel begins to rotate. Unscrew it a quarter turn. We check while driving: if acceleration is difficult, then tighten the screw a quarter turn. Acceleration is normal - the screw should be turned a quarter counterclockwise. Then we adjust the idle speed screw again.
Let's take a closer look at how to check the vacuum fuel pump on a scooter if the adjustment fails:
- Unscrew the four screws using the hexagonal star handle;
- carefully pull out the fuel pump cover, remove the rubber gasket, membrane, see the valve;
One of the important parts is the fuel pump for the scooter.
- due to the vacuum, gasoline passes through the valve from the tank into the upper chamber of the carburetor, we clean it;
- close it in the same sequence: gasket, membrane, gasket, screw it on, install it on the scooter and ride. It is necessary that there is always gasoline, otherwise these parts in the gasoline pump may dry out;
- You must tighten it carefully so that gasoline does not spill out.
Tips and tricks
When performing adjustment operations, it is important to follow a number of rules:
- perform adjustments only after the engine reaches operating temperature;
- rotate the adjusting elements smoothly, observing the operation of the engine;
- Make sure there is no debris inside the fuel chamber and the jets are clean.
Before starting work on setting up the carburetor, you must study the operating instructions and clearly determine the location of the quality and idle screws. If you have a 150cc scooter, the carburetor adjustment is done in a similar way. After all, the process of regulating the fuel system is the same for engines of different powers.
The design of a scooter carburetor is quite simple; Once you understand it, you will be able to understand how to properly configure the carburetor so that the vehicle does not let you down in bad weather, how you can tune it and improve the performance of the engine. You will be able to control the quality of the mixture and many other processes that affect the operation and operation of the device.
Features of operation and spare parts
Gasoline is poured into one of the holes in the tank. The fuel pump automatically opens when the engine starts, and closes its second hole when it stops. In this case, a vacuum occurs, affecting the opening of the gas tap to supply fuel to the pipeline. Then, through the gasoline filter, the fuel enters the carburetor, where it is mixed with the air that has passed through the air filter. At the same time, the filters clean gasoline and air from foreign impurities, respectively, protecting scooter parts from damage.
How do they use a fuel pump on Chinese scooters? On Chinese technology, instead of a pump, there is a vacuum valve. Here, fuel is supplied from the tank by gravity, since the tank is located above the carburetor
When servicing and repairing, it is necessary to pay attention to breakdowns and contamination of hoses from the carburetor and filters in the tap.
Design features of the fuel valve
The principle of operation of the fuel tap of a scooter is similar to the operation of the simplest locking devices. The membrane located inside the housing, thanks to the force of the return spring, is pressed against the fuel channel and blocks it.
When the engine is running, a vacuum is formed in the intake manifold, which passes to the membrane through a rubber tube. Under the influence of vacuum, the membrane, compressing the return spring, moves back and opens the fuel channel. Gasoline begins to flow freely into the carburetor through a special fuel line.
If the engine stops running, the process occurs in the reverse order. Due to the drop in vacuum in the intake manifold, only the return spring acts on the membrane. The partition is pressed tightly against the fuel channel and shuts off the fuel supply. Gasoline does not enter the carburetor.
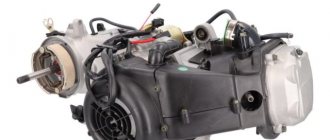
Supply system
The power supply system for scooter engines includes: fuel tank, fuel tap, fuel filter, carburetor and air filter. Fuel tanks are made of high-strength plastic and can hold, depending on the model, 4.5-6 liters of gasoline.
The fuel taps for all models are automatic – requiring no action from the driver. Such valves open only when the engine starts, and when it stops they close immediately. The operation of the valve is controlled by the vacuum that occurs in the inlet pipeline. A fuel filter is inserted into the line between the tap and the carburetor, which prevents dirt from entering the carburetor.
An important detail that extends the “life” of the engine is the air filter, which also plays the role of an intake noise muffler. It consists of a housing with a cover and a foam air filter that allows repeated cleaning.
Air filter (Nexus Viper)
Air filter design:
- lid;
- foam filter element;
- partition;
- frame;
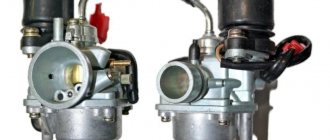
The main device of the power system is the carburetor; it prepares and accurately doses the air-fuel mixture entering the cylinder. Its design is quite complex; it includes several fuel dosing systems. Without going into details, the carburetor must supply enough gasoline to maintain an optimal ratio in all modes, approximately one part by weight of gasoline to 15 parts by weight of air. When the proportion of fuel is higher, the mixture is called enriched, and when it is lower, it is called lean. Running the engine on rich mixtures increases power, while running on lean mixtures increases efficiency. However, too rich mixtures do not burn completely in the cylinder and worsen efficiency, while poor ones lead to engine overheating, flashes and pops in the carburetor, and a drop in power. In addition to the fuel metering systems, the carburetor contains a float chamber in which the float maintains the fuel level at a constant level. Otherwise, the dosage by the carburetor is violated.
Main parts of the carburetor:
- starting enrichment;
- throttle valve;
- frame;
- idle jets;
- float;
- float chamber cover;
- float chamber cover;
- main fuel jet;
Another automatic device included in the carburetor that allows the driver not to think about what to do when starting a cold engine is a starting enricher with a heating element. When starting a cold engine, the enricher shut-off needle is retracted, the fuel nozzle cross-section is completely open, and the fuel-air mixture is enriched. After starting the engine, current from the generator flows to the heating thermoelement; after a certain time, sufficient to warm up the engine, its working fluid expands and, acting on the enrichment needle, closes the fuel channel.
How does a scooter carburetor solenoid valve work?
The starting enrichment on a 2t scooter and on a four-stroke moped works according to a fairly simple algorithm.
On a cold power unit, the spool needle occupies the upper position. It is responsible for opening the fuel channel, and the position of the damper affects the volume of supplied air. The first revolutions when starting the engine cause a vacuum inside the emulsion channel, and gasoline is sucked into the engine. The result is a highly enriched mixture, making it easier to start a cold engine. Before reaching operating temperature, the power unit needs to be fed with an enriched mixture.
The current generated by the generator of the running engine is supplied to the contacts of the heater that controls the thermoelectric valve of the intake system. Due to heating, the temperature of the powder drive increases, which causes the rod to gradually extend up to 4 mm. The force is transmitted to the pusher, which ensures the movement of the damper.
The starter enricher on a scooter works according to a fairly simple algorithm.
As the engine warms up, the spool with the needle lowers, followed by the air-fuel channel closing. After five minutes, the damper closes completely and the mixture becomes lean. Now the gasoline enrichment system on a warm engine is regulated by the carburetor.
After stopping the engine, the valve stops heating, and as a result of powder compression, the damper drive using a pusher and rod returns it to its original position. The system is ready for subsequent startup. The cooling and return process takes no more than two minutes. The enricher has a drawback - it works separately from the motor.
Equipment, etc.
Various insects cause quite a lot of inconvenience when riding a scooter. They constantly strive to break on the visor of the helmet and dry on it for a long time. In this case, as well as to protect the helmet glass from water, dirt and fogging, a helmet cleaner can be used. For leather lovers, there are leather care products. These are lotions that make the skin softer, prevent it from drying out and cracking, protect the skin from water and improve its appearance. Skin treated with this lotion is cleansed and looks like new.
For lovers of fabric clothing, there are various means of impregnating clothing and tents. They will save you from getting wet and dirty in bad weather, maintain the breathability and softness of the fabric, and prevent the formation of oil and grease stains. Such aerosols are suitable not only for fabric, but also for impregnating suede.
Typical problems with the ignition system of Chinese scooters
There are times when scooter owners are faced with the problem that it will not start. The reasons for this can be different, but there are also quite typical ones. In some cases, fixing the problem takes a few minutes.
Let's look at several reasons that lead to the scooter not starting. All examples are real, obtained during the repair of the Chinese scooter ABM Storm L and Motoland VXR5.
The scooter does not start with the button.
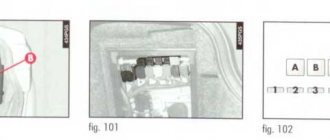
If the scooter does not, but starts from the kickstarter without problems (from the “leg”), then you should pay attention to the main fuse, which is located in the battery compartment
This same fuse may be the cause. There was a real case when, when measuring the voltage at the battery terminals, 13 volts was displayed on the multimeter display. The norm, considering that the battery was slightly discharged.
Automatic scooter starter enricher
In order to start a cold engine without problems, you need a rich mixture (lots of gasoline and little air), and to operate the engine in normal mode, you need a regular mixture (the optimal ratio of gasoline to air is about 1:15).
On old scooters, motorcycles, cars, enrichment of the mixture when starting a cold engine was done manually in two ways: closing the air damper, thereby limiting the flow of air into the engine, or again manually, opening a special channel in the carburetor, through which an additional portion was injected fuel.
But opening and closing it manually is not very convenient, and to automate this process they came up with an automatic starting enrichment.
How does he work?
There is a heating element inside the enrichment body, through which, after starting the engine, an electric current begins to pass, under the influence of which the element and the capsule heat up as they come into contact with each other. Inside the capsule there is a special powder that, when heated, expands and pushes out the rod along with the needle.
This is what the enrichment looks like when cut.
Now let's look at how the enricher works in the carburetor itself.
When you start a cold engine (the enricher needle is raised), a vacuum is created in the carburetor diffuser, which through the wheelhouse sucks fuel into the enricher well, where it mixes with the air entering the well through the air channel and then through the main channel in the form of an enriched starting mixture enters the engine intake manifold .
After starting the engine, as it warms up, the element begins to warm up the capsule and the needle, together with the rod, gradually comes out and closes all channels in the enrichment well, thereby stopping the supply of the starting mixture to the engine intake manifold.
For clarity, we connect the enricher to the battery and after about five minutes the needle came out and blocked all the channels.
In conclusion, you will be shown a way to check the performance of the enrichment.
The state of the enrichment before starting (the engine is cold) connect the battery to it and after a few minutes the needle should come out.
As you can see in the photo, the needle came out, which means everything is in order with our enrichment, and if the needle does not come out, then the enrichment is faulty and must be replaced.
How to properly check?
How to check the fuel pump on a scooter? This question worries many fans of this vehicle when the vehicle does not start. There could be several reasons for this, one of them is that there is something wrong with this part. You can carefully check the performance of the fuel pump yourself.
First, let's try to configure the fuel pump:
- It has two screws: the first is for idle speed, the second is responsible for the quality of the fuel mixture. We tighten both screws, then release the second screw two turns, the first two and a half turns. We start the scooter, listen to the engine: smooth - no adjustment required, intermittent - continue.
- We fix the equipment with a step, slowly tighten the idle screw until the clutch engages - the wheel begins to rotate. Unscrew it a quarter turn. We check while driving: if acceleration is difficult, then tighten the screw a quarter turn. Acceleration is normal - the screw should be turned a quarter counterclockwise. Then we adjust the idle speed screw again.
Let's take a closer look at how to check the vacuum fuel pump on a scooter if the adjustment fails:
- Unscrew the four screws using the hexagonal star handle;
- carefully pull out the fuel pump cover, remove the rubber gasket, membrane, see the valve;
One of the important parts is the fuel pump for the scooter.
- due to the vacuum, gasoline passes through the valve from the tank into the upper chamber of the carburetor, we clean it;
- close it in the same sequence: gasket, membrane, gasket, screw it on, install it on the scooter and ride. It is necessary that there is always gasoline, otherwise these parts in the gasoline pump may dry out;
- You must tighten it carefully so that gasoline does not spill out.
Medium and high speed tuning
Using the quality adjustment screw, the fuel proportions at idle speed are ensured. For medium and high rotation speeds, the engine operating mode is adjusted using a different method. After turning the gas handle, the fuel nozzle starts working, supplying gasoline to the diffuser. An incorrectly selected jet cross-section causes a deviation in the fuel composition, and the engine may stall when gaining power.
To ensure uninterrupted operation of the motor at a higher frequency, it is necessary to perform a number of operations:
- remove debris from internal cavities;
- set the gasoline level in the carburetor;
- adjust the operation of the fuel valve;
- check the cross-section of the jet.
The correct operation of the engine is indicated by its quick response when turning the throttle.
How to check the operation of the fuel pump?
First, you should check the fuse. To do this, check the instructions for its location. Next, you should check the voltage at the pump. Before doing this, be sure to check if everything is in order with the battery. The voltage at the fuel pump terminal must be checked using a multimeter or tester. The instruction manual always indicates the required voltage.
Using a tester, check the voltage supply to the fuse. Often this is where the electrical circuit breaks.
If the search does not yield results, then the voltage should be checked on the contacts themselves. All contacts must be in place and connected to ground. A broken contact or its oxidation leads to failure of the fuel pump system. If no broken contacts are detected, but the voltage drops by more than 1 volt, then the problem is in the wiring or oxidation of the contacts. There should be no short circuit in the wiring.
If, after checking the voltage, contacts and fuse, you do not find any problems, then the problem lies in the fuel pump itself. In this case, the fuel pump will most likely require replacement. In practice, it most often turns out that replacement is a last resort. First, you should try to restore and test the fuel pump again.
Before you check the fuel pump, you need to remember that, as mentioned above, pressure is the most important characteristic of the fuel pump, so it is worth measuring its level.
How to check the pressure in the fuel rail?
You will need a pressure gauge that measures pressure in the range from 7 to 10 atmospheres. If you choose a pressure gauge with a large margin, you risk getting less accurate measurement results. Specialized stores sell a kit for measuring pressure, but you can also design your own device.
If you want to assemble the device yourself, you will also need a hose with an internal diameter of 9 millimeters. You will also need plumbing tow, with which you can seal the connection between the pressure gauge and the tube. All parts are connected and tightened using a clamp. You will also need a car spool. Next you need to perform a series of actions:
- Place the car on a level surface that is prevented from rolling, turn off the ignition and open the hood.
- Check that the injection nozzles have access to the fuel rail.
- Find the fuel pressure plug and remove it. Then you should unscrew the nipple using the spool.
- Prepare an empty container (a regular bucket will do) and a clean rag. This is necessary to collect residual fuel, which under pressure can splash out in different directions. Therefore, take care of the safety of your skin (especially your face and eyes).
- Connect the device to the fitting and begin checking the mechanism.
Checking the pressure in the fuel rail should occur in four operating modes of the power unit:
- when the ignition is on;
- at idle engine speed;
- code the fuel pressure regulator tube is reset;
- when the drain tube is compressed.
Fuel rail pressure measurement results
The results may vary slightly for different car models, but in general they should be as follows:
- when the ignition is turned on, the pressure must be at least 3 atmospheres,
- at idle engine speed - at least 2.5 atmospheres,
- when the pressure regulator tube is reset - at least 3.3 atmospheres,
- when squeezing the drain tube - at least 7 atmospheres.
Fuel rail pressure fluctuates slightly during preparation. When you press the pedal, it suddenly takes on a value of 3 atmospheres; when you release the pedal, it drops to 2.5 atmospheres. When fuel enters the fuel system, turn off the ignition and begin observing the pressure gauge. The pressure in this case should drop to 0.7 bar and remain unchanged.
If the pressure drops to zero, there may be a problem with the fuel pressure regulator. In this case, the regulator must be replaced immediately. The cause could also be the fuel pump check valve.
It is necessary to observe the behavior of the pressure gauge even at 3,000 engine speeds. A drop in pressure will indicate a faulty fuel pump. Sometimes the fuel pump cannot reach the required pressure for a long time. In this case, the problem lies in a clogged fuel filter, which needs to be replaced, or in a dirty fuel pump mesh (read more about where the fuel filter is located).
If the above methods do not reveal a malfunction of the fuel pump, you will have to diagnose other units (DPZD, IAC, mass air flow sensor, compression in the engine and some other indicators and parts).