Protecting your body while riding a bicycle is one of the first priorities after purchasing a two-wheeler. After all, failure to comply with simple safety measures can lead to very sad consequences. Head injuries from falls occur less frequently than injuries to the extremities (abrasions, scratches on the arms and legs), but as practice shows, if they happen, the consequences are much more serious (concussion, etc.). Therefore, to protect your head while cycling, you should always wear a helmet. Plus, if you are going to participate in any cycling competitions, for example, at the opening of a cycling season, then at most of them the presence of this accessory is mandatory. And here, due to the huge assortment of cycling components on the market, the question arises of how to choose a helmet for a bicycle based on the specifics and riding style of the cyclist, which bicycle helmet is best suited, for example, for aggressive riding, and how to determine the size you need. Plus, we will look at the design, materials and principle of operation, and also tell you how to properly wear and store a bicycle helmet during winter “cycling holidays”.
Types of bicycle helmets
All bicycle helmets are essentially divided into types according to the degree of aggressiveness of the cyclist's riding, which we will discuss below. This is something to consider when purchasing a bike helmet so you don't overpay for a level of safety you don't need.
Cross Country
This type of helmet is great for casual cycling, city commuting and simple cross-country competitions. Due to its lightness, comfort and relatively affordable price, it is widely used among riders for use on every cycling day. Due to the large number of ventilation holes, the head is well-ventilated with air, which reduces overheating, especially on hot summer days.
The helmet only protects the top of the head. The temporal and occipital zones are not covered by the body. But this is not really necessary unless you ride aggressively. But this design saves the weight of the product and improves ventilation. By the way, the average weight is up to 300 grams. If you see a helmet of this type that is heavier, then it is better to refuse to buy it. The heavier it is, the more tired your neck will be, which will cause discomfort when cycling.
Since in our country bicycle helmets are not subject to mandatory certification, when choosing this accessory for greater safety, you should pay attention to American and European certificates. It’s good if this type of helmet has any of these (or all of them): ISO9000:2008, CE EN1078, CE EN1077 CPSC 16 CFR 1203, AS/NZS 2063:2008.
This bike helmet is disposable. If hit hard enough, its foam base will crumple and break, making it impossible to reuse. Even if you do not see any damage after a strong impact, it is still better to change the helmet. This is due to the fact that hidden microcracks can form in the foam base, which, if dropped again, will not allow the helmet to fulfill its protective functions. A large number of ventilation holes also contributes to this.
The cross-country helmet is attached to the head using a system of straps and clamps. On the inside you can often find a detachable lining, which can be easily removed after riding and washed. Almost all models of cross-country helmets have adjustment in some range according to the diameter of the rider’s head. This is done using a special twist lock or slider.
This type of helmet can be equipped with adjustable and non-adjustable visors and reflectors, which is optional, but will increase your visibility on the road.
Highway
Road bicycle helmets are practically no different from cross-country helmets. They have the same design, cover the same parts of the rider's head and have similar certifications. The differences are the absence of a sun visor to improve aerodynamics and larger ventilation holes in the body.
Enduro
Enduro helmets are a cross between cross-country bike helmets and bowler helmets (discussed below). This type has similar design features to cross-country and, accordingly, road. It also has developed ventilation holes, making this type perfect for everyday riding. What distinguishes it from previous models is the more developed protection of the back of the head and temporal lobes of the cyclist’s head. Therefore, it is a good choice for riders who not only use a bicycle as a means of transportation, but also sometimes like to go a little extreme (the key word here is a little). Although this helmet protects the back of the head better, it is still not as safe as bowlers.
Enduro helmets, like their predecessors, are disposable (after a more or less severe impact the helmet must be replaced) and have the same safety certificates. Weight is approximately the same, about 300 grams. The price of some enduro helmets is almost the same as country models, but on average it is still a little higher.
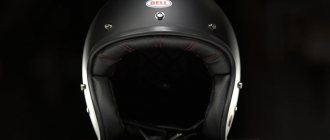
Bowler
Bowler helmets are so called because of their shape, which to some extent actually resembles a bowler hat. Designed for increased protection of the rider's head when performing various stunts on a bicycle, therefore they are a necessary attribute when riding BMX bicycles, and other stunt bikes in the style of dirt, street and other types of extreme riding. Plus, this helmet is also perfect for extreme riding on roller skates, skateboards, when going down mountain rivers in a boat, etc. This helmet protects the head of its owner much better due to the almost complete absence of ventilation holes, which increases its strength, and the developed protection of the occipital and temporal areas of the rider’s head. Although the lack of ventilation has a very bad effect when using a helmet in the summer. This causes the cyclist's head to become very sweaty, which can lead to heatstroke. But as they say, increased protection requires sacrifice. Therefore, bowler helmets are not suitable for everyday riding on regular bicycles, but are only used when performing tricks.
These bike helmets are not disposable and can withstand many strong impacts. But many riders still advise changing it at least once every 3 years. This is primarily due to the fact that the foam base is crushed by strong impacts, which worsens its shock-absorbing properties.
The design is not fundamentally different. The pots also have a foam base, an outer covering and a system of fastening belts. Its difference from previous types is the lack of adjustment to the rider’s head circumference, which complicates the procedure for selecting a bicycle helmet.
Certifications that are desirable when choosing a bowler helmet: CE EN1078, ANSI Z90-4, CPSC.
Due to the almost complete absence of ventilation holes and the increased size of the base, these bike helmets have gained a little weight, which is somewhere around 500 grams. Their price is also higher than that of enduro and country helmets.
Fullface
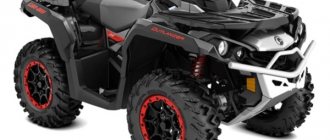
These bicycle helmets are related to motorcycle helmets, and are intended primarily for high-speed descents from the mountain - downhill or freeride. They have all-round head protection, including the rider's chin. Can be equipped with eye shields. If the latter are not available, then you should purchase special protective masks that cover the open part of the face and protect the eyes from stones, dust, etc.
This is the most protected type of bicycle helmet, but it is not advisable to use it even for dirt and street riding. Only downhill or freeride. Due to the above features, it is significantly more expensive than all previous models.
For greater strength, these bike helmets have a not very developed ventilation system, and very often a carbon outer layer, which increases impact resistance. The weight of these helmets varies around 1.1 – 1.3 kg, which is almost 700 grams more than bowler hats.
Certificates: CPSC 1203, CE EN 1078:2002 + A1:2012 ASTM F1952-15, ASTM F2032-15, ASTM F2040-11.
Track
Track helmets for bicycles are used by cyclists to achieve speed records or in circuit cycling races, and are designed not only to protect the rider’s head in the event of a fall, but also to significantly improve the aerodynamic characteristics of the cyclist (it is debatable what is the priority for these helmets). Because of this, we can observe similar teardrop-shaped shapes. They are absolutely not suitable for ordinary bike rides, so it seems to us that there is little point in focusing on them.
Children's
Children's bicycle helmets are almost a complete smaller copy of country helmets. The only thing is that the ventilation holes are a little smaller. This is done to increase the service life of children's helmets, because... Statistically, a child falls off a bicycle more often, and if a bicycle helmet were full of holes, then the broken ones would have to be replaced very often. They are lighter and the inner linings are generally softer.
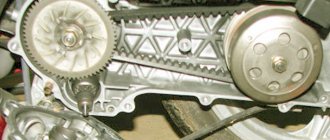
Setting the valve timing ch2 (in collective farm style - ignition)
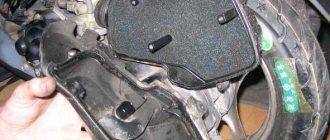
Without knocking the piston off from TDC, we orient the camshaft so that the large hole and marks on its sprocket become as shown in the photo and, while putting on the chain, install the camshaft in bed.
Ideally, the marks on the sprocket should be strictly parallel to the plane of the valve cover connector. In practice, unfortunately, such accuracy is difficult to achieve. And this is mainly due to the stretching of the timing chain. And there’s nothing you can do about it - either change the timing chain to a new one or catch the phase by switching the teeth, but this method of setting the valve timing is not acceptable to me personally.
We orient the camshaft bed with a mark in the form of the letters “E” and “X” towards the exhaust channel and install the bed.
Tighten the bed nuts crosswise and then tighten the two bolts on the side boss of the cylinder head.
Design
All of the above types of bicycle helmets have almost the same design, which we will look at below.
Frame
The body of a bicycle helmet is its main structure, which performs protective functions. It may differ in shape and materials of its constituent components, but the general principle of construction is the same.
- Base. The base of the shell of bicycle helmets performs the main protective function. It softens the impact of a fall due to its deformation until complete destruction.
It is similar to foam plastic and can be made from polypropylene foam, polystyrene foam or polyurethane foam. Small particles of this material are pressed together in a special form under the influence of temperature. On more expensive bicycle helmets, the base is reinforced with nylon or carbon threads. Please note that this element of the bike helmet must be made exclusively from a single piece of foam, and not be glued together, for example, from two halves (as can be the case on Chinese models). The use of helmets with a glued base is unacceptable. - External covering. The outer covering can be made from materials called polystyrene, polycarbonate, or carbon fiber in more expensive models. It performs several functions: it increases the strength of the entire structure, thereby preventing accidental damage to the base layer, as well as punctures during a fall; and reduces the load on the cyclist’s neck when falling, due to the reduced friction force of the helmet on the asphalt (or other surfaces) due to its smooth surface.
- Lining (removable and non-removable). The lining of a bicycle helmet also has several purposes. The first is to increase comfort due to the soft structure. The second is a reduction in impact force. Third, it helps to “fit” the helmet to the cyclist’s head (this is especially important for bowler hats that are not adjustable to the rider’s head). Plus, it absorbs sweat, which is very important in the summer. The lining can be removable or non-removable, and based on the latter property, we can conclude that it is better to buy a bicycle helmet with a removable one, since it is quite easy to remove and wash. It is usually attached to the base with Velcro.
- Ventilation holes. These vents are located along the shell of the helmet and are designed to capture and properly distribute airflow to maximize heat transfer away from the cyclist's head.
I can’t say how true this is, but I found information somewhere that during wind tunnel tests it turned out that at a speed of about 30 km/h, cross-country helmets cool your head better than if you were driving without it . The other side of the coin is that the more holes, the less durable the helmet. Plus, it will be colder in winter.
Fasteners and auxiliary fittings
Any bicycle helmet is equipped with fasteners, straps and other additional accessories, the task of which is to ensure reliable fixation of the helmet on the cyclist’s head not only during a fall, but throughout the entire trip (since a poorly secured helmet can slide over the eyes, the back of the head or to the side) . It is advisable that the main straps be laid along the top of the helmet, and not attached to the sides (this increases the reliability of its fixation on the rider’s head). Every bicycle helmet must have a chin strap. It is advisable that it have a clasp that can be easily unfastened with one hand. On bicycle helmets with adjustment to the diameter of the head, a special rotating clamp is used (instead there may be a simple elastic band), which can be used to increase or decrease the volume.
When choosing, pay attention to all plastic parts, since components made from low-quality plastic may fail before the helmet itself.
Mosquito net
Typically, this element is located in the front ventilation openings to prevent insects from entering under the helmet. Installed on almost all children's helmets. This component is not required, but is desirable, because You must admit, it wouldn’t be very pleasant if some wasp got under the helmet.
Reflectors and mounts
To increase the safety of cycling at night, additional reflectors (reflectors) or mounts for various electric lighting devices can be installed on a bicycle helmet. They are also not mandatory, but it is better to take care of your safety (especially relevant on children’s bicycle helmets).
Stationary mounts for action cameras, such as Go-Pro, are rarely seen. Fortunately, they can be purchased separately and installed on a helmet without any hassles.
I would like to note that these mounts, which are glued to the helmet, do not fit well with country and road models. For these types, it is better to use a special mount with a strap.
Additionally
On some female models there may be a special hole for hair. This feature, as usually happens, leads to an increase in the price of the product.
Preparing for work
To make a motorcycle helmet, you will have to use very toxic, allergenic and hazardous materials. Therefore, it is better to work outside (in the warm season) or in a well-ventilated area, ideally under a hood. Be sure to stock up on a respirator, goggles, thin rubber gloves, a rubberized or oilcloth apron to protect your clothing, and a work cap or bandana to protect your hair from dust. Keep a container of clean, warm water near your work area so that if a toxic substance gets into your eyes or skin, be ready to immediately wash the affected area with plenty of soap and water. Before putting on gloves, soap or lubricate your hands with silicone cream.
For work, prepare the following materials:
- epoxy (polyester) resin - about 2 kg;
- fiberglass ASTT-6 - 5 m;
- fiberglass mesh - 2 m;
- high-quality leatherette - 0.5 m (an old or second-hand leather jacket is also suitable);
- a strip of knitted fabric or knitted elastic;
- three to four sheets of plexiglass;
- art plasticine or clay;
- wax mastic (you can take “Edelvax”), paraffin or vinyl alcohol;
- foam block or wooden block;
- several old newspapers;
- starch paste (a little bit);
- a large piece of flannel or flannel;
- M3 bolts;
- rasps and fine sandpaper (zero).
Shelf life of a bicycle helmet
As strange as it may sound, bicycle helmets have a shelf life that does not depend on whether you fell while wearing it or whether it was just sitting in the closet. This is especially true for road and cross-country models. The thing is that over time the foam base dries out and deteriorates. On average, even a completely new helmet is best replaced after 5 years from the date of its production.
Based on the above, it is categorically not recommended to buy a used bicycle helmet, since you do not know how old the product is and whether it has been subjected to strong impacts (as was written earlier, the external appearance of the helmet can be almost perfect, but inside the base it is damaged by microcracks). Therefore, if you decide to buy a used bicycle helmet, it is better to do it from familiar cyclists whom you can trust.
Cylinder installation
Fill the rings and piston with clean engine oil. We tighten the piston rings with a clamp. We cut the clamp from a piece of any sheet metal - cut out a strip of the required length, give it a profile along the piston and make a retainer from the same piece of sheet metal.
Lubricate the cylinder mirror with clean engine oil
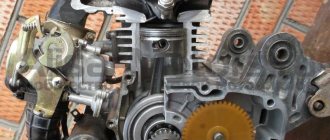
We hook the timing chain with a piece of wire, pull the chain through the cylinder and put the cylinder on the studs.
Very carefully and slowly insert the piston into the cylinder. After the rings are completely inserted into the cylinder, unfasten the clamp and install the cylinder into the crankcase.
How to choose a helmet size
If you decide to buy a bike helmet online, which is not a very good idea (we’ll tell you why later), but it happens that there are simply no other options, then you should know some parameters, namely the circumference of your head. It is measured at a line 2 cm above the eyebrows.
Knowing this parameter, you can choose a bicycle helmet using special size tables. I would like to note that you can only choose “blindly” cross-country, road and enduro helmets (since they have size adjustment), but other types should be measured without fail. Below we provide a size chart for adults (men, women), teenagers and children.
Installing the timing chain tensioner
If you have a 157QMJ series engine, do the following: unscrew the plug on the tensioner body; We insert a thin flat screwdriver into it and begin to tighten the bolt until the tensioner rod goes inside the body.
Without releasing the screwdriver while simultaneously holding the tensioner body, with your free fingers, insert the tensioner into the cylinder, screw it in with bolts, and only then release the screwdriver and screw the plug into place.
If you have a 139QMB series engine, then do this: unscrew the plug from the tensioner housing and remove the spring; push the rod inside the body; install the tensioner in the cylinder; insert the spring into the housing and screw in the plug.
After installing the piston, do not forget to adjust the thermal clearances of the valves and break in the engine.
It is worth noting that durable and trouble-free operation of the piston largely depends on the correct installation of the rings. There is absolutely no need for haste and dirt in this matter. Do everything carefully (for yourself, after all), slowly and most importantly: keep it clean!
First, let's take a little look at what a standard set of piston rings for a four-stroke scooter engine is. The standard kit consists of: two compression rings (upper and lower) and one oil scraper ring, which in our case has a collapsible design.
A set of piston rings for a two-stroke scooter engine differs from the previous one in the absence of an oil scraper ring; also, a set of rings for a two-stroke engine may include an expander (marked with an arrow).
So, we have more or less figured out the kits - it’s time to get down to business. We prepare in advance small strips of tin or thin plastic, with their help we will put the rings on the piston.
We thoroughly wash the rings and piston; when installing new rings on a used piston, do not forget to clean its grooves from carbon deposits, otherwise the new rings will not fit into the cylinder. We prepare a clean workplace and perform the installation.
We take the oil scraper ring expander from the kit and place it in the lowest groove of the piston.
In the same way, we install the expander from the kit for a two-stroke engine (if any), with the only difference being that the expander lock should be located in the area of the locking pin (marked with an arrow) of the piston groove.
We look for marks on the rings, apply pre-prepared strips to the piston, very carefully and slowly pull the rings along our strips onto the piston, in this order: first we put on the oil scraper ring, then we put on the second oil scraper ring, then we put on the lower compression ring (dark) and only then put on the upper compression ring (light). The marks on the rings after installation should be located upward towards the cylinder head.
We straighten the rings so that they stand exactly opposite their grooves and slowly pull out our strips from under them. Now the main thing: after you have pulled out the strips and the rings are in their grooves without fail, check each ring for mobility. The rings in the piston grooves should rotate freely in different directions.
The oil scraper ring should look something like this after installation:
After installation, the marks must be directed strictly towards the cylinder head.
Immediately before installing the piston into the cylinder, the piston ring locks must be moved apart in the correct order. This is done like this:
We unfold the upper compression ring so that its lock moves relative to the piston pin axis by approximately 45 degrees, and unfold the lower compression ring so that its lock moves approximately 180 degrees relative to the lock of the upper compression ring.
We rotate the upper oil scraper ring lock 90 degrees relative to the lower compression ring lock, and rotate the lower oil scraper ring lock 180 degrees relative to the upper oil scraper ring.
The photo shows approximately how the piston ring locks of a four-stroke engine should be positioned:
Red marks indicate compression ring locks. Blue marks indicate oil scraper ring locks.
Before final installation of the piston, the piston ring locks of a two-stroke engine must be positioned strictly in the center of the locking pins.
How to wear a bicycle helmet correctly
An incorrectly worn helmet may not protect you during a fall or may simply interfere with normal riding.
- The tightening of the fastening straps should not be too loose so that the helmet does not dangle from side to side, but also should not be overtightened, because this causes discomfort and impairs blood flow to the head. You should achieve a position where the helmet is as secure as possible, but does not cause discomfort. When adjusting the puff, move your head from side to side, lift it up, open your mouth, etc.
- The position of the helmet should be strictly horizontal, and not shifted towards the face, back of the head or to the right/left.
- In the autumn-spring period, you need to wear a bandana or hat under your helmet so as not to catch a cold. In winter, you can additionally place a plastic bag on the inside to cover the ventilation holes.
This video does a good job of explaining how to properly adjust the position of your helmet.
Setting the valve timing ch1 (in collective farm style - ignition)
We push the cylinder all the way into the crankcase and set the piston to top dead center (TDC). It is best to set the piston at TDC using an indicator or, at worst, visually/touch. You can also align the piston according to a special mark on the generator rotor, but I have more than once encountered the fact that the marks on some engines are stamped incorrectly and, in order to avoid troubles, I advise you to use them only as a last resort, for example, when the cylinder head is not removed and you need to adjust valve
We insert the cylinder head guide bushings and the lower timing chain guide into the cylinder, degrease the surface and install the gasket.
We install the cylinder head, insert the valve bed guide bushings.
How to store a bicycle helmet
The materials from which bicycle helmets are made are very sensitive to high and low temperatures, dampness, and direct sunlight. And if this cannot be avoided during travel, then during storage it is better to protect it from these harmful influences. It is advisable to store the helmet at room temperature, for example in a wardrobe. You cannot store a helmet on a balcony, in an unheated garage, or in a basement.
If you get your helmet dirty while traveling, you can wash it with a rag and warm water. The use of chemical cleaning agents is not recommended.
Piston installation
Insert a retaining ring into any boss of the piston pin. It is most convenient to insert the ring with small round nose pliers. After installation, check how well and tightly the retaining ring fits.
- If the retaining ring does not cover the entire surface, but only a small part of it, replace it with a new one.
- If the retaining ring does not lie tightly in the groove and dangles, straighten it a little
Lubricate the bearings of the lower and upper connecting rod heads and the piston pin bosses with clean engine oil. We put the piston on the connecting rod, orienting it with the “IN” mark to the inlet port; if there is an “arrow” on the piston instead of the “IN” mark, orient the arrow to the exhaust port. We insert the piston pin into the boss - orient the piston on the connecting rod so that the pin hits the connecting rod - install the pin all the way into the locking ring and secure it from falling out with the second locking ring.
We install the cylinder guide bushings on the studs and put on the gasket. It is advisable to place the gasket on the sealant, but without fanaticism.
Tips for choosing a helmet in a store
- Since every head is different, you should definitely try it on before buying a bike helmet (that’s why we don’t recommend buying it online). Consider several models, because due to the different positions of the inner lining, some helmets will be more comfortable for you, and some will not.
- If you plan to ride with a helmet on, for example, to work, to the garage, or just on leisurely bike rides, then a cross-country or road bike helmet is best for you. If you want to bring a little extreme to your riding (a high-speed ride through a forest area or a steep descent from a small hill), then it is better to choose enduro. For jumping on the ramp and performing various tricks, use only a bowler hat. Well, for downhill – full face.
- Choose bright models, as this will attract the attention of motorists, which will increase your safety. Plus, you should consider purchasing a helmet with reflectors or flashing lights.
- If you are purchasing a bicycle helmet for a child, you should not choose one “to grow into.” This is not a sweater. It should sit correctly on your head and not dangle on it. Some children's helmets have a diameter adjustment, just like adults'. You can take the one with the minimum value that matches the size of your child’s head, but in this case, be sure to try it on in the store.
- If you are buying full-face or bowler helmets, it is better to take a closer look at well-known brands of cycling equipment, for example, Met, Bell, Giro, BBB, etc. When buying a country helmet, you can save a little and take a product from a less famous company (since this helmet is still disposable) . But you should not buy Chinese models if you are not sure of their quality.
Installing piston rings
Remove the set of piston rings from the box. A piston ring set for a Chinese four-stroke scooter usually consists of five items. Three of which are a single assembled oil scraper ring, the other two: upper and lower compression.
A typical set of piston rings looks something like this
Carefully unpack the kit with perfectly clean hands.
In the kit you will find two of the thinnest rings and one thick corrugated ring (expander) - this will be an assembled oil scraper ring that needs to be installed on the piston first.
We place an expander in the lowest groove of the piston
We place thin oil scraper rings in the same groove - one under the expander, the second on top of the expander
We find the lower and upper compression rings in the kit and install them, respectively, in the middle and upper grooves of the piston - with marks on the side surface to the cylinder head (cylinder head). The lower compression ring differs from the upper one in color (not always) and the shape of the working edge (always). In most kits, the lower compression ring is painted black, and its working edge has a slight bevel.
The top compression ring in the vast majority of piston ring sets is a uniform light color. But this is in most cases, and in practice it happens that the kit comes with upper compression rings that are black or even red. By and large, the color is not particularly important to us, something else is important to us: the working edge of the upper compression ring has small roundings (chamfers) on the sides, and the working surface of the edge of the upper compression ring is covered with a shiny protective coating.
For example, in this kit both compression rings are black. But the working surface of the upper compression ring is covered with a layer of protective coating, and small chamfers are removed on the edges of the working surface.
The lower compression ring has a matte working surface, and the working edge is beveled at a slight angle. All these moments are clearly visible in the photo.
The compression rings in this kit are red and black. As in the first case, the upper compression ring has chamfers on the working edge and a protective coating, and the lower one has a matte working edge beveled at an angle.
On classic piston ring sets, the upper compression ring has a light color and a rounded working edge. The bottom is dark in color and the working edge is beveled at a slight angle.
When installing the piston rings, do not forget about the marks. The marks on the rings after installation on the piston should be oriented towards the cylinder head (cylinder head).
Transition to 12 volt circuit
The use of electrical parts from later model motorcycles will inevitably affect the voltage change, because:
- The 12V system is more advanced;
- Has increased sparking;
- More “tenacious” in our climate zone.
For reference: The price of many parts is affordable for motorcycle owners, so modernization will not break the bank.
We hope that the proposed algorithm for modifying the standard electrical system of the IZH Jupiter 3 motorcycle with video and photo materials will help you (see also the IZH Planet 3 wiring diagram). And you will use this method to upgrade your own motorcycle.
The main provisions of the traffic rules regarding cyclists:
1. General provisions The Rules use the following basic concepts and terms: “Bicycle” is a vehicle, other than wheelchairs, that has two wheels or more and is driven by the muscular power of the people on it. A cyclist, according to the Rules, qualifies as a bicycle driver .
A bicycle is a vehicle, but it is not a “motor vehicle”. Therefore, if the traffic rules say “vehicle”, then this also applies to bicycles, but if it says “motor vehicle”, then this does not apply to bicycles. In particular, this means that the driver of a bicycle is obliged to:
Before leaving, check and ensure that the vehicle is in good technical condition on the way in accordance with the Basic Regulations for the admission of vehicles to operation and the responsibilities of officials to ensure road safety.
2.3.2. In established cases, undergo a test of knowledge of the Rules and driving skills, as well as a medical examination to confirm the ability to drive vehicles;
2.3.3. Provide a vehicle:
* employees of the police, federal state security agencies and federal security service agencies in cases provided for by law;
2.7. The driver is prohibited from:
drive a vehicle while intoxicated (alcohol, drugs or other), under the influence of medications that impair reaction and attention, in a sick or tired state that jeopardizes traffic safety;
* cross organized (including foot) columns and take a place in them;
* consume alcoholic beverages, narcotic, psychotropic or other intoxicating substances after a traffic accident in which he is involved, or after the vehicle was stopped at the request of a police officer, before an examination to establish the state of intoxication or until a decision is made exemption from such examination;
* use a telephone while driving that is not equipped with a technical device that allows hands-free negotiations.
Additional requirements for the movement of bicycles...
24.1. Persons at least 14 years old are allowed to drive a bicycle, horse-drawn cart (sleigh), or be a driver of pack animals, riding animals or herds when driving on roads, and a moped is not younger than 16 years old. If a person does not ride a bicycle, but rolls it, then he is considered a pedestrian, not a cyclist (Traffic Regulations 1.2).
1.2. The Rules use the following basic concepts and terms:
“Pedestrian” is a person who is outside a vehicle on the road and is not working on it. Persons moving in wheelchairs without a motor, driving a bicycle, moped, motorcycle, carrying a sled, cart, baby stroller or wheelchair are considered pedestrians. At the same time, the Rules stipulate only one difference between a cyclist and a pedestrian:
Responsibilities of pedestrians
4.1. Pedestrians must move on sidewalks or pedestrian paths, or, if there are none, along the roadsides. Pedestrians carrying or carrying bulky objects, as well as persons using non-motorized wheelchairs, may walk along the edge of the roadway if their movement on sidewalks or shoulders creates an obstacle for other pedestrians.
* If there are no sidewalks, pedestrian paths or shoulders, and if it is impossible to move along them, pedestrians can move along a bicycle path or walk in a single file along the edge of the roadway (on roads with a dividing strip - along the outer edge of the roadway).
* When driving along the edge of the roadway, pedestrians must walk towards the movement of vehicles. Persons moving in wheelchairs without a motor, driving a motorcycle, moped, or bicycle, in these cases must follow the direction of travel of the vehicles.
* When driving along the side of the road or the edge of the roadway in the dark or in conditions of insufficient visibility, pedestrians are recommended to carry objects with reflective elements and ensure that these objects are visible to vehicle drivers.
Best articles : Unicycles (unicycles)
Changes made by owners
The unreliability of individual components and faulty wiring on IZ Jupiter 3 forced the owners to delve into all the intricacies of the modernized elements.
And the first to cause numerous complaints were changes in the primary circuit of power supplies:
- Battery;
- Generator.
As well as ignition systems and circuits for lighting devices of the trailer module - a cargo-passenger stroller. In most cases, the reason for the refusal was a banal manufacturing defect.
Battery charging system
Given the total shortage of spare parts for motorcycles that existed in those years, unplanned failure:
- battery;
- voltage regulator relay;
- ignition coils;
left the owners without transport for a long time. In addition, poor-quality assembly of individual elements led to unstable operation of all systems. This forced me to improve and polish the factory defects with my own hands (for example, see how to modernize the wiring diagram of IZH Planet 5).